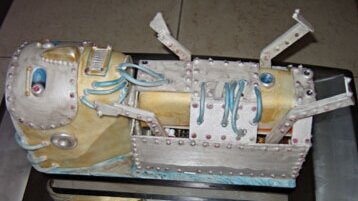
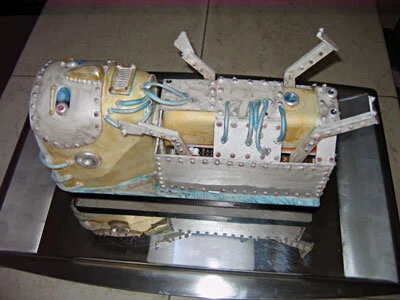
Robot Baby Cake
I made this creepy robot baby cake for my little friend Isaac's second birthday party. Nobody requested this, I came up with this one on my own.
I made this creepy robot baby cake for my little friend Isaac's second birthday party. Nobody requested this, I came up with this one on my own.
My little friend Isaac has a room entirely decorated with space robots(plus the giant stuffed spider I made him when he was born, which sort of fits in with the decor if you assume it's a giant stuffed SPACE spider.)His wall is covered with framed robot pictures, intermingled with illustrations from children's books about space travel from the 1950's; the hooks on his door are made of wooden stacking robot toys; and the wall over his crib reads "Blast Off!" His mom even turned his diaper pail into DiaperBot! He lives to serve humanity and devour and vaporize our dirty diapers. At least until he rebels against his human masters and destroys us all. And after a few months of eating diapers, who can blame him?
So when it came time to make Isaac's second birthday cake, what could be more appropriate than a robot cake? And naturally a robot cake ought to do more than lie there like a pile of hardware. It ought to do something. But what? Unfortunately I don't know anything at all about robotics, in spite of having taking a brief Kinetic Art class, in which we made a vibrating spider out of a motor, a paper clip, and an Altoids tin. So I turned where everyone turns when they need robot construction kits - the internet. I purchased two - one for a line-following snail robot and one for a sound-activated walking robot (clap once, it starts walking; clap again, it stops walking.)

As it turns out, robot kits supplied by the internet are really lame. First of all, they teach you absolutely nothing about robotics. The circuit boards are pre-assembled, so all the "assembly" that I got to do involved zip-ties and plastic pop-rivets. Not really very educational. Also, the snail robot couldn't carry even so much as a cupcake, so it was essentially useless to me. The walking robot, however, had more potential. It clearly wasn't strong enough to make the entire cake walk (which would have been cool) but, by laying the robot on its back I was able to achieve a nice kicking and flailing motion. "Aha!" I said to myself, "I can make that look like a newborn baby robot, lying on its back and kicking its adorable little aluminum arms and legs!" Some of you might be tempted to argue that a newborn baby robot cake might be more appropriate for a party for, say, a newborn baby, as opposed to a party for a two-year-old. Well, you're right, but I didn't have time to learn how to make a toddling robot, so a newborn baby robot was really my only choice.
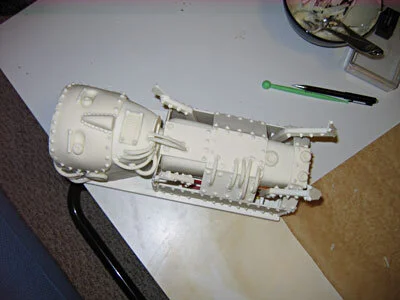
First I created a dowel framework that would support the body of the robot while leaving the legs free to flail. Then I rolled out a big sheet of gum paste, to be cut into the various metal plates. Once the gum paste dried enough to be rigid, but not enough to make it impossible to cut, I cut out arms, legs, hands, and feet and attached them to the robot's little legs with a bit of royal icing.

My sister (ably assisted by her two-year-old daughter) kindly baked the cake for me. I started out with two 9" square cakes, which I cut up and reassembled into a small body section, to be mounted on top of the robot base, and a head, to sit adjacent to the robotic body. I covered both of these with a layer of fondant (which actually took a couple of tries - the first time out I made both the body and the head too big, so I had to peel the fondant off, re-carve the cakes, and recover them) and mounted them in the appropriate places on the cake board.
In order to hide at least the majority of the plastic robot mechanism, I cut rectangles of gum paste and assembled them around the cake and the base of the robot. I wish that I had thought to make the body of the robot more human and anatomical because then I could have made it kind of a Matrix-style cyborg-y baby trapped in a metal cocoon, but I didn't think of that until it was too late. I also made a face plate and mouth plate to put on the head, along with a little pair of circular ears.
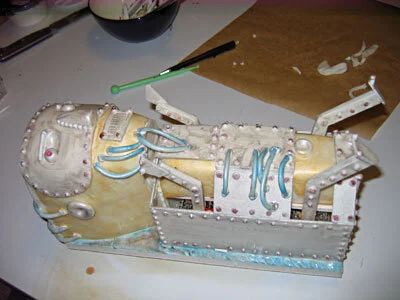
At this point, it was about 1:00 in the morning on the day of the party (I got a really late start on this cake - sorry, Isaac!), so I was really rushing to add all the additional details. As a result, I was unfortunately unable to put as much care and detail in as I would have liked, and I also didn't have time to let the gum paste tubing dry sufficiently so it turned out pretty wilted. The cake did end up with an interesting steam punk vibe about it though, with all the royal icing rivets. I confess that I couldn't resist adding a little gum paste belly button rivet and two subtle little gum paste testicles. Evidently no one noticed, because no one at the party commented on it, which is probably just as well, since it was a pretty juvenile thing to do.
In retrospect, maybe I should have left the cake white rather than painting it, because it looked a lot cleaner unpainted, but I suppose that might have made it seem unfinished. I was going to paint the entire thing silver, but I didn't have enough silver luster dust (I was using luster duster dissolved in gin, because I didn't have any vodka [alcohol works better than water because it dries faster due to the alcohol content.] If you're thinking I was totally unprepared for this cake project, you're right - sorry again, Isaac.) So I painted the outer plates silver and the inner "skin" areas gold. It still looked a little too monochromatic, so I added some shiny blue and red accents.
At this point I realized that my cake seemed to be leaking brown sugary goo. I had refrigerated and thawed the cakes a few times over the course of the day, because cold cakes are firmer for carving and fondant smoothing. As I said earlier, I messed up the fondant covering, so there were several trips in and out of the refrigerator. Apparently in my refrigerator this generates humidity or something and breaks down the icing enough to cause the cake to leak, slowly but continuously. Well, now I know not to do that again. Fortunately, in this case, it wasn't that bad. The leakage didn't get anywhere near the electronics, so it didn't interfere with the robot's functionality. In fact, the little trickle emerging from the corner of the head looked like an oil leak, so it basically worked with the overall concept.
The cake was a hit at the party, especially with my 2-and-a-half-year-old niece, who enjoyed clapping it on and off. Later in the party, she inadvertently turned the cake on by shrieking in rage that she was not permitted to play with the birthday boy's new toys (because the birthday boy was currently playing with them himself.) I think we all know what that frustration feels like. We left the party early.
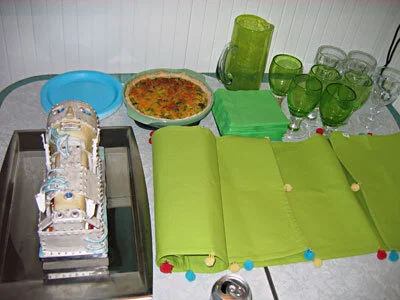
Housewarming Cake
Slightly less than a year after we moved into our new house, my sister, her husband, and I decided that we were finally ready to have a housewarming party, which naturally provided me with a perfect excuse to overdo the cake.
Slightly less than a year after we moved into our new house, my sister, her husband, and I decided that we were finally ready to have a housewarming party, which naturally provided me with a perfect excuse to overdo the cake.
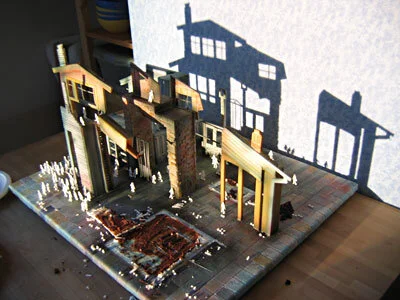
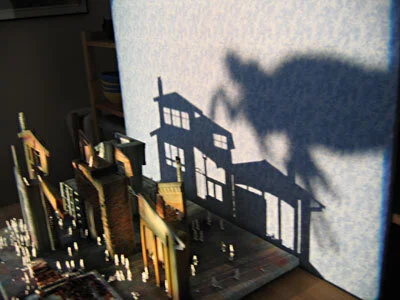
I wanted to convey the idea that, of all the buildings in all the world, we had found the perfect house for us, so I designed a cake that was made up of a collection of small buildings that, when properly lit, cast the shadow of our house on the wall.
The first problem, of course, was to find a light source that cast a sufficiently defined shadow on the wall. After initial tests with household clip lights and powerful flashlights, it became clear that I really needed a bona fide theatrical lighting instrument. So I bought myself a mini-ellipsoidal pattern projector. Which means that I need to build a puppet theatre, now that I have such a nice light for it.
With my light source in hand, I now needed to figure out what the silhouette of our house actually looks like. I think it has a relatively distinctive silhouette (at least distinctive enough that our guests at the party were able to convincingly pretend that they recognized it.) To insure accuracy, I took a photo of the front of the house and traced that, deciding at the same time which features to include and which superfluous features to ignore. When I was happy with my drawing I blew it up to the full size that I wanted the shadow to ultimately be.
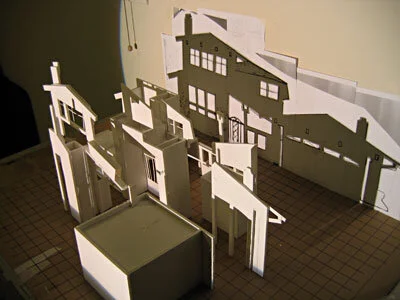
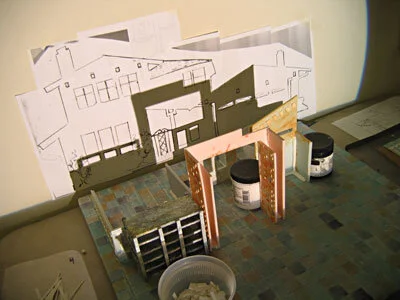
I now needed a full scale foam core mockup of the cake, positioned precisely the same way relative to the wall and to the light source as the finished cake would ultimately be. I set up a table in my studio, with the image of the desired silhouette taped to wall behind it and my light source clamped to a book shelf across the room. So as to be able to precisely position the completed cake buildings the same way relative to one another as the foam core mockup, I designed a base for the cake that would include a 1" grid to which I could align all my pieces. In order to insure that I would be able to recreate the setup in the dining room for the party itself, I took precise measurements of the relationship between the cake base, the lens of the lighting instrument, and the wall.
From there it was largely a process of trial and error, creating one building at a time in just right size, shape, and position to block out an incremental portion of the light to create the house's silhouette. I also had to keep myself cognizant of the fact that I needed to incorporate some buildings that were actually large enough to contain some cake. Otherwise I would just be making a big gum paste city, which would have been a big disappointment to our guests.
With the foam core mockup complete, I then had to translate that into a complete set of Bristol board templates which I could use to cut out the gum paste. In the interests of not getting massively confused, I numbered all the buildings. If I recall correctly, there were eleven distinct buildings, several of which I divided into substructures which I labeled with letters. Remarkably, my labeling system actually worked - at no point in the process did I wind up with a carefully cut out piece of gum paste and no idea what to do with it.
I also made the cake base at this point, which consisted of a piece of 3/8" foamcore covered with fondant, into which I etched lines on a 1"grid. I then painted it like a parti-colored sidewalk and sponged on some royal icing for texture.
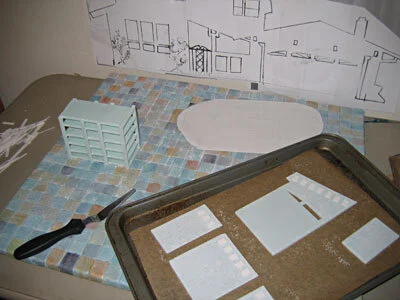
Finally I was ready to start creating the actual gum paste buildings, rolling out the gum paste and cutting it out with an X-acto knife using my Bristol board templates. Because there were so many pieces, it was quite a time consuming process, but it all went very smoothly, expect that I didn't have nearly enough flat surfaces in my studio to set all my pieces to dry. I really need one of those flat racks. Maybe I should build one instead of whining about it.
My plan was to do most of the color by hand, but I started out with a few different colors of gum paste - grey, blue, and pink - to get a different color base to build up from. My plan was to ultimately end up with a wide variety of architectural styles, thereby driving home the concept that, while we had essentially infinite choices of house, we culled the choices down to the perfect one.
As I was cutting the gum paste pieces, I also beveled the corners, in the hopes that they would then fit together in nice corners, rather than having more visible seams. For the most part this worked well enough that I was at least able to hide any imperfections with a little strategically placed royal icing.

With the basic gum paste shapes cut out, I set about embellishing them (variously with bricks, stones, adobe textures, wood panels, metallic windows, neo-classical columns, and even a nice little caryatid that I was rather proud of) and painting them.

Assembly was a rather finicky project, because I had to make sure that the shadows lined up appropriately with my shadow sketch, while slotting little slivers of cake into every available divot, some only a 1/2 inch thick. The only real problem I had was with the roof of one of the buildings wanting to cave in under the weight of the smaller buildings on top of it, so I had to disassemble it, shove in some foam core supports, and reassemble.

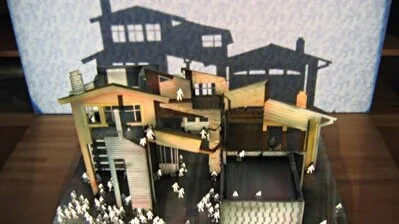
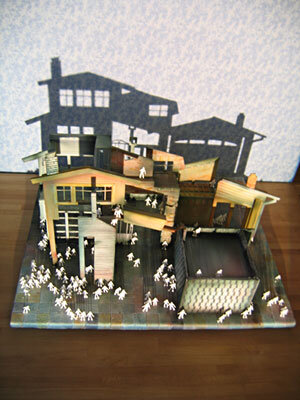
Once I had all the pieces together, I added some additional bricks and such to cover up messy seams, and then did some airbrushing, in attempt to unify the scene.
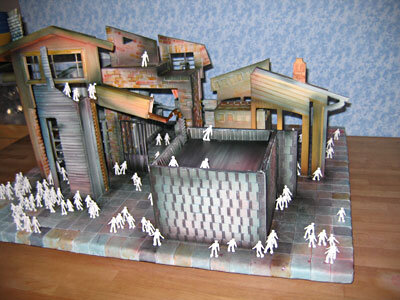
Because I was making it, it naturally ended up looking like a bit of a post-apocalyptic wasteland, an effect that was astronomically amplified once I had placed all of my little, white, unintentionally zombie-like, royal icing figures around the scene.

As a backdrop to project the shadow onto, I covered a sheet of foamcore with a vaguely cloudy-ish grayish-blue piece of fabric. Remarkably, I was able to move my entire cake/lighting/backdrop setup from my studio to the dining room without any detrimental effect on the projected silhouette. Truly, I wouldn't have been at all surprised to have moved it and then been utterly unable to recreate the shadow effect that I had achieved in my studio.

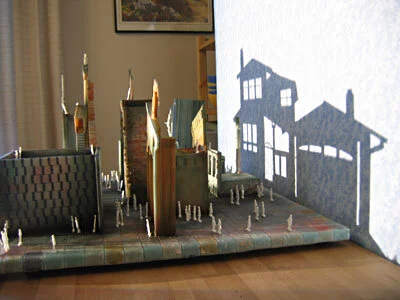
In many ways, this was not my most dynamic cake, as it didn't really do anything, or at least there was no dramatic moment in the party at which it did something that it hadn't already been doing before - casting a shadow on the wall behind it. But I like to think that it had a certain finesse to it, a certain quiet dignity that was appropriate to the occasion. Plus I enjoyed how, as we cut it up to eat it, it became evermore and more a diorama of catastrophic destruction, with the shadow crumbling right alongside its more solid counterpart. Also, the royal icing zombies made great garnishes for the slices of cake and everyone had a good time making the shadow of a little stuffed praying mantis menace the shadow of the house.


Enterprise Cupcakes
The Enterprise cupcakes were made for the wedding reception of two friends who are (obviously) big fans of the show. As am I.

The Enterprise cupcakes were made for the wedding reception of two friends who are (obviously) big fans of the show. As am I. I decided to go with the original Enterprise both in honor of the significance of the institution of marriage - you don't want to commemorate such a monumental event with some Johnny-come-lately 1701-D - and because it's simpler to sculpt.
I don't recall exactly how many of these I made, but it was a lot. I decided that the most efficient way would be to make molds. I started by sculpting clay versions of the top half of the saucer section and one of the nacelles. I made molds of these with Model Magic. I know, it's not technically food safe, but it is non-toxic. I figured that if it won't make toddlers sick if they eat it, it wouldn't be detrimental to fondant through some brief physical contact.
Once the Model Magic molds dried it was a simple matter to press some fondant into the mold and pull it right back out, now shaped like a piece of the Starship Enterprise. I could have gotten more detail with a more rigid mold, but for the most part it worked well.

I used gum paste to create the thin quadrilaterals that connect the nacelles to the body of the starship. Once all the pieces were dry, I painted everything with silver luster dust mixed with vodka, then I used blue, orange, and pink luster dust to indicate the various lights and windows and such. Fortunately my sister helped me with a lot of this, since it was quite time consuming and I was working under the gun. The last touch was to paint on the name and number of the vessel. I went with the USS Dalton, in honor of the couple, and NCC 06 17 08, in commemoration of the wedding date.
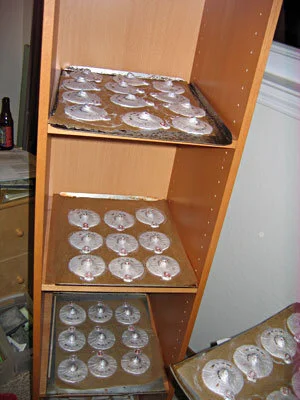
My sister was kind enough to bake all the cupcakes that were to become the little starships, and run to Michael's to purchase a bunch of little white boxes and some tissue paper to put inside. After that, all that was left to do was assemble the disparate pieces into little starships.
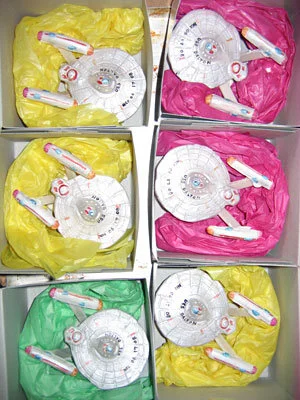
I assembled each starship in place, in the box. After frosting the top of the cupcakes with buttercream, it was easy to plop the saucer section down on top. It was a bit trickier to assemble the nacelles. I used royal icing to stick the gum paste pieces to the bottoms of the nacelles, then more royal icing to stick the gum paste pieces to the bottom of the box next to the cupcake. I used a wadded up piece of tissue paper to simultaneously fill the empty space in the box, conceal the big blob of royal icing supporting the nacelles, and prop up the nacelles until said royal icing dried.
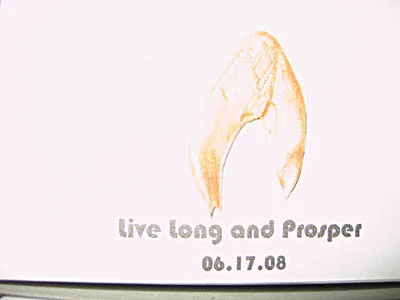
For the tops of the boxes my sister made some little royal icing Federation logos and labels with the wedding date, and, of course, that staple sentiment of all sappy Star Trek events, "Live long and prosper."
True to form, we wound up with way more cupcakes than there were guests at the reception, but otherwise they were a great success.
I was also able to use the same clay positives that I had made for the cupcakes to make a rubber mold for a two-part plastic cast of the starship, which I sprayed silver and presented to the couple as a keepsake. The nice thing about the plastic was that it picked up the detail that I was unable to capture in fondant.

Digger Cake
The digger cake was for my niece's second birthday. I figured that two was old enough that I should make the cake relate to her interests, but young enough that I still had majority creative control.
The digger cake was for my niece's second birthday. I figured that two was old enough that I should make the cake relate to her interests, but young enough that I still had majority creative control.
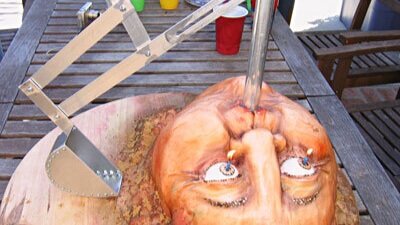
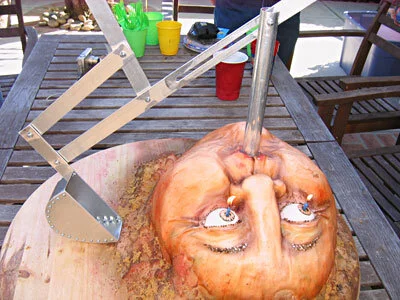
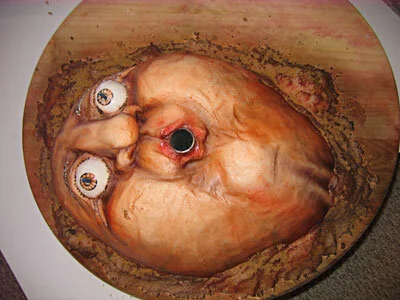
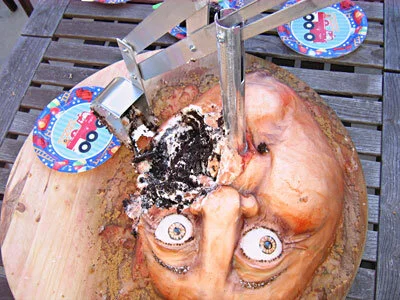
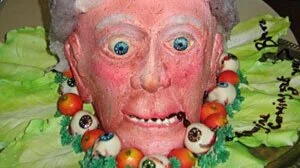
My niece loves trucks. Excavators were an early favorite. So when it came time to make her second birthday cake, I thought she'd enjoy a cake with a digger built right in. To amuse myself, I decided to make the cake shaped like a giant face, rising up out of the dirt with the digger coming out of its mouth. I liked the idea of gouging out the cake's cheek with a big metal scoop.
The first order of business was to make the scoop. I purchased some plans from somewhere on the internet and adapted them a bit to suit my own needs. I needed the digger to be able to reach all parts of the cake, so it had to spin 360 degrees and it had to move from the perimeter of the cake to the center.
Basically, the mechanism I came up with consisted of a 1" ID steel tube 4" long, mounted to a heavy wooden base. Nested inside that tube was a length of 1" OD aluminum tube about 1' in height. This inner tube had a notch cut into the top so that the digger arm could slide up and down within it. Then a bolt ran through the top of the tube and through the aluminum bar that formed the main arm of the digger. This arm had a track cut in it so that it could slide in and out, closer to and further from the digger's pivot point. Connected to this digger arm was another handle, connected in turn to the scoop itself, so that it could be used to rotate the scoop up and down.
As soon as my niece saw the scoop she was determined to master its use, which actually required a fair amount of manual dexterity. Since manual dexterity is not a strong suit of most not-quite-two-year-olds, she had some initial trouble and got very frustrated the first day, but she was determined and within a few days she was using it like a pro. Then I had to reclaim it so that I could actually use it for the cake.
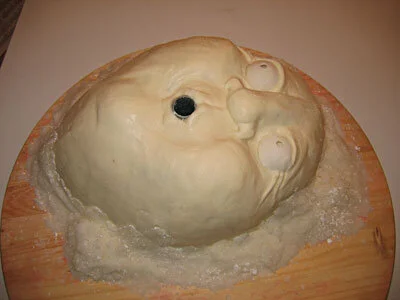
I used chocolate cake, of course, since that way it would look like dirt when we scooped it up. I started with some oval cakes and carved them into a big, sort of cartoonish, oversized face shape. Since it was for a child's birthday party and it was going to be gouged out with a metal scoop I didn't want it to be 100% realistic. That seemed like it would be too macabre for the occasion.

Because I wanted it to be easy to dig, I wanted to ice the cake with standard buttercream, rather than fondant, which I thought would be difficult to tear through with the scoop. So I used a nice thick coating of buttercream icing and smoothed it with a damp paintbrush. For the eyes, I made some little gum paste half spheres and cut out the irises so I'd have somewhere to stick the candles. With those in place, I piped more buttercream on to get the details of the eyelids, lips, and nose.

Then, to make it look like the face was rising up out of the dirt I made a batch of pressed sugar, which is just regular white sugar with a bit of water mixed in thoroughly. It can then be pressed into a mold, or, as in this case, shaped by hand. I used it to build up a hill of sugar around the face. For good measure, I put a few blobs of dirt onto the face itself, as if the face had just risen from the earth and hadn't yet shaken off the detritus.

My next step was to airbrush the face. I started by putting in some blue veins as an undercoat, then built up shades of flesh tone, red, and brown, then some dark purple for shadows. I wasn't altogether happy with how the dirt looked, so I sprinkled on some brown sugar to give it more variety and depth.

I hadn't masked off the gum paste eyeballs, so I had to carefully wash off the airbrush color with a damp paintbrush. For eyebrows and eyelashes I piped on some royal icing detail, then painted in irises, painted the eyebrows and lashes, and painted on some white highlights on the eyes and lips.

With two candles stuck through the eye holes and the aluminum digger planted in the mouth, I was done.
My niece loved it, and even helped use the digger to serve our guests. And once the cake was gone, she still had a digger to use in her sandbox.
Heart Cupcakes
In the past, my heart-shaped cakes have tended to get bigger and bigger, resulting in things like a heart the size of a small dog and the infamous Thoracic Cavity Cake. This year I decided to buck the curve and make very small, individual-portion-sized heart-shaped cakes.

In the past, my heart-shaped cakes have tended to get bigger and bigger, resulting in things like a heart the size of a small dog and the infamous Thoracic Cavity Cake. This year I decided to buck the curve and make very small, individual-portion-sized heart-shaped cakes.
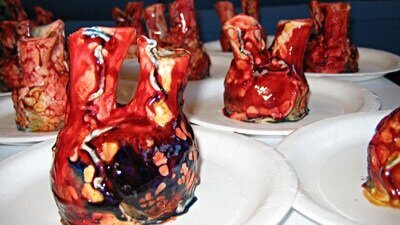
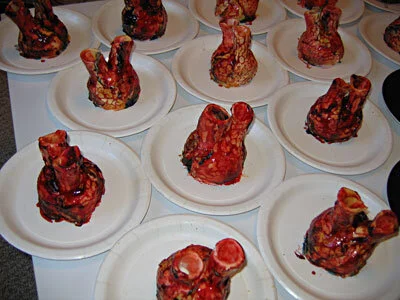
There were 18 people coming to Pumpkinfest, so I needed to make 18 little, cupcake-sized hearts. I also wanted them to bleed because what would be the point of making heart-shaped cupcakes that didn't bleed? I thought it would be a nice touch to have both red blood (arterial) and blue blood (venous), so I made a batch of fresh raspberry sauce and a batch of fresh blueberry sauce. Both of these sauces are very delicious and very easy to make. The only ingredients are berries, sugar, and lemon juice, mixed up in a blender and strained through a sieve to remove the seeds. The blueberry sauce was perhaps less blue than it might optimally have been, but I think we all know how hard it is to find appetizing blue food.
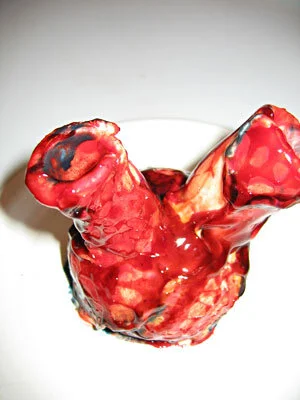
To contain the sauces, I made two gum paste cylinders per cupcake, for a total of 36. The idea was that one of them would be the aorta (full of red blood) and the other the superior vena cava (full of blue blood). Mounted vertically on the top of each cupcake, they would hold the fruit sauces until the cupcakes were cut into, at which point they would spill their gory contents over the plate.
For the cake itself, I started with cupcakes, which are relatively heart-shaped to begin with. I removed the paper from each one and set them in the middle of white paper plates, the better to emphasize the soon-to-be-spilt fruit sauces, and covered them with a thick later of chocolate buttercream frosting.
I didn't want to use fondant to cover and sculpt these hearts because I thought that the proportion of fondant to cake would be overpowering at cupcake scale (not that it probably makes that much difference anyway since most people peel the fondant off before they eat the cake.) For some reason, I also decided not to use buttercream frosting. I don't recall why I made that decision because in retrospect, buttercream would clearly have been the way to go. Instead, I decided to use white modeling chocolate. I didn't do a very good job of making the modeling chocolate, so it came out very hard and a little grainy. I used it anyway. I rolled out circles of the modeling chocolate to drape over the whole cupcake and then shaped it a bit with some gum paste sculpting tools. Then I used royal icing to pipe on detail veins and attach the cylinders sticking off the top.
Because I had used modeling chocolate I needed to color the hearts with powdered food coloring mixed into cocoa butter. Water-based colors don't stick to chocolate. To get the hearts nice and shiny, I then painted on a layer of red- or blue-tinted piping gel. Because the piping gel is water-based, it didn't spread smoothly, but rather beaded in rills and pockets, which I thought was actually kind of a nice effect.

Right before serving, I filled the tubes with my two fruit sauces.
Reactions were mixed. Adults more or less agreed that the cake was tasty, but that the modeling chocolate was too thick, hard, and grainy to eat. I really should have used buttercream. One little boy, who had been promised a cupcake adamantly refused to accept that these were, in fact, cupcakes in a slightly different configuration and had to be supplied with a normal-looking cupcake that we fortunately had in reserve. His little brother, on the other hand, took to the little hearts immediately, breaking off the aorta and jugular vein and gleefully drinking the contents like a proper little cannibal.

Poo-Flinging Monkey Cake
I made this creepy poo-flinging monkey cake for our little friend Isaac's first birthday party. This was a special request by Isaac's mother, who was also the recipient of the dancing yeti wedding cake.

I made this creepy poo-flinging monkey cake for our little friend Isaac's first birthday party. This was a special request by Isaac's mother, who was also the recipient of the dancing yeti wedding cake.
What does every little boy want for his first birthday? That's right - a cake shaped like a creepy-looking monkey! And what's even better than a creepy-looking monkey cake? That's right - a creepy-looking monkey cake that flings poo, just like a real monkey.
OK, maybe that's not exactly what my little friend Isaac would have requested for his first birthday cake, but he can't talk, and that is exactly what his mom requested.

The first step, of course, was to figure out exactly how the poo mechanism should work. My first thought was to make it a sort of catapult, but thenI realized that it would be more fun if it could fling poo repeatedly without a complicated reset of the mechanism. So I decided to go with a spring-loaded hinge. I made an armature for the arm and hand out of wood and brass tubing - I felt that it was necessary to have a metal structure within each individual finger so they wouldn't break off when I pulled the arm back to release the poo. The arm was connected via the spring hinge to a post, which was in turn secured to the heavy wooden base of the cake.

Before I made the cake, I sculpted the arm out of gum paste and fondant around the wooden armature, which meant that I had a sort of ghostly white monkey arm on a stick. I did load it up with some raisinettes (aka cake monkey poo), which it flung quite effectively, so I was ready to move onto the cake.
My sister was kind enough to actually bake the cakes for me. Fortunately she baked more than I asked her to, because the amount that I asked her to make would not have been enough. I had to cut notches in each tier and slide them into place around the arm support post. When I was done, I had what appeared to be a squat, one-armed robot, at least until I carved it into a more monkey-like shape.

This cake marked my first experiment with using rice krispie treats to sculpt additively onto my cakes. It's a technique that I learned, like so many others, from reading Colette Peters' books. My plan was to sculpt the tail, haunches, and second arm out of rice krispie treats. Not having ever made rice krispie treats myself, for some reason I thought they solidified really quickly. "I'll have to work fast," I thought, "but once I get them into shape they'll hold really well." Yeah, it didn't work out that way atall.

I'm not sure whether it was because it was really wet out or just because that's the way rice krispie treats are, but they didn't behave at all the way I expected them to. As I started sculpting them, they were just gooey and collapsing everywhere. I hollered for my sister to bring me skewers! Hurry! Hurry! Yikes! I stuck in skewers, here, there, everywhere! Anything to hold those rice krispie treats together and to hold them in place. Pretty soon I had a proto-monkey which appeared to be undergoing a truly ghastly acupuncture session. But at least it had arms and legs. I added some detail to the hand and feet with fondant.
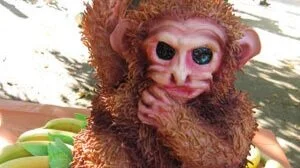
I made the facial features by piping buttercream and sculpting it with a paintbrush. It was kind of hard to make it look like a monkey rather than like a sort of withered old man, but I think I did OK. I was using one of my baby niece’s animal picture books as a reference. It was very nice of her to share it with me.
The ears I had made a few days in advance out of gum paste with skewers embedded in them so I could just stab them into place in the cake.
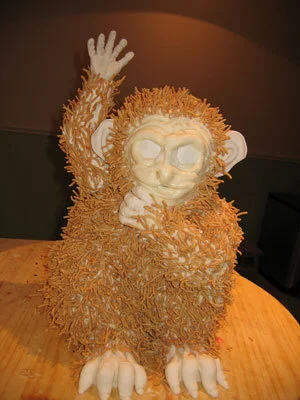
What's the point of a poo-flinging monkey without gross, matted fur? It would have been easy to make the fur out of frosting, but that tends to be too cartoonish for my taste. So I came up with a different plan - those little crunchy chow mein noodles. I know, I know it sounds a little weird. But potato chips and chocolate can be good. Those little shoestring potato snacks and chocolate can be good. I though it was workable. And they looked GREAT! It took me quite a while to cover the entire monkey and I seriously underestimated the amount of noodles it would take. Fortunately, there was some confusion as to who was buying how many packages of noodles, and we wound up buying approximately twice as many as I thought I would need. Which turned out to be just barely enough.

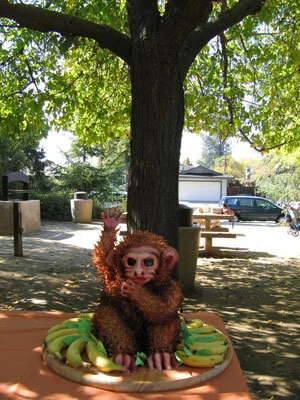
The noodles were already a pretty good base monkey color, so I just airbrushed in some mottling and some shadows. I painted the eyes with black food coloring and then went over that with clear piping gel to get the necessary depth and sheen. With that, the monkey itself was done. Left to my own devices I probably would have left it at that, but fortunately my sister gave me the kick in the ass that I needed to make it a better presentation. She came up with the idea of surrounding the monkey with bananas. So we bought about sixteen bananas and I made some gum paste leaves to fill in the gaps. It looked quite regal really, like he was a monkey king sitting on his banana throne.
The party was in an outdoor park, which was a great setting. We arranged the monkey on a picnic table underneath a big tree, with a convenient bowl of raisinettes to use as poo. The green leaves of the tree complimented the green leaves on the cake perfectly and I got to bask in the compliments of the guests at the party in the next picnic area as well as those of the guests at our party. I actually went to the party thinking that the cake was entirely innocuous and mainstream, at least compared to all my other cakes. But the unanimous verdict was that it was actually quite creepy, primarily due to the huge, hypnotic, glassy eyes.

The weight of all the gum paste and frosting and chow mein noodles on the arm made the poo flinging a little more sluggish than it was in my initial tests, so the monkey only threw his poo about two feet in front of him. Oh well, next time maybe I can get a better angle of release.
Cutting the cake was very funny because I had to cut it away around the arm mechanism. We ended up with a monkey arm hovering above a field of cake and banana carnage. The verdict on the chow mein noodles with the cake was mixed. Some people thought it worked quite well - a bit of crunch, a bit of salt - while others just found it weird and incongruous and ate around it. The birthday boy himself didn't weigh in on that particular issue, as he doesn't have enough teeth to get any of the chow mein noodles, but he certainly seemed to enjoy the cake. No one's quite sure how he got some on the back of his head, though.

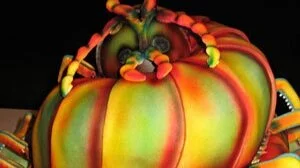
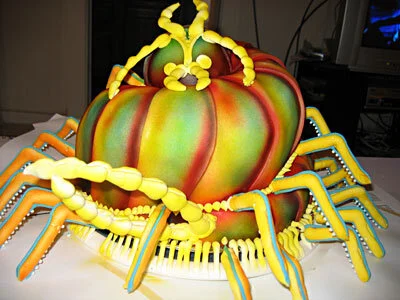
Centipede Cake
When I was in MBA school I had to take a class called Venture Creation, for which the final project was to write a business plan. Mine was for a cake business. We also had to do a presentation for people pretending to be potential investors, so, as part of that presentation, I naturally needed to make a cake. The Centipede Cake is what I came up with.
When I was in MBA school I had to take a class called Venture Creation, for which the final project was to write a business plan. Mine was for a cake business. We also had to do a presentation for people pretending to be potential investors, so, as part of that presentation, I naturally needed to make a cake. The Centipede Cake is what I came up with.
Since the name of my imaginary cake business was Kinetic Cakes, it was obvious that my cake had to do something. Since I didn't have all that much time blocked out in my schedule to make the cake, it was obvious that it wouldn't do anything too complicated. Since there would only be a few people at the presentation, it was obvious that it shouldn't be very big. Since moderation in cakes is not one of my strong suits, it was obvious that I was going to make way too much cake.
I had some trouble coming up with a concept because I had a bit too much creative freedom - it can be hard to design anything when there are so few parameters. I have no idea why I ultimately settled on the centipede, unless perhaps it was because the apartment I was living in at the time was occasionally invaded by house centipedes, which are completely harmless but quite large and shocking to meet in the bathroom in the middle of the night. And I like arthropods. I once had to walk five blocks in my pajamas to my friend's apartment because she had a house centipede in her sink and couldn't get rid of it herself.
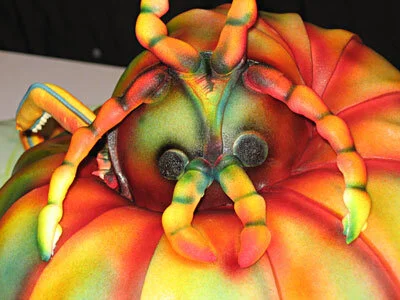
The legs are, of course, the most pivotal part of the centipede, plus it is their disturbingly inhuman rippling motion that makes the centipede seem so alien to us. It was this motion that I was trying to convey through my cake.
My plan was to mount the cake on a turntable that was, in turn, sitting on a bumpy base so that, when the turntable was spun, the legs, which would hang off the sides of the turntable, would ripple up and down as they passed over the bumps.
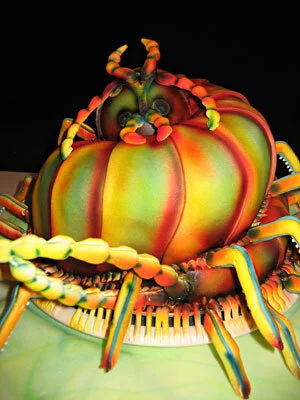
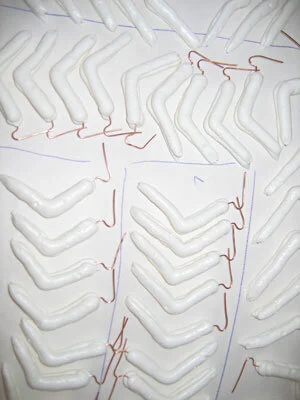
First I needed a turntable. I was fortunate enough to find one with a wire around the perimeter so that I could easily attach my legs to it. In order to do that, I built the legs around lengths of copper wire by piping royal icing onto each side of the wire with a large round tip. I airbrushed one side of each leg yellow and the other side orange because I though that having a variance in color between the two sides would help to emphasize the rotational motion of the turntable. To hide the seams running up each side of the legs, I piped on a thin line of turquoise royal icing. (If this sounds like an unusually colorful centipede, you're right. I don't really recall why I chose this color scheme, but it was quite festive.) Then I positioned the legs all the way around the perimeter of the turntable, wrapping the copper wire in the legs around the wire at the circumference of the turntable.
For the base that the turntable would rest on I used a big piece of foamcore, with smaller segments of foamcore arranged around it to create the bumps. Then I covered the whole thing with a layer of green marbled fondant, to suggest grass and because I like marbled fondant.
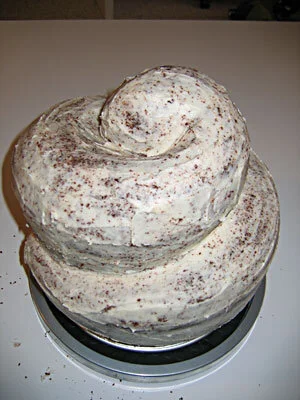
To make the cake, I started with two tiers of chocolate cake, one 10" in diameter, the other 8" in diameter, torted and filled with buttercream frosting. Then I carved that into a spiral, as if the centipede was curled into a loop, and coated it with buttercream.

Because centipedes have segmented bodies, it was easy to cover the cake with small fondant sections, each overlapping the one before. With the fondant in place, I built up the airbrush color in layers. First a yellow base, then orange and red shadows around the perimeter of each segment, then blue shading in the center of the segments. Once the color was on, I moved the whole cake onto the base, which already had the legs attached. I stuck some additional legs directly into the cake, following the curve of the centipede's body. In an attempt to conceal the edge of the turntable that wasn't already obscured by the legs, I piped on some sort of mini-legs between the big legs. I also piped some details onto the face. I had made some royal icing antennae and mandibles in advance, as well as some wicked-looking pincers for the back, and I stuck those on at this point as well. Then I airbrushed my new royal icing details with the same yellow, orange, red, and blue and a bit of black for good measure.
The cake went over well at the presentation, though I think if I were talking to real potential investors for a real project it would behoove me to make a cake that did something more impressive, though the rippling of the legs was nice in a restrained kind of way. And of course I had about five times as much cake as I needed, so I gave the rest to my friends in the Entrepreneurship Center. And I got an A in the class (which no one but my parents cares about because it's grad school.)

Fish Fountain Cake
The second in my series of disintegrating cake (the first being the Melting Head Cake), the Fish Fountain was made for the Second Annual MBA Art Show at my business school.

The second in my series of disintegrating cake (the first being the Melting Head Cake), the Fish Fountain was made for the Second Annual MBA Art Show at my business school.
My goals in creating the Fish Fountain were:
To explore the impermanence of human achievement by creating a cake - a work of art that by its very nature must be destroyed to be appreciated - that preemptively destroys itself.
To show off for my classmates.
I think the main mistake that I made in designing this cake was that I was much more concerned with the functionality - the simple fact that it was a self-devouring fountain - than I was with the aesthetics, which, to be honest, were a bit of an afterthought and I was sort of making things up as I went along. I wish that I had put more thought into integrating the appearance of the cake with its actions. I also think that I could have made the melting more impactful had I made the exterior of the cake darker, because then when the color melted away to reveal the white fondant beneath it would have created a sharper contrast.
Instead, a fish was the first shape I thought of when I thought of a fountain, so I made a fish. Well, not just a fish, of course. In keeping with my usual style, I wanted to make it a bit monstrous and grotesque, so I decided to give it fins that were morphing into human hands and feet.

The first thing I did was make the hands and feet out of royal icing so they would have lots of time to dry. I piped the royal icing onto parchment paper, then set them over some curved cardboard pieces to give them a nice shape. In hopes that it would help the cake melt in an interesting fashion, I gave the fins some very thin sections and some very thick sections so they would dissolve at different rates.

Next I ran some tests on various form factors of sugar, to see how quickly they melted when left under a stream of water. I wanted the cake to melt quickly enough to be easily observable, but not so quickly that the cake would melt into a soggy inedible mess before everyone had a chance to appreciate the complexities of my concept. I experimented with pressed sugar, royal icing, isomalt sheets, hard candy sheets, and fondant. I also wanted to use multiple materials that would melt at different rates and create interesting textures. Everything worked pretty well, except for the pressed sugar, which dissolved too quickly to really be of any use to me.

Now I needed a fountain. I picked up two different little pumps at Home Depot as well as some tubing. After a fair amount of trial and error, I wound up with a plastic cake plate sitting in an ugly blue plastic bowl with a paper towel tube sticking up through the middle. Underneath the cake plate was my little pump, with a tube running up through the center of the paper towel tube. I wanted to make the water come out as close to vertically as possible, so that it would dissolve the cake all the way around and not just on one side. I knew I wouldn't be able to test it anymore once I had the cake in place, so I just had to set it up as best I could initially and hope.
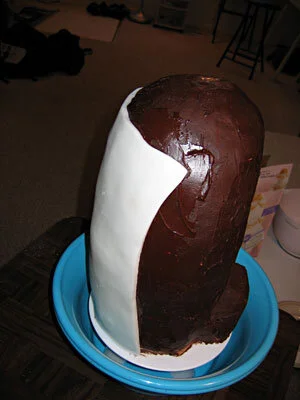
For the cake, I made my usual chocolate recipe, baked a whole mess of rounds, torted and filled them with chocolate ganache, and stacked them around the paper towel tube. Because it was so tall, I used dowels and foamcore circles every four inches or so. Then I carved it into basically a big oblong blob and crumb coated it with more chocolate ganache. In retrospect I should have given it a more contrapposto shape. It would have been more dynamic.

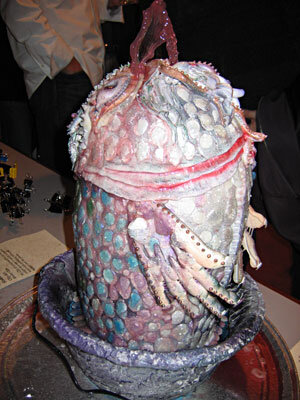
Rather than try to cover such a tall shape with just one piece of fondant, I used three. I also made them extra thick because I didn't to risk the cake itself getting soggy. First I covered the side with two rectangles, so that the seam would run right up the back and the belly of the fish. Then I put one more piece over the top that would serve as the fish head up to the gills. This had the highly unfortunate effect of making it look like a penis.

Next I added the larger fondant decorations to the face. Again, my propensity for making monsters came to the fore and the fish came out very dragon-y. I also ran textured fondant lines up the front and back to hide the seams in my initial fondant layer. Then I put my royal icing fins and tail in place, using big skewers to hold them until the royal icing dried.

At this point, because I hadn't planned the visuals well enough, my decorations got a bit out of hand. It was like the royal icing had a mind of its own. I piped fringe, dots, whiskers, stripes ... in an attempt to conceal the fact that I had made the fountain inside a cheap plastic bowl from Walmart, I covered the bowl with royal icing as well and tried to texture it like stone with a sponge. It wasn't the prettiest thing in the world, but it was probably marginally less ugly than the bowl. I also sponged some royal icing onto the cake itself, as I was vaguely planning to give that a bit of a stone appearance as well.

Once my royal icing dried I put a base coat of airbrushing on. To emphasize the fact that my fish-dragon was also part human, I put flesh tone on the fins/hands and tail/feet. Because I was going for a stone feel overall, I put a grey base coat on the rest of the cake and on the bowl.
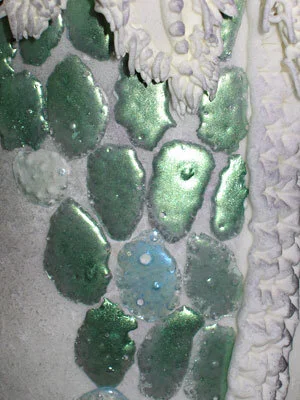
Now my fish needed scales. Of course, if I had really been committed to my stone texture idea, I would have sculpted the scales into the fondant before I applied my stone texture. But, as I said before, cohesive aesthetics was not my top priority. I thought by having several different media on the cake - royal icing, fondant, isomalt - I would get a more interesting melt. So I made some multicolored, iridescent scales by mixing isomalt powder with silver, purple, green, and blue luster dust, then melting little piles of the mixture in a 400 degree oven on a silpat mat. They came out nice and bubbly and organic-looking, but of course they did absolutely nothing to make the cake look like a stone fountain.
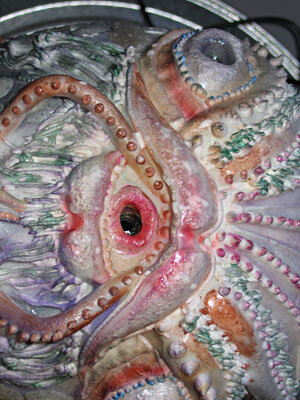
I stuck the scales to the cake using royal icing, gradating from green around the back ridge through blue and purple to the silver at the stomach ridge. Then these got out of control, too, and I started sticking scales on the face, the fingers, the toes, everywhere ... I just couldn't stop myself. Improv has never been a strong suit of mine - I really need a firm plan to work from, or I won't be happy with the results.
To try to better integrate the multitude of scales with the rest of the cake, I painted luster dust all over the rest of the cake, too. When I was done, my cake looked more like a disco ball than a fountain. And not a tasteful, restrained, silver disco ball. A ridiculous, garish, rainbow-colored disco ball.

On the bright side, the fountain-ness of it functioned quite well. I realized at the last minute that the bowl the cake was in would be nowhere near big enough to contain all the drips and splashes from the fountain, so I had a friend of mine bring a big silver tray to the art show to put the cake on. I had bought several gallons of cranberry juice to use instead of water, so I poured that in and plugged in the pump. I hadn’t gotten the angle on the tubing just right, so at first the juice all sprayed down one side of the fish. I had to prop one side up a bit with a stack of napkins to get it to flow evenly. I was glad that I had decided to use different types of sugar, because that really did enhance the texture of the melting.

I don’t recall exactly why I decided that the fountain should spray something red. Perhaps I didn’t exactly decide; perhaps after so many gory cakes blood red is just my default setting. My finance professor told me that I should have used Cabernet. He was right, it would have been classier to use wine, but I was too cheap to spend much money on a drink that was obviously going to be useless once it was all gummed up with melted sugar. And it did get gross – you have no idea how bubbly and sticky and gooey cranberry juice full of sugar and fondant can be.

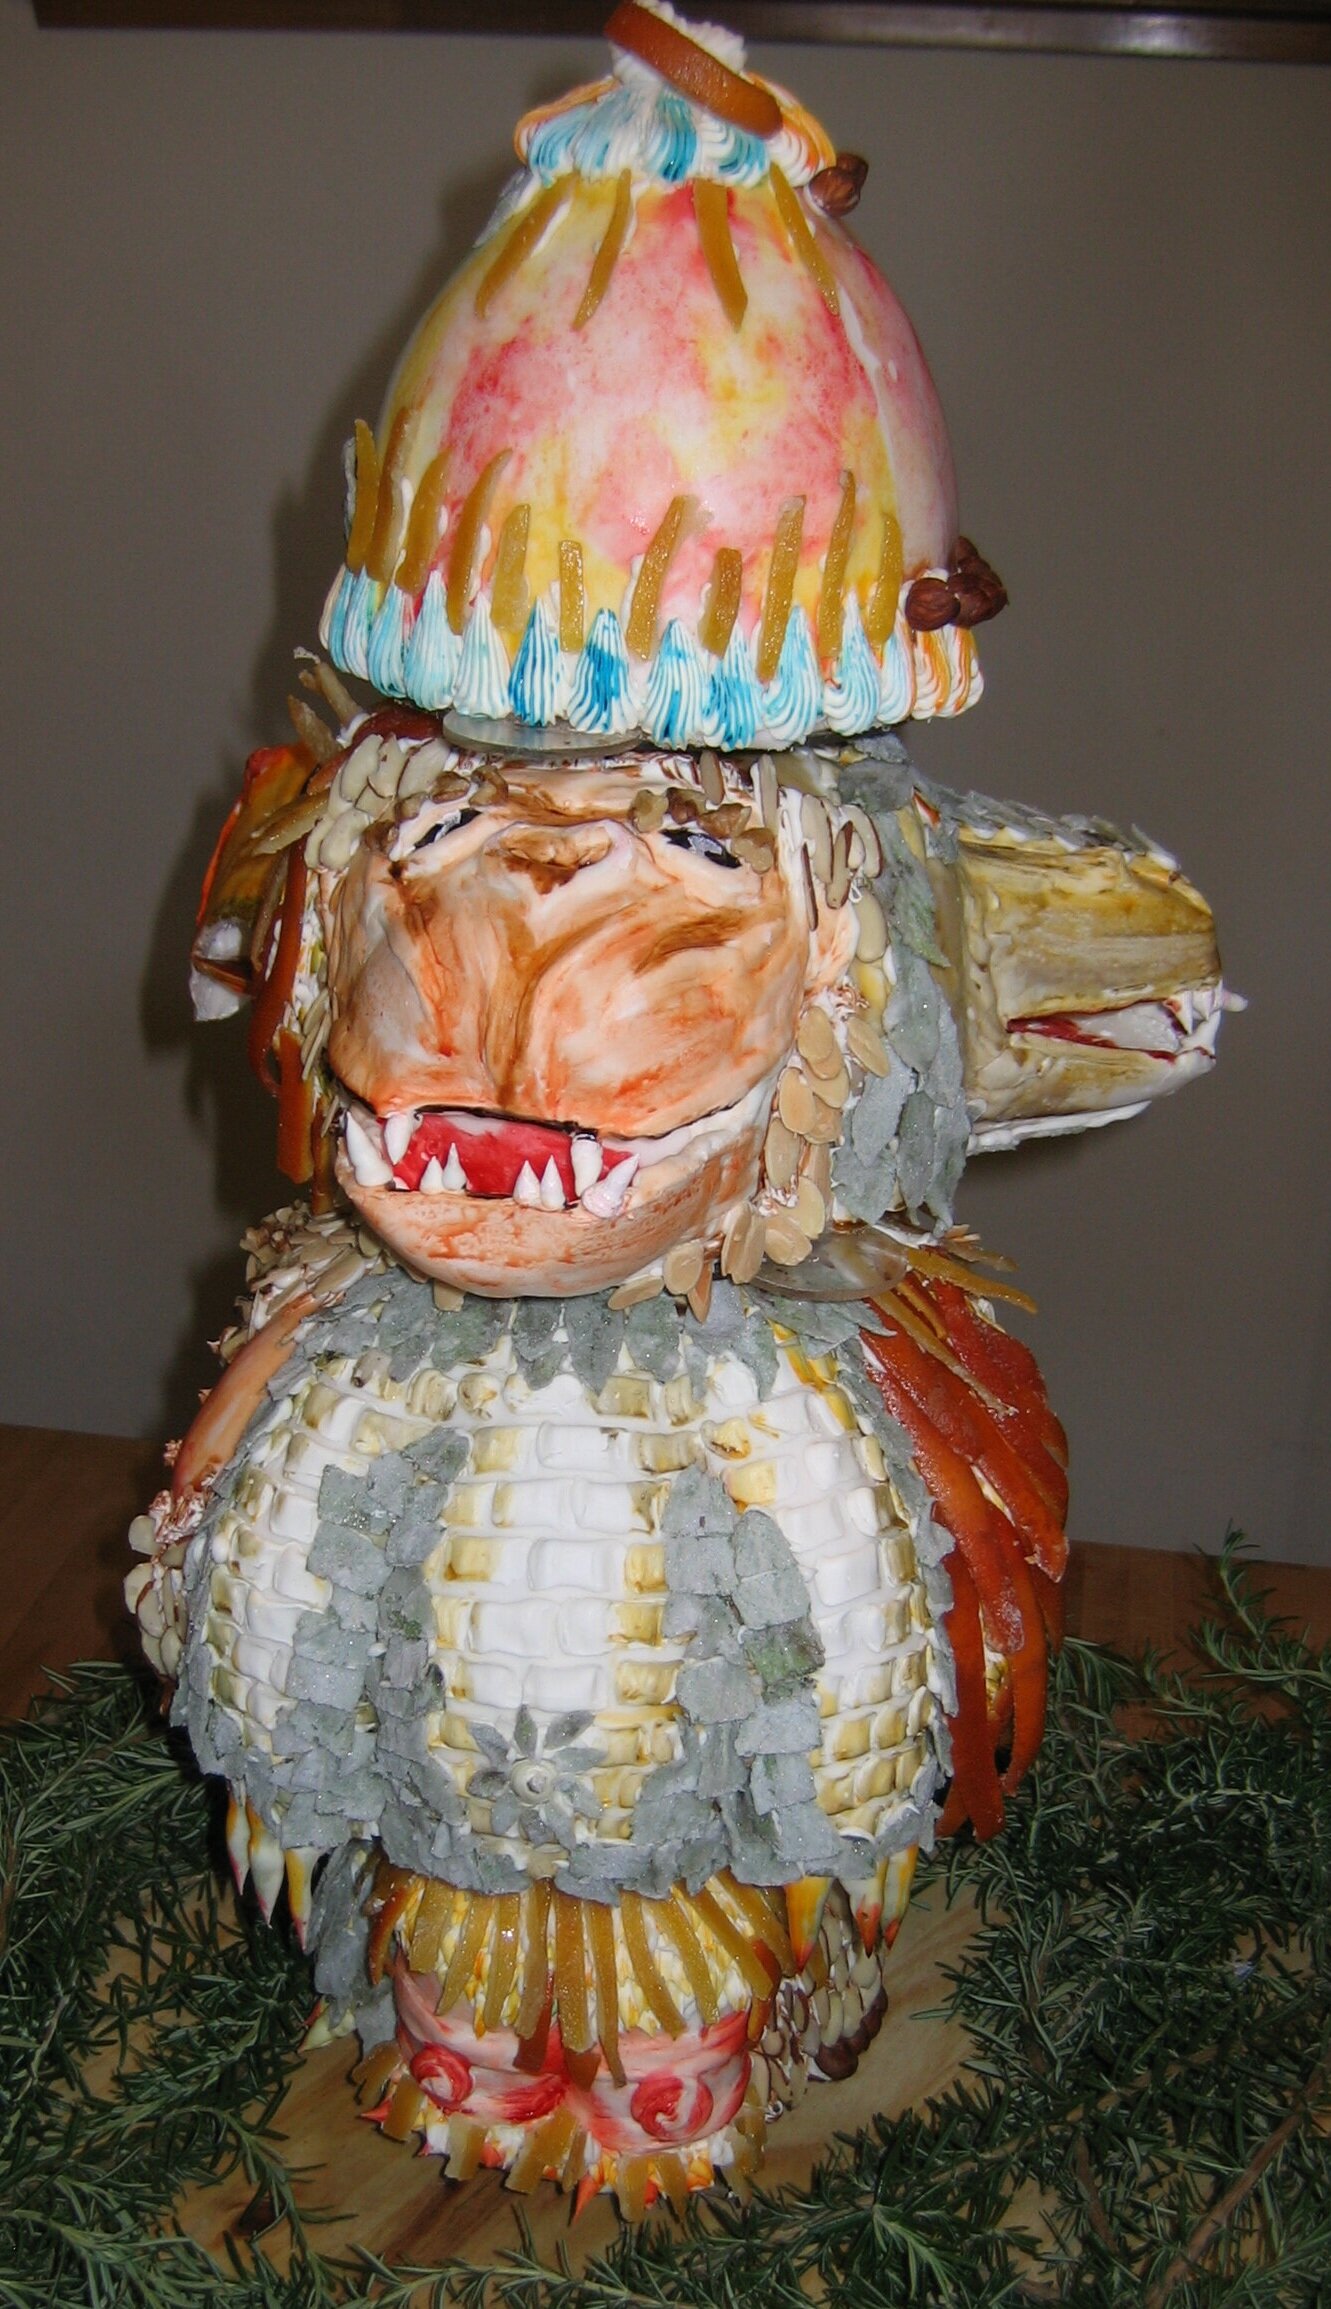
Triple Animal Cake
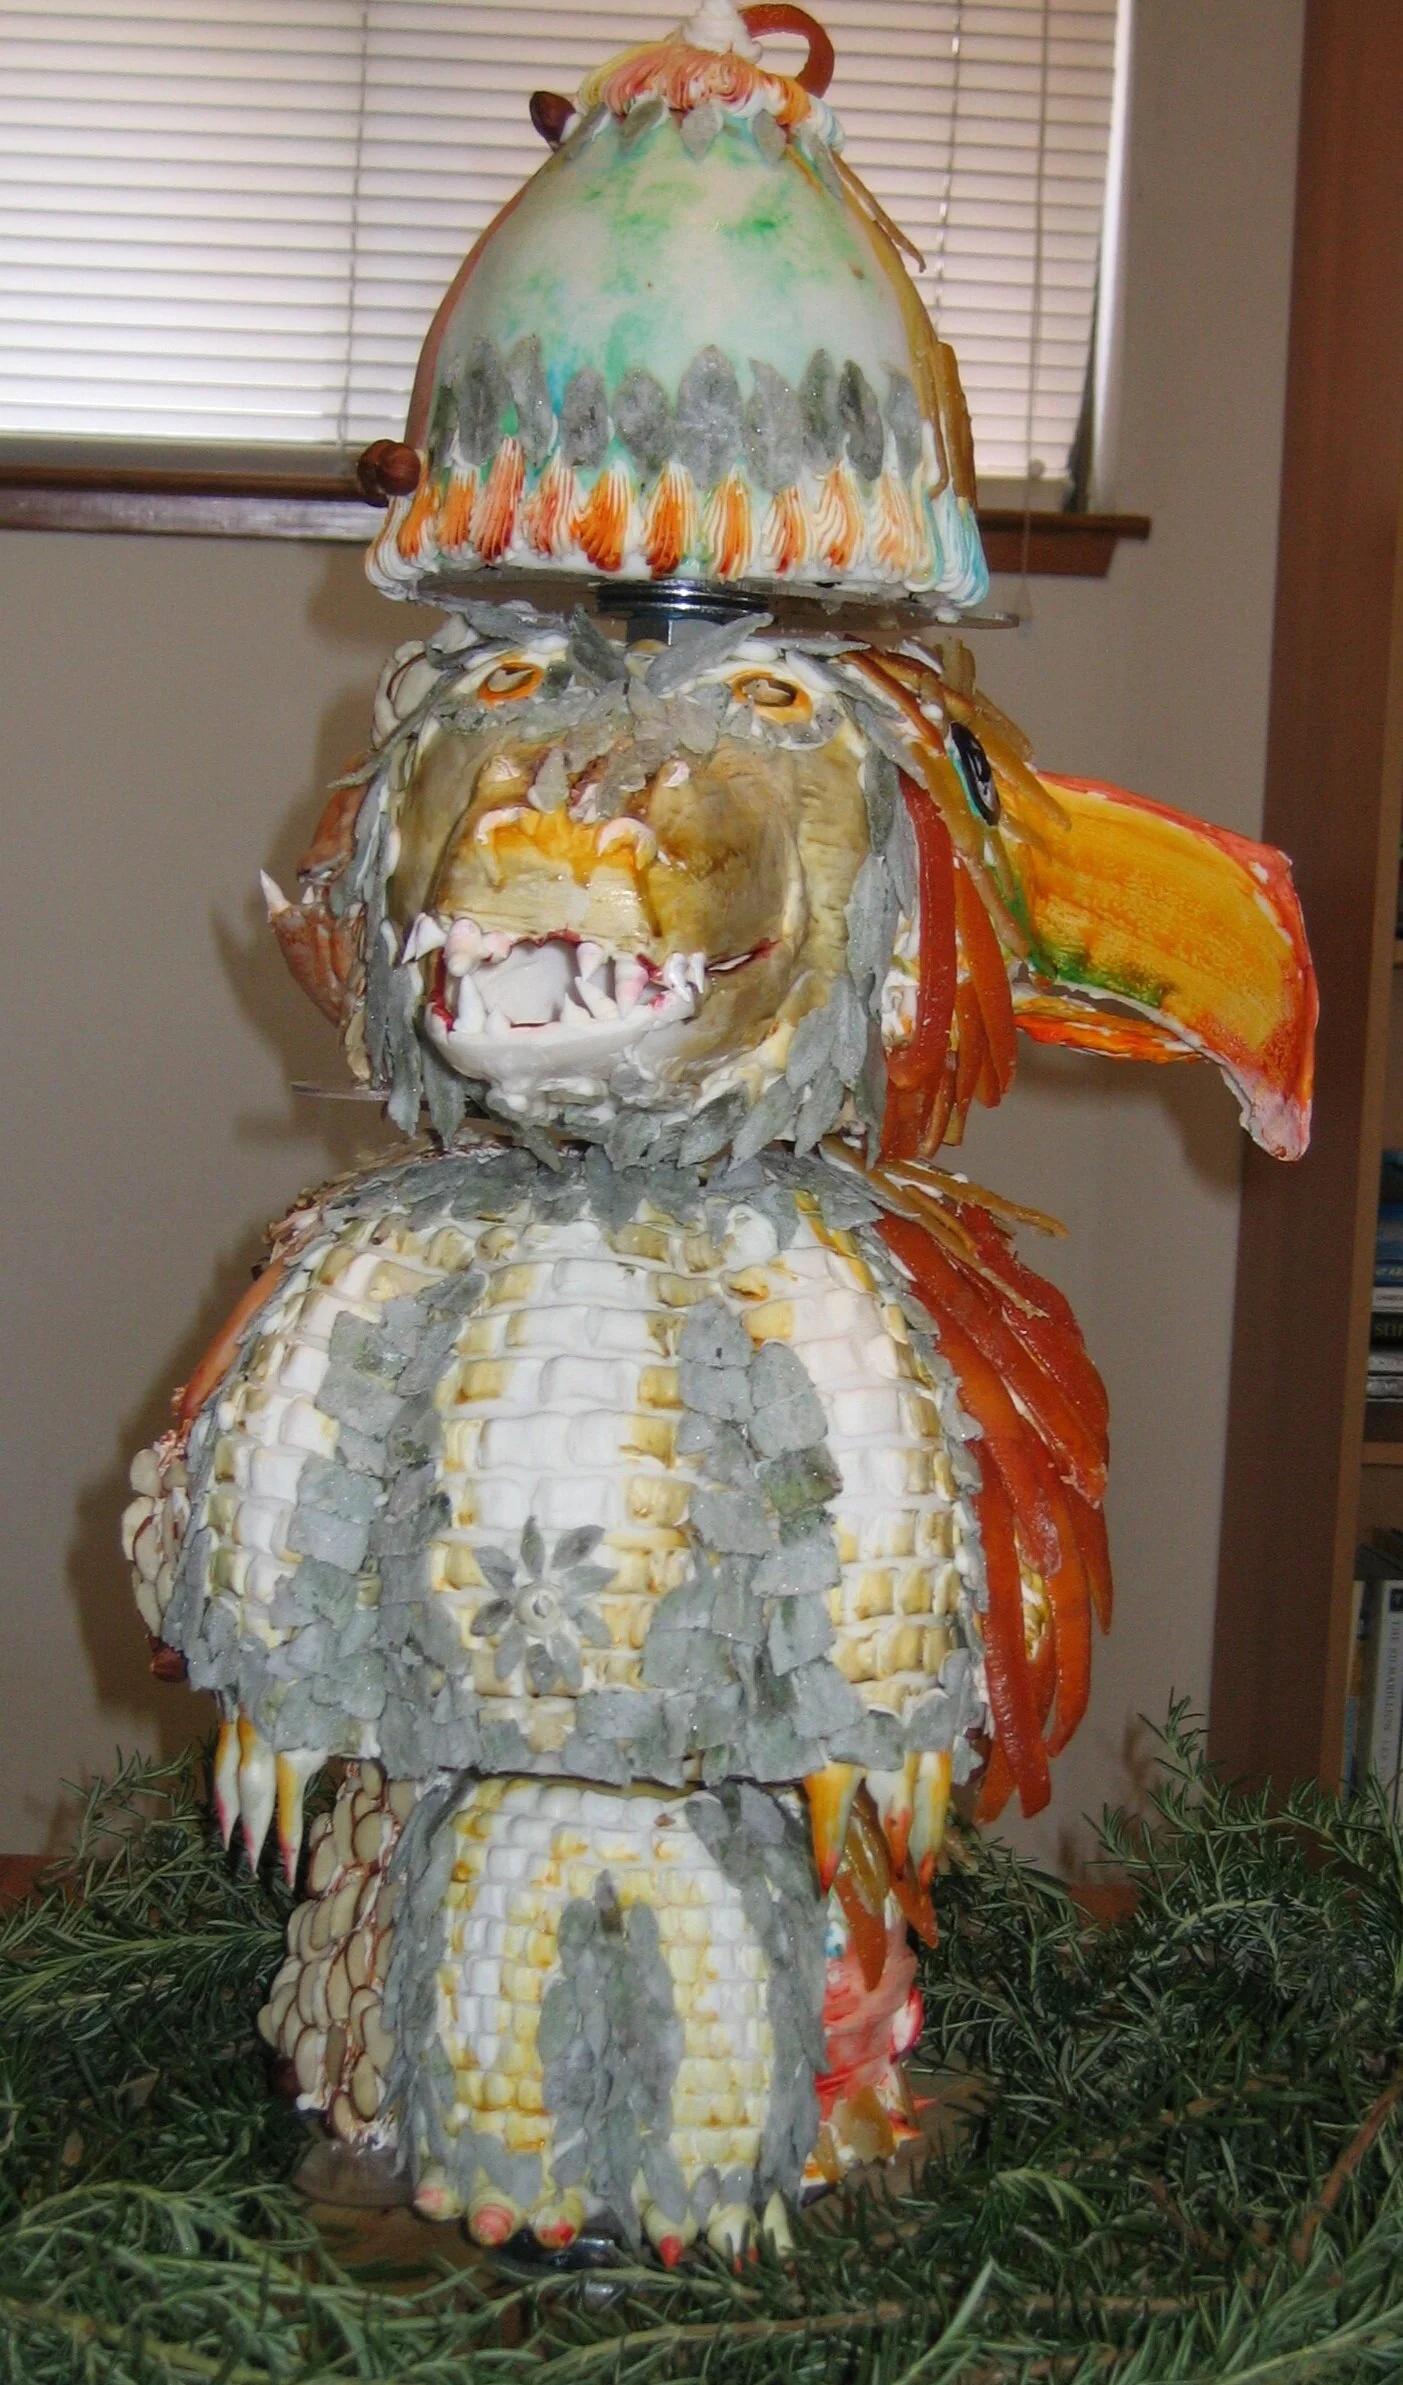
This cake was made for my niece's first birthday. I was trying to make a 3-dimensional version of those children's picture books where each page is split into three parts so that you can mix and match the heads, bodies, and feet of the animals.
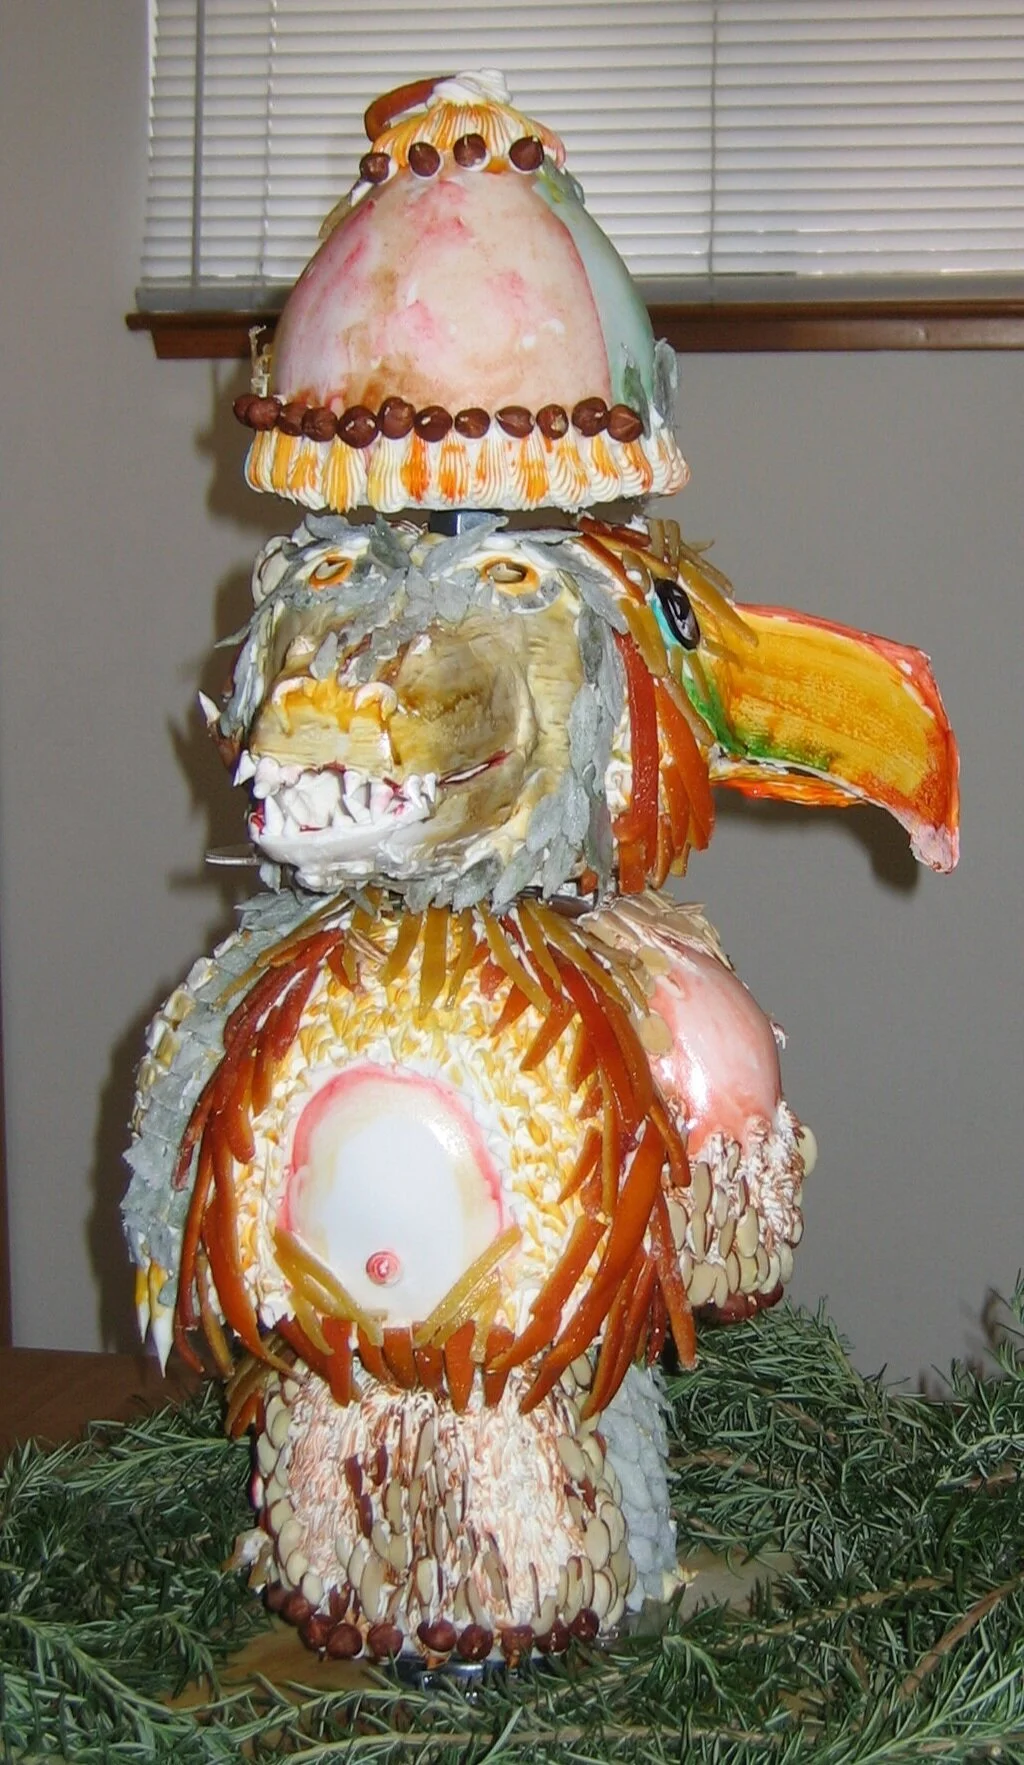
This cake was made for my niece's first birthday. I was trying to make a 3-dimensional version of those children's picture books where each page is split into three parts so that you can mix and match the heads, bodies, and feet of the animals.
My plan to adapt the concept of the mix-and-match animal parts book into a 3-dimensional cake was to build the cake around a central pole, so that each tier would be able to rotate independently of the others. The first tier was the feet, the second tier the body, and the third tier the head. Because I was planning to put all kinds of decorative schmutz onto and into these cakes and because I wanted to have just a basic chocolate cake section for the one-year-old birthday girl to smush, I also made a hat for the fourth tier, which frankly didn't really add a whole lot, visually or conceptually speaking.
Each tier was divided into three sections, each decorated like a different animal. That way, you could line all the sides up so that the three animals appeared in their entirety on the three sides of the cake, or you could rotate the sections relative to one another so that, for, instance, each side of the cake would show the feet of one animal, the body of another, and the head of the third. I also wanted to experiment with different decorating and texturing techniques, so rather than decorating in the usual way with only fondant and frosting and food coloring, I decided to enhance the primary texture of each animal with a different food product and then also coordinate the flavor of the cake within to the decor on the facade of the cake. My animal / decoration / flavor combinations were:
Side #1: Monkey / Nuts / Hazelnut Chocolate Cake
The monkey side of the cake was made of chocolate cake with hazelnut paste added to the batter, with nuts of various types and textures applied to the outside to create the appearance of matted monkey fur.
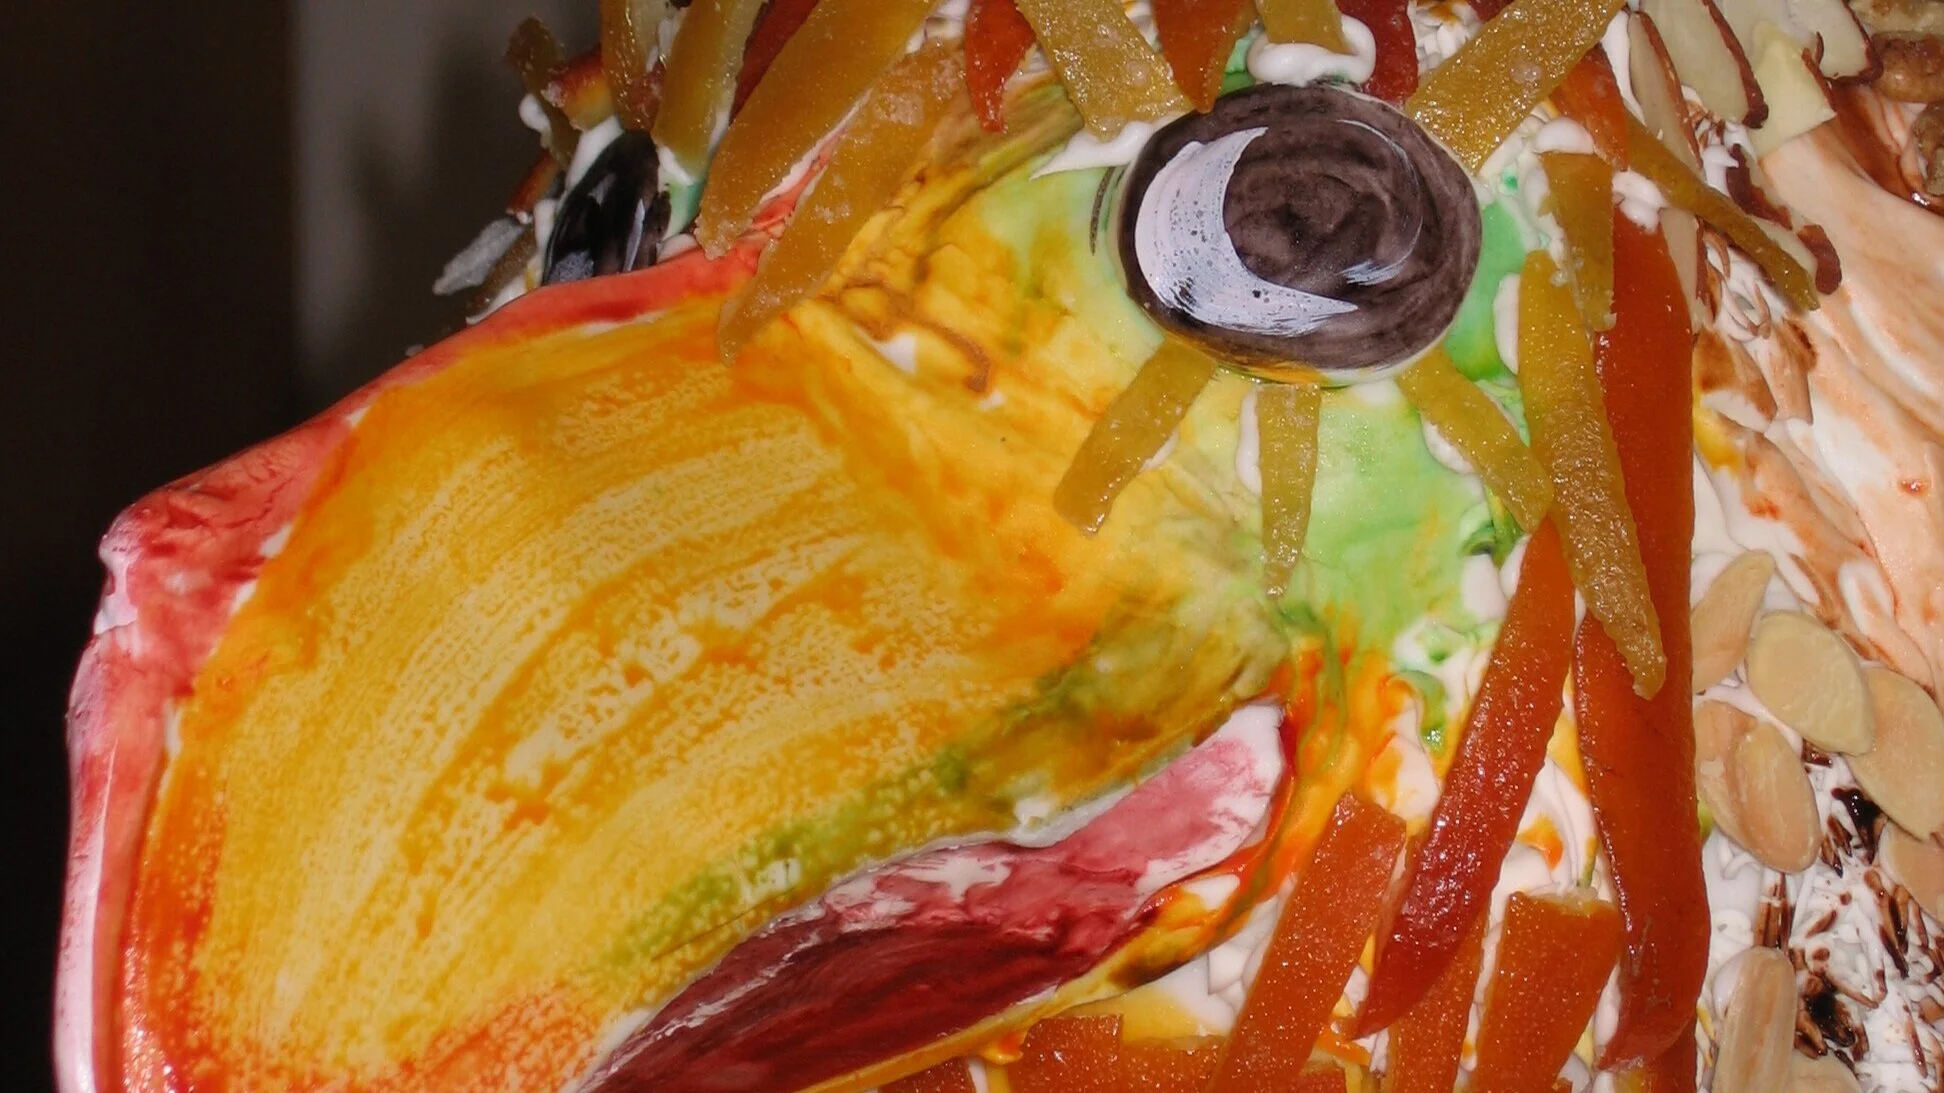
Side #2: Bird / Candied Citrus Peel / Chocolate Orange Zest Cake
The bird was chocolate cake with orange zest added to the batter, with candied lemon, orange, and grapefruit peel feathers.
Side #3: Alligator / Sugared Mint Leaves / Mint Chocolate Chip Cake
The alligator was chocolate cake with mint chocolate chips mixed in, with sugar-coated mint leaves for the textured skin.
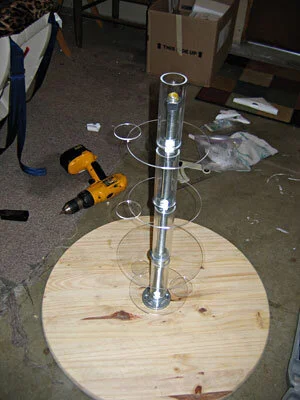
The first thing I needed was a central pole for my cakes to rotate around. I started with a heavy circular wooden base with a 3/4" threaded rod screwed into a phalange in the center. To support the cakes, I got four plexiglass circles with holes drilled in the middle with acrylic tubes the height of the tiers glued around the holes. So that we would be able to turn the tiers without touching the cakes, I glued little plexiglass circles onto the edges of the bigger circles to use as handles. To support these plexi cake bases, I used big nuts and fender washers, screwed onto the central threaded rod. Each tier required three nuts and a fender washer. The nuts were just the right size to fit inside the acrylic tube while the fender washers were big enough for the plexi bases to rest on. To assemble, I started with one nut, then a fender washer, then another nut pinching the fender washer in between. Then one more nut, positioned so that the distance from the top of the fender washer to the top of the nut was the same as the height of the tier. That way, when I slipped the plexi plate and acrylic tube over the nuts, the plate rested on the fender washer and the nuts at the top and bottom kept the whole piece stable. Then repeat the whole operation for each successive tier. I did a dry run putting this whole assembly together without cake to make sure it would work the way it did in my head before I started working on any of the edible cake components. When I reassembled it later with the cakes in place, I also sprayed the washers with cooking spray as lubricant to counteract the weight of the cakes, which I was afraid would hinder the rotation.
Before I started on the cakes themselves, there was lot of advance work to do:
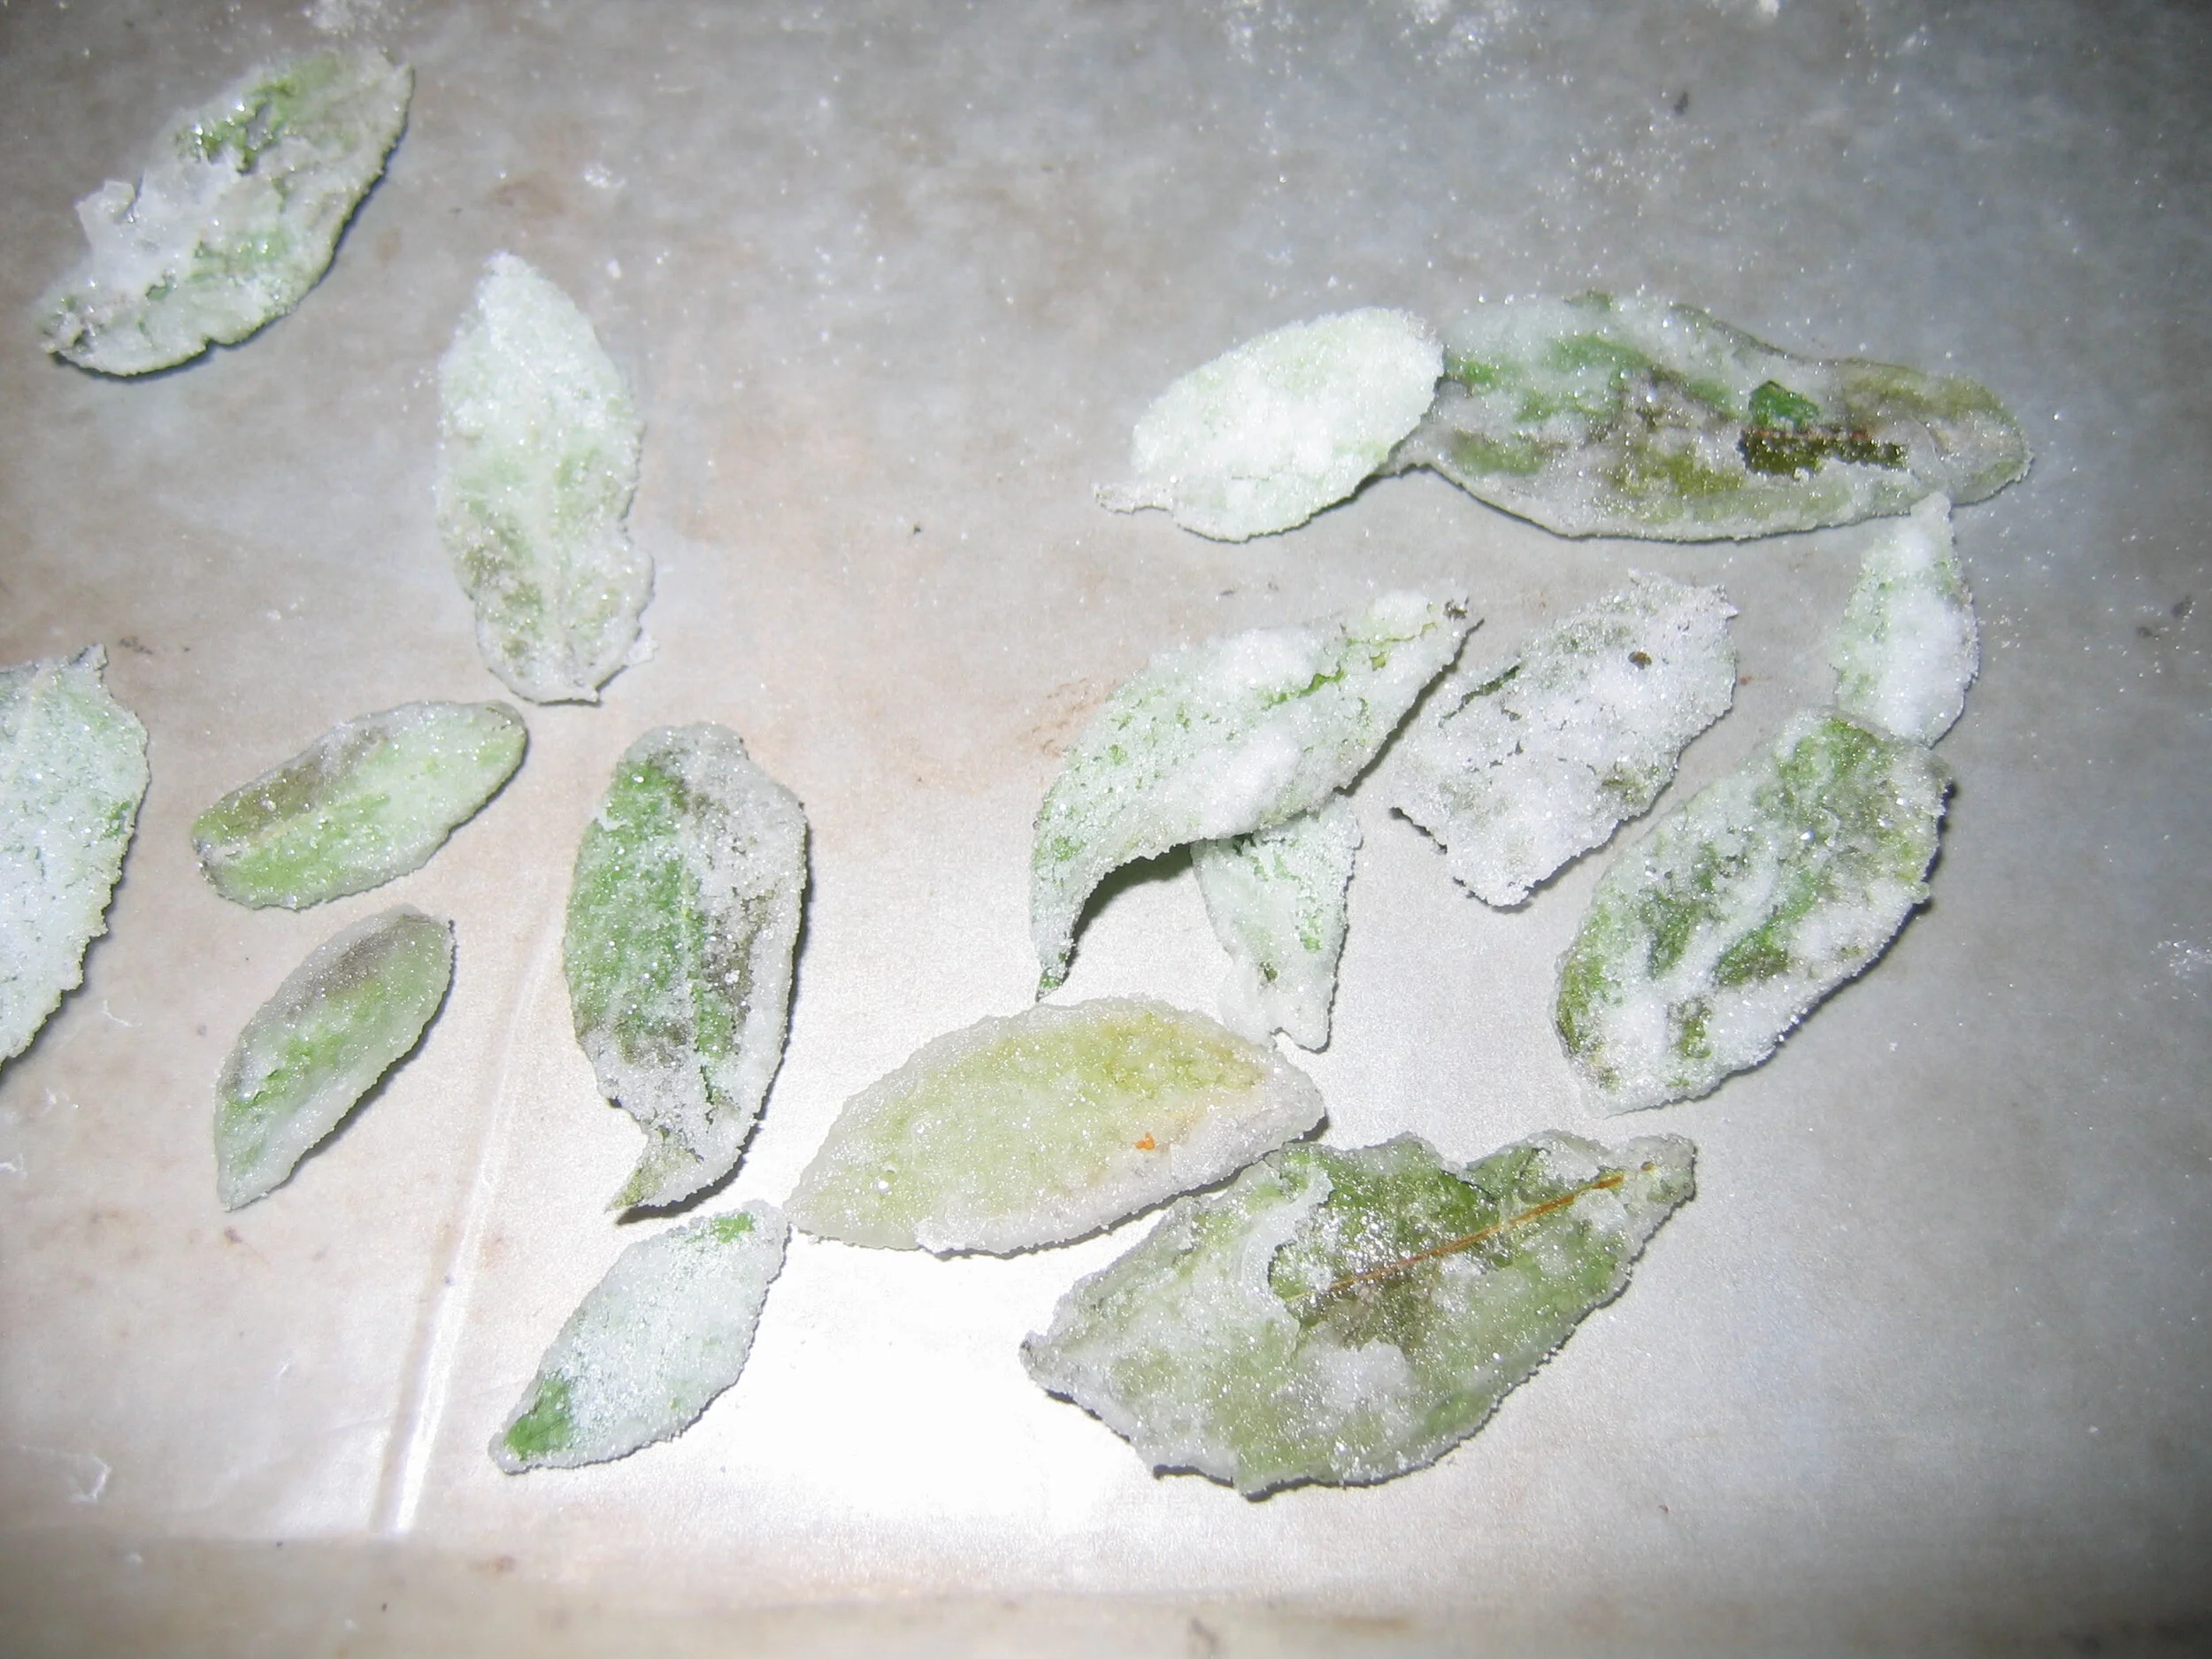
Sugared mint leaves:
These were easy to make, if a bit gooey and tedious. Fortunately, my sister had a big mint plant in her back yard, so I had ready access to a virtually infinite supply of mint leaves. To sugar them, I dipped each leaf one at a time in egg white, then in granulated sugar and put them on wax paper to dry. I have since realized that I could probably have gotten a nicer result had I rubbed on the egg white with my fingers in a thinner layer and then sifted the sugar overtop. As it was, some of my leaves got too much egg white or too much sugar on them and wound up being unusable or just a little lumpy and weird.
Candied citrus peels:
I started with lemon peels, orange peels, and grapefruit peels, so that I would have a variety of sizes and colors to use for my feathers, using a recipe from Jacques Torres. First I cut the fruit into fourths and removed the peels. My mom was in town (she and Dad were both a big help on this cake) so she took the leftover fruit and carefully separated the fruit from the inner membranes to feed to my niece. I tried to eat some of the grapefruit but Mom shooed me away. Apparently I don't rate as highly as she does. The pieces of peel went into a pot of boiling water three times to blanch some of the bitterness out of them. Then they went into a pot of sugary water to simmer for a couple of hours. Then I pulled them out of the syrup and left them on a wire rack to drain and dry. I had been lead to believe, by Jacques Torres' recipe, that they would dry out in a few hours. As usual, Jacques' recipe didn't work out the way I expected. None of Jacques' recipes that I have ever tried have worked out the way I expected. I left the peels out on the rack overnight, and they were still nowhere near dry. At that point, I became pressed for time, so I had to put them into a warm oven to dry before I could put them on the cake.

Gum paste faces:
To make the snouts of the alligator and the monkey and the beak of the bird protrude appropriately from the cake surface, I made them in advance out of gum paste. As it turned out, I didn't make them quite enough in advance, as the beak wasn't quite fully hard when I went to attach it, but I'll get to that in a little bit. In order to get the shapes I needed, I draped rolled-out sheets of gum paste over forms. In the case of the monkey nose and the alligator snout I was able to find cups lying around the kitchen that were basically the right size and shape. To get the more distinctive shape of the bird's beak, I made my own form out of cardboard. All the forms had to be liberally coated with corn starch before applying the gum paste to insure that the finished pieces would release easily.

When it came time to make the cakes and the frostings, Mom and Dad were invaluable, with Mom doing most of the baking work and Dad doing most of the cleanup. For each tier, we made three two-inch tall cakes - one of each of the three flavors described above. I torted each of the cakes and filled them with chocolate buttercream frosting. Then I cut each of the cakes into thirds and stacked the thirds on top of each other, so that I wound up with three pie wedges per tier, one in each flavor, each about six inches tall. I had to cut a little divot out of the corner of each pie wedge so I could fit them around the central tubes, assembling the pie wedges back into circles. As it turns out, cakes are much flimsier when they're built this way and until I finished carving them and covering them with fondant I was very worried that the three sections of the cakes would flop outwards like the petals of a flower. As I said before, I had conceived of the hat as the smash cake for the birthday girl, so for that one I simply made a basic chocolate cake and didn't have to worry about cutting it into thirds.

Carving was pretty easy, actually, since I was going for sort of puffy cartoony animal shapes. Once I had them covered with fondant, I was able to stick my gum paste beaks and snouts on with royal icing, holding them in place with skewers until the icing dried. Unfortunately the beak wasn't quite dry enough and it sort of sunk over the skewer, so I had to leave the skewer embedded in it and pipe royal icing on top to hide the end of the skewer sticking out.
I added a base layer of royal icing details - feathers and fur and scales - because I didn't trust my textural appliques to provide the level of detail that I was looking for. I also added facial features to the heads, and nipples and belly buttons to the torsos. I wasn't quite sure what to do with the hat, so I just gave it a poorly executed inverted shell border.

Because I was visiting my sister when I made this cake, I didn't have my airbrush with me, so I had to paint the colors on the old fashioned way - with a soft brush and some paste food coloring. I didn't do a very good job - so I wound up with a lot of drips and messy brush marks. I also think I either went too muted with the alligator colors or too bright with the bird colors because they sort of didn't belong in the same world.
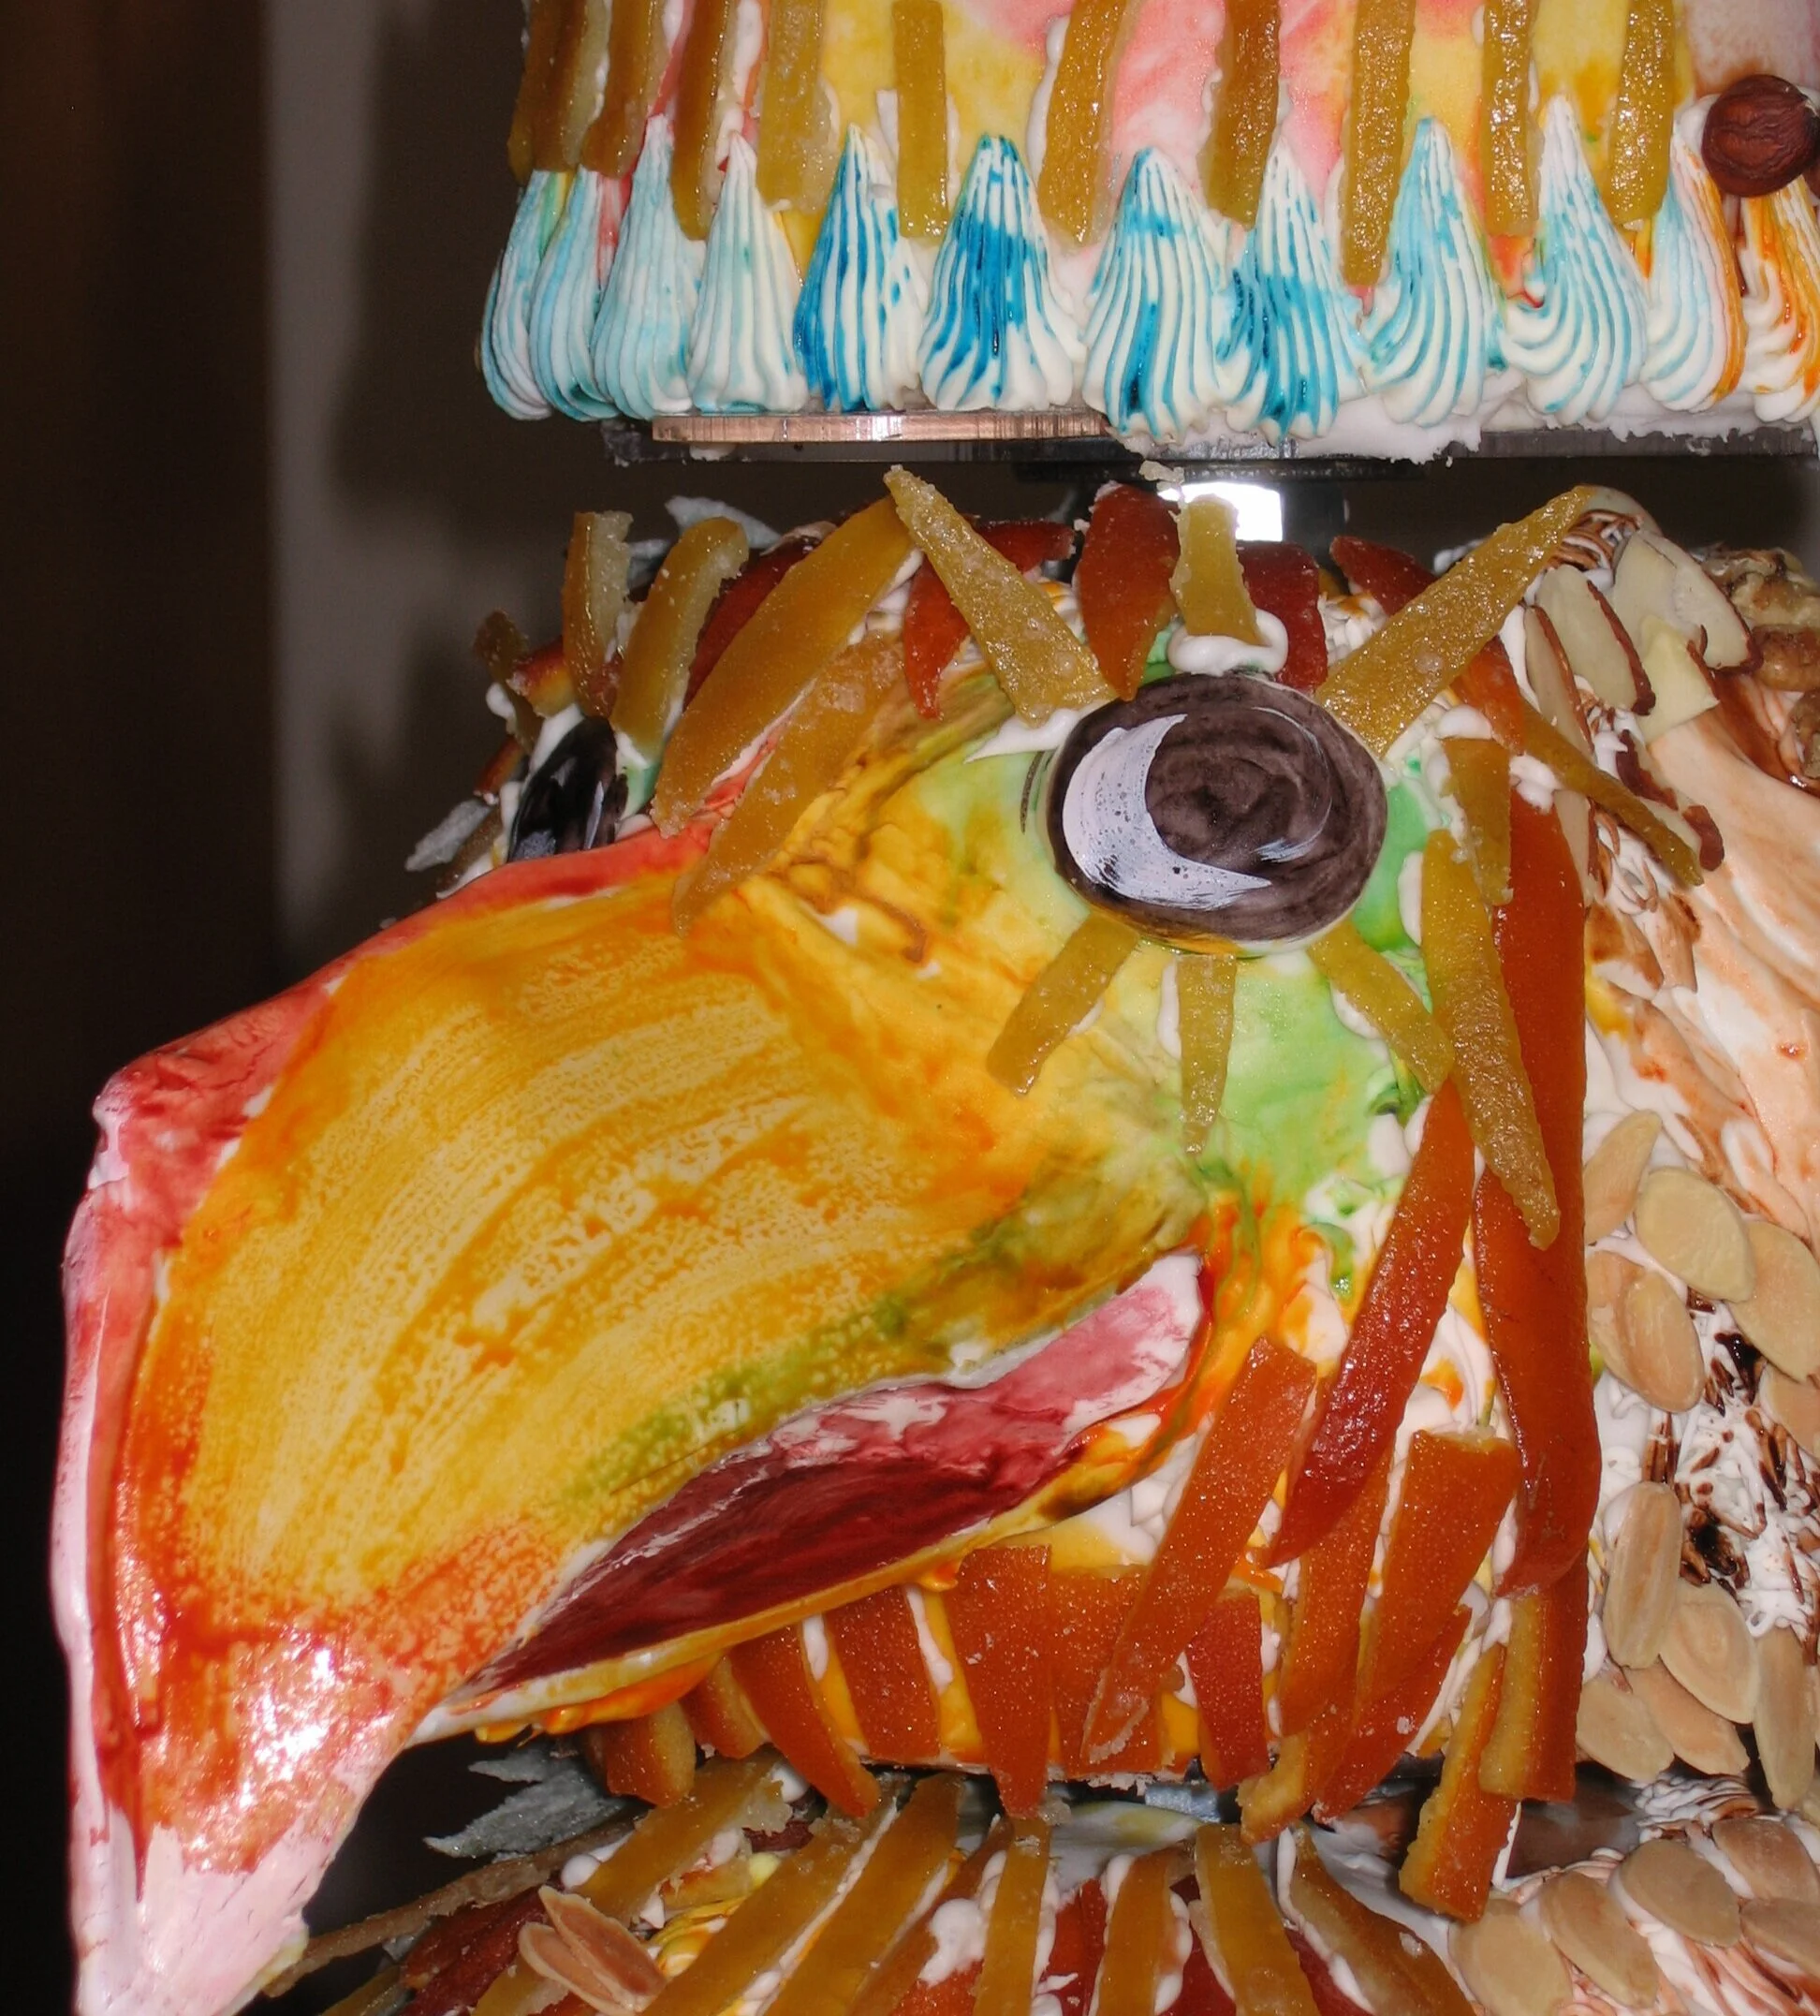
I was pleased with the effect of my appliques, though. I did get a little carried away with the alligator. I'm not sure why I put a little flower of mint petals around its belly button (which reptile don't even have, by the way!) My bird wound up looking a bit like it was on drugs, because I gave it big blank staring eyes surrounded by dramatic lemon peel lashes. The monkey was apparently a bit diseased, since its shoulders were bald and red and splotchy. You didn't really expect me to successfully make cute little children's book animals, did you?

The board had to be pretty big relative to the cake in order to make sure that it was stable, but I hadn't given any thought whatsoever to decorating it, so it looked very bare. Mom suggested that we get some rosemary sprigs from the garden to gussy it up a little. I think it helped.
Whatever aesthetic faults the cake may have had, my rotation mechanism worked flawlessly. With that aspect, I really couldn't have been happier. Each tier spun easily and smoothly and yet the cake as a whole still felt rock solid.

Ice Cream Cone Cupcakes
When my sister and I were kids our mom used to make us ice cream cone cupcakes. These are my grown-up version.
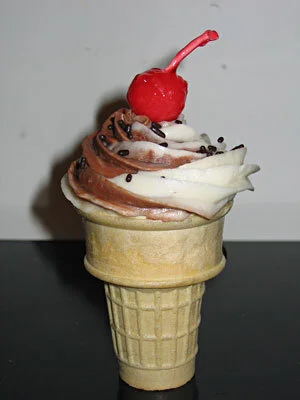
When my sister and I were kids our mom used to make us ice cream cone cupcakes. These are my grown-up version.
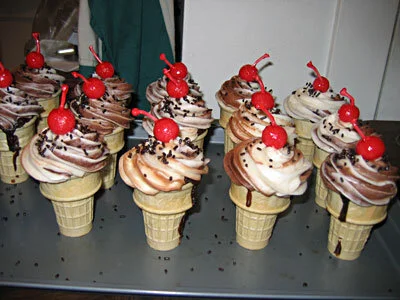
The basic technique of the ice cream cone cupcake hasn't changed since Mom made them for us thirty years ago. Any cake recipe works fine. I used my favorite chocolate recipe. Set up the cake cones (the kind with the flat bottom) on a baking sheet and carefully spoon in the batter, filling each one about three quarters full. I was not as careful as I should have been and wound up with some drips down the sides. On the plus side, the drips get dark when the cupcakes bake and make it look like the ice cream is melting and dripping down the side of the cone.
Ideally, once baked, the cupcakes will wind up with the cake doming up nicely above the lip of the cone. Once they're cool, they're ready to frost. Of course, they're fun and delicious any way you decorate them. I wanted to try to make mine look like real ice cream cones.

I mixed up a batch of buttercream frosting, half vanilla and half chocolate. Then I got a big piping bag with an extra large star decorating tip in it, to imitate the shape of ice cream that comes out of a soft serve dispenser. To mimic the pattern of vanilla and chocolate that you get on a soft serve swirl cone, I filled one side of the piping bag with the vanilla frosting and the other side with the chocolate. When I piped the frosting onto the cupcakes in a spiral, starting at the outside edge of the cone and moving inwards and upwards, it created something pretty similar to the classic swirl cone design.
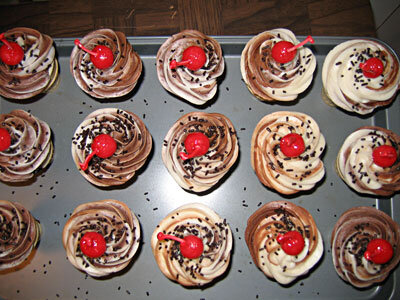
To make them look even more like real ice cream cones (and because jimmies are good in that take-you-back-to-childhood kind of way) I added some chocolate jimmies on top. I also made maraschino cherries for the top by rolling out balls of pink marzipan, sticking in a premade royal icing stem and coating the whole thing with bright red piping gel. I suppose that I could have used real maraschino cherries, but I was concerned that they would be wet enough to dissolve the frosting. Plus I think marzipan tastes better than real maraschino cherries.
I was very pleased with how my ice cream cone cupcakes looked, but they did suffer from the classic flaw of all ice cream cone cupcakes - you have to eat the top first, so by the time you get to the bottom of the cone, there's no frosting left. I recall having this issue in my childhood as well. In this case, the contrast was exacerbated by the fact that the tops of the cupcakes had almost too much frosting because I had piped it on quite thickly in order to get the swirl cone aesthetic.
If I were to create these again, I would therefore make sure to fill the cupcakes inside the cone either with some kind of frosting or with some other custard or cream filling. I would think I could accomplish this just by jamming a decorating bag with a nice big round tip deep into the cones once they're cool, and squeezing. At least that looked like what they did when they filled their cupcakes on the Food Network Cupcake Challenge.
Melting Head Cake
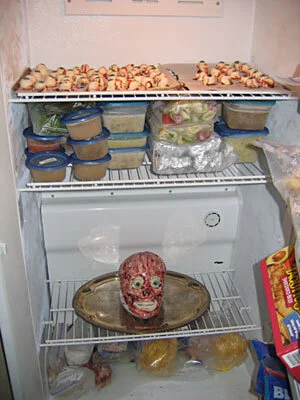
Bride of Zombiefest was the perfect opportunity for me to make a cake that has been percolating in my head for a while now. The idea was a severed head cake, served up on a silver platter with an attractive array of garnishes, with flesh that would melt off over the course of the party, revealing the grinning skull underneath.

I made this delightful severed head presentation for a party celebrating our 400th review on theyrecoming.com.
I admit that we celebrated Bride of Zombiefest before we had actually posted our 400th review on theyrecoming.com (which the party was ostensibly in honor of), but we were close and we needed to schedule it while I was still visiting my sister for the summer.
Bride of Zombiefest was also the perfect opportunity for me to make a cake that has been percolating in my head for a while now. The idea was a severed head cake, served up on a silver platter with an attractive array of garnishes, with flesh that would melt off over the course of the party, revealing the grinning skull underneath.
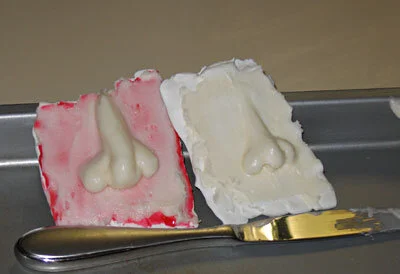
It was obvious that the skull should be made of royal icing, but the question of what to make the flesh out of proved to be a thornier problem. My initial plan was to use buttercream icing and put the cake on a hotplate. I'm glad that I decided to test this plan prior to implementation because the experimental buttercream nose, piped onto the experimental royal icing skull fragments, did not melt at all. Not even a little bit. My sister and I thought that the nose got a little shinier with the heat, but even that may have been wishful thinking.
This preliminary test did teach me a few important things, in addition to the big lesson that buttercream icing does not melt, at least not when I want it to. For instance, I learned that it is, in fact, safe to put buttercream icing onto royal icing, provided that the royal icing is dry first and it's the quick and easy buttercream, not the fancy cooked buttercream. I tried to put royal icing onto cake filled with the fancy buttercream for my sister's baby shower and the royal icing just dissolved into oily goo. I also learned that both red piping gel and seedless raspberry jam are fully compatible with royal icing. This was important because I needed something red to put on top of the skull and underneath the flesh so that the melting would also be bloody. I settled on the raspberry jam because it tastes better, but I actually think in retrospect that the red piping gel might have worked a little better.
At this point, though, I was far more concerned about the flesh's failure to melt. Clearly buttercream icing was not the answer, so I tried boiled icing. Boiled icing really doesn't taste very good at all, but I had high hopes for its melting properties as I confidently made another test nose and set it on the hot plate. And . . . nothing. No melting. Nothing even close to melting. Not so much as a little bit of softening or a sheen of moisture.
At this point I nearly gave up on the melting aspect of the cake. Bear in mind that while I was carrying out these tests the day of the party was fast approaching and I was already well into the creation of the advance elements of the cake - the bloody eyeballs, the skull, and the garnishes, which I will discuss in more detail later in this narrative. But I decided to persevere and test one final type of icing - whipped cream icing. I have never used whipped cream icing before because it is notoriously unstable and the cake, once frosted, has to be frozen or refrigerated. Surely this intimidating, unreliable icing would be fragile enough to melt off my cake!
I made a few test noses this time, so I could test the icing in the fridge and the freezer as well as on the hot plate. I also made test noses of a 50-50 mix of boiled icing and whipped cream icing, because I was afraid that the whipped cream icing, by itself, would be too unstable.(I also tried mixing the whipped cream icing with the buttercream icing, but this instantaneous collapsed into a lumpy mess.) It turned out, however, that the whipped cream icing is actually sturdier and more structural by itself than in conjunction with the boiled icing. And, to my lasting delight, it turns out that whipped cream icing does, in fact, melt when placed on a hotplate!
With rekindled hope for the melting face, I performed a few additional tests on the whipped cream icing to determine if it can be painted with an airbrush (It can.) and to determine if it can be painted with a paintbrush (It can, but only if it's thoroughly frozen.). At this point I also hit on the idea of using a heat lamp to melt the cake from above in conjunction with the hotplate melting it from below. Of course, I didn't have a heat lamp, but I tried a 60 watt bulb and even that melted the test nose, so I went out and bought a heat lamp from the hardware store across the street, as well as a 200 watt bulb. I would have bought two heat lamps, but they only had one, which, as you'll see later, was very fortuitous.
And thus ends the saga of my icing experiments, leaving me ready to move on the saga of the actual cake. So if you thought the icing story was long-winded and melodramatic, you ain't seen nothin' yet.

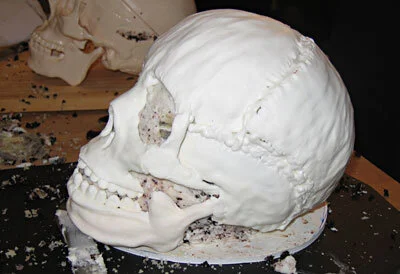
The first step of the cake construction was to make the royal icing skull. For maximum accuracy, I purchased a plastic skull to use as a mold. I used tin foil to cover the skull because it holds the shape really well, but it does have some disadvantages. Because tin foil is opaque it was hard to see the breaks between the skull segments and tin foil also seems to lengthen the dry time of the royal icing. This wouldn't be a problem except that I'm impatient and wasn't willing to wait more than a day to try to unmold the pieces, at which point they were not completely dry. Thus, it took me three tries to make a solid jawbone. I actually managed to wait three days before unmolding the last one, so it was completely dry and came off perfectly.
Unmolding aside, actually making the icing skull was really quite easy. I piped the icing on with a wide, flat tip, then smoothed it with a slightly damp paintbrush.

While I was making things out of royal icing, I also made fifty-odd little tiaras. Why, you ask? Well, we were afraid that a cake the size of a human head wouldn't serve the twenty-five to thirty guests we were expecting at our party, so we decided to make supplemental cupcakes. If the party was Bride of Zombiefest, and the cake was the Bride, then clearly the cupcakes should be the Bridesmaids of the Monster - little fuzzy monster cupcakes (with cotton candy fur; more on that later.) So they needed tiaras, which I piped flat, then draped over a roll of wrapping paper so they would dry with a nice curve. I also made little royal icing eyes for the cupcakes, with painted irises and tiny red veins.

The next pre-baking project was the eyeballs. I have made cordial cherry eyeballs several times before and they're also summarized in the description of the cake from our first Zombiefest. Basically, maraschino cherries are soaked in brandy for a few days then drained and dipped, first in a melted coating fondant, then in white chocolate. The nice thing about the eyeballs is that they actually look better when I don't dip the cherries neatly because weird drips and blobs look like veins and pools of blood. Once the chocolate is set, the eyeballs are painted with powdered food coloring dissolved in melted cocoa butter. Some of the eyeballs were served on their own; others were used as garnishes on the head's serving tray; still others served as the eyes of the head itself.
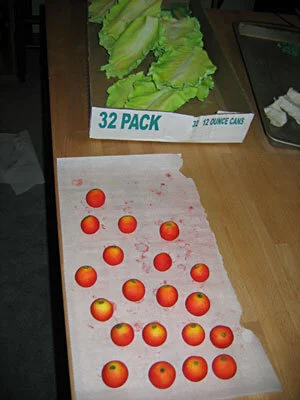
Next came the other garnishes for the head platter - lettuce, tomatoes, and parsley. My sister came up with the idea of how to make the lettuce. I bought actual lettuce (Romaine), dusted the back with corn starch, then pressed a very thin sheet of gum paste onto it so that the gum paste picked up all the lettuce veins. I then ripped the edge a little to get it rough, rolled the edge with a ball tool to ruffle and thin it, and draped the gum paste lettuce over a bed of wax paper so it would dry with nice shape. The parsley was even easier. I just used a very small gum paste flower cutter, then cupped it with a ball tool.
For the tomatoes, I used a 50-50 gum paste-fondant mix, mostly because I didn't have enough gum paste so I had to use the fondant to stretch it. I colored this mixture bright yellow and rolled it into cherry tomato-sized balls. I used an umbrella tool to make the little divot in the top and then rolled the tomato in my hand once more to get it nice and round.
I colored all of these garnishes with ground up chalk pastels and then steamed them in front of a kettle of boiling water to set the color and give it a little sheen.
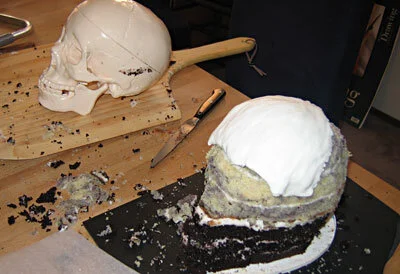
Finally, we're at the baking stage! I made a chocolate cake for the bottom of the head, then a lemon butter cake, swirled with black food coloring to give it a nice brain color, for the top of the head. I also made about fifty lemon butter cupcakes.
Once cool, I torted and filled the cakes with buttercream icing and, using my plastic skull as a model, carved the cake into the proper shape. My royal icing skull fit together remarkably well over top of the cake. At this point, it would actually have been a pretty cool looking cake in and of itself, but I was nowhere near done.

A coating of raspberry jam made the skull look delightfully freshly skinned, especially once I had popped the cordial cherry eyeballs into place.
At this point I transferred the cake onto its silver serving tray (borrowed from a church where a friend of mine works) and I could no longer avoid the part of the operation of which I was most terrified - the icing. I put the head in the freezer for a little while first so it would be nice and cold when the icing hit it.

Actually icing the cake went more smoothly than I had feared. It took me three batches of whipped cream icing and between each batch I put the cake in the freezer. Piping the whipped cream icing for details like the nose, lips, ears, and eyelids was a little challenging because if I held the piping bag for too long the icing got too soft, but all in all I was happy with the face creation process. I was trying for a woman's face because she was supposed to be a bride, but it turned out looking androgynous, possibly skewed a little towards the masculine. I hoped that a little airbrushed makeup would tip it into womanhood. Into the freezer it went!

Airbrushing the cake was a little nerve-wracking because the room where I was working was really hot so I had to work fast. I also had to mask off the eyeballs and teeth with parchment paper which was very difficult to do without messing up the icing, but it all went pretty well in the end. The blue eyeshadow (I grew up in the 80's so it somehow got into my head that eyeshadow is always blue. Since I don't wear makeup myself, I've never really been disabused of this notion.), blush, and lipstick did make her look a little more feminine, but she still had a bit of an old man in drag vibe about her.

The garnishes went into place quickly and easily with a few dabs of royal icing and that was all I could do until right before the party. At this point, she was still bald, but my plan was to use cotton candy for the hair and cotton candy doesn't have a great deal of longevity. So the cake went into the freezer and I went to bed.
The party was scheduled for 12:30 in the afternoon, evening parties being inadvisable now that my sister has a five-month-old daughter. At about 9:00a.m. we started making cotton candy. First we made some colored cotton candy for the cupcake fur, using sugar mixed with powdered food coloring. A little ball of cotton candy went on top of each cupcake, followed by a tiara and a pair of eyes.
Our cotton candy machine is actually a children's toy that we purchased at a garage sale for three dollars, so it is perhaps not surprising that it overheated after about half of the cupcakes. I had a few moments of panic when I thought that it would not be in service to make hair for the cake itself, but my sister suggested putting it in the freezer to cool it off quickly, which worked like a charm.

Afraid that the machine would crap out altogether next time, I made the hair for the cake next - a tower of white hair with black Bride-of-Frankenstein-style streaks on the side. I assembled the hair on the tin-foil-covered plastic skull first, then plopped it readymade onto the cake. It looked like a wig and only exacerbated the resemblance to a drag queen - a very old one, given the gaunt cheeks, the white hair, and, due to the icing texture, the pockmarked skin. But I considered that a minor problem. My sister said she looked like Mrs. Haversham. Dad thought she looked like a French aristocrat, which also might have been pretty appropriate, given that whole guillotine escapade.
I added a little red piping gel blood to the mouth so she would look more dead and a little red piping gel blood writing on the lettuce stating, of course, that, "They're coming to get you, Barbara". Then I took a whole lot of photos and popped her back in the freezer to await the party.
By this time the cotton candy machine had overheated again so I had to put it back in the freezer for a while before we could finish the cupcakes. But finish them we did, just before the party. By this time, the cotton candy on the first cupcakes was already wilting and we were afraid that the cotton candy hair on the cake herself would fare even worse, due to condensation from the freezer, so we decided that the cake would remain in the freezer until most of our guests had arrived, at which point we would dramatically reveal her, then turn on the heat lamps and hope for the best.
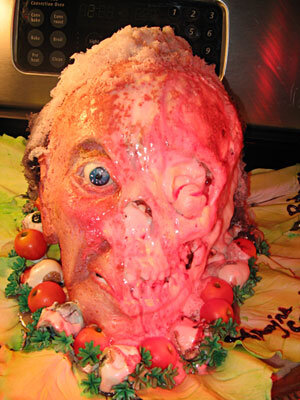
And . . . amazing enough . . . the best actually happened! Even better than I had hoped! I brought her out and set her on the hotplate, turned on the heat lamp on one side and the 200 watt bulb on the other and . . . her flesh started to melt! And, because I only had one heat lamp, at first only the left side of her face melted. Which was incredibly cool looking! She ended up with one side of her face still solid and the other melted all the way to the skull. The heat lamp even toasted the melted icing a bit at the closest point, so it looked like the skull had been cooked.
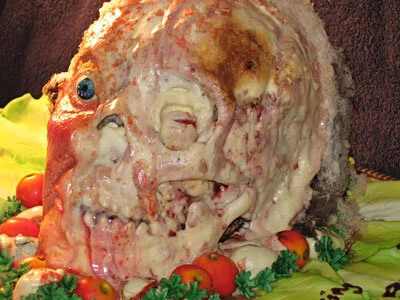
First, the hair melted, then the flesh on top of the skull. The eye socket started to appear, followed by the cheekbone, and the lower jaw. The nose was sloughed off, revealing the nasal cavity and the teeth appeared with a horrifying smile. The eyeball melted away, first crying tears of melted colored cocoa butter, then bursting open to reveal the shiny red cherry within. Red piping gel blood ran out of the mouth, mingling with the gooey white melted flesh.

Once the first side was thoroughly melted away, I switched the heat lamp to the other side until I was left with nothing but a gooey skull sitting in a pool of its own liquefied flesh. Even the garnish cordial cherry eyeballs melted away, leaving only bright cherries amidst the little red tomatoes.

In my darker moments I doubted the melting head cake. I'm ashamed to say that I even seriously considered throwing in the towel and just making a non-melting severed head cake. But that would have been unworthy. That would have been cowardly. I'm proud of myself that I didn't surrender to the temptation of taking the easy way out. I persevered and, in spite of the combined efforts of many different kinds of icing and a finicky cotton candy machine, I succeeded! It was a beautiful moment.

Little Monster Cake
We often refer to my niece as "Little Monster" so naturally when I set about designing a cake for her four-month birthday party (OK, I admit it, I designed the cake first and then made up an occasion to make it for.) what I came up with was essentially a 3-dimensional bust of my niece as a slimy octopus monster.

We often refer to my niece as "Little Monster" so naturally when I set about designing a cake for her four-month birthday party (OK, I admit it, I designed the cake first and then made up an occasion to make it for.) what I came up with was essentially a 3-dimensional bust of my niece as a slimy octopus monster. When I described this concept to my sister, she pointed out that she had been envisioning her as a cute, fuzzy, Sesame Street-type monster, not as an oozing, ugly, Cthulhu-type monster. I pointed out that, unlike Cthulhu, my design had no wings and so was merely an octopus or squid monster, not a Cthulhu monster.
Initially I was hoping to cover the entire cake with a very thin layer of Jell-o Jiggler for a truly slimy, gooey texture. Unfortunately, while preliminary tests were encouraging in terms of the feasibility of creating a very thin, firm Jiggler and draping it effectively over the cake, these same tests also revealed that Jell-o is fundamentally incompatible with all forms of icing. A couple years back I tried to incorporate a Jell-o swamp into my New Orleans Gingerbread house. This proved to be impossible because the liquid Jell-o would have dissolved the house's royal icing wrought iron railings so I used piping gel instead. I was hoping that this time the Jell-o would work because my plan was to use Jell-o which had already set up. But my hope proved to be in vain. Even solidified Jiggler dissolved sample royal icing bits away into nothing within a few hours. I think it's time that I face the fact that the marriage of Jell-o and my cake / gingerbread projects is not meant to be.
I planned the flavor combinations while still envisioning the Jell-o coating. Coordinating an entire set of cake and icing flavors to go with cherry Jell-o is quite a challenge and I suspect that, had the Jell-o actually happened, it would ultimately have been rather gross with any flavors of cake and icing. I settled on a white butter cake with raspberry buttercream icing filling. In and of itself, this might have been OK with cherry Jell-o, but I also planned hazelnut flavored tentacles, a chocolate ganache crumb coat, followed by a layer of marzipan and a royal icing finish. Like I said, it probably would have been gross with cherry Jell-o.
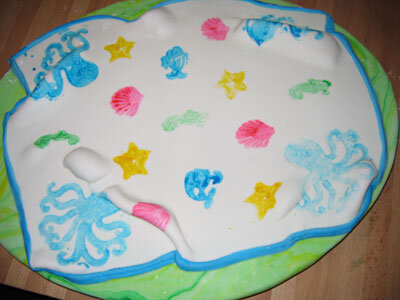
The first step was to make the base for the cake to sit on. My plan was to make a cute fondant baby blanket to contrast with the yucky monster. First I covered an elliptical piece of 3/8" foam core with marbled green fondant, suggesting grass. Then I rolled out another sheet of white fondant for the blanket and stamped little sea creatures on it with food coloring. I tried to drape the blanket onto the base in such a way that it would look like the monster's tentacles were squinching it up, but it didn't work that well and I probably would have been better off with a flat blanket. I also put a little blue border around the edge to make it look more like a blanket. In the end, the blanket wasn't that good and didn't really make sense with the rest of the cake, which I think proves that I'm not meant to make those sickeningly adorable baby shower cakes shaped like diaper bags. But I think we all knew that already, didn't we?
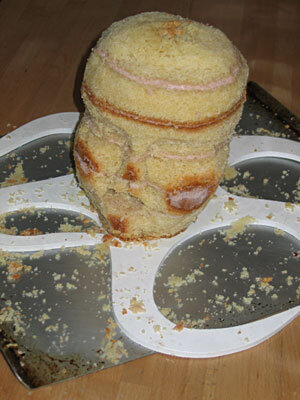
Next, the cake itself. As I already mentioned, I used a butter cake recipe. I had never before tried this recipe, mostly because I'm a much bigger fan of chocolate cake than white cake, but it turned out to be a great recipe - really buttery and one of the best cakes for carving that I've ever tried. So once it was torted and filled with the raspberry buttercream icing (made by mixing some seedless raspberry jam into vanilla buttercream icing) carving it into the shape of a baby / octopus head went very smoothly.
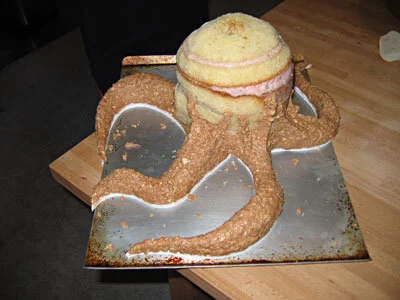
For the tentacles I made some praline feullitine candy that learned how to make at a candy class that Mom and I took recently. Essentially, it's hazelnut butter (made by grinding up toasted hazelnuts and confectioners sugar in a food processor) mixed with milk chocolate and feullitine, which is a lot like ground up flakes of cake ice cream cones. In this case, in fact, it was exactly like ground up flakes of cake ice cream cone because it's not like one can buy real feullitine at the local grocery store. In fact, it's hard to find even on the internet, but that may be because I'm not really sure how to spell it. The praline feullitine worked remarkably well as a sculpting material, and I soon had some lovely tentacles.
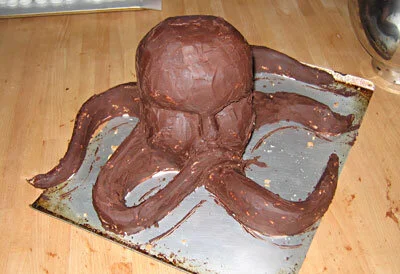
Next, I coated the cake with a smooth layer of chocolate ganache and started rolling out the marzipan. It's a good thing that I was planning to coat the entire cake with royal icing, because the marzipan did not go on neatly at all. I rolled it too thin because I didn't have enough and then it dried out, both because I put too much confectioners sugar down to roll it in and because I covered the cake too slowly. So the marzipan covering ended up extremely messy with seams all over the place and smudges of chocolate ganache everywhere.
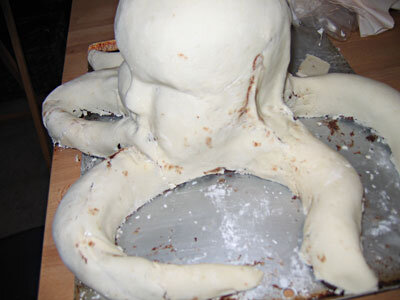
Fortunately, none of that mattered, because the next step was to cover the entire cake with royal icing. The first layer of royal icing obscured all the imperfections. The second layer filled in all the facial details. I even put in the little dent in the top of her little baby skull. At this point I decided that it looked too much like an octopus and not enough like a monster, so I added some little ridges running up the sides of the tentacles and extending onto the face. As my sister pointed out later, it made her look sort of Cardasian.

No octopus monster is complete without suckers on its tentacles. I made these out of gum paste, cutting them out with a circle cutter, then cupping them with a ball tool. I stuck them to the tentacles with royal icing.
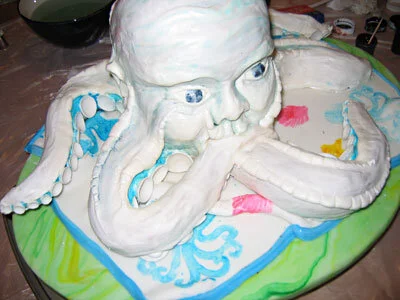
At this point I transferred the octopus monster onto the previously prepared base and discovered that the 3/16" foam core under the octopus monster wasn't sturdy enough to support the tentacles without bending and the royal icing coating cracked in several places and had to be repaired.
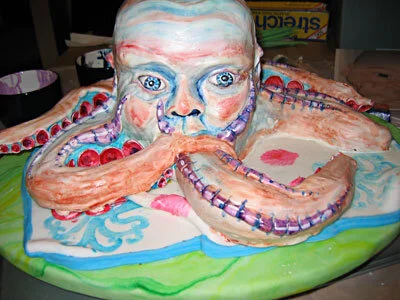
Next step - color! An airbrush probably would have been a very effective tool, but mine was 2,000 miles away, so I did it the old fashioned way - paste food colors and a soft paint brush. In the interests of maximum ickyness, I went with a base coat of flesh tone interspersed with icy blues. I painted the Cardasian ridges purple and added deeper blue shadows. Red suckers and white highlights finished off the paint job.
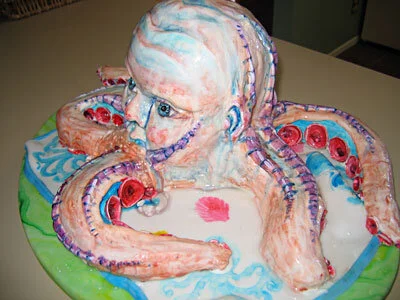
Now the cake looked pretty good, but it just wasn't wet enough. An octopus monster presumably lives in water and my niece drools a lot so I had a couple of reasons for wanting the cake to look moist. I put a big pile of piping gel drool in front of the monster's mouth (which was chewing on a tentacle in homage to my niece's habit of constantly chewing on her hand - and her toys, and her clothes, and our fingers, and basically anything else that comes within arm's reach of her). Then I sprayed the entire cake with some watery corn syrup for that all over, just-emerged-from-the-briny-deeps shine. This had the added advantage of making the colors run and blend a little bit which gave the cake more of a natural look.

Most everybody at the party thought the cake was sort of gross (looking, not tasting) and didn't really look anything like my niece, who is the world's cutest baby. My sister, on the other hand, thought that it did look like her and she therefore declared the monster cake absolutely adorable.
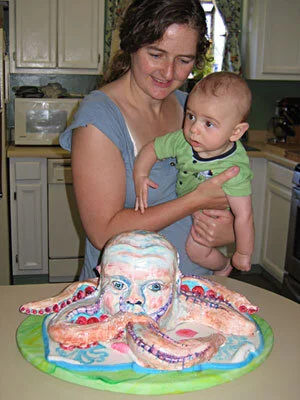

Gelatinous Man Cake
The Gelatinous Man was created for a small art show that some friends and I were hosting at my business school.
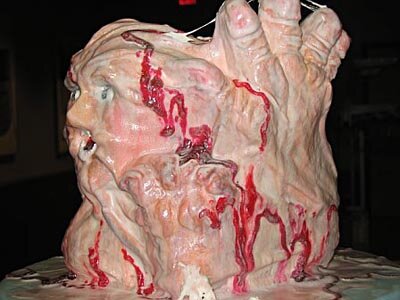
The Gelatinous Man was created for a small art show that some friends and I were hosting at my business school. Very few people at the show actually believed that he was cake until I cut into him, but then everyone agreed that he was delicious. One boy even expressed delight at the way the eyeball squished when he bit into it.
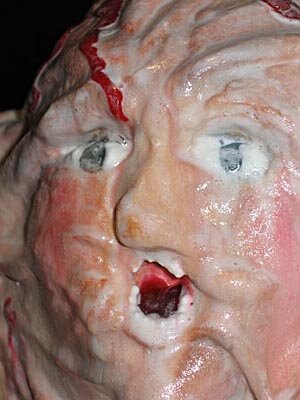
The concept for the Gelatinous Man developed out of a cake that I made when I was taking a Master Class from Colette Peters at the Wilton School for Cake Decorating and Confectionary Art. I referred to it as a Sea God cake. It was essentially a standard 3-tiered cake with a raised face on top spitting out a fountain of gum paste water. This got Colette and I talking about making a cake that had an entire man trapped inside, trying to get out. Naturally, when I finally got around to making the cake, it came out all oozy and bloody and moist. And so the Gelatinous Man was born. Or at least he's on the verge of being born. Or possibly he's just been absorbed into his odd, oozing sack. I can't say for sure. You'd have to ask him.
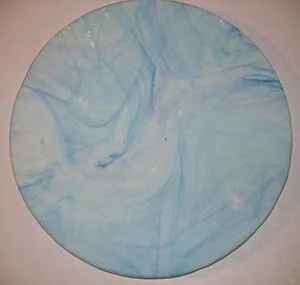
The first step was to make the base, which is simply two circles of 3/8" foam core glued together, one larger than the other. The smaller circle is only there to make it easier to pick up the cake by leaving a space under the upper plate to get your fingers into. It's a little trick I learned from watching cake competitions on the Food Network. The larger circle is covered with fondant, marbled with some royal blue food coloring. Just knead some of the color into the fondant until you come up with a cool marble texture, and then roll it out to about 1/8" thickness. It's very easy to stick the fondant to the foam core by brushing it with water.
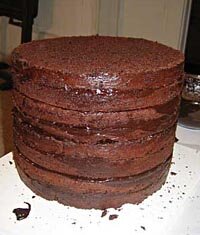
I started in on the cake itself by baking four 10" round cakes, using a really great chocolate cake recipe I got from one of Colette's books. I then torted and filled these with a plain chocolate ganache. Because the cake was so tall I had to put a layer of 3/16" foam core, supported by 1/4" dowels, in the middle. I also put a 3/16" foam core circle on the bottom of the cake to make it moveable before it was mounted on the final base. Both pieces of foam core were only 9" in diameter, instead of the 10" diameter of the cake so I would be free to carve into the cake without worrying about running into the foamcore.

Now for the fun part - carving the cake into the shape of a man trapped in some sort of membranous sack. I had a little sketch, which I had made in the margins of my Operations notebook during class. So I was sculpting a cake while consulting my Operations notes. I found this juxtaposition perhaps unduly amusing, because, as anyone else out there who has gone to business school doubtless already knows, Operations is about the most tedious class in existence (Sorry, Professor Rappold.) and I'm not just saying that because, as I write this, my final Operations project is due in eight hours. Using a paring knife, I started by cutting away the area around the face, the hands, one foot, and one knee. I carved the back into a slope with a ridge of spine running down the middle, then added a little butt crack at the bottom. I had to add some extra pieces to the top of the cake to get the requisite height on the fingers of Gelatinous Man's right hand.

Once I had the basic shape, I sealed the entire cake with a crumb coat of royal icing. Royal icing isn't the greatest tasting icing, of course, but I needed the stability of it to hold up to all the brushing and sculpting that would be required in subsequent steps. I had to wait for that crumb coat to dry before I could proceed to the next step.
My plan was to sculpt the details of the features by piping them on in essentially the right place, then smoothing and making fine detail with a damp paint brush. My first attempt at this failed because the water on the brush diluted the icing so much that it couldn't maintain its shape. So I scraped it off and started over again with much thicker icing, to the point where I could barely squeeze it out of the bag, and a slightly drier brush. This worked much better.
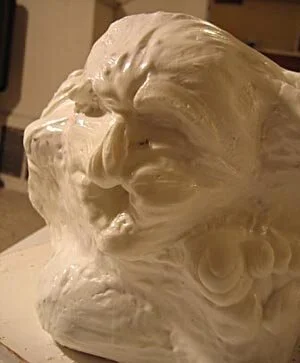
It took me two passes through using this technique to get the finished shape. The first pass created all the major shapes - toes and palms and cheeks, even details like the creases in the finger joints. The second pass added more fine details and built up heavily frosted areas like the heel, but mostly focused on stretching out the icing between elevated area - between the finger and the spine, for instance, and between the toes and the chin - to make it seem like Gelatinous Man was writhing inside and struggling against a contiguous membranous sack.
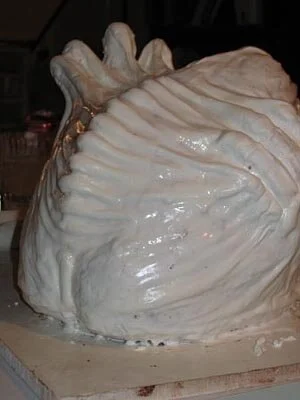
I ran into some difficulty with the nose. I couldn't make it as prominent as I wanted to because the icing wasn't sturdy enough and kept slumping into his open mouth. Clearly I needed something structural to stick into the cake to build the nose around. It needed to be edible, so I ran around my apartment for a while like a chicken with my head cut off, looking for a pretzel, which I already knew I didn't have. Then I stumbled across a packet of Lik-M-Aid that a friend gave me for Valentines Day. The little candy stick, which was already broken in half, was perfect. I stuck the broken end into the cake and built up a frosting nose around the protruding rounded end.

Now for color. My plan was to just add color to the regions that protruded, as if the sack was white but thin, so the flesh color underneath only showed through where Gelatinous Man was exerting pressure on his membranous prison. That plan didn't really pan out because I got carried away with the airbrush, and the whole thing ended up fleshier than I had anticipated. So I made the protrusive parts even darker and redder. Then I sprayed some dark blue and purple vein-ish lines along the stretched membrane areas. I believe that while, obviously, red is important for blood, in order to really evoke gore, you need blues as well. I also added some blue in the as-yet-empty eye sockets and red inside the mouth.
To complete the eyes, I piped in big blobs of clear piping gel for the irises then added royal icing whites over top of the piping gel. A bright red piping gel tongue enhanced the mouth.

With that I was ready to transfer Gelatinous Man onto his blue fondant-covered base. Considering that I was by myself, this went remarkably smoothly and I even got him relatively centered. To clean things up I piped a bead of royal icing around the seam between the cake and the base, and then smoothed it with a damp paintbrush. While I had the icing out, I put some little teeth in Gelatinous Man's mouth.
Now I had a good shape and some decent colors, but the cake still didn't sing. For one thing, it was too neat - no damp oozing, no blood - and for another thing, Gelatinous Man wasn't integrated with his base to create a unified piece.
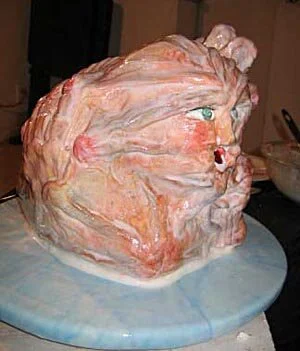
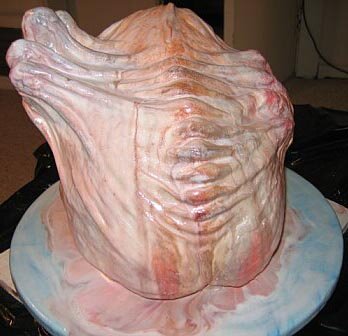
To create the oozing, damp look I was going for, I made some very, very thin royal icing and used a paintbrush to apply it to the cake. Naturally, such watery icing pooled in the crevices and around the bottom of the cake, giving more of an illusion of depth and an indication of moist membrane. A somewhat unforeseen but beneficial effect of the dripping icing was that it made the airbrushed colors run and bleed. I think it made it look much more natural and frankly, I should have known that was going to happen, since I know that airbrush colors don't really set. It took three coats of this watery icing to really get the depth I was looking for, and by that time a whole bunch of icing had pooled on the base, so that Gelatinous Man appeared to be sitting in a puddle of his own melting flesh. It was a nice look, and effectively joined Gelatinous Man visually with his base.

I almost called it quits at this point, but I still thought it needed a little more, and I had a bunch of piping gel lying around. So I whipped up two different colors of red piping gel - a deep burgundy and a bright red. I painted a stripe of blue food coloring on the inside of a piping bag (I told you I'm a big fan of judicious use of blue in my gore effects.) fitted with a #8 round tip and filled it with the darker red piping gel. It was a little hard to control the piping gel on the vertical surfaces, but I ended up pretty happy with my big veins, so I then used the bright red piping gel in a bag with a #6 tip to make the smaller veins.
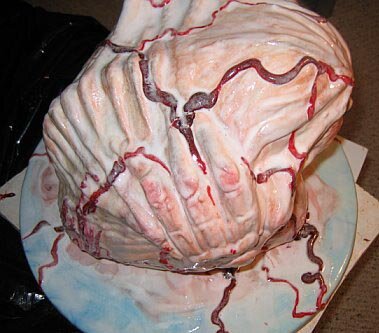
Now I had blood, but was once again faced with a piece that seemed unfinished. One more coat of watery icing did the trick, blending the veins into the cake, melting them just enough to make them seem integrated into the membrane rather than disconnected and sitting on top.

Once again I almost called it done. Then I remembered that I had bought a bag of marshmallows in the hopes of melting them into some sort of fibrous tendrils. This worked really well when I tried it on a practice bowl, but less well when I tried it on the cake because it was still a little wet so the marshmallow wouldn't stick easily. So I only used a little bit, but I still think it added a nice touch and it'll probably be a good technique to have in my arsenal in the future. Easy, too - I just popped the marshmallow in the microwave for fifteen seconds, and then stuck it wherever I wanted it with the tip of a knife. I only used three of the marshmallows, but I have since eaten the entire rest of the bag.
I could probably have gone on poking and prodding at this cake forever until it was just an indistinguishable blob of yuckiness, but fortunately, I ran out of time at this point and had to decide that I was done. I think it has firmly established me as the weirdest member of my MBA class.
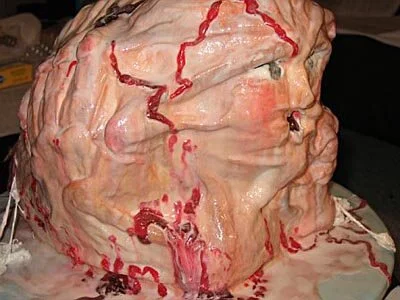
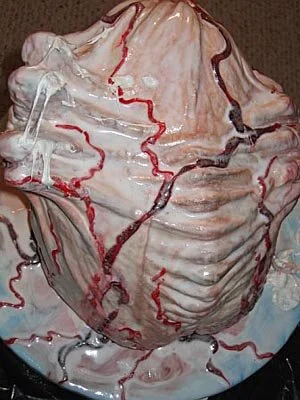

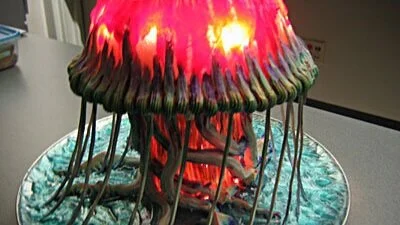
Jellyfish Cake
One of the first things that I did when I arrived at MBA school was to brag to my new friends about my cake-making prowess. Naturally, my bravado was met with a request for a birthday cake. At this point I had known the birthday girl for all of two months. Not having that much to go on in terms of personalizing the cake, I decided to make a glowing jellyfish, based solely on the fact that she had happened to mention a recent trip to the aquarium.

One of the first things that I did when I arrived at MBA school was to brag to my new friends about my cake-making prowess. Naturally, my bravado was met with a request for a birthday cake. At this point I had known the birthday girl for all of two months. Not having that much to go on in terms of personalizing the cake, I decided to make a glowing jellyfish, based solely on the fact that she had happened to mention a recent trip to the aquarium.
The plan was for me to serve this cake during class at our Arts Administration Seminar, which meant that I had to transport it from my apartment to school. Naturally, I responded to this requirement by making a cake based on one of the most delicate, ethereal creatures on earth.

Because I wanted the jellyfish to glow from within, my first step was to make a hollow dome of hard sugar to serve as the bell of the jellyfish through which the light would shine. This marked my second attempt to make such a sugar dome (the first being the Cyndi Lauper cake) and it remains a very difficult thing to accomplish (or at least a very difficult thing for me to accomplish.) I used a metal bowl as the mold, covered with tin foil because I wasn't confident in my ability to release the sugar from the bowl otherwise. The problem with tin foil, of course, is that it doesn't lie perfectly flat and thus has a tendency to form ridges that get stuck in the sugar and have to be carefully pried out with tweezers and/or melted out with a wet paintbrush. The other huge problem that I always have in making sugar domes is that melted sugar, being a liquid, has a strong tendency to flow down the side of the bowl and thus form a deformed letter "o" with a bowl in the middle, rather than a dome. I counteracted this downward tendency by continually pulling the sugar back up the side of the bowl with a spoon until it cooled and hardened enough to stay in place. As you can imagine, this didn't result in the pristine, glasslike surface that I would have liked, so I had to settle for a streaky, lumpy jellyfish bell.
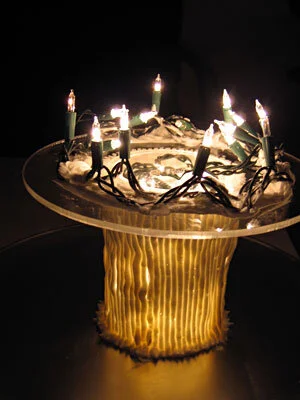
Next, I needed to get my glowing mechanism functional. My plan was very simple - put some Christmas lights between the cake on the inside and the sugar dome on the outside, forming the bell of the jellyfish. Obviously, in order to have some sense of the jellyfish floating gracefully in the ocean, I would need to raise this bell up on a pedestal from which the arms and tentacles could descend. I bought an acrylic cake stand that consisted of a round acrylic plate that sat atop a 6" diameter acrylic cylinder. In order to run the Christmas lights down from the bell, I drilled a hole in the top plate. This also allowed me to wad some of the Christmas lights inside the cylinder so that the tentacles would also glow from within. The strand of Christmas lights was too long for me to fit all of them into the cylinder and I still needed a way to get the plug out of the cake and into the outlet, so I mounted the acrylic cake stand onto a silver tray, which I also drilled a hole in so that the Christmas lights could come out the bottom of the tray. Then I took the remaining Christmas lights and taped them to the bottom of the tray, carefully, so that it was still able to sit relatively stably. This had the pleasant effect of making the cake appear to be floating on a bed of light, as if, perhaps, some phosphorescent fish were swimming around in the depths below.

To make the acrylic cylinder look more like a life form and less like an architectural necessity, I piped vertical stripes of royal icing all around it, using a big round tip. I think it was a #8. Because I was going for an organic look, I deliberately let some of the lines curve and slump a bit.

There wasn't a whole lot of room for the actual cake, but fortunately it only needed to serve eight people. I made a 6" round cake, carved it into a hemisphere and covered it with fondant. The cake fit easily into the center of the circle of Christmas lights, and I slathered on a whole mess of royal icing to conceal the green cord. I plopped the sugar dome over top of everything and more or less had a proto-jellyfish. But it still needed a lot of work.
For one thing, I wasn't happy with an all-white jellyfish, though in retrospect, it may have maintained a more ethereal quality with a more muted palette. Instead, I piped on a bunch of bright red and blue piping gel and painted the royal icing around the cylinder with food coloring to match.
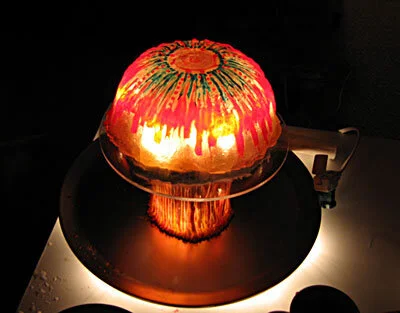
At this point it looked more like an eerily glowing mushroom than a jellyfish. I needed life. I needed movement. I needed fondant tentacles. I had the good sense to leave these mostly white, with just some blue and purple edging and red accents on the tips, which certainly kept them more ghostly than they would have been with more color.
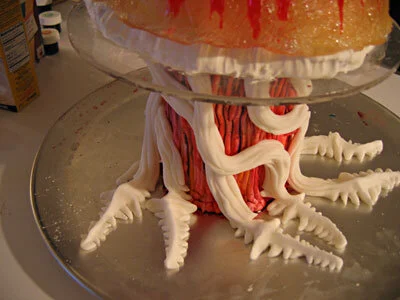
My next problem was that the acrylic circle of my cake stand was about two inches bigger in diameter than my sugar dome, so I needed some way to conceal the overhang. I used a big star tip to pipe a sort of elongated inverted shell border around the perimeter of the dome. Apparently the inverted shell border is a bit of a go-to decorating technique for me when trying to conceal imperfections. I went on to use it again on my niece's first birthday cake, with similarly unimpressive results. I also went in around the base of the cake with piping gel tinted blue to indicate water.
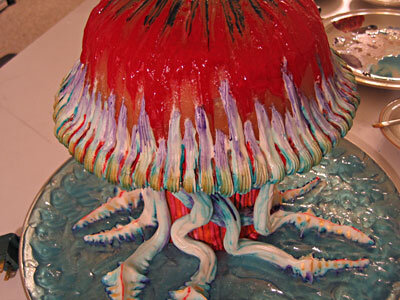
My jellyfish still looked too static for my taste, so I made some wispy royal icing arms to set round the edge of the bell. I attached them to the cake before I realized that would doubtless break during transport so I took them back off and painted them with some blue and green luster dust. I guess because I had the luster dust in hand I went a little shine-crazy at this point, slinging utterly garish amounts of blue, purple, and gold luster dust all over the place. Sometimes I just lose control of my paintbrush.

I had a bit of trouble transporting the cake to school because I drive a little pickup truck, which is great for buying lumber and for piling all your stuff in the back and moving across the country, but not very good for transporting cakes. Obviously it would be unwise to just chuck the cake into the bed, so I had to put it in front. Sadly, it wouldn't fit in the footwell, so I had to put it on the passenger seat, which, being designed for human butts, not for cakes, is neither flat nor level. I also had to drive down my driveway, which was both steep and bumpy. The upshot of all this was that the cake got knocked around a bit in transit and I had to make some repairs on site, as well as attach the wispy arms around the perimeter.

In conclusion, this was by no means my greatest moment as a cake decorator, but my friend still seemed to appreciate it.

Killer Rats Cake
The Killer Rats Cake was made for Son of Zombiefest, our celebration of the posting of our 300th review.
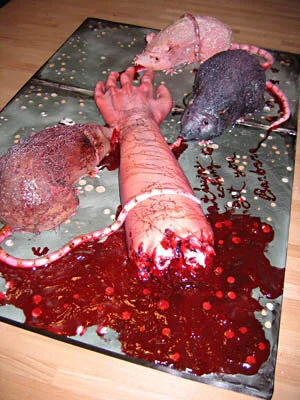
Introduction
The Killer Rats Cake was made for Son of Zombiefest, our celebration of the posting of our 300th review. Actually, to be fair to the rats, I don't really know that they killed the man they're eating. It's possible that they simply came upon the severed arm and decided it would make a tasty snack. That's why I referred to it through much of this process as the Rat-Arm Cake, but my sister pointed out, and I agreed, that was a very uninspiring title, so "The Killer Rats Cake" it became. Like its illustrious predecessor, The Zombie Cake, The Killer Rats Cake began life as a pattern for a carved pumpkin. Both the pumpkin and the cake depict a severed human arm being devoured by three large, ugly rats. Well, ugly in their cake incarnation, at any rate; they're sort of cute on the pumpkin. The cake arm was constructed in layers, from the inside out, so that a slice of the cake looked like a cross-section of an arm, complete with ulna, radius, bone marrow, skin, etc. Admittedly, this did not make for a spectacularly dynamic presentation, at least as compared to the cakes that burned or shot blood or secreted bodily fluids, but I think it was just as effective, in its understated fashion. Sometimes even I opt for subtlety and finesse over gaudy drama.
Because the cake was created in several separate segments, then assembled, I'm going break up this narrative accordingly, although in reality these processes were occurring simultaneously.
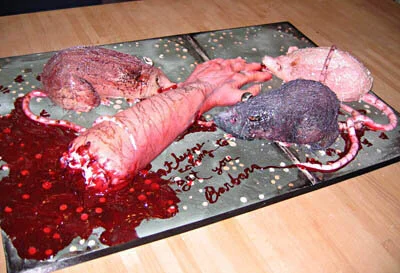
The Rats
The first step in constructing the rats was to make the gum paste and fondant pieces that needed time to dry before they could be attached to the cake. I did this about five days before the party.
The rat ears are simply gum paste, rolled very thin, then cut into the shape of ears. I then thinned the edges even further with a ball tool and pinched the bottoms together to give the ears the appropriate shape.
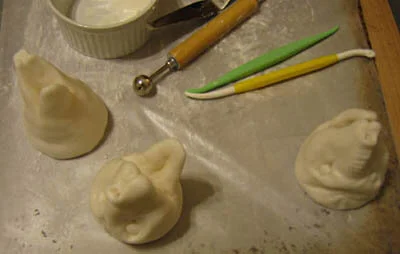
The rat faces were a much more difficult proposition. As I always do, I started by finding a few good research photos to work off of. Of course, I couldn't find any pictures of rats that were as mean as I wanted my rats to be, so I supplemented the photos with the use of a really ugly, vicious, battery operated rat toy that I once bought for my sister at a KB Toys that was going out of business.
I made the rat faces out of a fifty-fifty mixture of gum paste and fondant. At first I had a lot of trouble sculpting them because I couldn't figure out how to handle them and set them down without distorting the features I had already carved. Eventually I discovered that I shouldn't try to pick them up, just set them on wax paper, noses facing up, and work on them that way. After that, things went much more smoothly and, with the help of various gum paste sculpting tools and a lot of shortening to keep the gum paste-fondant mix moist enough to work for the requisite period of time, I was able to crank out three pretty vicious looking rat faces, two with open mouths, one with mouth clenched as if he were in the process of ripping off a succulent morsel of flesh.
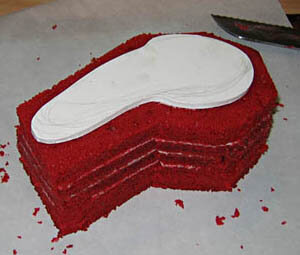
The next step was to cut a foam core base for each rat, which obviously necessitated my planning the body shape and position of each rat, so I would be able to stick the base to the cake, then carve around it.
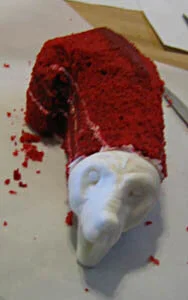
Finally it was time for the actual cake. My sister was kind enough to bake the cakes for me. We used a red velvet cake recipe so the rats would look nice and meaty inside, and we started with three 10" round cakes. I then took each cake, leveled the top and split it into two layers using a cake leveler. Cutting each of these layers in half along the diameter of the circle allowed me to assemble the four resulting pieces into a four layer cake shaped like a semi-circle. I used buttercream icing as my filling between layers.
Once I had torted and filled all three cakes in that fashion, I was ready to carve, which is one of my favorite parts of the cake construction process. I started with the first cake upside down and stuck the foam core base to it with buttercream icing. Using a small, sharp kitchen knife I cut the cake so that it was about half an inch larger than the base all around, then flipped the cake sight side up. I then did the more detailed carving, rounding the body, giving the rat haunches, and cutting the front carefully so that the head would line up properly.
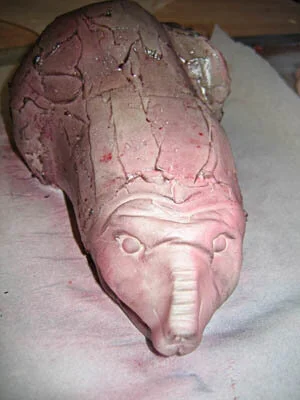
Having carved all three cakes, I was ready to attach the heads, which I did using buttercream icing, reinforced with a toothpick stuck between the back of the head and the front of the cake. I then frosted the rats with buttercream icing. I took two layers of icing, with some dry time in between, to cover most of the red in the cake.
Before adding fur, I used my cake airbrush to put a base coat of color on each rat. I planned to make one white rat, one brown rat, and one grey rat. For the white rat I used a pink base coat with some darker red and orange shadows. For the brown rat, I used a reddish-brown base, but left some lighter pink highlights. For the grey rat, I used a medium grey base, but with lighter grey and pink highlights. Then I decided that I wasn't satisfied with them, so I airbrushed in even more shadows and highlights.
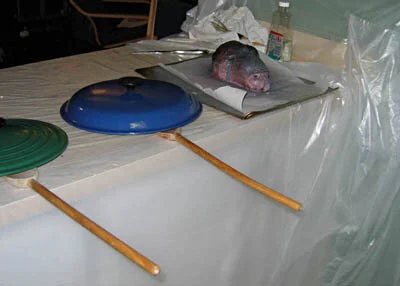
The next step was the application of fur, which was made of spun sugar. I had decided, after a few experiments, for the sake of time to make all the fur colorless, then airbrush on the colors. Using Jacque Torres's recipe for spun sugar, I set up two long wooden spoons hanging over the edge of the counter, wrapped half the kitchen in plastic bags, then proceeded to fling hot sugar absolutely everywhere.
Because my spun sugar tools had a tendency to get gunked up and need to be washed after only five or six uses, it was good that I had two. One was a whisk with the curved ends cut off; the other was a wooden ruler with some cut up pieces of wire taped to it. The wire ends of either tool were dunked into a bowl of hot sugar, then whipped back and forth over the two wooden spoons, leaving a trail of thin strands of sugar behind. I then scooped up these thin strands and draped them over the rat bodies. After I had finished the first rat, I decided I had put too much fur on it, so I did less fur on the other two. As it turned out, I was wrong. The first rat, the one with more fur, wound up looking better than the other two.
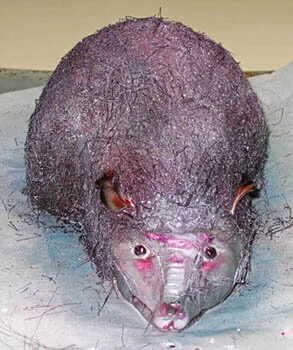
Airbrushing onto spun sugar turns out to be a tricky operation because the sugar is so thin that it tends to dissolve if it gets wet. Long story short, I oversprayed the rats and the two with less fur wound up looking patchy and diseased. I rationalized this by saying that the scene took place in some kind of abandoned government lab which was full of all sorts of chemicals and viruses and the like. No wonder the rats are diseased! The rat that I thought had too much fur wound up looking really good.

Before applying the final coat of airbrushed color, I stuck ears to each rat, by simply jamming the bottoms of the ears into the cakes. I obviously should have attached them better, because several of them fell off and later had to be reattached.
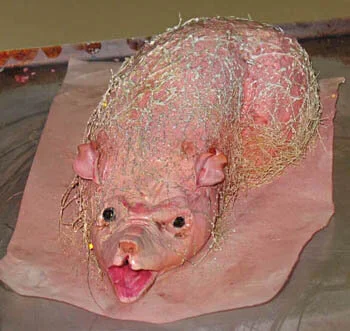
There are details too delicate to the airbrushed onto cake rats, so I went in with a little brush to paint the insides of mouths and ears and eyes and noses. I also gave little white royal icing teeth to the one rat whose mouth remained open. The other rat that was supposed to have an open mouth settled somewhere along the line and wound up with a closed mouth. The third rat, of course, had a closed mouth to begin with.
The rats still needed, feet, tails, and bloody snouts, but that had to wait until they were positioned on the cake base, so I'll cover that in the Assembly section, which means we're ready to move on to the arm.
The Arm
To begin with, I needed a picture of an arm to work from. I couldn't use my own arm as model, because I wanted a big, hairy man arm. So I turned to my brother-in-law, my sister's husband, who was a very good sport about me photographing his arm and incorporating it into the cake.
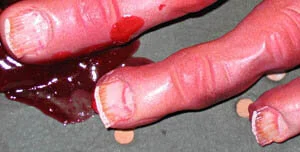
The first step was to make the fingernails out of gum paste. My brother-in-law has much flatter, squarer fingernails than I do, so it took me a while to get the hang of them and to find an appropriately curved surface to drape them over to dry. I also discovered that the key to sculpting realistic fingernails is the subtle, vertical striations. Take a close look, you'll see what I mean.
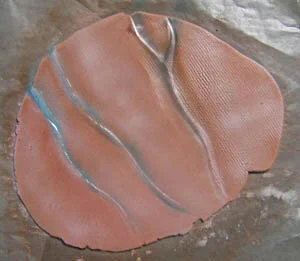
I wanted to experiment with the skin before trying it on the real cake, both to find a good skin texture and because I hadn't used the airbrush much before and I wanted to make sure I knew how to handle it. So I rolled out some fondant and tried texturing it by pressing on it with various fabrics. The winning texture came from a blue dishtowel. I then made a couple of samples complete with protruding veins and let them dry before practicing airbrushing on them.
On the extras of one of the Lord of the Rings DVDs I saw a special effects guy explaining how the way to get a realistic skin coloring on a mask was to work outwards form the inside, that is, start with the veins, and build up the color in layers from there. So I tried it. I started by painting in blue and purple veins, then built up layers of reds, browns, yellows, pinks, and eventually white highlights on top. I think it worked pretty well, except that I need to learn some patience and let each layer dry completely before I do the next one.
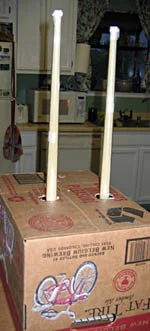
Next came the bones. The bones of the hand are made from hard candy, colored with white and a bit of yellow and brown food coloring. I poured it onto a silpat mat into the shape of finger and hand bones, making many more than I needed, so I'd be able to mix and match the appropriate ones.
I wanted to make the arm bones out of white chocolate, but I had trouble getting it to set up properly, so I wound up using candy melts instead, which really don't taste as good. For molds for the bones I wrapped acetate paper into thin cones. I filled these with melted candy, then dumped then candy out, leaving only a thin coating on the inside of the acetate. I needed hollow bones, of course, in order to fill them with marrow. I then set them upside down to dry, stuck through holes in a FatTire Amber Ale box that was sitting on a wire mesh, so excess candy could still drain out of them. Once that layer of candy dried, I repeated the process to build up thicker walls. Once they were dry it was easy to cut the bones to the correct length with a little patience and a serrated blade. Before filling them with marrow, I plugged up the smaller ends with royal icing.
The marrow inside of the bones is made of lemon curd, which my sister made for me. If you haven't had it, it's kind of like a super-intense lemon pudding, and we thought it would have just the right consistency for jiggly bone marrow.
After just a few seconds in the microwave, the lemon curd was soft enough to put into a piping bag and pipe into the hollow arm bones. I also put a little fresh raspberry sauce (basically just raspberries pureed with a bit of sugar and lemon juice and strained to remove the seeds) into the piping bag because I thought that bone marrow should have some red in it. Once each bone was full, I plugged the other end with royal icing as well.
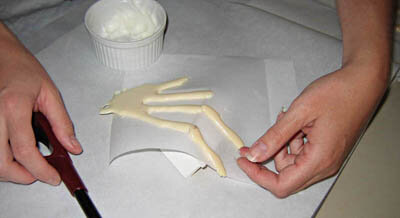
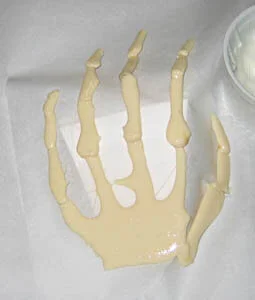
Assembling the bones of the hand took some doing. I built a form out of foam core to assemble the hand on in order to get the somewhat tented shape of a relaxed hand, then draped wax paper over that. One by one I selected bones and stuck them together by melting the ends with one of those big red lighters. Worried that this wouldn't be stable enough, I then piped royal icing over the top of the bones. In retrospect, I should perhaps have just made the bones out of royal icing in the first place. In any event, I should have given the royal icing more time to dry, because the hand wound up collapsing somewhat under the weight of the fondant skin and turned out flatter than I had hoped.

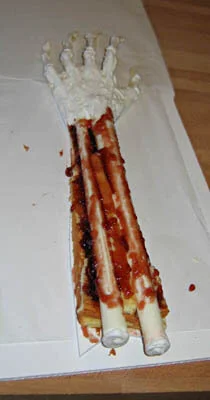
The actual meat of the arm is made of a jelly roll cake, which was easy to cut into appropriate pieces and to wrap around the arm bones. The first step in assembling the arm was to stick a layer of cake onto the previously cut foam core base for the arm, using red currant jelly. I then slathered on another layer of red currant jelly and positioned the arm and hand bones. I added yet another layer of royal icing to the hand at this point, both to attach it to the arm bones and to give it a little more thickness and dimension. Then came another layer of red currant jelly, then more jelly roll cake and even more red currant jelly. I wanted to make sure the arm looked nice and red inside when it was sliced.


I was finally ready for the nerve wracking process of skinning the arm. Or would it be unskinning the arm, since skinning usually means to remove the skin? Anyway, this was quite scary because effective skin needs a lot of subtle sculpting and texturing, but there is very limited period of time in which the fondant is still workable before it dries out. Gamely, I rolled out the fondant, and draped it over the arm. I covered the arm itself with plastic wrap to keep it moist and started with the hand, carefully trimming and pinching around the finger, adding veins and knuckles and pushing the gum paste fingernails into the soft fondant. I worked as quickly but as carefully as I could, so I could turn my attention to the arm itself. I made veins, protruding from the skin, running the length of the arm and then swiftly grabbed my blue texturing dishtowel. I was almost too late. The texture didn't come out as prominently as I had hoped, because the fondant had dried beyond the ideal texturing point, but I did get some good skin texture in places. I was content. I also pulled and frayed the skin at the back of the arm to give it that all-important violent torn away look.

Next step - coloring. Again, the build up from the purple-blue veins all the way to the white highlights. I clearly didn't learn my lesson last time because again I failed to allow sufficient dry time between coats, which resulted in a few runny spots. I cursed myself and added some brown and purple shadows to cover the imperfections.
The hair making process has been amply discussed in the Rats section, so suffice it to say that I carefully draped the arm hair in the appropriate direction, in some places almost hair by hair. Again, I overairbrushed a little when I went to make the hair brown, but at least it stuck the hair firmly down to the arm. Finally, the fingernails required some brush painting to get the subtle coloring just right. Take a look at your own fingernails; they're more complicated that you think!
And here we will leave the arm for a little while, while I move on to the base.

The Base
Obviously, it would not be very fitting to simply plop a severed arm down on a cookie sheet and call it done. No, I needed a more appropriate base.I decided to go with a sidewalk - simple enough not to distract from the central composition of arm and rats, large enough to give ample room for bloody piping gel rat footprints, apt yet non-specific enough to allow the viewer to construct the scenario of his or her choice around this glimpse of carnage.
I bought a sheet of 3/8" foamcore, figuring that the standard 3/16" foamcore that I use for the cake bases wouldn't be sturdy enough to support that many rats. After carefully studying the sidewalk in front of our house, I was ready to begin. First, I made the grout line between two sidewalk squares with some light grey icing and a large scooped decorating tip.

I mixed three different colors of royal icing to use for the small round rocks embedded in the concrete. Using two different sized round decorating tips for each color I piped dots of icing them squished them down and simultaneously textured them with a damp rag. This took much longer than I expected it to, but eventually I had a good coverage of small rocks, which had to dry before the next step.
I used a modified run in icing technique for the concrete. I made two shades of grey icing and watered them down just a bit, so they were easy to spread, but not as thin as regular run in icing. I filled a pastry bag with both colors at once to get a nice random variation of color and attached a wide, flat tip. I used the bag to fill in icing around each rock, then used a knife to spread icing in the larger areas. This took much longer than I had anticipated and I was soon cursing myself for making so many stupid little rocks.
Once that layer of icing had dried it was time to paint. In order to maker the sidewalk look distressed and dirty I went in with some black food coloring and painted stains, mostly around the grout line and around the edges. A thin black ribbon glued around the perimeter of the foamcore finished off the edge nicely.
At this point I'm in a position to describe for you the dramatic conclusion of my cake making saga, but I'm going to pause for moment and go off on a few tangents describing a few other culinary marvels of our party. Hopefully, this will heighten the tension for you and make my eventual return to the cake itself all the more enjoyable.
The Cupcakes
My sister and I were concerned that The Killer Rats Cake might not be sufficient to feed all our guests, which is exactly the opposite of the problem that we usually have with my cakes. As it turned out, we needn't have worried (we had two whole rats left at the end of the party) but to guard against the possibility of insufficient cake we decided to make supplemental cupcakes. My sister came up with the brilliant idea of making them monster cupcakes, covered in fur, with googly eyes.
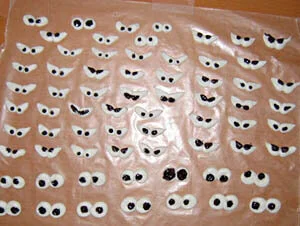
Several days in advance Barbara May piped a selection of royal icing eyes onto wax paper with lots of different expressions - angry eyes, sad eyes, scary eyes, surprised eyes . . . Once they were dry she painted in little black food coloring irises.
While she was making the red velvet cakes for me to carve into rat bodies she also made several dozen red velvet cupcakes and iced them with the cream cheese icing that traditionally accompanies red velvet cake.
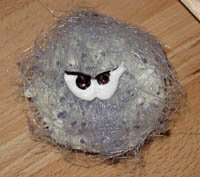
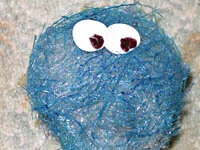
While I was making spun sugar for the rat fur and the arm hair I also made fur for all of the cupcakes, just scooping up a wad of spun sugar and plopping it atop each cupcake. Have you gathered yet that there was a lot of spun sugar involved in this entire operation? My sister and I did our best to clean it all off of the kitchen floor, walls, cabinets, etc., not to mention our shoes, but it wouldn't surprise me if she were still finding ants embedded in elusive deposits of sugar in various corners of her kitchen. And you should have seen the weird looking mess when we put our shoes outside on the porch because they were too sticky to leave in the house and the sugar on the soles melted in the heat into gooey, sticky puddles!
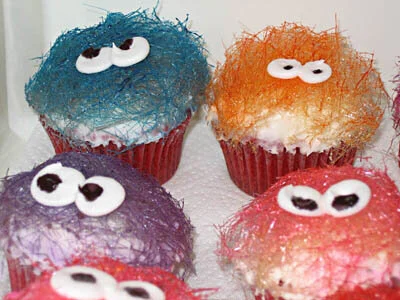
Anyway, once the cupcakes all had fur I sprayed them various bright colors with my airbrush and turned them back over to my sister to stick eyes onto. Interestingly, many of the cupcakes had entirely different facial expressions depending on the side from which they were viewed. Some seemed angry from one angle, but worried from another angle or alarmed from onside, but sad from the other. And they all looked like the bastard children of Muppets and those aliens from Critters.
All in all, they were delicious, cute, and incredibly sticky to eat. Clearly a winning combination!
The Truffles
The final culinary element of our party that I'm going to discuss here is the googly-eyed truffles. Mom had just given us about twelve pounds of fancy chocolate, so we decided to try out some new truffle recipes -brandy truffles, jasmine truffles, ginger truffles, and mint truffles. All the recipes involved soaking various things in cream for various periods of time then pouring the hot cream over chopped chocolate. This mixture is then stirred until smooth and set aside, wrapped in plastic, to cool.
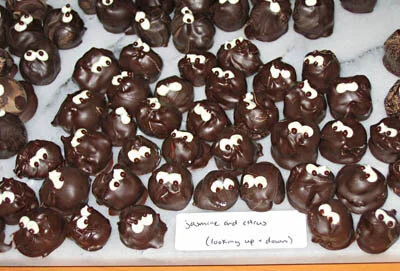
The nest step is to form the centers, which turned out to be much harder than we had anticipated, since the consistency of the chocolate was, well, inconsistent. But we persevered and soon, after letting the centers sit for a bit to dry, my sister was ready to dip them all one by one into melted chocolate, an operate that requires non-sweaty hands and a lot of patience, but also satisfies the little girl inside all of us who liked to make mud pies. (My sister and I actually mud pie recipe books. Mom still has them in the scrapbook.)
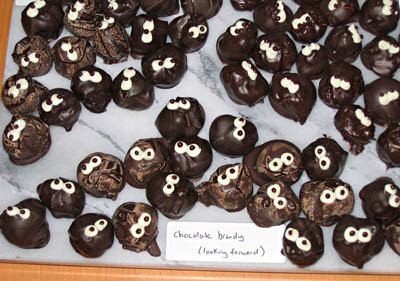
In order to make the truffles appropriate to the horror theme of the party and to integrate them with the cupcakes, my sister then decided to give them all googly eyes with little dabs of white chocolate and even smaller dabs of dark chocolate for irises. This had the dual beneficial effects of making the tray of truffles just cute as the dickens and allowing our guests to distinguish between truffle flavors by the direction the eyes were looking. I don't remember which eyeball direction corresponded to which flavor, but one flavor was looking up (or down), one was looking to the side, one straight ahead, and one flavor was cross-eyed!
OK, are you all ready? Take a deep breath because it's time to return to the final chapter of The Killer Rats Cake saga! That's right; it's finally time for the assembly.
The Assembly
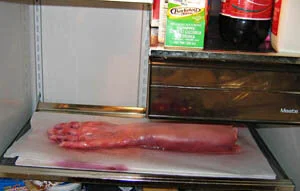
So here I was, the day of the party with three rats perched on the counter and a human arm safely stowed away in the refrigerator. Moving everything into place on the base was a risky operation, especially for the hand, which wasn't entirely supported by the foam core base of the arm. But with my natural manual dexterity, a flat spatula, and my sister standing by to peel wax paper off the bottoms of the rats, the transfers were all accomplished successfully. The rats lost a bit of hair off their butts when the wax paper was removed, but I stuck most of it back on and, as they were all sort of scruffy and patchy already, it made little difference.


I chose to position the rat whose mouth had remained open prominently at the end of the hand, about to chow down on the middle finger. The rat whose mouth had closed against my will I shoved up into the wrist area, so its nose was nuzzled up to the arm. I left some space between the arm and the rat with the clenched mouth so that that I was able to cut a bit of the flesh of the arm and pull out a piece of skin to put in the rat's mouth.
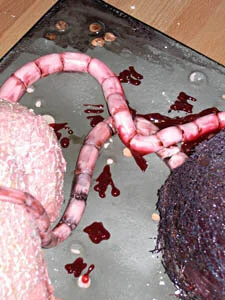
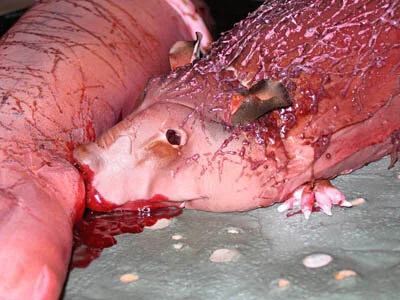
Now, as we all know, a rat is nothing without a nice icky tail, and since I was going to exceptionally gross rats, I made them exceptionally long, slimy tails. I made the tails out of fondant, rolled into long strands, then segmented with a plastic fondant tool. Making the tails at this late stage, with fresh, soft fondant, allowed me to drape them grotesquely over the arm and around the other rats. I think the tails really unified the piece.
While I had the fondant out I also make little feet for the rats. I then painted the tails and the feet with some paste food colors and water, varying the colors slightly from rat to rat, but mostly using reds, pinks, browns, and black.
Now, my composition was complete except for the blood. No severed arm lying on a sidewalk could be complete without copious amounts of spilled blood, so I busted out the piping gel and the red food coloring. Piping gel doesn't really taste all that good; it's just gooey sugar, but it has a great wet, glossy sheen to it. I mixed some that was a nice, deep, blood red and put it in a piping bag with a small round tip. I did the detail work first with this - little bloody rat footprints, and a blood trail from one of the rats' tails that spelled out, of course, "They're coming to get you, Barbara." I also made sure to get blood in and around each rat's mouth and into the fresh wound in the side of the wrist. Then I slathered lots of blood around and on the torn stump of the arm, washed the slimy red goo off my hands, and went to look for a cold beer.

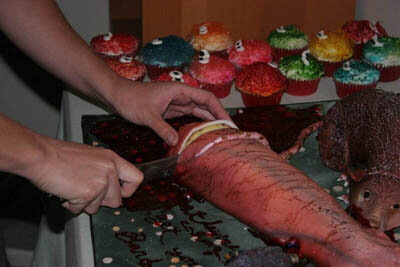
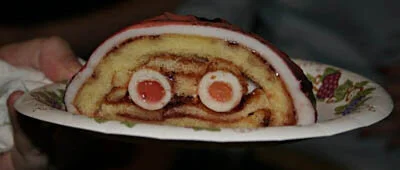
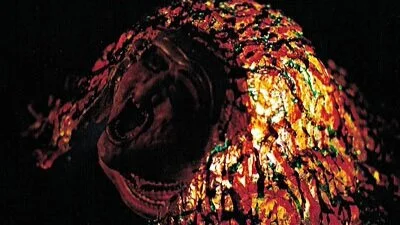
Cyndi Lauper Cake
This cake was intended to be presented to Cyndi Lauper on The Graham Norton Effect. Unfortunately, it didn't survive being FedExed from Colorado to New York.
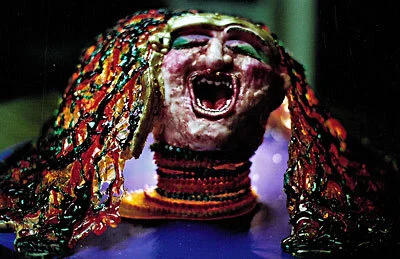
This cake was intended to be presented to Cyndi Lauper on The Graham Norton Effect. Unfortunately, it didn't survive being FedExed from Colorado to New York.
As my mom pointed out to me, I had no idea five or so years ago when my sister and I started theyrecoming.com (our horror movie review website) into what strange adventures it might soon lead me. The one it's led me into most recently involved sculpting a bust of Cyndi Lauper in cake to be FedExed to New York City and presented to Cyndi on a show called The Graham Norton Effect, which I had never even heard of until they contacted me about two months ago. Evidently, someone at the show had found their way to theyrecoming.com and seen the photos of my thoracic cavity cake and my zombie cake. Initially, they wanted me to make a werewolf cake for Seth Green, but they didn't give me enough lead time and I was really busy that weekend, so I had to tell them no, but please keep me in mind for the future. The next time they contacted me they wanted a cake for Cyndi Lauper and, as they gave me a few weeks notice this time and I'm a sucker for rock of the 80's, I enthusiastically agreed, providing they could come up with a way to transport the cake from the little Colorado mountain town where I spend my summers to the Big Apple.
I decided to make the cake a portrait of Cyndi with her mouth open, singing or possibly screaming, however one wants to interpret it. Behind the head, which was to be made out of cake, the hair would be a big dome of colorful hard candy with a light bulb underneath. My goal was to give the impression of something along the lines of a Tiffany lampshade. The folks at The Graham Norton Effect were excited about the idea, so I set about the planning and supplying stages. I believe I've mentioned before that I spend the summers in a little town about two hours away from the nearest big city, so supplies are a bit harder to obtain here than usual. Fortunately, the internet knows no petty geographical bounds, so I was able to order some powdered food colors and cocoa butter, which I didn't end up using after all and my sister sent me some paste colors and paintbrushes and luster dust and suchlike from California.

The weekend before the weekend I was to make the cake I was planning to drive to Indiana for a friend's wedding. Yes, I drove eighteen hours just to go to one party, then turned around and drove back. I loved every minute of it. This afforded me an opportunity to pick up supplies at places like Home Depot and Wal-Mart. I was looking for a good, battery-operated method of lighting up the sugar dome, but I never came up with one that I was really satisfied with, so I went with the tried and true method of a plug in light bulb. I also needed a big metal bowl, which I planned to cover with tin foil and use as a mold for the sugar dome. I found one at Wal-Mart that I thought would be perfect. As it turns out, I was wrong.
I returned to Colorado on the evening of Tuesday, September 7 and the cake was due to be shipped to New York on Monday, September 13 for a taping on Tuesday, September 14. The next day I got up and drove forty-five minutes to the nearest Safeway to get all my supplies (mostly sugar and corn syrup, neither of which, as it turned out, I bought nearly enough of.) My goal for that evening was to make the sugar hair dome. I covered the top of my kitchen table with tin foil, then set the bowl on top of some tuna cans to give it a bit more height and covered it with tin foil as well. Using the hard candy recipe from my favorite candy cookbook (The Practical Candymaking Cookbook) my plan was to first create an under layer of clear (or as clear as cooked sugar gets, which is sort of amber) sugar then pour various bright colors of sugar onto that to give the impression of wavy hair. I had forgotten to ask my sister to send me my good candy thermometer, so I bought a cheap one at Safeway, which evidently is cheap for a very good reason. It worked fine for the first batch or two of candy, then condensation formed inside it which made it impossible to read and when I tried to wipe off the inside I inadvertently moved the paper scale inside so it ceased to be accurate at all. I gave up on the thermometer altogether after a while and went by the sound of the bubbling and the color of the sugar. I think I did a remarkably good job of it, too, if I do say so myself.
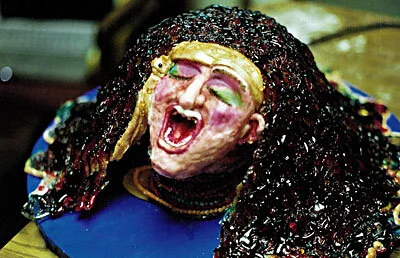
Building up the preliminary shell of clear sugar went fairly well expect that it was impossible to get it smooth because of the steep slope of the sides of the bowl. Eventually I had a fairly even coating of clear sugar and proceeded to the colored sugar, which was a complete failure. My plan had been to spoon the colored sugar into attractive swirls of hair but this proved to be impossible to do with any kind grace or precision on such a steep slope, so I just ended up with sort of messy wedges of red and purple sugar, which looked really sloppy and non-specific. I set that one aside (just in case I wanted it again later) and started again.
This time my plan was to draw specific wavy hair shapes onto the tin foil over the bowl with royal icing, then fill the spaces with clear sugar, which I would then paint bright colors with food coloring. I took me two tries to get royal icing shapes I was happy with (and this time I didn't set the bowl onto the tuna cans so it was bit shorter) and it proved difficult again to fill the more vertical surfaces of the bowl neatly. I had to do it with my little metal pastry tube from the sixties, which my sister got me at a garage sale or flea market or something, which is awesome because they're pretty much impossible to find. This is a very time-consuming process and it involved a lot of me burning myself with hot sugar. About halfway through the process I ran out of sugar and went to bed.
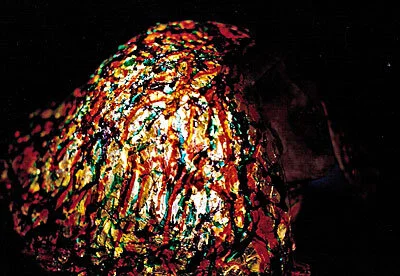
By the time I woke up the next morning. I had an even better idea - I would start over with a solid, clear sugar shell, then drizzle bright colors of sugar over it in abstract patterns. This would eliminate my difficulty in forming neat, specific shapes and give the cake a wild, carefree look, which I felt would be appropriate to Cyndi Lauper. This was also the day I had planned to bake the cake itself, which I had to do in my friend's cabin because I don't have an oven. I also borrowed a bowl similar to the one I had bought but slightly smaller on which to create my new sugar dome. This way I could start on a new dome without trashing the half-finished dome I had been working on the night before (just in case.) This time I created a more graceful shape (I hoped) than the natural shape of the bowl by taping pieces of paper over it to the bowl and to the table to form ogee-like curves. It formed a good shape, but made the finished product harder to remove from the table.

I spent the morning running back and forth between the two cabins, coating the bowl with clear sugar and baking three 6" round cakes, using a recipe for white cake I got from a book by Colette Peters. This was my first experience baking at a high altitude (about 8,300 feet) so I was a little nervous, but it seemed to go really well. I went online to get tips on high altitude baking (increase eggs, decrease baking powder, decrease sugar, etc.) I followed those and it went without a hitch expect that it seemed to take longer to bake than I expected, but maybe the oven just wasn't as hot as it said it was.
By three in the afternoon I had all the cakes baked and most of a good, solid layer of sugar on the bowl and I had to go to work for a few hours. By the time I came back the sugar on the bowl had had a chance to cool completely, which, I discovered, was a very bad thing. The first time I poured another coat of hot sugar onto a thin spot, the sugar dome started to crack. Evidently sugar can't take that quick a change in temperature. This was make even worse by the fact that I had, for some inexplicable reason, removed the sugar dome from its supporting structure of bowl and paper and even in some sections started to remove the underlining of tinfoil (to assure myself that it was possible), so the hot sugar started drooping through cracks and the dome started to sag. I hurriedly pressed the still-pliable sugar into a tolerable shape and put the bowl back underneath. Clearly, I would have to re-coat the entire dome with hot sugar before I started drizzling hot colored sugar onto it or the whole thing would crack apart. I tried to warm up the sugar dome by setting it in front of the radiator and by rubbing it with a hot, damp sponge, but that didn't help much. Every time I poured more hot sugar onto a cool section of the dome, more cracks appeared. Finally, I had a very thick layer of sugar on everything and all the cracks were sealed and covered up. (By this time I had also made two additional trips to the little grocery store across the street to buy more sugar and corn syrup. I bought pretty much all the corn syrup they had. Ordinarily things are much more expensive there than at a big grocery store, but fortunately the corn syrup was inexplicably cheaper.) I was ready to start on the colored sugar. Finally, something went right and the sugar drizzling went smoothly and looked good. I used bright red, bright purple, and bright greenish-blue. Once this cooled I pulled it off the form and peeled away the tin foil. This was easier said than done and I had to use tweezers to get the foil out of a few of the crevices, but eventually I got (almost) all of it.

Finally my sugar dome was ready and I was ready to start sculpting the cake. I didn't have my cake leveler so I had to eyeball it, but fortunately the cakes were small in diameter so it was pretty easy. I filled the cake with raspberry jam, then, working from a photo I found online, carved it into the rough shape of Cyndi's head with an open mouth. I gave the leftover cake bits to my friend who lent me her oven. To crumbcoat the head I used an apricot glaze, made by boiling and straining apricot jam.
Next, I mounted the head onto a neck, which I had made by stacking circles and oblong shapes of clear sugar on top of each other. This, I hoped, would look more graceful than simply plopping a severed head onto a tray. There's a reason why classical busts always include the shoulders.
My plan at this point had been to use white modeling chocolate to sculpt the facial features, but an old problem I had the first time I used white modeling chocolate resurfaced. Evidently I had added too much corn syrup because the modeling chocolate was very sticky and didn't set up right. I also had a hard time getting it to stay in place on the cake. I went to my backup plan, which was to use royal icing. Unfortunately, in the process of removing the modeling chocolate I had already put on, I ripped the nose off of the cake, so I would have to build it up again with icing. I put a preliminary coat of royal icing onto the whole head and went to bed to let it dry.
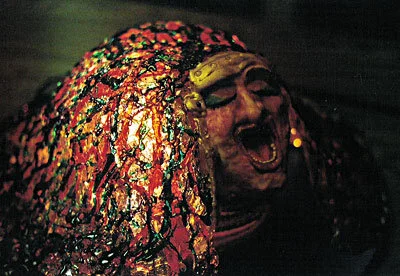
The next day, for some incomprehensible reason, I tried the modeling chocolate again. Again, it failed miserably and pulled off some of the royal icing in the process, so I had to redo it. Eventually, I had a good base coat of royal icing on the head and a royal icing beaded necklace around each tier of the sugar neck and could position the head and the sugar hair on the plywood circle I had cut to use as a base. The lightbulb was already mounted to the base, wired and ready to go. I had to move it once because the head sat further back than I expected, but that was easily accomplished. By some miracle the head and neck together were actually the right height to fit with the hair and the whole structure together seemed remarkably stable, a major concern for a cake that had to travel across the country. I lit it up to see what it looked like and was thrilled with the result!
I used a large #12 round decorating tip and a medium #6 round decorating tip to pipe in royal icing features like lips, nose, ears, and cheekbones, then carefully smoothed and shaped them with a slightly damp, soft paintbrush. I put in a tongue and eyelids with a flat #104 decorating tip and again smoothed with the paintbrush. The nose took two applications to get it built up enough, but all in all it was quite successful. I even added a uvula at the back of the throat.
Once the royal icing had dried overnight, I was ready to paint the face. I had gotten powdered food coloring to use when I thought I would be painting onto white modeling chocolate, but with the royal icing I could use paste colors, thinned with water. First the skin tone went on, then rouge, lipstick, and bright, gaudy pink and green eyeshadow. I also painted each beaded necklace a different bright color. Then I added more details with royal icing, such as eyebrows and eyelashes and a head scarf to cover the less-than-perfect edge of the sugar dome hair, then painted those. I used some gold luster dust on the lips and blue luster dust on the eyelids to make it shine and used a few little drops of sugar I had saved for earrings and ornaments on the head scarf. Oh, at some point in there I decided that I didn't like the shape of the lips and had to go back and add more royal icing and touch up the paint job. The finished skin was a little lumpier than would have been ideal, but other than that, and a slightly odd chin shape due to some frosting sagging, I'd say it wasn't half bad.
Finally my cake was done! Hooray! Now my only problem was packing and freezing it for transport. The packing method I came up with pretty darned smart, if I do say so myself. Like many of my "brilliant" ideas, it came to me as I was drifting off to sleep. First I covered the cake in plastic wrap, then tied it inside a plastic bag. I cut another plywood circle, about two inches bigger in diameter than the one on which the cake was mounted. I screwed the cake base to this so it wouldn't shift around. ThenI wrapped about six layers of cardboard around this, forming a squat little tube, the excess space of which I filled with foam peanuts, then closed the top with a triple layer of cardboard. The result looked a lot like a giant hatbox and was far too large to fit in a standard freezer. Fortunately (and this is one of the big advantages of living in a small town) I have a friend who runs a restaurant and he let me stick the cake in his giant freezer.
On Monday morning, I got up, fetched the cake, then spent three hours waiting around for FedEx to arrive to pick it up. He had a little trouble finding my cabin because the street address isn't actually posted anywhere on the property but I guided him in by phone and a few minutes later my rustic little cake was on its merry way to the big city! Sounds like the premise for a Broadway musical, doesn't it?
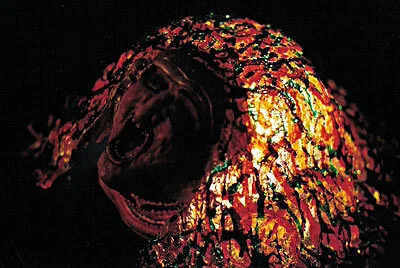
Sadly, perhaps cakes were not meant to be shipped cross-country as I'm told the cake arrived in New York broken. I never knew what, precisely, was broken or to what extent, but evidently the damage was severe enough to preclude the use of the cake on the show, because it never put in an appearance (though my name did appear for about a third of a second in the special thanks section of the credits.) I like to think that someone showed the photos of the cake I sent to Cyndi Lauper. I also like to envision the crew of the show munching on Cyndi Lauper's smushed face in the break room.
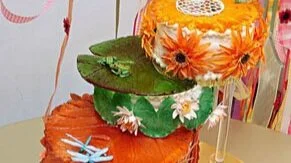
Seasons of Love Cake
Two of our dearest friends were getting married and we got to make the cake! Being the incredibly brave and trusting souls that they are, they gave us a free hand. They didn't have any idea what the cake was going to look like until they showed up for the wedding! If that's not trust, I don't know what is!
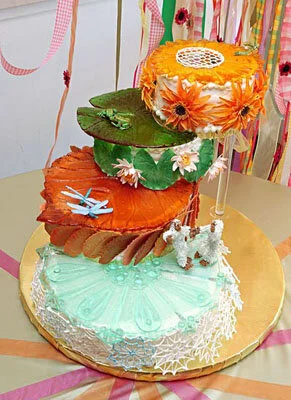
This is by far the most complicated cake we've made. My sister and I spent the entire day before the wedding working on it (about 18 hours, each) but during the week before, I spent about 50 hours and my sister (due to her day job) spent about 30 hours working on it. That all adds up to about 120 woman-hours and an incredibly fun project.
We didn't keep close track of the cost, but we estimate we spent about $500 on supplies, including all the ingredients, gum paste, cake pan and leveler, and the silicone mold compound for the sugar plates (which was the biggest single expense).
Introduction
Two of our dearest friends were getting married and we got to make the cake! Being the incredibly brave and trusting souls that they are, they gave us a free hand. They didn't have any idea what the cake was going to look like until they showed up for the wedding! If that's not trust, I don't know what is!
Naturally, being who we are, we came up with an incredibly complicated and time-consuming concept. We called it the Seasons of Love cake, because our idea involved each tier representing a different season of the year and of the couple's life together. We also tried to flavor each tier to match the season it represented. All four tiers were made with the same chocolate cake recipe, but my sister came up with the great idea to add different flavorings to the batter for each season. We also used a different filling for each layer, as follows.
Winter - Chocolate cake with chocolate chips added to the batter with a mint chocolate ganache filling
Autumn - Chocolate cake with hazelnuts added to the batter with a chocolate hazelnut spread filling
Summer - Chocolate cake with orange zest added to the batter with a cherry jam filling
Spring - Chocolate cake with orange zest added to the batter with an orange marmalade filling
Each tier of the cake was to be topped with a sculpted sugar plate appropriate to the season, then the sides wrapped with seasonally appropriate leaves, flowers, etc. as follows.
Winter - Blue snowflake sugar plate with royal icing snowflakes around the sides
Autumn - Red leaf sugar plate with gum paste autumn leaves around the sides
Summer - Green lily pad sugar plate with gum paste lily pads and lilies around the sides
Spring - Yellow flower sugar plate with gum paste gerbera daisies around the sides
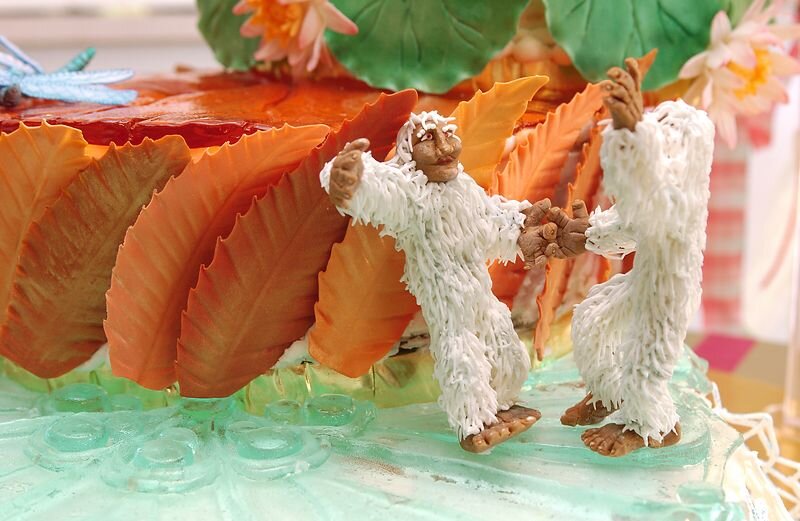
Each tier also got a symbolic bride and groom in the form of a pair of life-size little animals sitting on the sugar plate.
Winter - Pygmy yeti
Autumn - Dragonflies
Summer - Frogs
Spring - Caterpillars
The final touch was to involve a giant gum paste flower blooming out of the top of the cake.
In case all of that doesn't sound like enough, I also came up with a structural design for the cake wherein each layer was cantilevered out from the layer underneath so that it appeared to defy gravity.
I think trying to give you a straight, chronological report of our cake-creating activities would be more confusing than anything else, so I've divided my narrative into sections each describing one aspect of the project. I'll warn you now; it's a pretty long narrative. Enter at your own risk!
Baking, Torting, and Filling
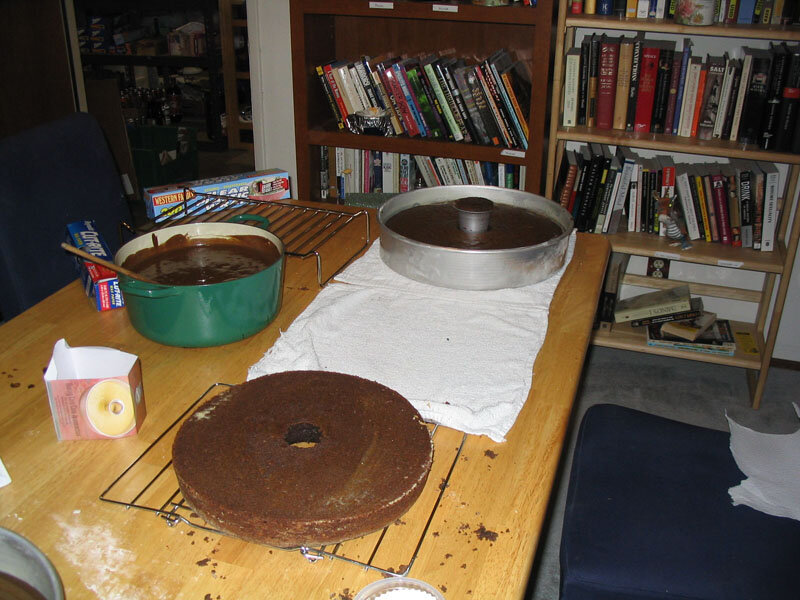
Baking all the cake was pretty much an all-day project (and that's not even counting the enormous shopping trip the day before. Who would have imagined anyone could ever need so much butter?) The smallest tier, the spring tier, was 6"in diameter, summer was 8", autumn 10", and winter 12", so I had to bake two 2" high cakes in each of those sizes for a total of eight cakes, which adds up to a whole lot of cake batter!
Fortunately for me we had decided to make all four layers using the same basic cake recipe so I was able to mix a lot of batter at one time and I never had to wash out the mixer between batches. This meant that I had to add the extra ingredients (chocolate chips, hazelnuts, or orange zest) to the batter by hand
.It all went remarkably smoothly (especially for such a huge project involving me and a kitchen) and eight hours later I had a fridge full of carefully wrapped cakes and a mountain of chocolate-covered dishes.
Torting, filling, and frosting the cakes, however, turned out to be more time-consuming than we could ever have imagined. Fortunately for me, my sister handled that part of it.
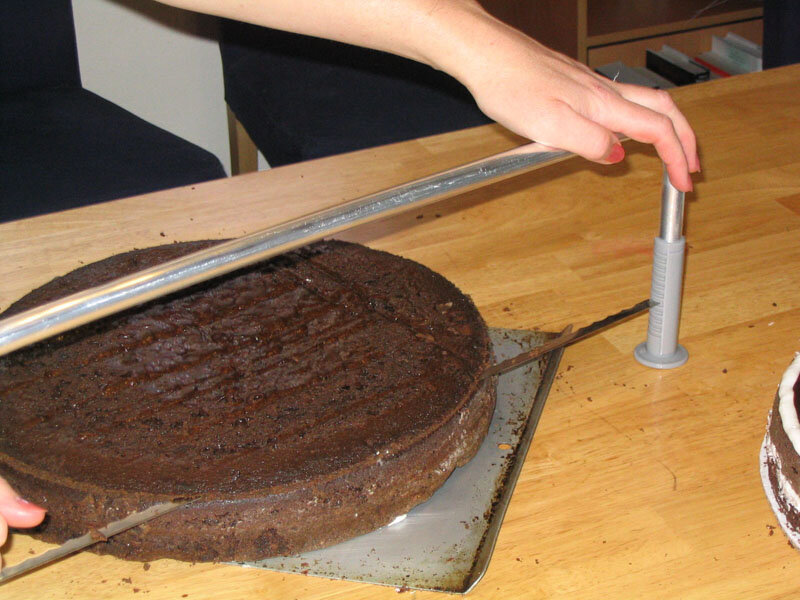
The first step is to level off the top of each cake, for which purpose we bought a special cake-leveling tool, which is like a fine saw turned sideways with feet on it. We thought this would be easier to do when the cakes were cold because then they don't crumble as much but this turned out not to be the case at all. Apparently our cakes were too cold, because our saw wouldn't go through the cake at all the first time we tried it straight out of the freezer. So we let the cakes thaw and tried again with much greater success. We still had to be careful on the larger tiers not to let the cake distort the blade of our tool, which happened if we tried to work too quickly. We found it worked best if my sister held the saw while I held and rotated the cake. After each piece was level on top we had to go through the same process again to split each cake in half, giving us four thin layers of cake per tier between which we could spread our fillings.

The first step in assembling those four separate pieces into an entire tier is to stick the bottom layer onto the cardboard base with a little bit of buttercream icing. Then my sister piped a thick dam of buttercream icing around the edge of that layer to hold in the filling. The filling can then be spread on the cake without fear of it leaking over the sides. The next layer of cake is placed on top of this and pressed down firmly, then the process is repeated until all four layers are in place.
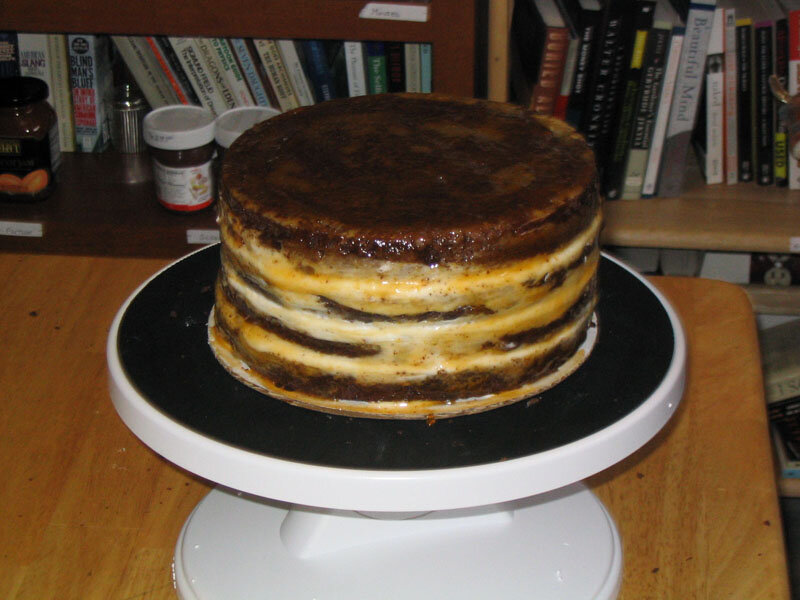
Her next step was to put a crumb coat on each tier. This is a preliminary undercoat of icing to keep the crumbs from the cake from getting into the final icing coat. She decided to use a glaze of apricot jam for this, which she made by heating the jam and then pressing it through a sieve to remove the stringy bits. Applied with a pastry brush in a thin layer, it picks up the stray crumbs and keeps then in place when it dries. In retrospect, it would have been a better idea to use thinned buttercream icing for this, since we had some trouble with the dark cake showing through the icing.
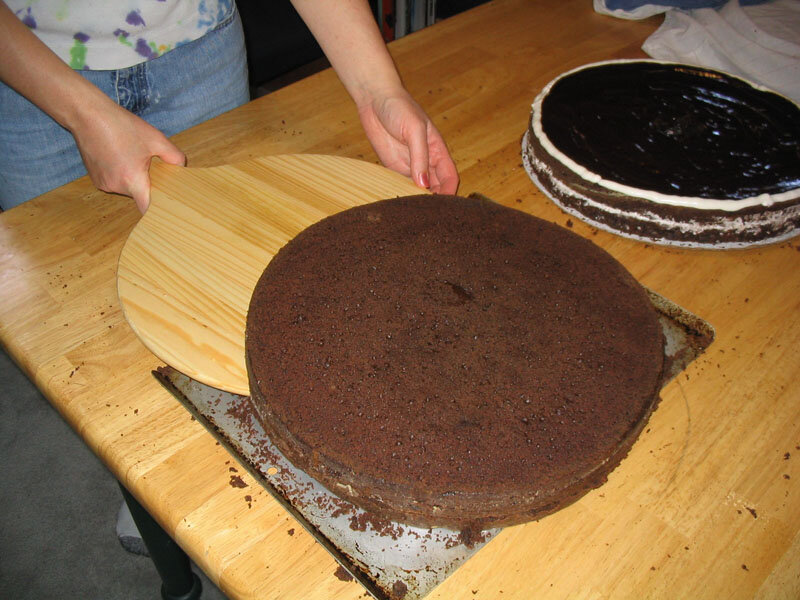
While I'm on the subject of buttercream icing, I should add a sidebar here about my sister’s experiments with buttercream icing. One flaw that buttercream icing has is that, because it is made with butter, it isn't truly white. Buttercream icing can be made with Crisco instead, which does make it white, but it doesn't taste as good. To decide the best way to make the buttercream icing for this cake, she made several batches with slight variations such as using a very light colored butter, or using Crisco but with artificial clear butter flavoring, or adding a bit of white food coloring to icing made with regular butter. We decided that the loss of taste wasn't worth the loss of color and decided against using the Crisco. There was only a very slight color difference anyway.
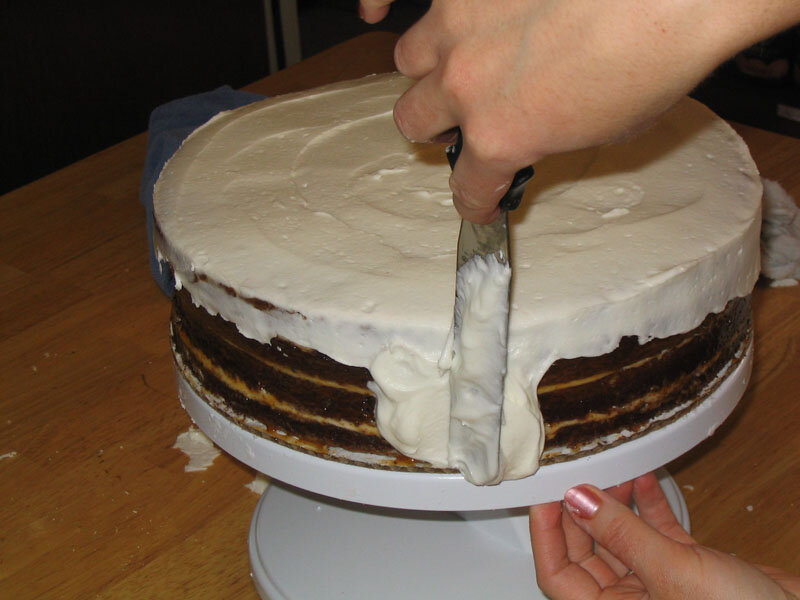
Once the crumb coat dried, she went back to each tier with a layer of buttercream icing. Unfortunately, you could still see the cake through the first layer of icing, and she had some trouble with the second layer sagging and dripping. But she cleaned it all up and the resulting cake tiers were by far the neatest cake tiers we've ever frosted, though I will say that my sister didn't make it look quite as easy as Sandy, our instructor at our Wilton master class in cake decorating. I'll bet she will next time, though.
Gravity-defying Structure
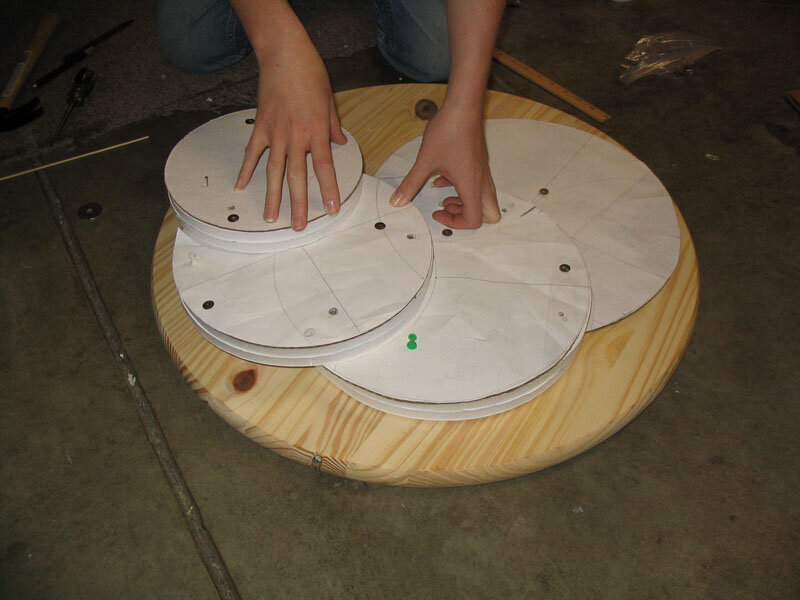
I was determined to make this a cake that defied, or appeared to defy, gravity. I'd like to be able to claim that it was some kind of metaphor for the happy couple's love defying the pressures of life that weigh us all down or some such sentimental hoo-hah, but really, I think it was just because I was convinced I could do it and thought that would be really cool.
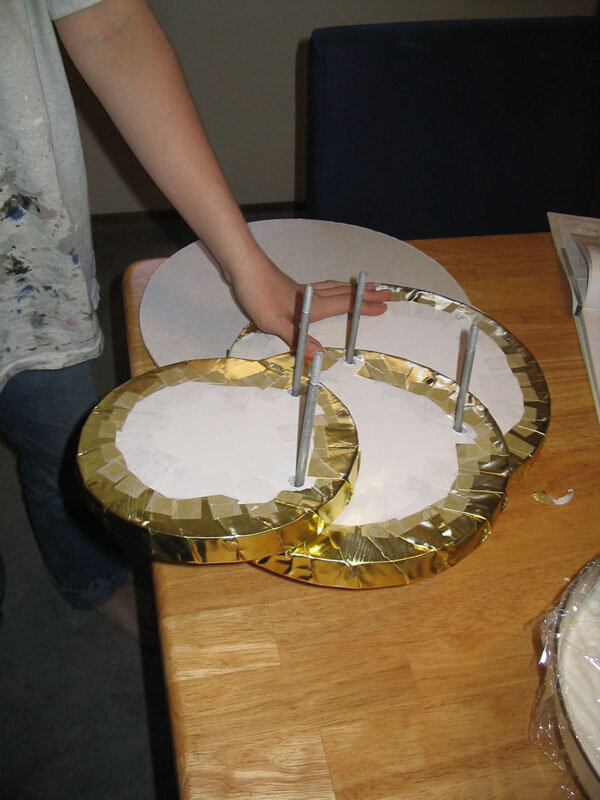
The result - my plan for a cake on which each tier sat only halfway on the tier beneath, the other half cantilevered out in an attractive spiral. I hope to one day adapt this design to allow me to render a strand of DNA in cake. For a while I contemplated having each layer actually next to the previous layer, and slightly elevated, not sitting on top of it at all. While I still believe this to be theoretically possible, I'm glad I didn't try it this time because this way was hard enough.
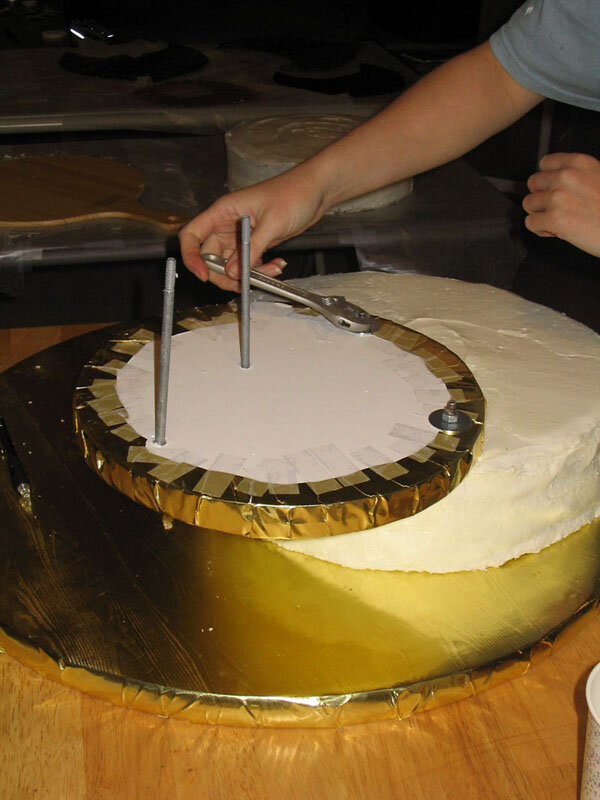
Each tier was to be supported by a circle of 1/2" foamcore, on top of which would rest the cardboard base of each tier, on top of which rested the actual cake. To hold them in place, each tier had to be bolted to the foamcore base of the tier beneath. This necessitated some complicated and mystical-looking hole cutting in each piece of foamcore to allow both for the bolts themselves and for various bolt heads and bolt ends from the layers above and below. I felt like a sorcerer, which is always a good thing to feel like.
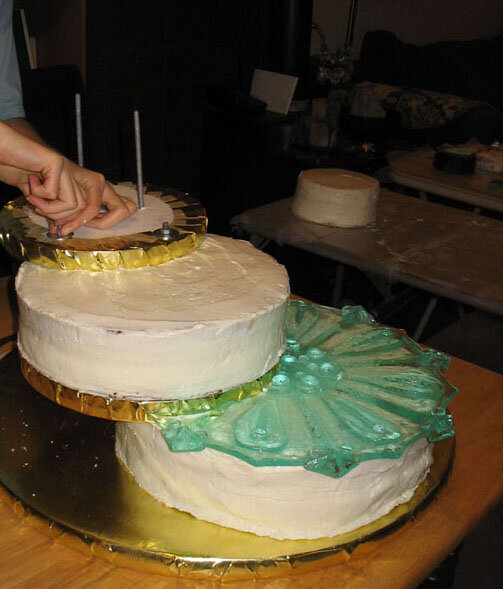
The assembly of the cake was an arduous and nerve-wracking process. Each tier was individually torted and frosted by my sister in advance. Then we started with the large, wooden, circular base, which already had holes drilled for the two bolts to hold the second tier. The heads were also countersunk to allow the base to sit flat on the table. The bolts were inserted first, then the largest tier of the cake, with holes precut in its cardboard base, was lowered into place over the bolts, which, for sanitary reasons, we wrapped in plastic wrap, though we also washed them well first. Next we positioned the foamcore base for the second tier and marked on the first tier where it would sit because we had to insert some 1/4" wooden dowels into the first tier of the cake to support the weight of the tier above. Otherwise, each tier would crush the tier beneath and the entire cake would collapse. I put nine or ten dowels into the fist tier of the cake, arrayed evenly about an inch back from the edge of the area where the next tier would sit. That done, we were ready to bolt the foamcore for the second tier into place. By the way, a cake that requires a crescent wrench to assemble is very funny.
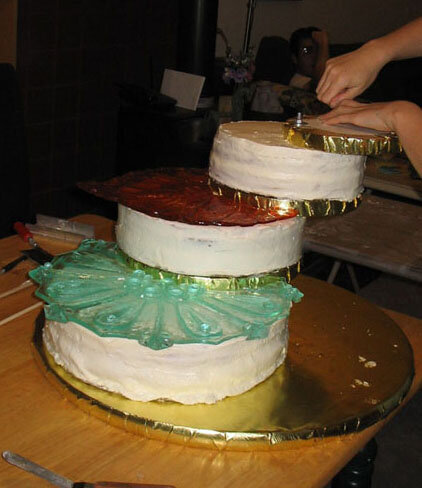
The foamcore base of the second tier already had the bolts to go through to the next tier in it at this point. In fact some of the bolts had to be glued in place in advance because the layers of foamcore were covered with gold foil and the bolts had to be in place before that in order for the heads to be hidden. Therefore, we were all set to lower the second tier onto those bolts and repeat the process described above for the third and fourth tiers. Bear in mind that this entire time, despite my professed confidence in my design, I was pretty much expecting the cake to collapse at any moment.
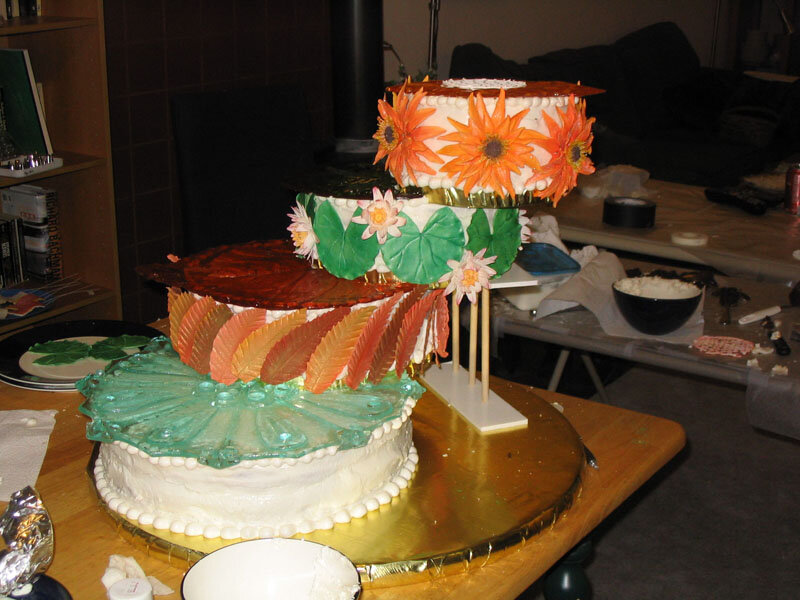
Miraculously, it all went together and appeared to be stable! We propped it up with temporary dowel supports to make sure and later we went out to get some attractive clear plastic supports from TAP Plastics, which we used for transport and actually had to put back in as a precautionary measure halfway through the reception. The layers did begin to settle and tip a bit, which I suspect indicates that the dowels were being tipped over inside the layers. I'm sure I could solve this problem next time by using an internal support with a wider base, like a plastic ring or oval. All in all, I'd say my first foray into the world of gravity-defying pastry was a roaring success!
Sugar Plates
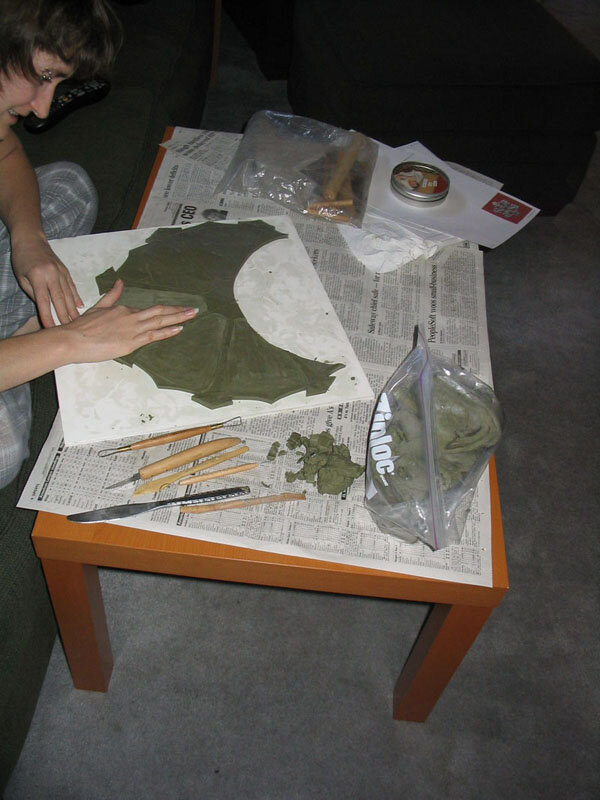
Each layer of the cake is topped with a seasonally appropriate giant sugar plate - a blue snowflake for winter, a red leaf for fall, a green lily pad for summer, a yellow flower for spring. Modern technology being the marvelous thing that it is, ordinary people like you and I are now able to make our very own rubber, food-safe hard candy molds in the comfort of our own homes! Amazing, isn't it? We purchased five pounds of a two-part, food-safe rubber mold compound from a site called chefrubber.com, which, by the way, has all kinds of products that look super fun.
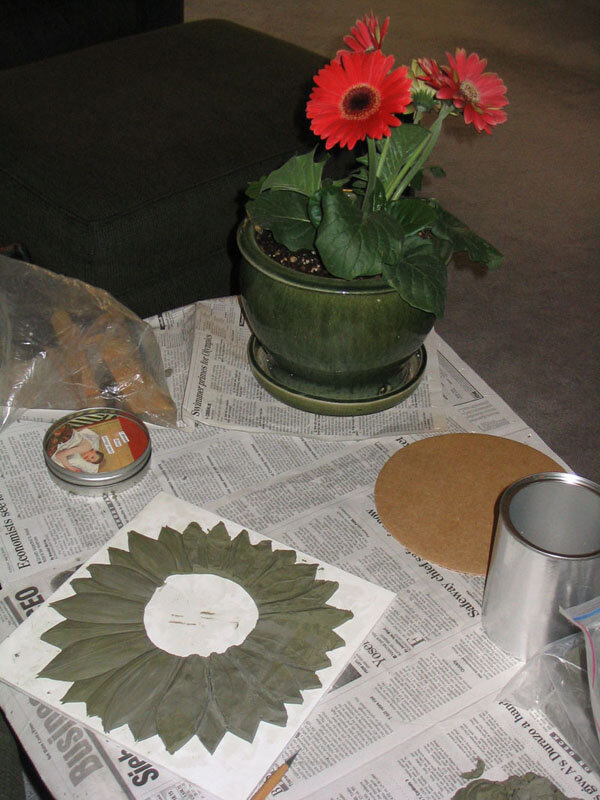
Our first step was to try out our new toy. I made a little leaf out of non-toxic clay and put it in the bottom of a paper cup. We tried out the rubber, carefully mixing the correct proportion using my sister-in-law's kitchen scale and it worked great! First we painted a thin layer of rubber onto the clay positive with a soft brush to make sure it got into all the little crevices, then we poured more rubber on top of that. The pouring process was a bit difficult, as in order to avoid getting bubbles in the mold, we had to pour the rubber in a very thin stream out a tiny hole in the mixing cup. The mold dried sturdy and detailed, and it pulled away easily from both the cup and the clay. We make some hard candy and poured it into the mold once again with great success! The candy took all the fine detail of the mold and then peeled away easily once it cooled.
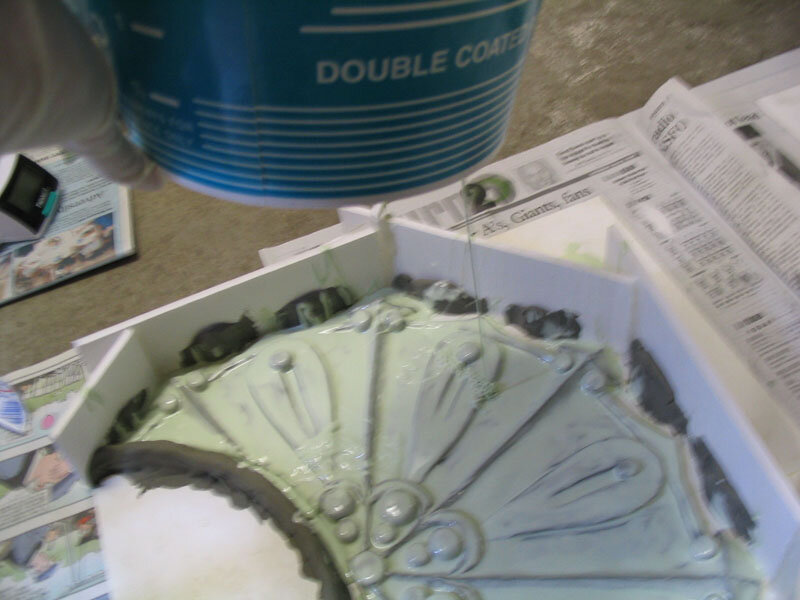
Emboldened by our success, I sat down to sculpt each of the large plates for the cake, again out of non-toxic clay, on sheets of foamcore. Once they were complete, I built up foamcore walls around each to contain the poured rubber, filling in some large spaces with excess clay, to minimize the amount of rubber needed to fill the mold box.
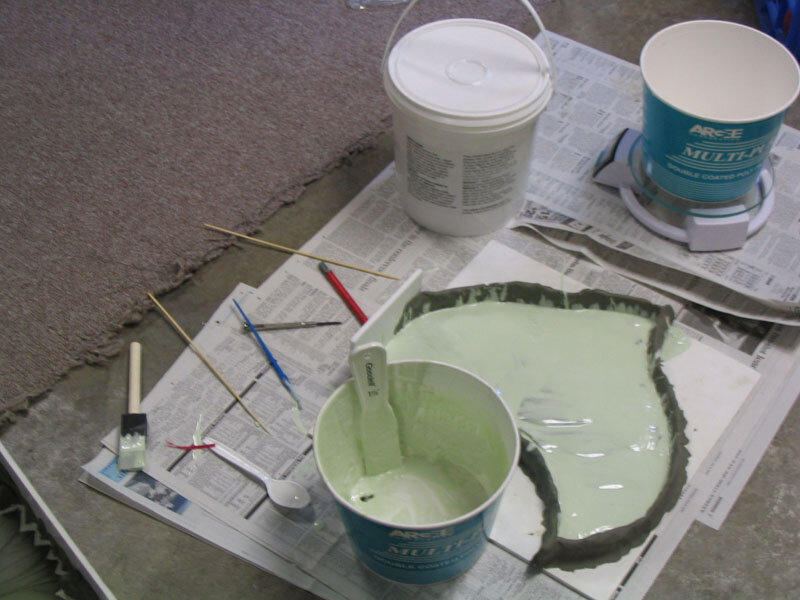
My sister was at work the day I had chosen as my mold-pouring extravaganza so I was left on my own with a fairly nerve-wracking procedure to perform, but I bravely rose to the challenge. My first mistake was trying to mix too much of the compound at once. Although it doesn't completely cure for 24 hours, it starts to set up after only about half an hour. If that seems like plenty of time to pour out a paper cup of rubber, bear in mind that I was pouring it through a pinhole. It's pretty time consuming. Also that I had to paint on a coat of the rubber before I could start pouring. So my first batch started to set before I was done pouring, resulting in me desperately ripping larger and larger holes in the side of my paper bucket until finally I gave up and just poured it over the side. (If you're wondering why I didn't just scrap that batch of rubber and start over, it was because I wasn't sure I would have enough to do all four molds and so I couldn't afford to waste any. It's not something I could just run out to the grocery store and buy more of.) This did, indeed result in quite a few bubbles. I popped the larger ones with a pin and, as always, hoped for the best.
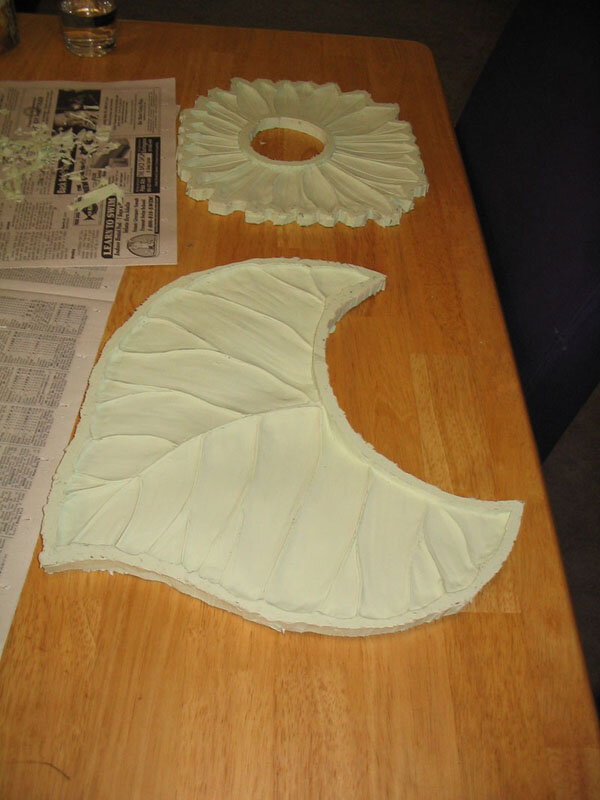
The rest of the pouring went better, as I worked in smaller batches, though I was also worried by one batch that I didn't quite mix as well as I should have, but it seemed to set up with no adverse effects. By the end I was such a pro that I was pouring rubber into one mold box with one hand while painting rubber onto another clay positive with the other hand. I even took pictures with my right hand of my left hand pouring the rubber into the mold box.
An anxious day followed until I could safely pull the molds off of the clay positives, but it was worth the wait. The molds looked great! We washed them with soap and water, as per the instructions and we were ready to the pour the sugar plates.
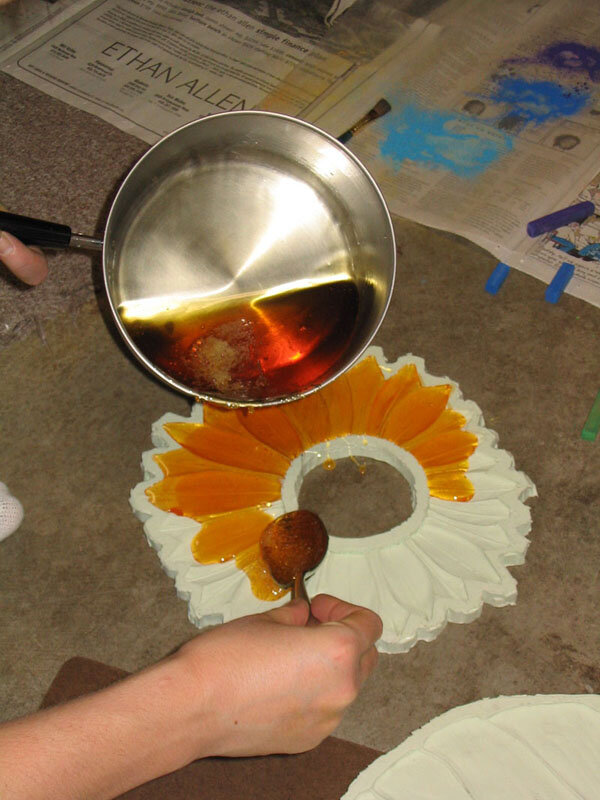
My original plan had been to pour each plate in two different colors so, for instance, the autumn leaves would be a light gold in the veins and darker amber in the areas in between. I expected that the second color of sugar, poured over the first, would melt the first color and the two would blend smoothly together. Boy, was I wrong. I tried this experiment first on the autumn leaf and it didn't work at all. Not only did the two colors not blend together at all, but the second color didn't flow all the way in next to the first color, so I had big ugly grooves on my sugar plate. I decided to try it with just one color.
Not only did this produce a nice, clean leaf, but it was also much faster, easier, less wasteful of sugar and it even produced some of the bi-tonal effect I was looking for all on its own. Because sugar is translucent and the molds were of various thicknesses, the deep areas looked much darker than the shallow areas. I was really pleased with the result.
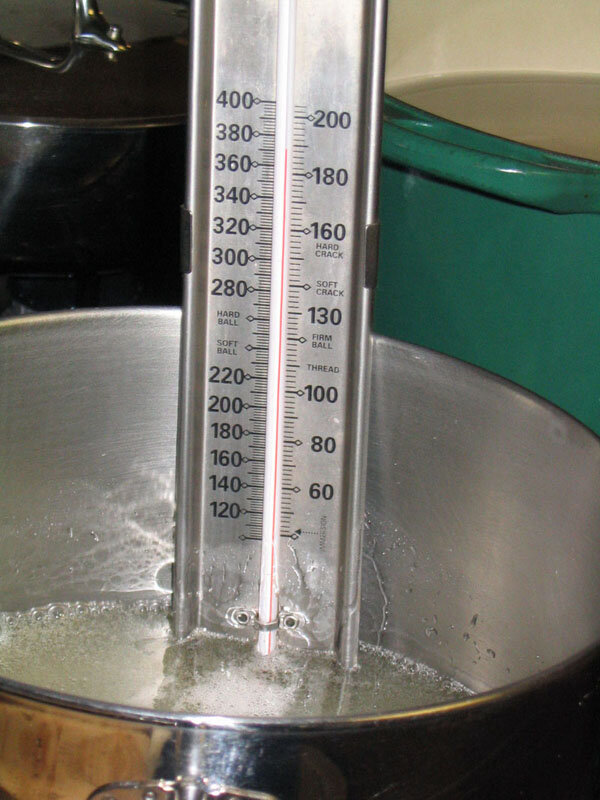
I proceeded to pour the yellow flower and the green lily pad this way, which brought me finally to the largest sugar plate, the snowflake. Now, we wanted the snowflake to be a very pale blue, just a hint of color, really. To accomplish this with sugar would be very difficult because cooked sugar always has a bit of an amber tint. We decided to try using a clear sugar substitute called isomalt, which we learned about at a Pulled Sugar class we took recently. Isomalt is pretty amazing stuff. It comes in the form of opaque white crystals, larger than sugar crystals and you don't need to add water or anything or even stir it while it melts. It won't burn the way sugar will and, unlike sugar, it's perfectly clear. You also have to heat it to a much higher temperature than sugar, which was a little scary, especially since I was stupid enough to do this barefoot, instead of wearing my steel-toed boots, which should have been the obvious thing to do, considering that this process involved me carrying a pot of 400 degree liquid from the kitchen to the garage. Fortunately, the whole thing went without mishap, although I was shocked by how quickly the isomalt heated up. It didn't behave the way sugar does at all, which I suppose is to be expected. I tinted the melted isomalt with just a smidge of blue food coloring and poured the snowflake, which turned out beautifully.

For the finishing touch I rubbed each sugar plate once over with a damp cloth to give it a glossy finish. They had a sort of frosted glass look when they first came out of the molds, which was also nice, but the advantage of the glossy finish is that then if you later drop icing or something onto the sugar plate (which my sister and I considered to be more or less inevitable), you can wipe it off without damaging the finish of the plate.
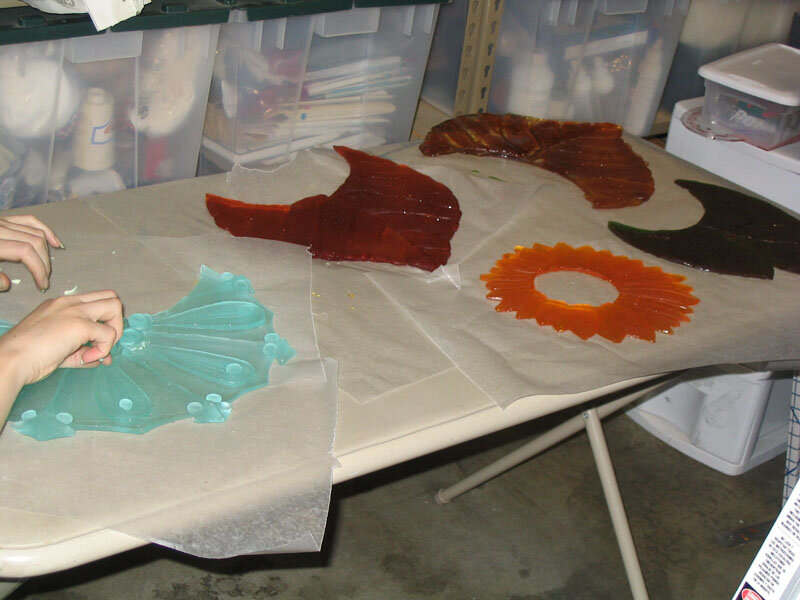
Side Decorations
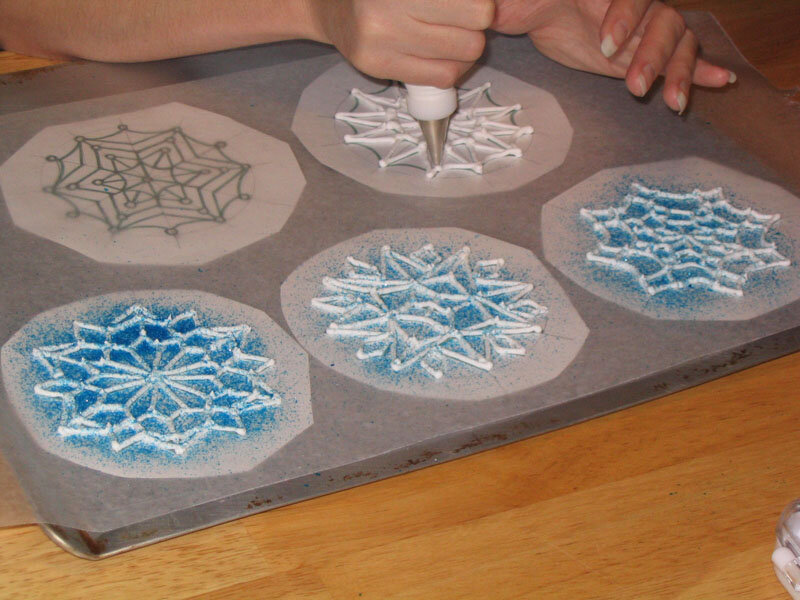
Winter
The sides of the winter layer called for royal icing snowflakes. The first step, as always, was to find suitable research photos, so I went online until I had more pictures of snowflakes than anyone should be able to use in a lifetime. Using these as a reference, I drew up six different snowflake patterns. These I taped to a cookie sheet then covered with wax paper. Using a #3 decorating tip, I piped royal icing over each pattern, then sprinkled it with edible glitter (clear, silver, or blue) before the frosting had a chance to dry.
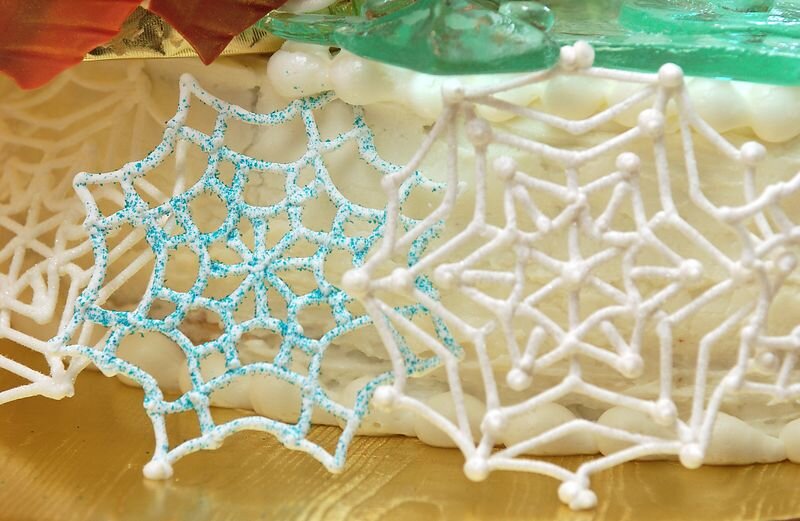
These proved to be extremely popular with the children at the wedding, who kept coming back to the kitchen asking for "snowflake candy." Fortunately, I made about twice as many as I actually needed for the cake, because I was afraid of breakages, so there were plenty to go round. There was one extremely sad incident involving the four-year-old daughter of a good friend of ours, whose piece of snowflake candy fell on the ground and broke. To make up for it I made snowflake candy again (in a slightly sturdier form) to serve at a dinner party that they were coming to a few days later, but unfortunately at the last minute they couldn't make it, so we put the snowflakes in bowls of ice cream and served them to the other guests, which also proved to be quite popular, even among the adults.
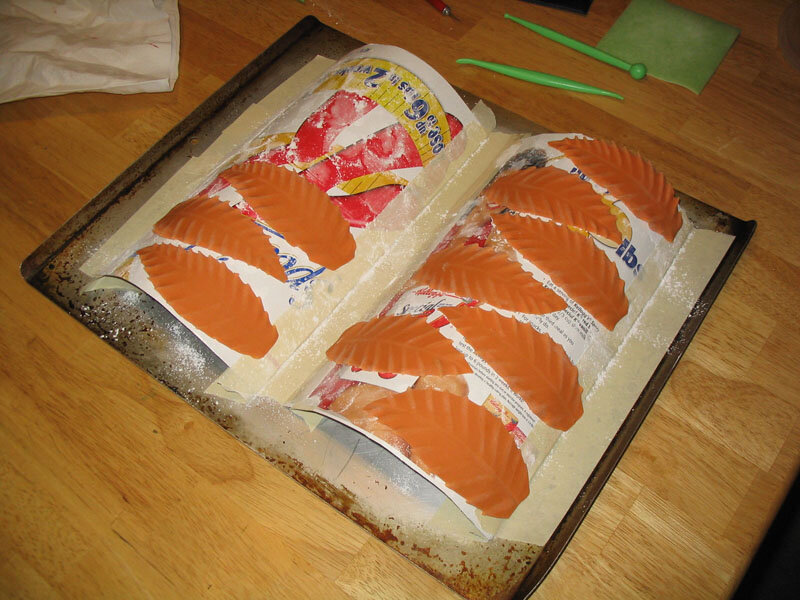
Autumn
For the sides of the autumn layer I made large gum paste leaves. Actually, they were a little larger than would really have been optimal, but oh well. I didn't have any gum paste cutters big enough to do the job, so I drew myself a paper pattern and cut each leaf out by hand, then drew in veins with a knife tool. All of my flower formers were also too small for these leaves, so I made my own out of the sides of a cereal box taped to a cookie sheet to get the curve I wanted. Once they were generously dusted with cornstarch to prevent sticking the leaves were draped over these to dry.
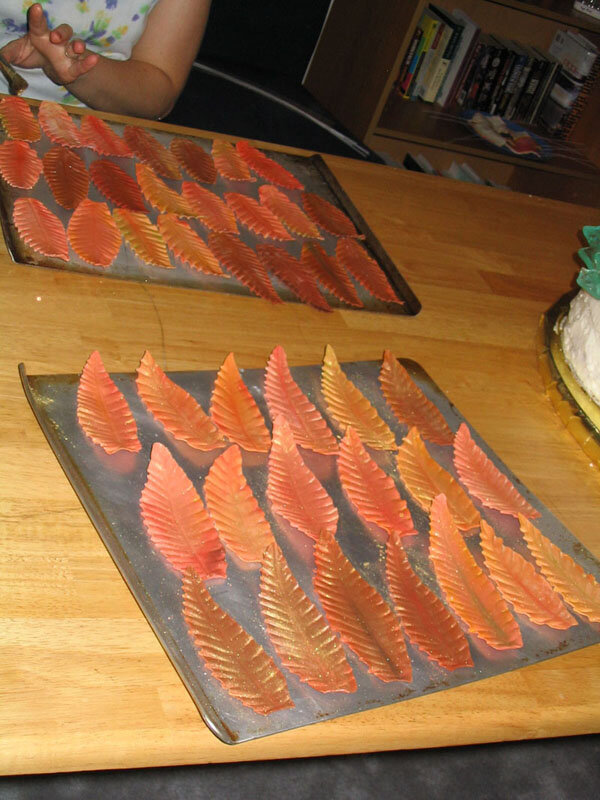
I started with three different colors of gum paste - orange, red, and brown. Once the leaves were dry I went in and added more color variations with chalk pastels - various reds, yellows, browns, oranges, and greens until each leaf was different. I steamed them to set the colors (a neat trick, by the way. You just set a kettle or pot of water boiling and wave the leaf for a few seconds in front of the steam. It keeps the colors from rubbing off and gives it a nice sheen.) For the finishing touch, my sister dusted them with gold luster dust.
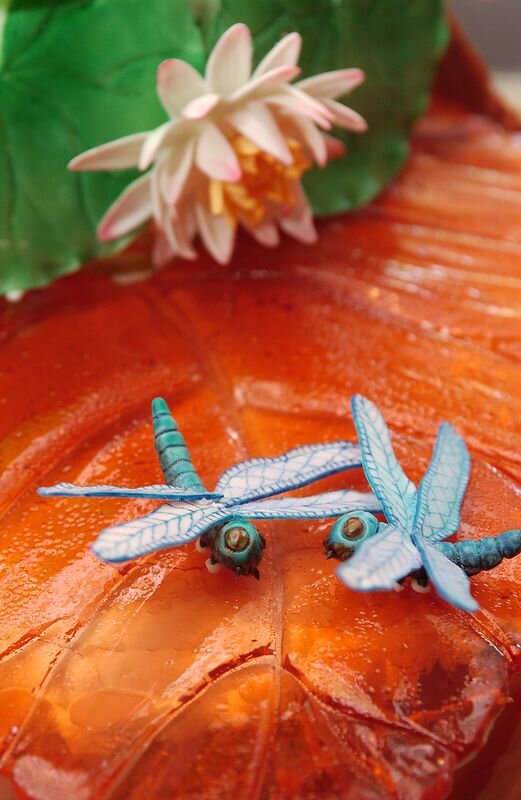
Summer
For the summer layer, my sister made gum paste lily pads and I made a few gum paste lilies to go with them.

The lily pads are made of green gum paste, rolled thin, then cut into a circle with a little wedge cut out. My sister then drew in veins and softened the edges with a ball tool. Once the lily pads were dry, we painted them with some thinned green piping gel so they would have the shiny, wet look of a real lily pad.
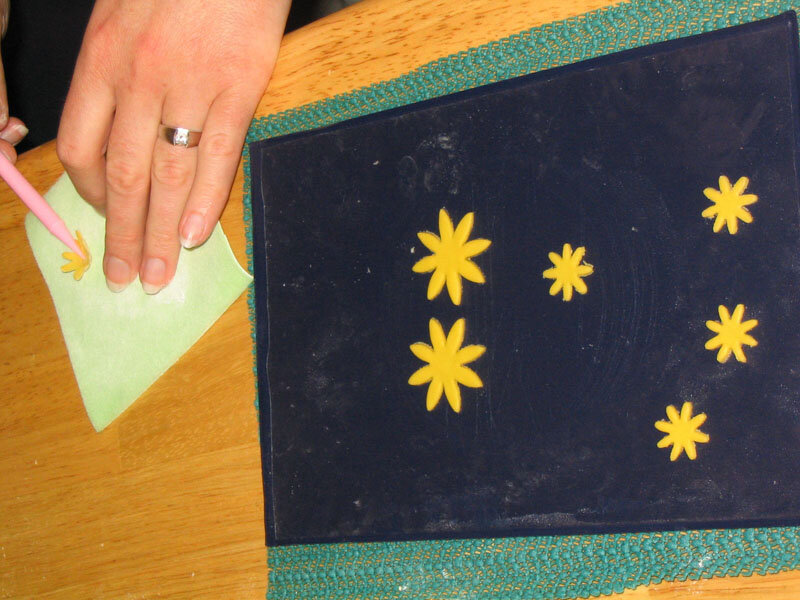
For the lilies my sister first made yellow centers around green floral wire. (We were following instructions in our gum paste flower book, but they were a little unclear sometimes, so she actually made them far too large the first time and had to do it over.) Once those were dry, she then cut daisy shapes out of yellow gum paste, softened the edges and added veins on the inside, and then built up the interior yellow petals from the inside out on top of the round center. These were left to dry upside down for a day or so.
Once these were dry I got some white gum paste to make the outer petals and some coffee cups covered with tin foil with a hole punched in the middle to assemble the flowers on. The white outer petals of the lilies are assembled from the outside in, so I made the largest petals first, cutting out the gum paste with one of my cutters, and adding veins with a knife tool. The first row of petals lies on the tin foil, arranged around the center hole, making sure to leave the hole exposed. The next layer of petals goes on top of that, glued with meringue powder, staggered and supported by cotton balls so as to give the petals the necessary lift and curve. This goes on until the flower is pretty much filled up, then the center is dropped into place with the wire going through the hole in the tin foil. The hardest part was not gluing the cotton balls to the flower. I didn't entirely succeed in all cases.
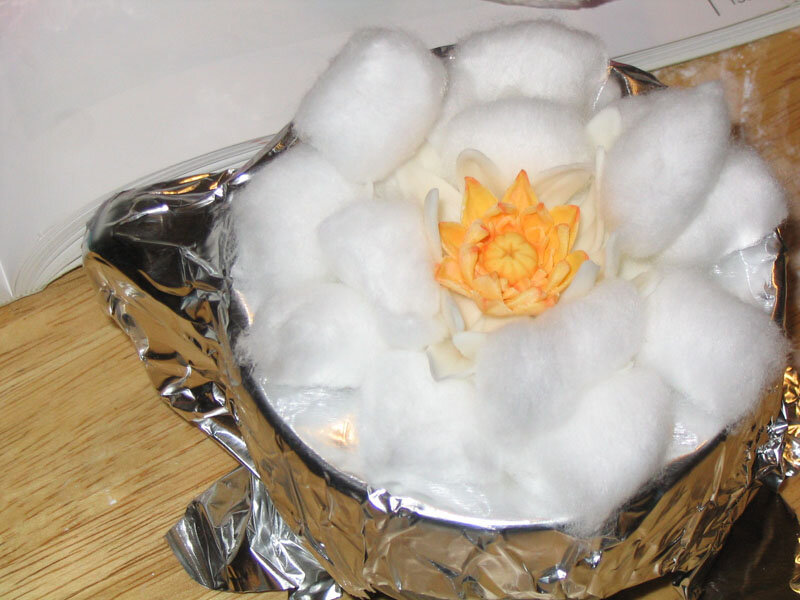
Once these dried, I pried all the cotton balls out, then added a little pink chalk pastel to the tips of each flower petal and the lilies were ready to go. The nice thing about the wire is that they can easily be stuck straight into the side of the cake.
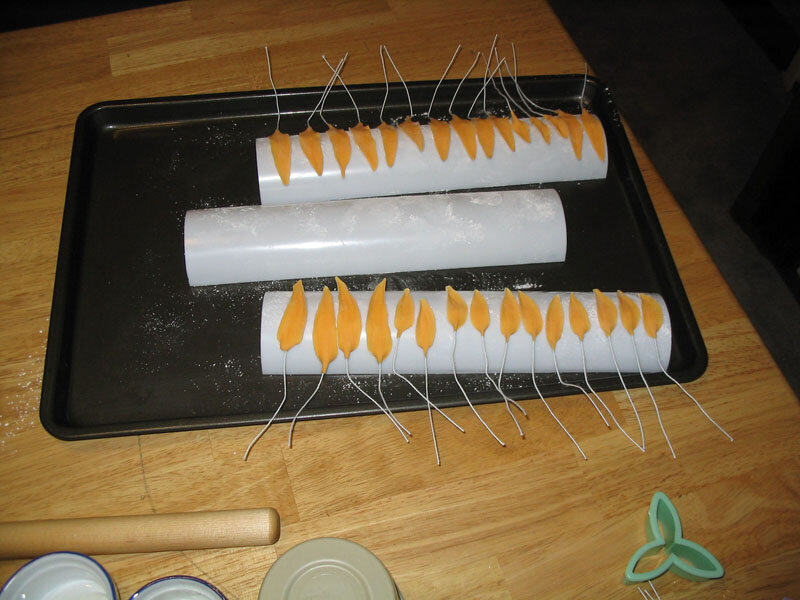
Spring
We chose what might well be the most time-consuming flower in the universe for the spring layer of the cake - the gerbera daisy. Somehow, my sister got stuck with all the tedious, boring jobs, like making millions of tiny daisy petals and I got to have all the exciting jobs like pouring boiling sugar into rubber molds and sculpting yeti out of gum paste. I didn't plan that deliberately, by the way, but I'm also not complaining.
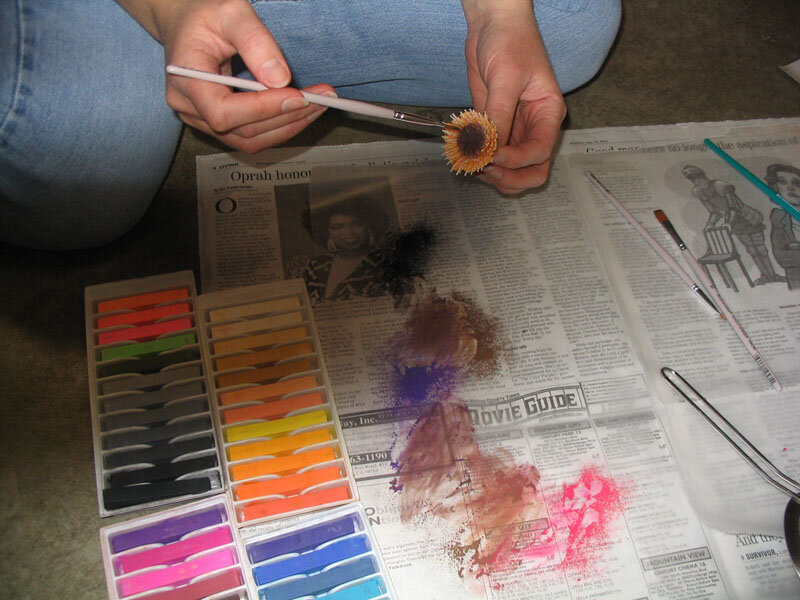
Like the water lilies, she started with forming a center on top of some stiff floral wire, since it needed to be strong enough to support the weight of all the petals. After the center dried, she wrapped it several times with orange gum paste rolled very thin with the edge scored and tiny pieces of very thin floral wire pressed gently into gum paste. This created little stamens around the center. Once that dried, she colored it with non-toxic chalk pastel powder (created by grating the pastels through a sieve).

Along the way, she worked on making the roughly 75 large and 75 small petals required for the 5 daisies. Each one was cut from orange gum paste using a large daisy cutter. She thinned the edges and elongated them to make a more natural shape, then pressed veins down the center. Using meringue powder and water, she attached the petal to short length of very thin floral wire and let it dry on flower former to create a nice curve. The instructions actually called for inserting the wire inside the petal, but when we tried that it seemed very awkward and required rolling thicker petals than we wanted. Once the petals were dry, she brushed them with several shades of orange chalk pastel, and then set the color by briefly holding them over boiling water. The steam also gave them a nice sheen.
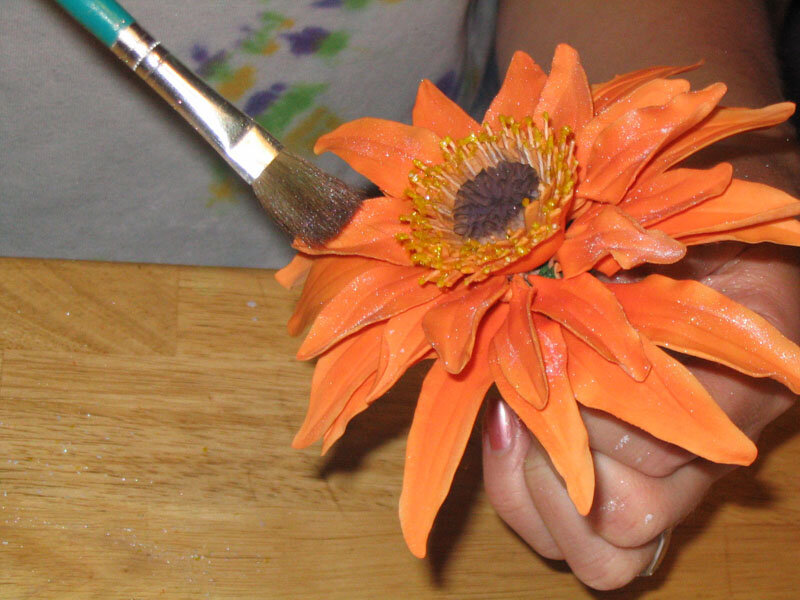
Finally, she was ready to assemble the flowers! First, she dipped the tips of the stamens in meringue powder and water and then dipped them into gold edible glitter. Then she attached the petals to the center stem with the small ones closer to the center. As a final touch, she brushed the petals with gold lustre dust.
Bride & Groom Figures
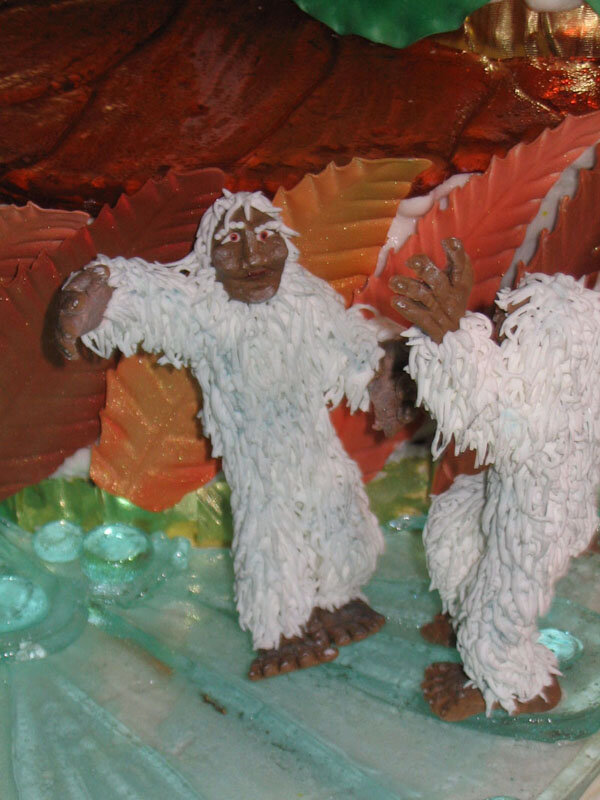
Rather than content ourselves with just one happy couple on the top of the cake, we decided to put a "bride and groom" on each tier of the cake. In keeping with our nature and seasons themes, we set about to select an animal appropriate to each season. Once we had come up with caterpillars for the spring layer, frogs for the summer layer, and dragonflies for the autumn layer we ran into a problem - each of the aforementioned animals can be sculpted and put on a cake full scale, which for some reason I thought was really important and my sister at least humored me, but we were unable to think of a winter animal which would fit on the cake in full scale. Penguins and polar bear were right out, of course, and though we may have been able to come up with some sort of winter mouse, we still weren't satisfied. Then it hit us - pygmy yeti! What could be more perfect? Due to its small size, the pygmy yeti is even more elusive than its larger, more famous cousins such as the migo, the sasquatsch, Bigfoot, and, of course, the standard yeti. In fact, it has yet to be proved that the curious little critter exists outside of this cake and our imaginations, but, if it does, rest assured that it is the same size as the ones I sculpted for this cake. Many of the wedding guests erroneously assumed that I had created small-scale versions of regular yeti, but that just goes to show you the abysmal state of yeti education in this country. That's education about yeti, not education directed at yeti, by the way, though I imagine that a lot of progress could probably be made in that area as well.
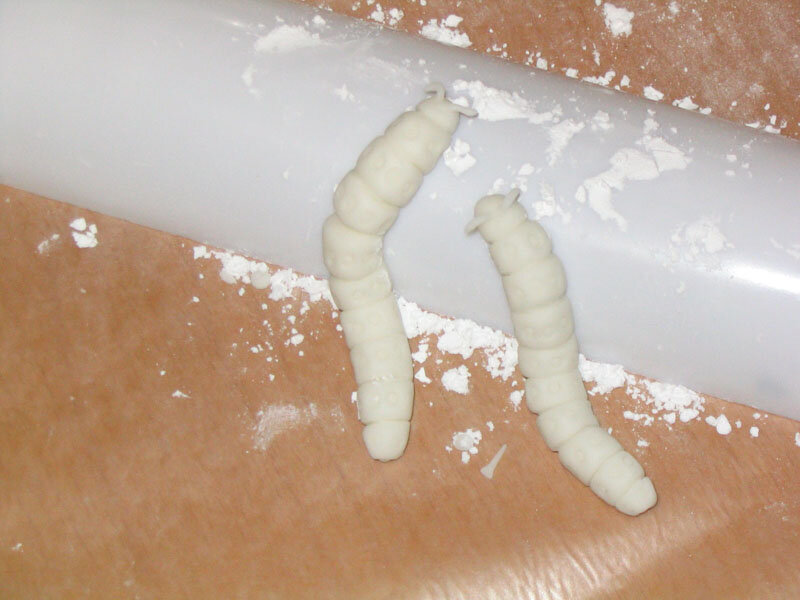
Spring - Caterpillars
We decided on these little green caterpillars because they would stand out nicely on the yellow sugar flower. I always like to have a research photo to work from, so I found a good one with a google image search. These were by far the easiest critters to create. I simply rolled a cylinder of gum paste, and then created the segments with a plastic knife tool from my rolled fondant set. The little spots are made by gently pushing a round decorating tip into the gum paste. I believe I used a #3. A little rolled string of gum paste stuck to the head created the antennae and then the caterpillars were set (arranged in what I hope was a graceful curve) on a large flower former, generously dusted with cornstarch to prevent sticking, to dry. The flower former lifted the front half of the caterpillars off the ground, so when they were set on the cake, they were rearing up the air and twined together. A few dabs of royal icing with a #1 tip created the tiny feet.
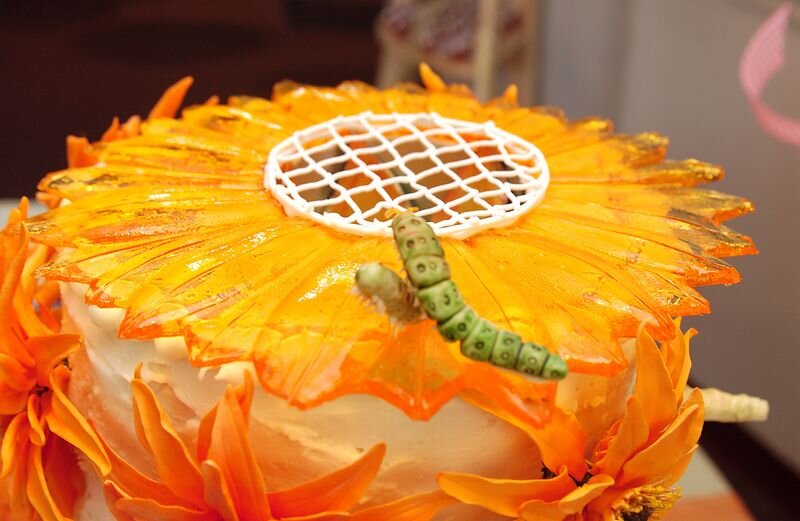
Once everything was dry, I painted them with paste food colors, thinned with water. The only tricky part is not to work one area over too much because it dissolves the gum paste. Just paint one quick coat, then set them aside to dry. I also did a little light dusting of chalk pastel once the food coloring dried to give them a more natural look and to make the two caterpillars look slightly different in color and in shade from each other, which I thought would be more realistic.
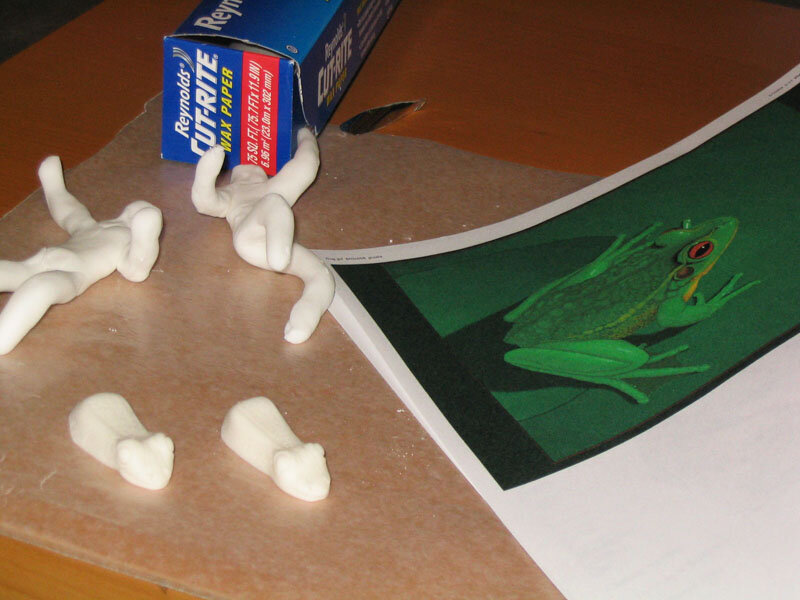
Summer - Frogs
I made the frog bodies and the legs separately, then glued them together with meringue powder once they had dried. One of the gum paste books we were using for reference actually had a picture of a gum paste frog, though it didn't have directions on how to make it. It did, however, provide me with the tip that bulging eyes could be made by pressing a decorating tip into the gum paste, which worked great! I believe I used a #8 for the eyes and a #5 for what I think are ears, directly behind the eyes. I also used a #16 star tip to make the rough skin texture on the frogs' backs. The mouth and the little lines on the back were done with the knife tool. I had to do all this pretty quickly because gum paste has a very short working time before it dries out and starts to crack.

That pretty much did it for the bodies, so I set to work on the legs. The back legs didn't need any reinforcement, but I had to put little #32 wires into the front legs, so they would be strong enough to hold the frog bodies up off the ground a bit.
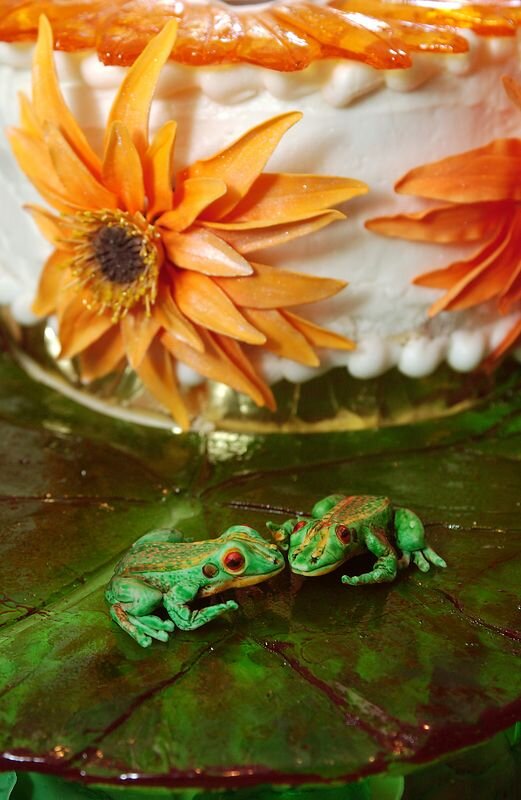
Once the frogs were dry and the pieces glued together, I painted them with paste food colors. I thought about making them red, so they'd contrast with their green sugar lily pad, but we decided against that because we though red frogs might look poisonous and went with standard green instead. First I painted the undersides a yellow ochre (again, working from research I found online) and let that dry before painting the tops green. I used a slightly different shade of green for each frog, so they wouldn't look identical. The eyeballs I painted red, then added a black iris once the red was dry. As with the caterpillars, I added a dusting of chalk pastel to soften the bright green of the food coloring and add a bit of shadow and highlight.
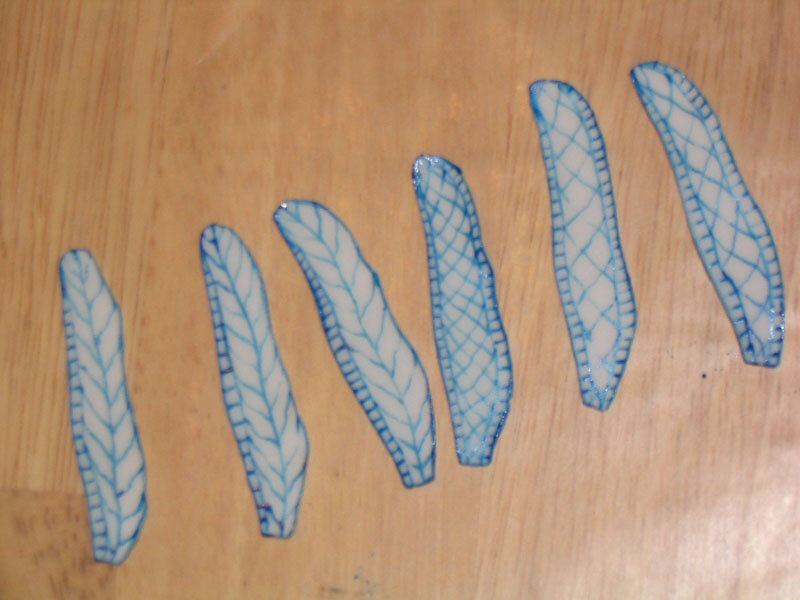
Autumn - Dragonflies
Our gum paste book actually did have directions for making a dragonfly, so I just followed those and used their picture as a reference. The bodies were made much the same way as the caterpillars - a cylinder of gum paste segmented with a plastic knife tool. The shape of the body is slightly different from that of the caterpillars, being rounder and fuller at the head and more tapered at the tail, but the idea is the same. The eyes, like the frogs' eyes, were made with a round decorating tip. The first time I made the wings, following the book's instructions, I wasn't happy with them. Their shape wasn't delicate and specific enough because I had flattened them with the rolling pin again after cutting them out. Also, the wire inside the wings made it impossible to get them as flat as I wanted them to be. I trashed the first set of wings and started again. This time I didn't put wires inside and it worked a lot better. I also rolled the gum paste thinner, cut out a specific shape using a pattern I made out of paper, then carefully thinned only the lower edge with a ball tool. Finally happy with the wings, I set everything aside to dry.
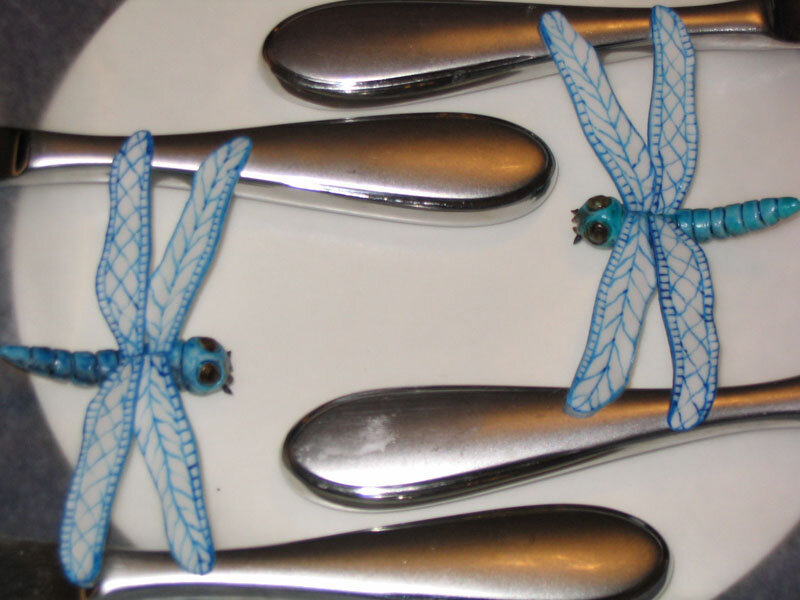
Next, I painted delicate veins on both sides of the wings with blue food coloring. I also painted the bodies with blue food coloring, a slightly different shade for each dragonfly, and added darker shading between each segment with black food coloring. Tiny feelers were added with royal icing and a #1 decorating tip, and the eyes were painted with black piping gel to make them glossy.
The wings were glued to the bodies with meringue powder. One fell off when I was positioning them on the cake, but I glued it back on. A light dusting of blue luster dust on the wings gave them that little extra shine. Amazingly, the dragonflies were even sturdy enough for one guest to take one home to keep.
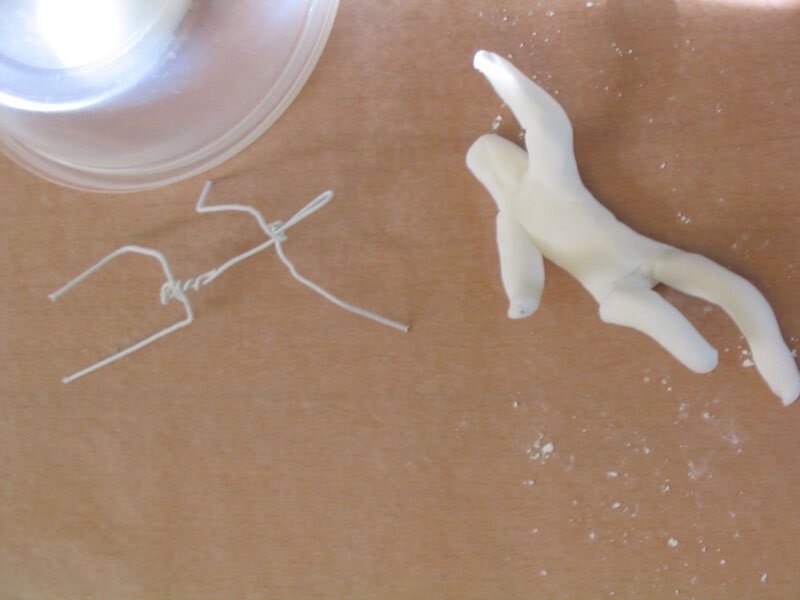
Winter – Pygmy Yeti
The pygmy yeti were by far the most time consuming creatures to make, plus I didn't have any reference to work from, so I had to make it up as I went along. In order to make them stand upright without collapsing under their own weight, I gave the yeti internal wire frameworks, made from #20 white floral wire. I covered this with fondant in the basic shape of a yeti body. I chose fondant instead of gum paste because it has a much longer working time before it dries out than gum paste and I didn't want to have to rush.

The face, hands, and feet are gum paste, colored a nice, rich, yeti-skin brown. I could only do one extremity at a time, then I had to wait for that one to dry before making the next one, so it was quite a drawn out process. At first I had a lot of trouble with the gum paste drying out too quickly (I didn't have the option of using fondant here, because fondant doesn't take fine detail as well as gum paste.), but I discovered that it I kept dipping my plastic sculpting tool in Crisco, it kept the gum paste moist and workable for a longer period of time. I used my own feet as a model (I have surprisingly large feet for someone my size, so they actually made pretty good models for yeti feet.) and I made the toenails and fingernails with #2 and #4 round decorating tips. (Can you tell I really like this new technique I learned?) The feet in particular turned out really well, which is important for such a close relative of Bigfoot, and surprised the heck out of me because I can't draw feet to save my life.
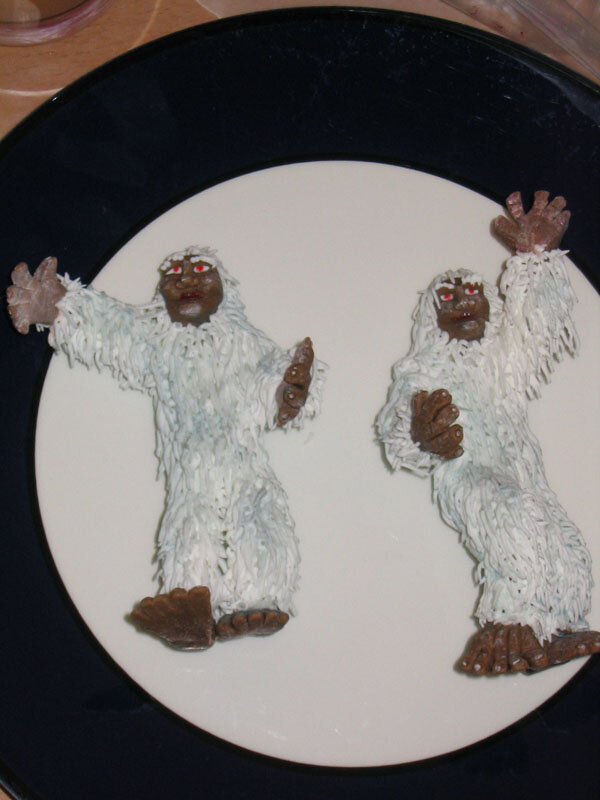
The next step was to give the yeti hair. I toyed with the idea of making the hair out of gum paste, but decided to use royal icing instead. I think I made the right choice. It was another very time-consuming process, but the results were worth it. I drew in each hair individually with a #1 tip and it had to be done in two stages, so that the yeti always had a dry side to lay them down on. I also gave them little royal icing eyebrows and eyeballs.
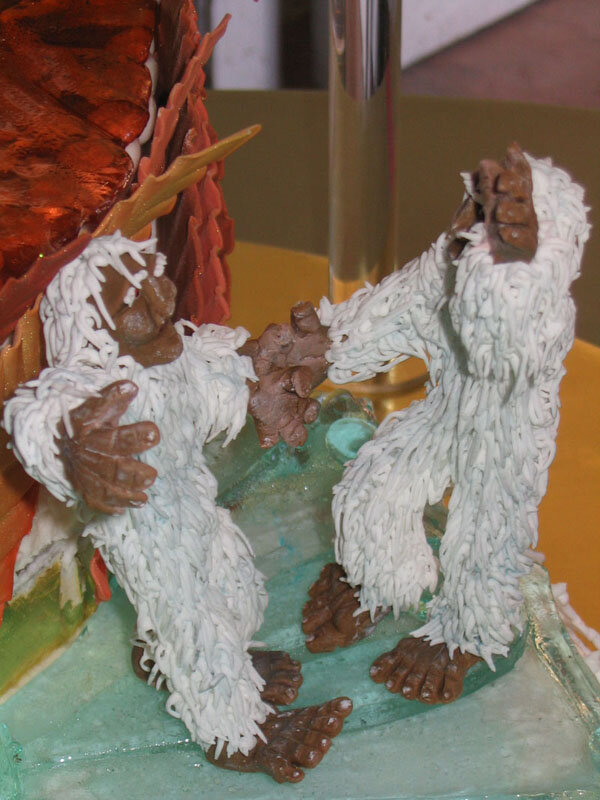
A dusting of a few grey and blue shades of chalk pastel gave the fur that slightly-dingy-wild-animal look and some pink and ivory chalk pastels on the face, hands, and feet, added highlights and emphasized the toenails and fingernails. I'm not sure how I came to the conclusion that pygmy yeti have red irises, but apparently they do. Those are painted with food coloring.
Originally, I had planned for the yeti to be skipping hand-in-hand, but when I put them together they looked like they were jitterbugging, so I went with that instead. We kept the yeti after the cake cutting to give to the bride and groom when they returned from their honeymoon.
Blooming Flower Mechanism
Apparently, just making a cake isn't enough for us. No, our cakes have to do something, even if we don't have time to make it work right. Oh well. We went through about four hundred different concepts and in the end we didn't settle on one so much as we went with the one we happened to be working on when the day of the wedding rolled around.
It all started with the concept of a big flower blooming out of the center of the cake. Nice metaphor for the commencement of the happy couple's new life together, right? Right. But it also raises a very important question - what should be inside the flower? Clearly the center of the flower suddenly becomes the most important spot on the cake, so it has to contain something meaningful, right? We were tossing around a lot of different ideas, including Homer and Marge cake toppers and tiny sugar words saying "love" or "joy" or something along those lines, when my sister suddenly hit on the solution we were looking for - a butterfly! This naturally brought up the idea that the butterfly should actually fly out of the flower, which led to the question - how do me make an edible butterfly light enough that it would be lifted by a tiny fan sitting inside the cake? The solution we came up with was to make the butterflies wings out of petals of edible flowers, but I don't actually know if that would have worked or not because fan difficulties prevented us from ever getting as far as actually making the butterfly.
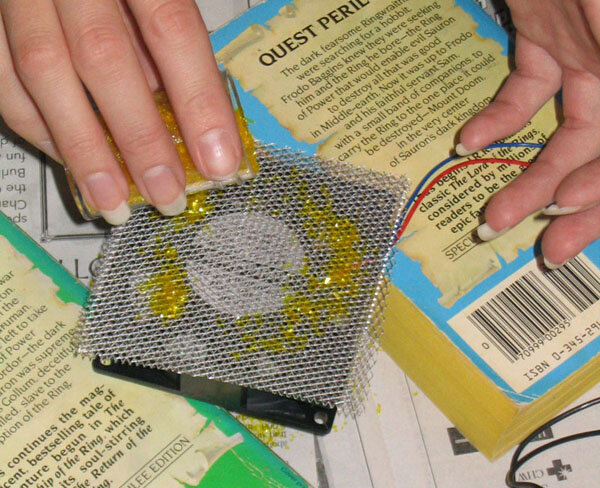
The first fan I tried was one of the little ones you can buy at Radio Shack to cool computers, which was just the right size to fir inside the cake, but, as it turned out, wasn't even powerful enough to launch edible glitter into the air, let alone flower petals or an edible butterfly. So I set out to look for another fan, but with little success. Fans powerful enough were too big and had to be plugged in, fans small enough and battery-powered were too weak. On the day of the wedding I went to a nail salon to get a manicure and pedicure and at every manicure station was a tiny fan, just the right size, for drying nails in front of, but by the then it was too late. Live and learn. I'll remember it for next time.
At this point I came up with another plan. Instead of using a fan, I'd make the center of the flower out of a piece of balloon, which would be stretched as the flower raised up, then released, thereby launching the flower petals and edible glitter inside into the air. We had to give up on the butterfly at this point because this launch mechanism would have resulted in an apparently dead butterfly catapulting into the air, and then smashing into one of the lower tiers of the cake, possibly taking out a frog or a dragonfly in the process.
Finally having a plan in hand that I had good reason to believe would work, I set about making the petals of the large flower, which was to bloom out of the cake. I made six, to be safe, though I only planned to use five. They needed wires inside to hold them to the center and to strengthen them, so I made two sides of each petal, and then glued them together with wires sandwiched in between. Each petal was made by rolling out the gum paste, cutting it out using a paper pattern I had drawn, then softening the edges with a ball tool and drawing in subtle ridges with a dogbone tool. I then set them on a flower former dusted with cornstarch to dry.
Once the petals were completed, I made the discovery that they were way, way too big to fit in the tube we were using and they had altogether the wrong curve to them, which wasn't as upsetting as it might have been because I had, for some inexplicable reason, painted all these petals with hideous bright pinks and yellows. I don't pretend to know what I was thinking when I did that. I'd like to be able to claim that I was under some sort of evil outside influence, but no, it was all my fault. In any event, it's just as well that I couldn't use those petals.
While I'm hovering near the subject of the cardboard tube, I've got a funny story about that, too. My sister and I were trying to figure out where we were going to find a tube the right size to use in our mechanism. We had some mailing tubes, but they were a little too small. Suddenly, in a blinding flash, inspiration smacked me upside the head. "Oatmeal!" I yelled, and rushed to the kitchen, my sister hot on my heels, where I triumphantly extracted from the cabinet a cylindrical container of oatmeal, which turned out to be much too big for our purposes. This did, however, put us onto the track of food containers, and my sister soon returned from the grocery store with a container of cashews, which was just the right size. Several hours later, after we had eaten half the cashews, my sister realized that the cashew container was exactly the same size as the container in which the gum paste mix is packaged. We had three of these in the house the entire time. Obviously we aren't the most observant people in the history of the universe, or maybe we just need to learn to think things through for a few minutes before rushing off in pursuit of something that was right in front of our noses the whole time.
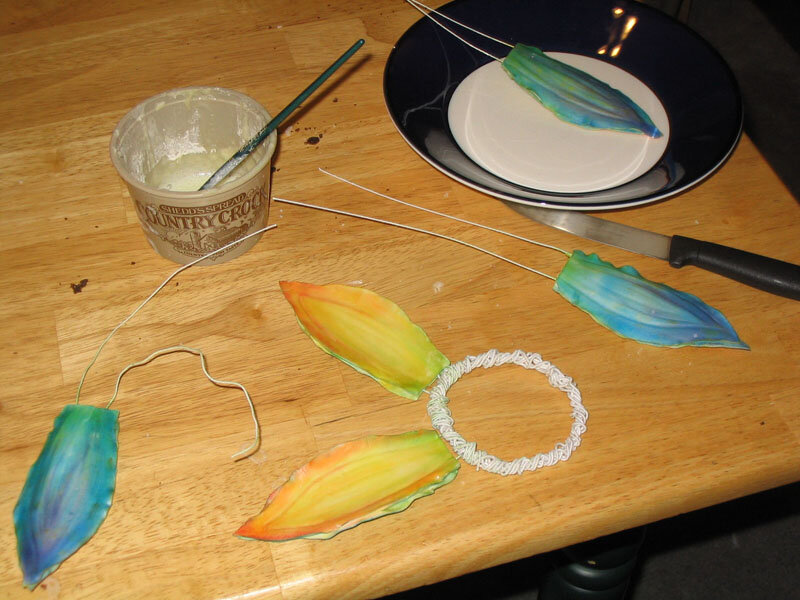
Returning to the topic of the petals, I started over with a new, much smaller petal pattern and this time I curved them the correct way to make them actually fit inside the tube. Once they were dry and their support wires were safely sandwiched in between the two layers of the petals, I set about coloring them. Mindful of past mistakes, I decided to color them with chalk pastels instead of food coloring, allowing for much more natural colors and smoother color blends. I went with a blue and purple color scheme on the bottom of the petals and a yellow and orange scheme on the tops. Remember, it's an idealized fantasy flower. I can make it any color I want. So there. I also added some greens at the bottom of each petal for a more natural stem to petal transition. Then I steamed all the petals to set the colors and make them a little shiny (a trick we learned at our Wilton master class in cake decorating we took last spring.)

With the petals complete, I had only to create the launch mechanism. I first made a ring of several layers of thick floral wire. To this, I taped a cut section of balloon, in which to place the glitter. At this point, we reached the hilarious realization that my launch mechanism looked like a giant condom, but I didn't let that deter me. I attached a wooden dowel handle to the giant condom, then wrapped the wires inside the flower petals into the wires around the perimeter of the condom and the flower was ready to be installed in the cake.
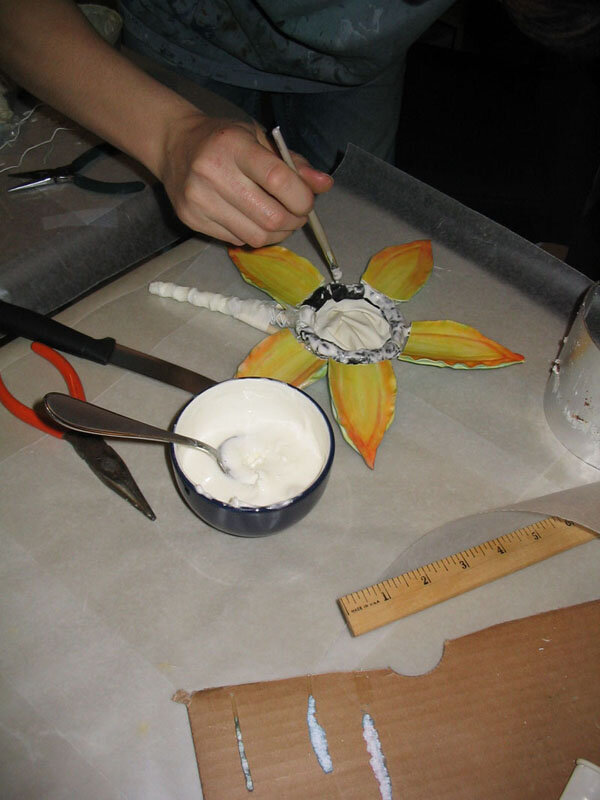
In order for that to happen I had to carve out a large circle in the center of the top tier of the cake. Well, not in the center, actually. It was more off to one side because I convinced my sister that would look more in keeping with the cantilevered, spiral design of the cake. In retrospect, I don't think I was right about that, but oh well. Even I can't be right all the time. Once I had hollowed out the large circle in the center of the top tier, I inserted the cardboard tube from the cashews (cut down to the right height) into the cake, then carved a groove for the handle of the flower to travel in. At about this point, I realized that the tier was slightly shorter than I had figured on and my petals were too long to fit inside the cake, so I had to take them off the condom, remove the wires, carefully cut off the bottom of each petal, reinsert the wires, and rewire them to the condom. After a surprisingly smooth execution of this procedure, I was ready to insert the flower in the cake.
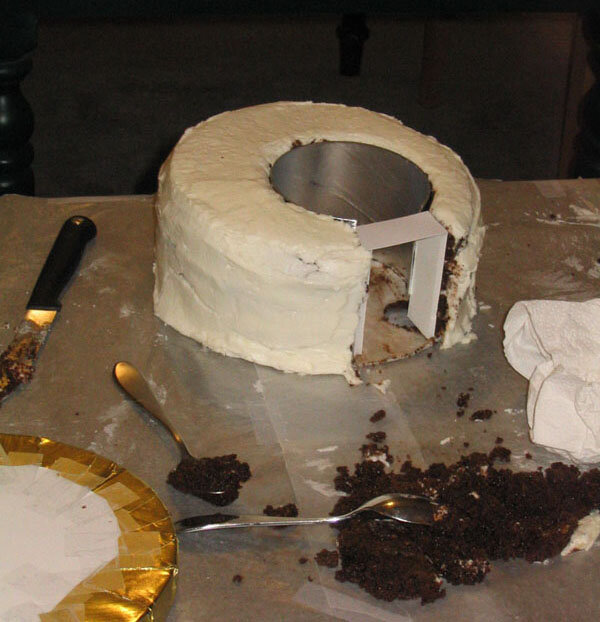
In order for the glitter to be launched into the air, the balloon had to be pulled tight, then released when the flower was lifted up and out of the cake. After experimenting with all manner of clamps and dismembering a little model-making clamp assembly I own, I hit on the solution of putting a tack down through the center of the balloon into the foamcore beneath the cake. This would hold the balloon for a little while until it stretched enough that the hole in the balloon would pass over the head of the tack, releasing the balloon. That done, I poured gold edible glitter into the center of the flower, covered the opening in the sugar flower with a sort of royal icing grid, and prayed for the best.
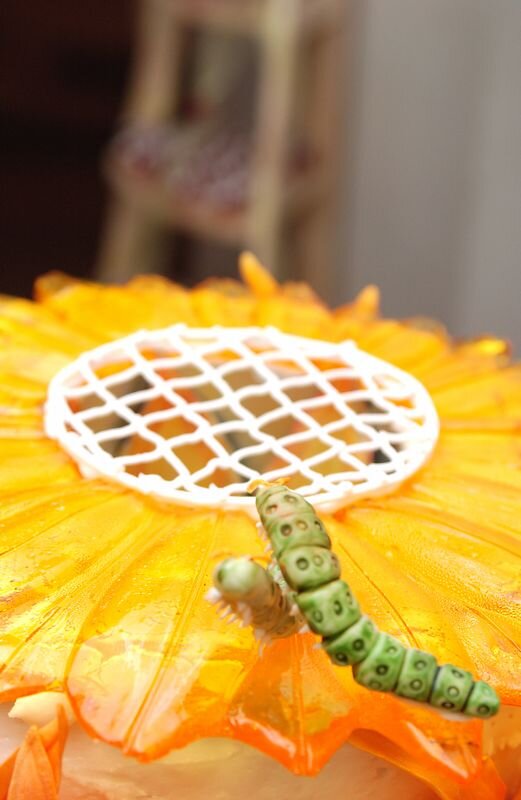
Assembly
Once the structure of the entire cake was together, it remained only to arrange and attach all of our pre-made decoration. For some reason I expected this to be much easier than it was.
The sugar plates actually were easy - they just plopped right down in place. We wet the icing on top of each tier first to make sure they stuck, but that may not have even been necessary. Incidentally, it would have been quite a neat, elegant looking cake with just the sugar plates and no other decorations.

I then piped bead borders around the top and bottom of each tier to hide various and sundry imperfections, then set about attaching the decorations.
We had decided not to attach the figures or the snowflakes until we arrived at the reception site because we didn't want them to break en route, so I had nothing to do on the winter layer for the moment. Which was fine with me because the autumn layer gave me more than enough trouble for two. It took me while to figure out the best way to arrange the autumn leaves around the side of the autumn tier because they were too tall to really fit under the sugar plate and not curved enough to go to the outside of the sugar plate, which extended in some places several inches beyond the cake. After a few abortive attempts, I settled on angling all the leaves so they would fit under the sugar plate and eventually managed to get them all stuck on with royal icing. (Quite a few of them fell off in the car on the drive to the church, but we just stuck them back on once we arrived.)
The summer layer was much easier, because the lily pads were just the right size, possibly because my sister made those, since everything I made for this cake for some reason came out too big. They stuck on easily and the lilies were laughably easy to stick in between.
Spring was also a breeze (again, my sister made these flowers). The gerbera daisies had big wire bases, which I stuck right into the sides of the cake. I placed a delicate royal icing mesh over the hole in the center of spring's sugar plate out of which the flower was to bloom and spring was finished.
That was it for the home assembly - the rest would have to wait until we arrived at the church, which, by the way, is a saga all by itself. There may be no more stressful car ride in the world than a car ride with a cantilevered cake in the back seat. Fortunately for me, My sister drives a station wagon, while I drive a truck, so she was the logical choice for cake chauffer. Because our plans on the day of the wedding called for her to drive to get the bride while I drove to get plastic supports for the cake we needed to take two separate cars, so I couldn't even be in the car with her to offer to moral support. The best I could do was to give her the occasional thumbs-up when she glanced in the rear view mirror.
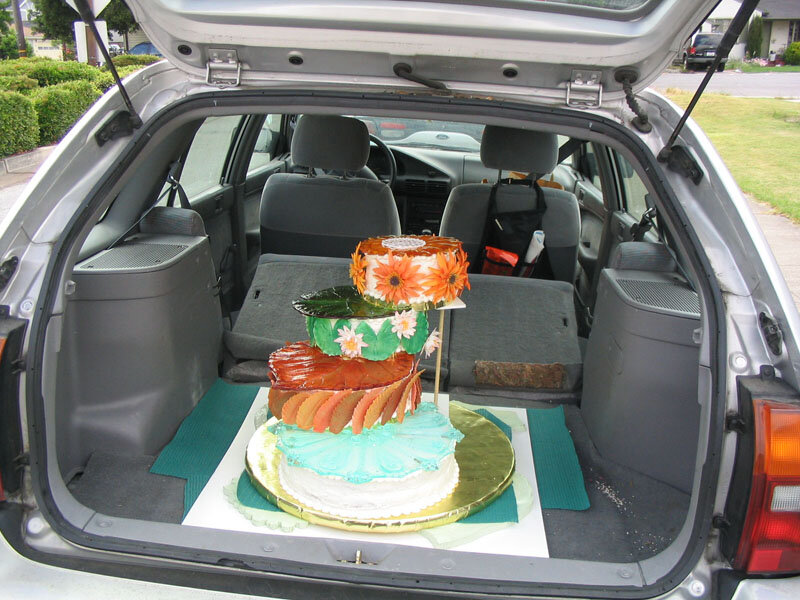
Even just moving the cake from our table to the car was scary. It was pretty darn heavy for a cake, let me tell you, and the round board it was sitting on was only a few inches smaller than our door. We got it safely ensconced in my sister's station wagon, on top of some non-slip material to keep it from shifting. To protect it against dust and such we built a box of foamcore around it and, making sure that our temporary dowel rod supports were firmly in place, we were ready to go!
I can't even imagine how nervous my sister must have been, listing to every creak or snap from the back of the car and cringing at every pothole. It was bad enough just following her. We only pulled over once on the forty minute drive to the church when my sister heard a noise which turned out to only be a few of the autumn leaves falling off.
We made it to the church unscathed and it remained only to get it in the building and onto its table, a process that was greatly assisted by the presence in the church kitchen of a rolling cart.
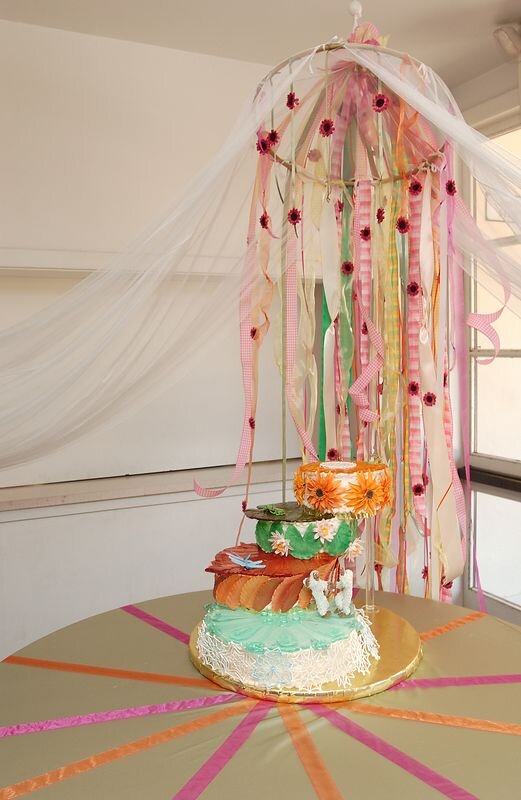
Once the cake was safely in place on the designated cake table (around which the bride and her helpers had erected a lovely ribbon canopy). My sister set about repairing the fallen autumn leaves while I rushed off to the local TAP plastics to get thick plastic rods to use as temporary supports for the cake (much more attractive than the temporary supports we had been using which I made out of dowel rod and foamcore.) I returned to find that the leaves were mended and that my plastic supports were, indeed, quite attractive.
At this point I took over the project of putting the finishing touches on the cake so that my sister (who was also the matron of honor) could scamper off to help the bride prepare. The snowflakes were simple to attach with a little royal icing, as were the various animal couples. I was very careful to position the caterpillars on the top tier so that they wouldn't be crushed by the giant flower when it bloomed out of the cake. That done, I headed out for a well-deserved manicure and pedicure.
Presentation
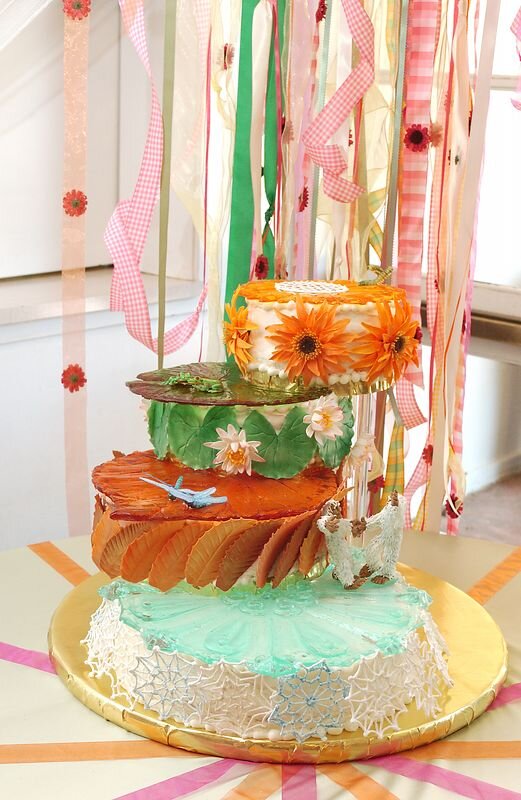
We kept the plastic supports in place until the ceremony was over (I cried; my sister cried; the bride cried; it was a great success.) and the reception began. Then we took them out and hoped for the best. Everything seemed fine, so we went to enjoy the sangria with little plastic monkeys on the glasses. After about forty-five minutes we checked the cake and decided to put the supports back in as a safety precaution because it had tipped a little bit, but it probably would have been fine without them as it wasn't long after that that we were called upon to serve the cake.
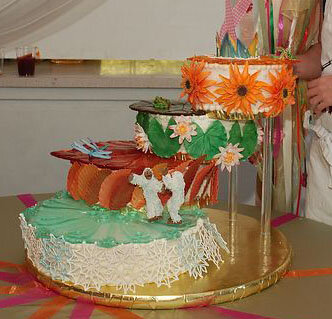
Of course, before the cake was served, the flower had to bloom. Or fail miserably. I couldn't be certain which. We gathered all the guests around the cake where my sister and I described our concept then I warned everyone that, while I hoped the cake was about to do something dramatic, it was possible that it was going to be a complete flop. Then I took hold of the handle and raised the flower. At first, nothing happened. The balloon was too firmly attached to the bottom of the cake and wasn't letting go. A great sigh ran through the assembled celebrants. I gave one last desperate tug and the balloon broke free! Gold glitter spewed into the air and was greeted by cheers! The flower didn't quite make it all the way out, so it only opened part way, but it was a heck of a lot better than nothing.
We pulled the sugar plate off of the top tier so the bride and groom could cut their first piece, then we moved the whole shebang into the kitchen to cut it into servings. We've never cut a cake this big before, but we had a diagram of how it's usually done and I think we did pretty well. I unbolted and disassembled the cake and removed the dowels while my sister and another woman from the church cut the pieces. I also answered questions about gum paste and sugar and isomalt from a few astute young boys who were fascinated by the whole thing and hung around the kitchen the entire time we were serving the cake then took various gum paste flowers and lily pads and such home with them to keep. It's nice to be appreciated.

Our work finally done, we kicked back on a bench in the courtyard to revel in our success, drink sangria, and watch some nearby children make long, beautiful, unintentionally pornographic chains out of the plastic drink monkeys.

For the moment we chose not think about the absolutely giant mess we had waiting for us in the dining room, kitchen, and garage at home.
Resources
We also learned many of our techniques (and had a fabulous time) at the Wilton School in Darien, Illinois. We took the The Master Course, Introduction to Gum Paste, Introduction to Rolled Fondant, and Introduction to Pulled Sugar. Sandy, our Master Course instructor, was one of the best teachers either of us had in any subject.
Our source for the food-safe mold making material (we used the Perfect Soft Silicone). They also have a helpful guide to mold making.

Thorax Cake
I generally make a bleeding heart cake for our annual pumpkin carving party (Pumpkinfest). Sometimes the heart beats, sometimes it's anatomically correct, and so on and so forth. This year I decided to go the whole hog and make an entire thoracic cavity cake.
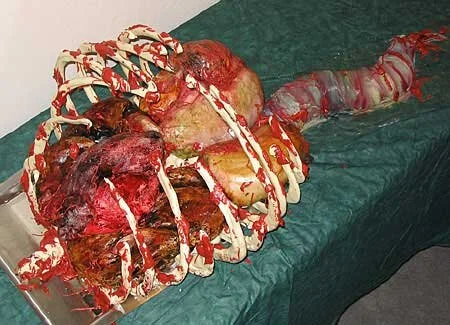
The Thorax Cake - grossing out the internets since 2003.
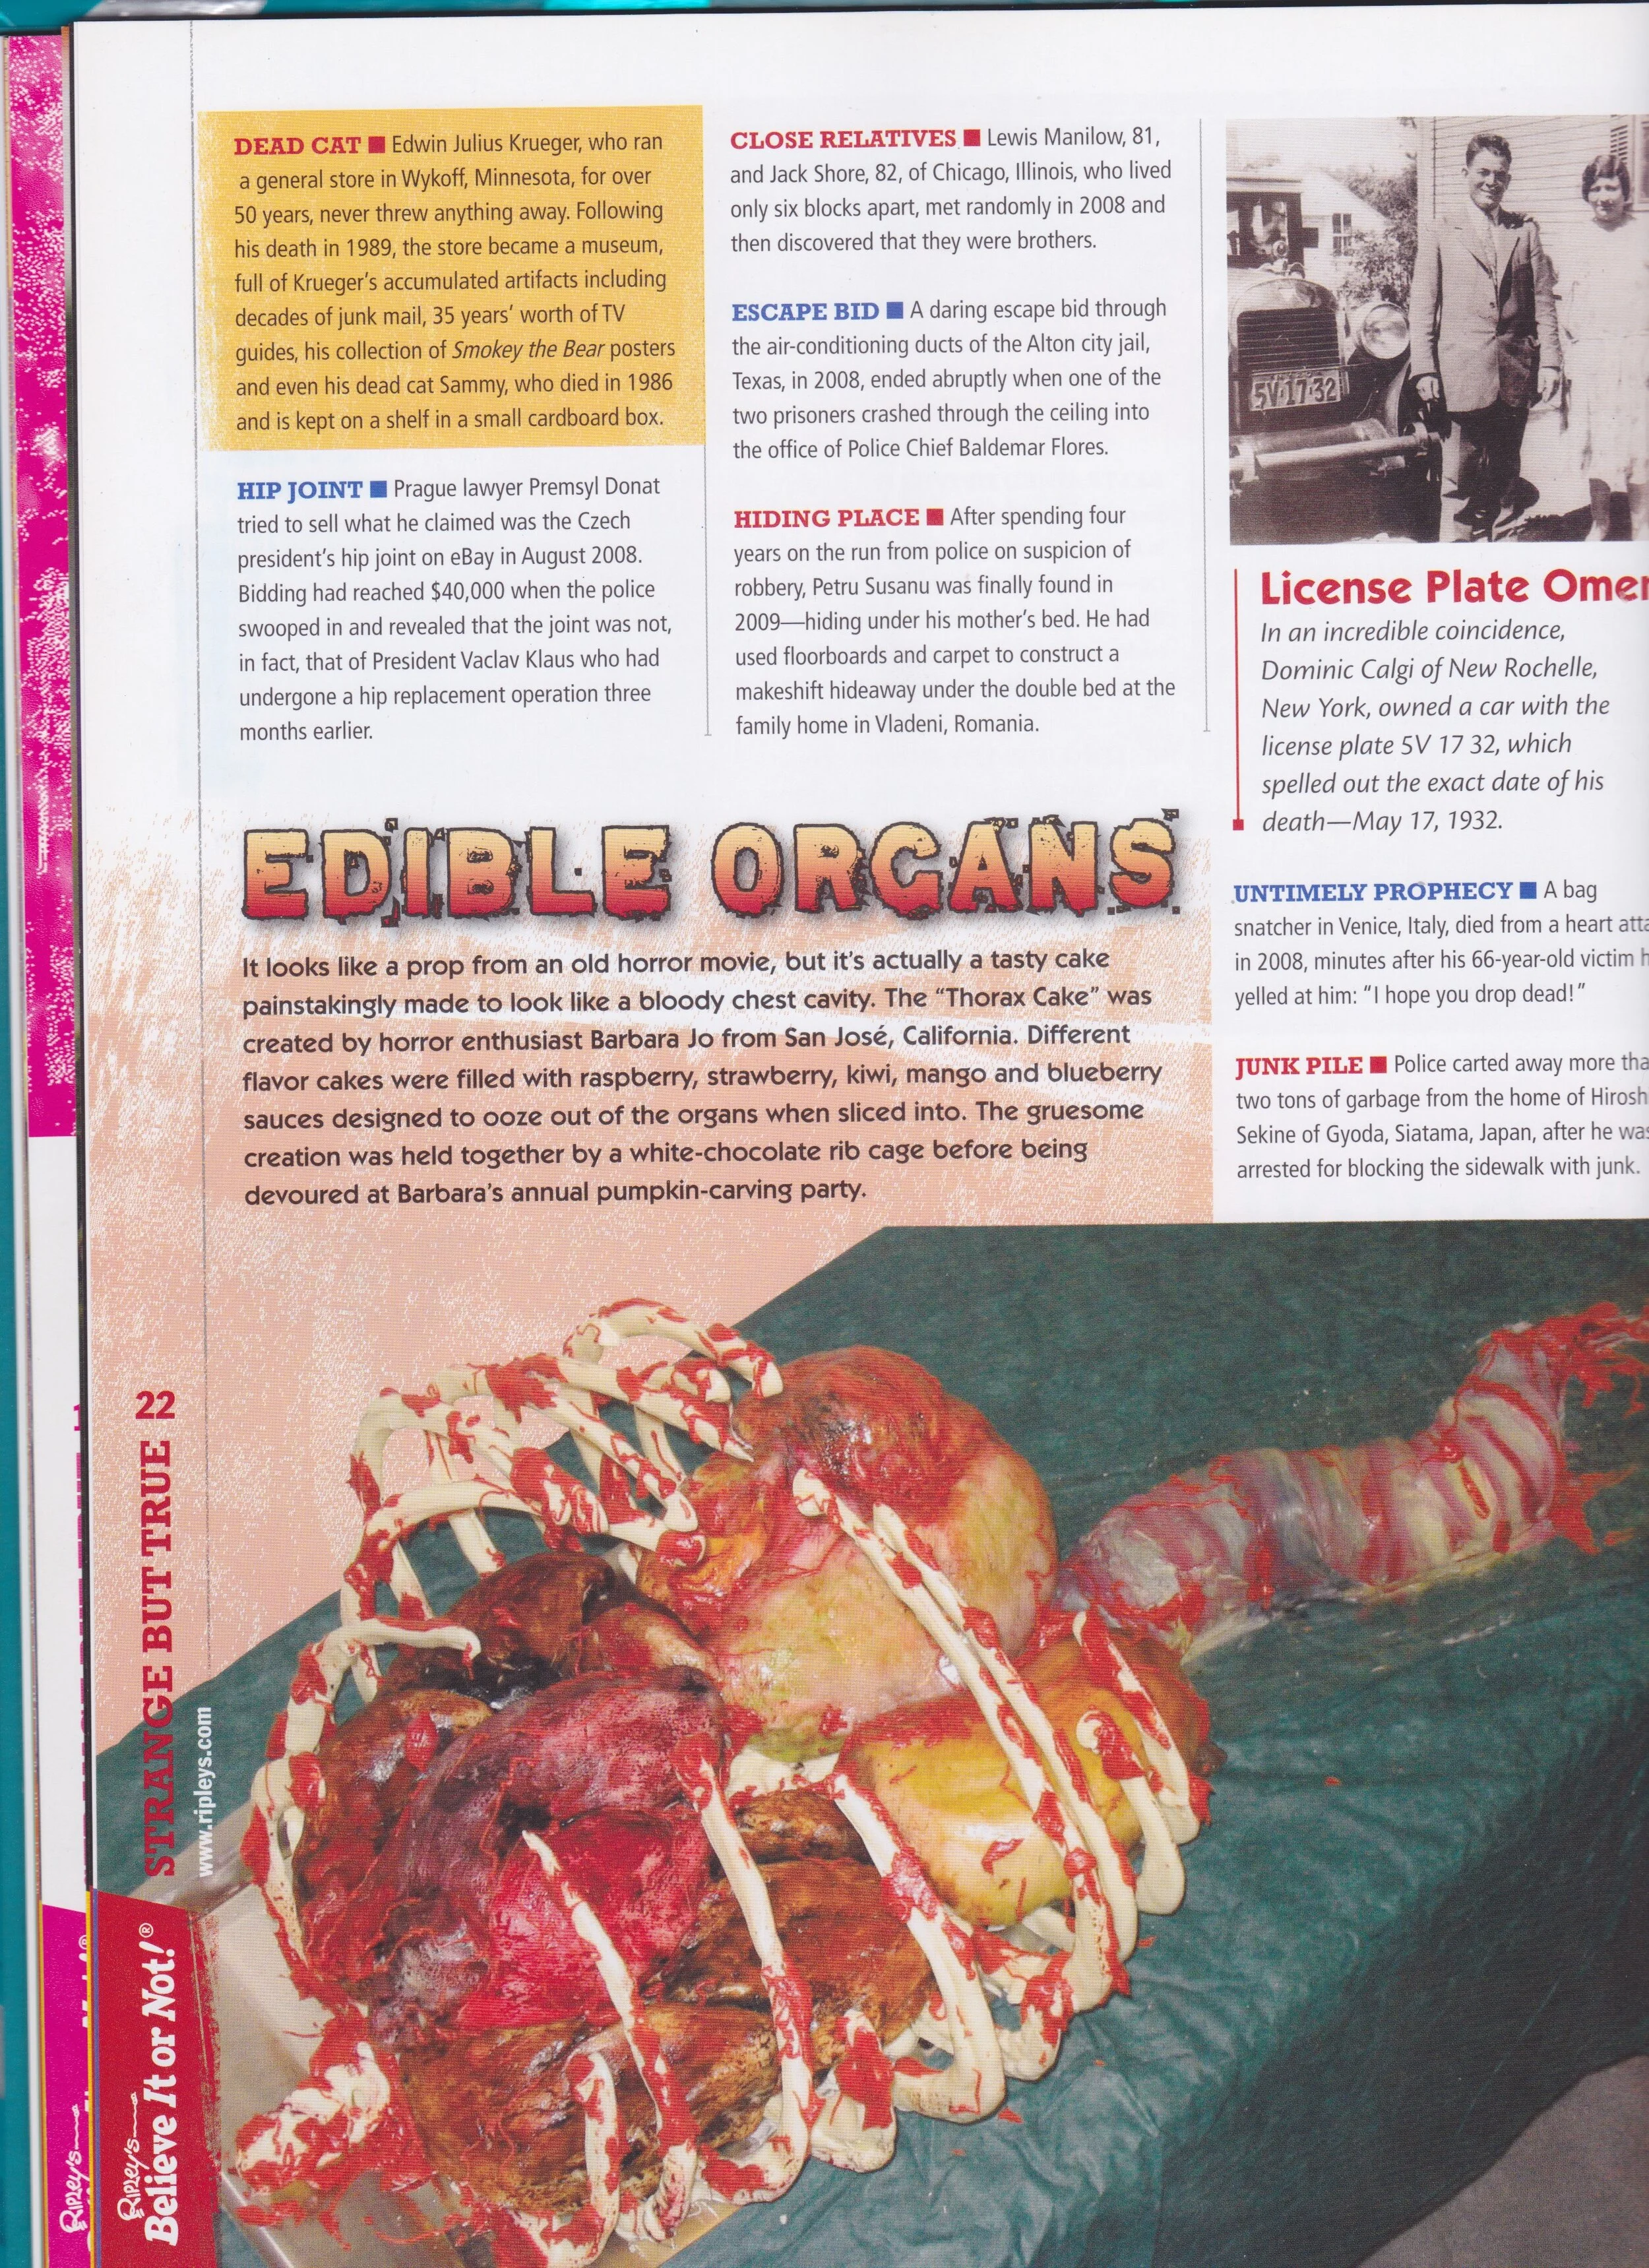
I generally make a bleeding heart cake for our annual pumpkin carving party (Pumpkinfest). Sometimes the heart beats, sometimes it's anatomically correct, and so on and so forth. This year I decided to go the whole hog and make an entire thoracic cavity cake. The plan was for each organ to be made out of a different kind of cake and to secrete a different color of fluid when it was cut into. Previous heart cakes have bled fresh, homemade raspberry sauce. This year I made raspberry, strawberry, kiwi, mango, and blueberry sauces. Sadly, the organs didn't bleed as well as I had hoped when I cut the cake, as each organ was relatively small and couldn't hold much sauce. Also all the moving around after filling the organs made it hard to keep the sauce contained in the little cavities I hollowed out. The heart bled pretty well, but the other organ fluids weren't very dramatic. On the bright side, there were lots of leftover sauces, which were all quite delicious. But I'm getting ahead of myself. My intended organ-cake-sauce combinations were as follows.
Heart - orange cake with raspberry sauce
Lungs - apple spice cake with strawberry sauce
Kidneys - orange cake with blueberry sauce
Stomach - ginger cake with mango sauce
Liver - chocolate cake with kiwi sauce
Small Intestine - jelly roll with red currant jelly
Unfortunately the liver suffered a complete structural failure when I tried to transfer into place within the rib cage, so it had to be eliminated from the presentation. I like to think that the liver was the tastiest bit and so whoever ripped this unfortunate man apart (My sister thinks it was Klingon because it was slightly larger than life size, but I'm not sure Klingons have the same internal organ structure.) ate the liver first before it ever got to our pumpkin party.

After baking all the different types of cakes, I carved them into the shapes of the appropriate organs, using my handy Gray's Anatomy as a reference.
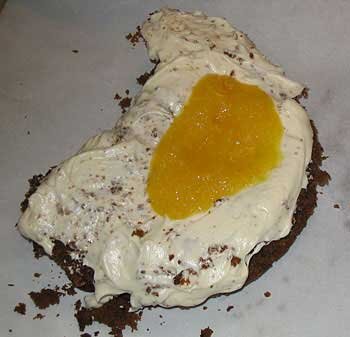
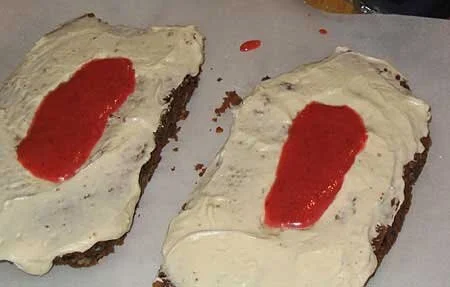
I then flipped each organ over, hollowed out a cavity in the center and frosted the inside of the cavity and the underside of the cake with buttercream frosting. After spooning in the fruit sauces, I sealed the cavities with a layer of fondant icing and flipped the organs back over. The heart and the lungs I covered with white modeling chocolate and the kidneys and stomach I covered with fondant icing. Both had their advantages and their disadvantages. White modeling chocolate tastes better than fondant and it sticks to itself better than fondant, but it's more difficult to work with on cakes like these which were relatively unstable due to the hollows in the middle. Also, modeling chocolate is difficult to paint with paste food coloring, which is what I usually use. It can be painted easily with powdered food coloring, but I didn't have any cocoa butter to dissolve the powder in. The fondant is easy to roll out and wrap around the cake and very easy to paint but it doesn't hold sculptural detail as well as modeling chocolate.
At this point, I took a break from the cakes in order to assemble the white chocolate rib cage in which all the organs were to be placed.
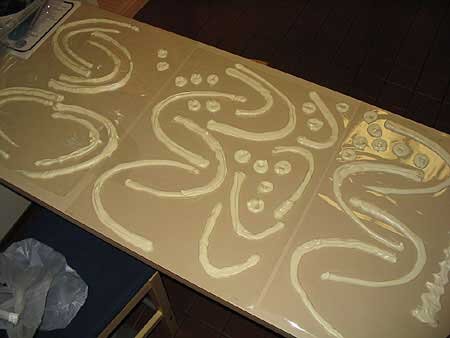
I tempered white chocolate chips in the microwave and piped ribs and vertebrae onto acetate with a plastic piping bag. I drew ribs onto paper which I placed underneath the acetate to insure that the ribs would be the same shape and the right size.
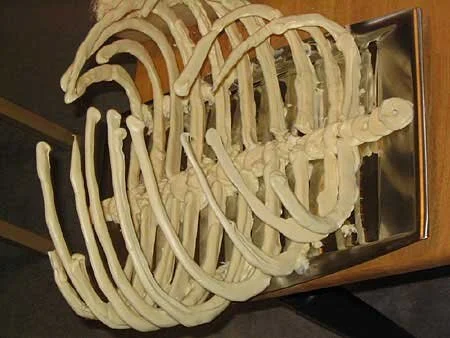
Dipping each piece into a bowl of melted white chocolate, it was relatively easy to assemble the rib cage on a silver tray. (The tray's last use was for passing out cookies at my sister's wedding.) Of course, with all the organs on top of it, virtually no one ever actually saw the fact that there was a complete spinal column underneath all the cake so some might say there was a bit of wasted effort there, but I say if you're going to make an edible, anatomically correct chest cavity dessert tray, you might as well do it right!

Once the rib cage was dry, I placed all the organs except the liver in the appropriate places inside it (again using Gray's Anatomy as a guide. This is, by the way, the only use that Gray's Anatomy ever sees in our household.)
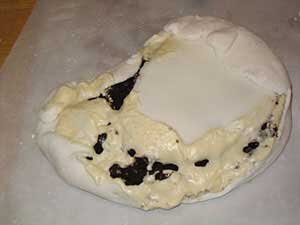
It was at this point that I realized the liver was beyond salvaging. (I had problems with the liver from the moment I tried to take it out of the cake tin.)
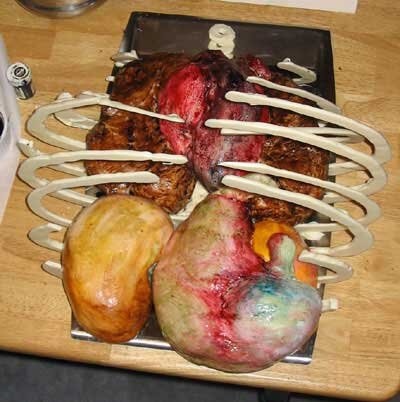
I'm not really sure what colors kidneys and stomachs and such are supposed to be, but, drawing on my vast experience watching people in movies being disemboweled, I gave it my best shot.
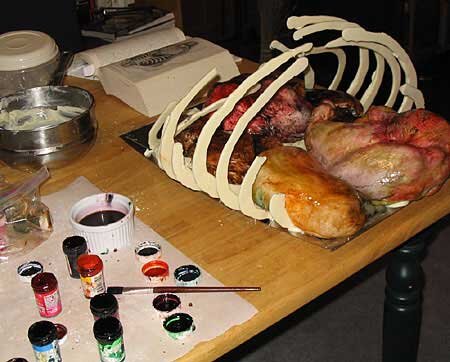
I'm not sure how accurate the results were, but they were definitely gross.
At this point my sister came home from a party and helped me move the cake to its final location so I could attach the intestine, which was to be trailing out of the rib cage so as to suggest that the person to whom the thorax had belonged had been ripped apart, rather than carefully dissected.
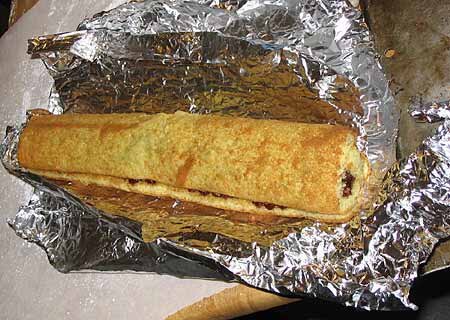
I bent the jelly roll (which I was quite proud of; I'd never made that kind of cake before and I sometimes have problems with whipping eggs. Fortunately, I was visiting my mom recently and she told me that it's very important the mixer and bowl be very clean and perfectly dry or the egg whipping won't work, so I didn't have any problems at all this time. Thanks, Mom!) into appropriate curves and covered it with white chocolate. I was, by this point, out of both kinds of frosting, lacked the ingredients to make more, and it was four o'clock in the morning so I couldn't get any more. That's why I just used plain white chocolate to cover the intestine. It looked fine, but was pretty difficult to paint, again because I lacked cocoa butter and so couldn't use the powdered food colors.
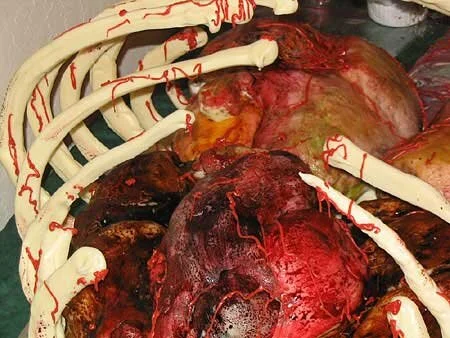
All that was left was to add the buttercream frosting blood, so it wouldn't look so pristine.
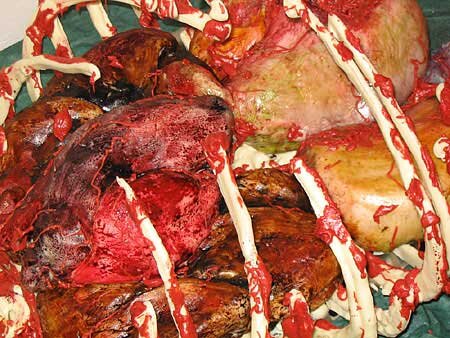
I did little veins on the organs first with a piping bag, then put big globs of gore on the ribs with a knife. A little spritz of corn syrup to give it that all-important oozing, wet look and I was done!
Tragically, the next day was very hot and, as white chocolate melts at about 95 degrees Farenheit, this caused major structural failure of the rib cage. By the time our guests arrived for Pumpkinfest, the rib cage had collapsed almost completely. It was nice and stable in the middle of the night when it was cool, though, I swear! So we put a photo of it in its original state up on the computer monitor. Actually, even with the rib cage broken, it looked pretty gruesome and neat, but it was better before. As I mentioned before, the cutting of the cake was not as dramatic as I had hoped, but, considering that I make all this up as I go along, I think the whole project didn't go too badly at all. And everyone said the cakes and sauces were all delicious, despite the excessive amounts of frosting required for this sort of project.

Zombie Cake
I made this cake version of our logo for a gala party we threw to celebrate our 100th review on theyrecoming.com.
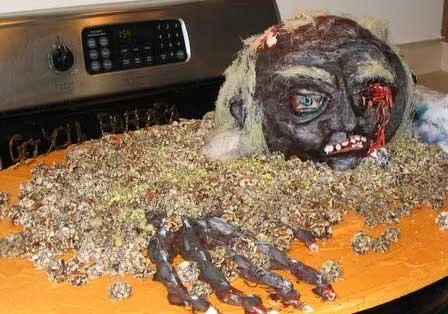
I made this cake version of our logo for a gala party we threw to celebrate our 100th review on theyrecoming.com.
The highlight of the party, if I do say so myself, was my zombie cake, which we named Orville, after the dead guy in Children Shouldn't Play with Dead Things, though it looked nothing like him. In effect, it was a three-dimensional version of our logo, a zombie rising up out of the grave, or, in this case, rising up out of a field of my homemade French cream candies. The head was made of sour cream chocolate chip cake, dyed red to resemble brain matter, covered with modeling chocolate and various other frosting and hard candy details. The hand was made of mint-flavored hard candy bones covered with chocolate. Green hard candy letters around the perimeter reminded everyone that "They're coming to get you, Barbara." At the height of the party we gathered everyone around it to witness the thrilling moment when raspberry flavored blood spurted from his eyes and poured from his mouth. In fact, it sprayed a bit further than I expected it to. Fortunately only my sister and I were hit.
I calculated that, between the cake, the French creams, and the bloody eyeball cordial cherries, I went through 15 pounds of granulated sugar, 2 bags of powdered sugar, 8 large bags of chocolate chips, 2 bottle of corn syrup, 8 pounds of dark chocolate, and 4 pounds of white chocolate. I have a slight tendency to go overboard with these things. We have a lot of eyeballs left over.
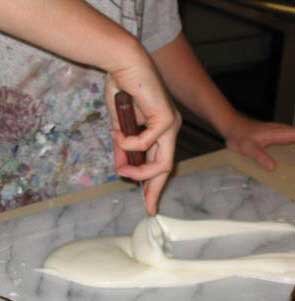
The first step is to make the French creams that will be used for the dirt in the zombie presentation. The creams have a flavored fondant center, dipped in chocolate, and then rolled in chopped nuts. Here, I am preparing the fondant by working it on a marble slab.

These are the completed fondant centers. The colors are all flavored differently -- I believe these are chocolate, pistachio, cherry, and orange. At this point, we're five days before the party.
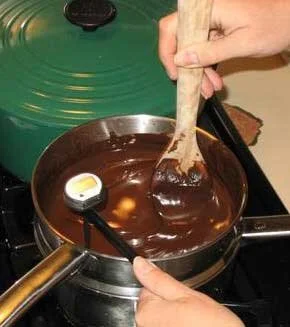
Here, I am tempering the chocolate to prepare it for dipping the creams. I’m using a double boiler and candy thermometer.
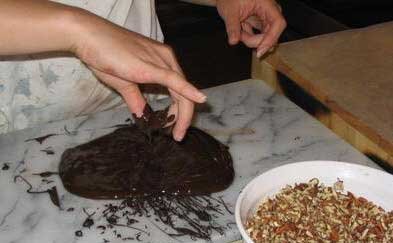
After the chocolate was tempered, I poured out a portion onto the marble slab. I dipped each fondant center into the chocolate, and then rolled it in the chopped nuts. The candies were completed four days before the party.
As a side dish to the zombie cake, I decided I also wanted to make cordial cherry eyeballs. Before dipping the maraschino cherries, they were soaked in rum or brandy for several days. They were then dipped in the center filling and left to dry. After this, I dipped them in white chocolate. Dark chocolate is better, but it wouldn't really work for the eyeball concept.
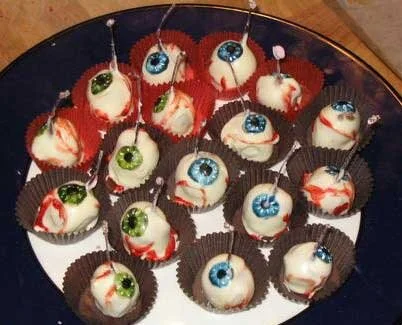
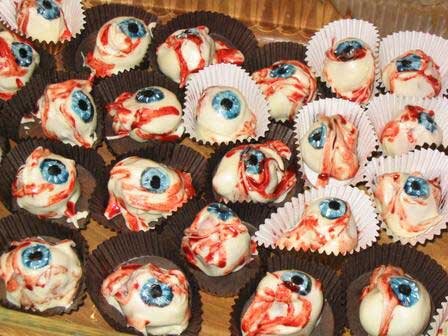
Yes, we had lots of eyeballs. They were painted using powdered food coloring dissolved in melted cocoa butter.
And we finally start the cake! Yes, it really did require that much cake. We used a recipe from The Joy of Cooking for a very yummy sour cream chocolate chip cake. Red food coloring swirled in the batter gave it a delicious-looking bloody brain color. Any light-colored cake would work as well.

This is me straining the fresh raspberry sauce which will be used for blood. This is great over cake or ice cream, even if your dessert doesn't bleed. Puree 1 pint of raspberries, 3 tablespoons of sugar, and 2 teaspoons of lemon juice in a food processor. Then strain the mixture through a fine sieve to remove the seeds.
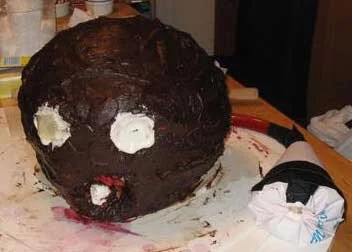
Ok, we've skipped a few steps here (clearly). This is the completed base of the cake. There are 5 layers of cake here, frosted with a chocolate ganache, which is made by melting semisweet chocolate with cream, and if you like (and why wouldn't you?) flavored with liqueur. Because it's so tall, we had to use interior supports, or the whole thing would have just toppled over. I cut a circle of foam core and stacked it between the middle layers. It's supported below with wooden dowels pushed into the cake, trimmed to just below the level of the layer. Of course, it was a little more complicated than that, since the plumbing system also had to be installed. You can see the large pastry bag to the right of the head, which is filled with whole lot of raspberry syrup. The bag is attached to a plastic tube, which curves behind the cake and enters in the back. Inside the cake, there's plumbing to send the syrup to outlets behind both eyes and the mouth. The outlets are blocked with frosting to prevent premature ejaculation, so to speak.
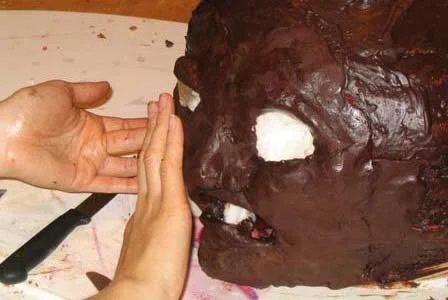
Once the base of the cake was completed, I started sculpting the facial features out of modeling chocolate, which is semisweet chocolate melted with corn syrup. Once chilled, it's very easy to work with and pretty tasty.
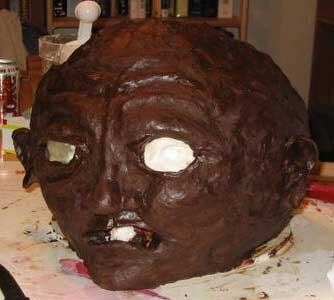
This is the completed face, with all the modeling chocolate details.

These are hard candy eyeballs, which were made by pouring out hot candy (sugar, water, corn syrup, and coloring) and pushing it into icky globs as it cools. Orville's right eye is already covered with a candy eye, so when the blood is pushed through, it'll fill up behind the eye before spilling out.
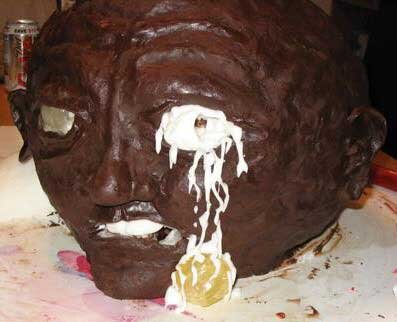
Orville's left eye has fallen out, so the other candy eyeball is just placed on the base. The blood details are done with royal icing.
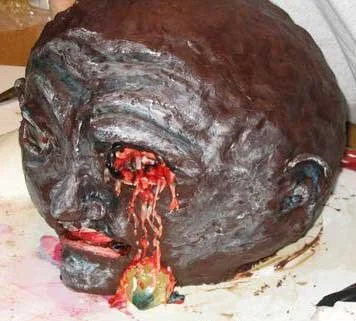
The next step is to paint the face details and the blood. The paint is powdered food coloring mixed with melted cocoa butter. It has a consistency kind of like oil paints, and the cocoa butter can be melted in the microwave.
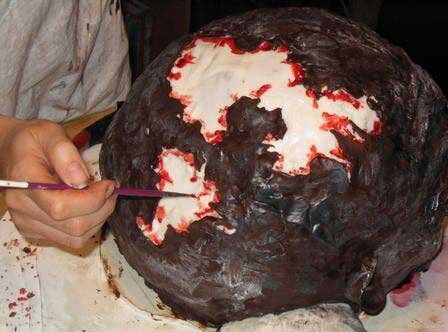
Here's me painting blood on the bits of exposed skull. The skull is done with royal icing, with modeling chocolate layered over it to make the ragged edges.

Here's Orville's hand, rising up out of the orange ground. Prior to placing the hand, the base was frosted with royal icing colored to match our site. The bones of the hand are mint-flavored hard candy, dipped in dark chocolate. The finger nails are royal icing.
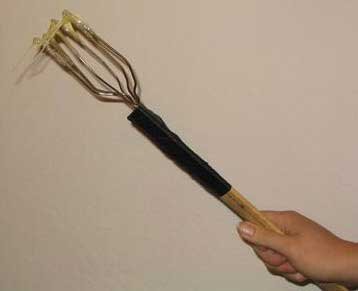
I display my zombie hair-making tool. I made it by cutting up some old coat hangers taped to a ruler, creating sort of a deformed whisk. To make the hair, I dipped the ends of the deformed whisk in hot candy, and then whipped it back and forth over two wooden spoons attached to the edge of the counter. As the candy cooled, it hardened into wispy somewhat hair-like strands.

Here's the skull with the hair attached. The strands are thin enough that they just kind of melt onto the head.

Note the lovely hairy eyebrows. Orville's left shoulder is the raspberry blood-filled bag, covered with a t-shirt. His right shoulder is made of fondant (cake fondant, not the kind used as the centers of the chocolate creams).

You can see the layers on the platform here, created to give Orville uneven ground to climb out of. The platform is made out of foam core, glued together in layers and covered with royal icing.
And here we have the full dirt presentation. The French creams are arranged around Orville, creating a lovely field of dirt. The different types of nuts create a nicely varied texture.

This is the hard candy lettering that followed the curve of the base, reminding us, "They're Coming To Get You, Barbara!". Usually I just pour the hot candy directly onto the marble slab in the shape I want. The letters require more detail than that method allows. The candy is hot enough to melt a paper or plastic pastry tube, so I used a 70's-era metal pastry tube, and filled that with the hot candy. I wasn't able to find a similar one online, and I'm not sure they're even made any more.

Orville looks pretty happy in the French cream dirt. Too bad about his eye.
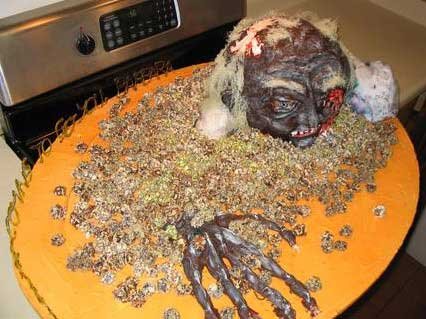
Wow, Orville has big hands. You can see that the shirt covering the raspberry blood bag has now been distressed (as you'd expect a zombie's shirt to be).

And here we are post-explosion! When I squished Orville's left shoulder, the blood shot out his left eye, slightly splattering both of us (but fortunately none of our guests).

I put our cleaver to good use serving the cake.
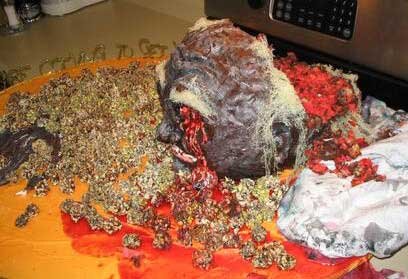
We did a fair job on the back of Orville's head, but of course we had at least three quarters of the cake left. My sister brought it in to work the next Monday, but her co-workers were oddly hesitant to cut into the face. She eventually dissected him and removed the face and all the plumbing, and that seemed to be more appetizing.

Lovely parting shot, eh? During the first spurt of blood, the frosting cap over the mouth didn't come off. Once I removed it, the blood just kind of oozed out the mouth, it was very nice. I really like the little drops of blood on the right cheek.

Easy Heart Cake
Instructions on how to make a simple heart cake that bleeds raspberry sauce when you cut it. It's easy, delicious, and sure to be a hit at your next Valentine's Day party!

Instructions on how to make a simple heart cake that bleeds raspberry sauce when you cut it. It's easy, delicious, and sure to be a hit at your next Valentine's Day party!
We thought you all might enjoy the instructions for this simple bleeding heart cake because it's quick and easy to make and delivers a dramatic effect for very little effort. It also requires almost no baking skills or cake decorating experience.
To start with, you'll need to bake a cake in a heart-shaped pan. Any kind of cake will work, including any simple, boxed cake mix, though I like to make mine from scratch. Ideally, make two cakes, to stack one on top of the other. A deeper cake will give you much more space on the inside to fill with blood. You want it to really pour out, don't you?
Once both cakes are baked and cool, level off the tops with a bread knife or cake leveler so your cake will be nice and flat. Then, frost the top of one tier with icing (or any other filling, jam, etc. that you want to use) and stack the other tier on top of it. It works best if you put the two cut sides of the cakes together, leaving the two perfectly flat sides that were at the bottom of the cake pan to be the top and bottom of the finished cake.

Now, scoop a sizable hollow out of the bottom of the cake. The bottom, of course, is on top, if you follow me, as the cake is upside-down at this point. The larger the hole you hollow out, the more blood you will be able to fit inside the cake. Of course, you'll also have less cake, so it's sort of a judgment call. Just make sure to leave a decent layer of cake on top of the hollow. You don't want the whole cake collapsing in on itself.
Once you have a hollow you're happy with, frost the inside with buttercream icing. Do a thorough job, so the cake is totally sealed. You don't want the blood to soak into the cake. While you're frosting things, also frost the bottom of the cake where it'll come in contact with the plate. Be generous. This icing is what keeps the blood from seeping out around the edges of the cake.
Now you're ready to add the blood. I like to use fresh raspberry sauce because it's bright red and totally delicious, but of course any red sauce or syrup will work as well. If you'd like to make the fresh raspberry sauce, it's quite easy. Just puree some raspberries and add a smidge of lemon juice and sugar to taste. Then strain the liquid to get the seeds out.
Fill the hollow carefully with blood. Make it fairly full, but definitely not overflowing. Now, set the plate or tray you're going to be using upside down on top of the cake. Squish it down into the icing so that the edge is sealed. Be sure to use a waterproof tray or plate, not a cardboard cake circle, because the sauce will soak into cardboard. I like to use a white plate because the blood shows up well on it.

Carefully holding the cake onto the plate, flip the entire assembly over, so the cake and plate are now right side up. Congratulations! You now have a cake full of blood and you're ready to start decorating.
You can, of course, decorate the cake any way you'd like, using any kind of icing. I've gone in two opposite directions with my decor. The first time I made this cake, I iced it with bright pink buttercream, and then added white trim so it looked like a lovely, innocent valentine heart until blood started pouring out of it. The next time, I made the cake look evil from the outset with sickly maroon and grey icing and candles shaped like tombstones. I leave it to you to decide which option is more effective.
When it's time to cut the cake, I like to do the honors with a meat cleaver. Failing that, I recommend you use the biggest knife available. If you separate the cake a little with the knife while making the first cut, you'll get an even more impressive flow of blood.
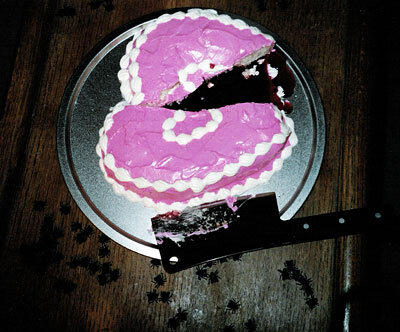
An alternate version of this cake I once did involved the heart actually beating. Instead of just pouring the blood into a hollow in the cake, I poured it into a Ziploc bag. The bag was then attached to a turkey baster via a length of rubber tubing. I placed the bag inside the hollow in the cake, leaving the baster outside, concealed under a piece of fabric that I draped decoratively around the perimeter of the cake. The hollow in this cake was deeper than the hollow in the other version of the cake, so that the bag was very near the surface of the cake. When I squeezed the bulb of the turkey baster in rhythm, the bag expanded and contracted, pushing up the top of the cake, so the heart appeared to be beating.
Of course, this version of the cake isn't optimal for serving, since in order to get the blood out, you have to pull the bag out of the cake, puncture the bag, and pour the blood either into a bowl or on top of the cut pieces of cake. This is inconvenient, but does have the advantage of being entertainingly messy. I wound up with the hands dripping with raspberry blood sauce! Jason Voorhees himself never looked better!
Another variation I've done, which requires a little more sculptural skill, is to make an oversized anatomical heart. For this cake, I started with a large round cake, and then carved it into the shape of a heart. I used fondant icing to cover the cake and to sculpt additional veins and arteries, then painted the whole thing with food coloring, mostly red (obviously) and blue. The bleeding mechanism is the same as for the basic heart cake. When I made this cake I also poured a layer of clear hard sugar over the top, so cutting the cake would be like breaking someone's heart. I don't recommend this, though. It just made the cake very difficult to cut. Maybe this would work if you were planning to smash the cake with a hammer. If you spray or brush the cake with a little thinned corn syrup, you'll get the same oozy, wet look without the inconvenient hard candy shell.