Hobby Eagle
As soon as my niece Alex learned how to walk I decided that she was ready to fly. So for her first birthday I made her a hobby eagle. (It's like a hobby horse, but much more cumbersome.) Being the giant Tolkien nerd that I am, I called it Gwaihir the Windlord.
As soon as my niece Alex learned how to walk I decided that she was ready to fly. So for her first birthday I made her a hobby eagle. (It's like a hobby horse, but much more cumbersome.) Being the giant Tolkien nerd that I am, I called it Gwaihir the Windlord.
In making the pattern, I tried to size it appropriately for a taller-than-average one-year-old child. Time has proven that I, in fact, sized it appropriately for a taller-than-average three-year-old child, which is just as well, since time has also proven that Alex had virtually no interest in the eagle until she turned three.
For the structure I used a wooden spindle with a dowel stuck through it at a right angle for the handle. I had already decided to go with a muted palette of natural eagle-toned browns (because everyone knows that one-year-olds love subdued, tasteful colors), so I simply used a basic oak stain. I put a caster on the bottom as well because I figured that would make it easier to use for a child too small to actually pick the whole thing up.
I then made a complete mockup of the entire fabric section out of paper. I of course made it unnecessarily complicated with layers of feathers in gradated colors and lots of alternating curves and a big gaping maw with a twisted tongue. So when it came time to sew the real thing out of fabric, I had to do a lot of hand sewing on the little fiddly bits. Then I used foam rubber to stuff the wing feathers and batting to stuff the rest of it and glued the fabric pieces onto the wooden structure.
Since I was making this in Wisconsin and my niece lives in California, I then had to make a giant, custom-made foam core box to ship the huge thing to Alex. I think that she found the box at least as interesting as she found the eagle.
Hobbit Hole
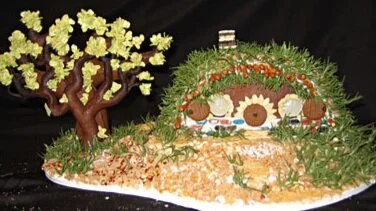
This year I was looking to make a relatively simple gingerbread house because my time was limited, so I took it as an opportunity to experiment with some new textures. I decided to make a hobbit hole, both because I love hobbits and because it only takes 2 pieces of gingerbread to make a hobbit hole.
This year I was looking to make a relatively simple gingerbread house because my time was limited, so I took it as an opportunity to experiment with some new textures. I decided to make a hobbit hole, both because I love hobbits and because it only takes 2 pieces of gingerbread to make a hobbit hole.
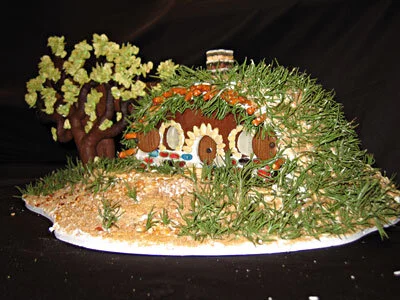
While it's true that a hobbit hole can be made with only two pieces of gingerbread (one flat with round doors and windows for the front, one draped over a bowl for the hill) I actually made several more pieces of gingerbread. In order to create a smoother transition from the base to the hole I made a few irregularly shaped blobbies to build up a slight mound underneath the hole proper. I also made a few small gingerbread circles for the shutters and the door, scoring them before baking to give them a weathered woodgrain texture. Finally, I shaped two pieces of gingerbread to make a tree for the yard. I won't say that it was meant to be the Party Tree, since we all know the Party Tree was cut down, but I imagine any self-respecting hobbit would want a nice tree in the yard.
I tried a new technique for the windows - cutting a thin slice of white gum drop and carving some little mullions into it. I think it worked pretty well, though of course it's more opaque than ideal.
After assembling the hill on the base with royal icing, I kept the decor on the facade to a minimum - a few thin slices of jelly bellies for rocks plus pine nut trim around the door and windows. The finishing touch was black peppercorn knobs on the shutters, and in the exact middle of the door.
For the groundcover I really gave myself free rein to experiment with various foods for texture. Though why I didn't bother to tint my royal icing brown before I used it to stick the ground cover on I'll never know. The dirt is composed of peanuts, grape nuts, red pepper flakes, tapioca, and brown sugar. The grass is dried rosemary, which I think looks pretty awesome. I added some broken off pretzel ends to suggest some sort of log support system for the roof. The path to the front door is made of wheat thins. The chimney is made of some sort of ugly gummy candy. I probably shouldn't have used such obviously commercially manufactured candy. It didn't really go with the more organic textures of the rest of the house.
The leaves on the tree are made of raw oatmeal, tossed in a bag with some powdered green food coloring and individually applied. For whatever reason, I did bother to tint the royal icing used to apply these green, although I had failed to tint the royal icing for the ground brown.


