Circulating Heart Cake
Some variation on a bleeding heart cake is a relatively standard feature of our annual Pumpkinfest. This year, I was trying to make a cake through which "blood" (cranberry juice) would continuously and visibly circulate.
Concept: A cake, shaped like a heart and covered with fondant, sitting on top of a platform elevated above a reservoir full of cranberry juice. In the reservoir, a pump attached to a tube leading up the side of the cake to pump the cranberry juice up and over the cake. To contain the juice and insure that it spread nicely over the surface of the cake, an isomalt (sugar substitute) shell, also in the shape of a heart, placed over the cake, leaving about an eighth inch of space for the juice to flow between the cake and the outer shell. In the opposite side of the elevated platform from the tube, a series of holes to drain the juice back into the reservoir and begin the whole cycle all over again.
Step 1: Make an isomalt shell shaped like a heart. At first, I had hoped to find something that was already in the shape of a heart, cover it with tin foil, and pour isomalt over the top. I wanted to use isomalt rather than sugar because it's more transparent. Unfortunately, in spite of having access to numerous seasonal Halloween stores, I was unable to locate anything that was a) accurately heart-shaped, b) big enough that I would be able to get sufficient cake for our guests inside, and c) able to resist the heat of liquid isomalt. I therefore had to make my tin foil heart mold from scratch. I started with a cereal bowl, upside down, and built up the rest of the heart shape around the bowl with wadded up tin foil. To get as smooth a surface as possible to pour over, once I had a shape I was happy with, I spread one final layer of tin foil on top and smoothed it as much as I possibly could. As you may recall from my description of the jellyfish cake, the problem that I often have with pouring sugar or isomalt over tin foil is that the little ridges of the tin foil get stuck in the solidified sugar and are very tedious and nerve-wracking to remove with tweezers and a damp paintbrush.
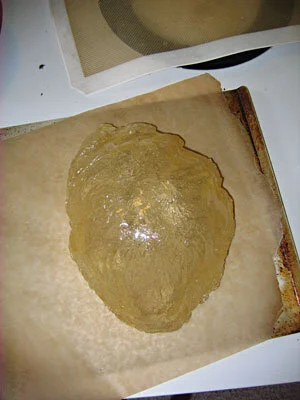
I put this tin foil heart onto a silpat mat and melted down my isomalt. In my earlier discussion of the jellyfish cake I described some of the problems that I have with making sugar domes. All of these problems apply equally to making isomalt hearts. I was also a little disappointed that the isomalt hardened somewhat cloudy, I think because I was working air into it as I pulled it back up the sides of my tin foil heart to prevent it from all pooling at the bottom. I was hoping for a transparent heart, but I had to settle for cloudy. I also think that there's something wrong with the bucket of isomalt that I have, because it always come out sort of yellow, when isomalt is supposed to be perfectly clear. At least the heart released from the tin foil better than any of my prior tin foil sugar projects.
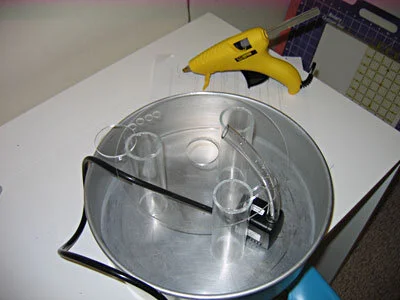
Step 2: Make an elevated platform, pump, and reservoir assembly. Rather than purchasing any new equipment for this project, with just a little glue and a few additional holes drilled, I was able to repurpose some of the acrylic circles and tubes from the Triple Animal Cake and the pump and tubing from the Fish Fountain Cake. I used a cake tin for the reservoir. Not the most aesthetically inspired choice, perhaps, but highly functional and readily available.
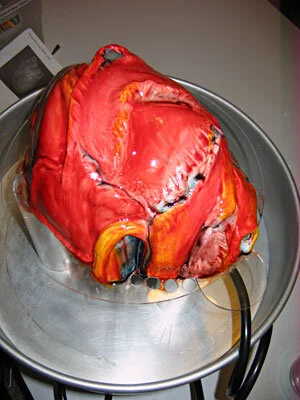
Step 3: Make a heart-shaped cake. Internal-organ-shaped cakes being something of a specialty of mine, the carving went pretty quickly. I covered it with white fondant - a much thicker layer than usual, as I wanted it to be able to stand up to the juice running over it without dissolving away and exposing the cake - then sculpted in some of the major features, like the divisions between the chambers. Then I moved it onto the acrylic platform, and positioned the tube tight up against it. To get some additional detail (though I wasn't overly concerned with extreme detail, since the whole thing was going to be under my isomalt shell) I piped on royal icing and shaped it with a slightly damp, soft paintbrush. I also covered the tube with royal icing, both to hold it in place and to camouflage it. I painted the cake with brighter colors than I might have ordinarily, because I wanted them to read through the translucent shell.
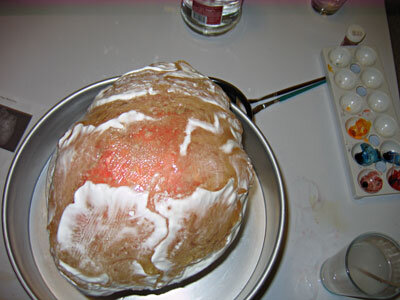
Step 4: Attach the isomalt shell. Unfortunately, once I plopped the shell over top of the cake, it looked more like an amoeba than a heart. I hadn't planned to decorate the top surface of the shell, because I wanted it to be as see-through as possible, but I felt that I had to do something to make it more identifiable. So I went over the top surface of the isomalt with royal icing details and texture, and then painted the surface with some reds and blues. This did make it look marginally more like a heart, but it also made it much more opaque, which proved to be unfortunate when I got around to plugging the pump in.
Step 5: Fill the reservoir with cranberry juice, cross your fingers, and plug in the pump. Because my isomalt was cloudy from the get-go and because I had further opaqued the surface with royal icing and food coloring, the pumping action, while technically successful was exceedingly subtle. I'm pretty sure that if I hadn't explained it to everyone, no one would have had any idea what the cake was or what it was doing. I tried to capture it on video, but all you can really see is the juice venting down the side and back into the reservoir. (Which, by the way, I really should have directed out the aorta.) The video is further compromised by the fact that my camera was in the process of kicking the bucket resulting in a distinct horizontal line across the frame and the fact that there was a toddler screaming in the background.
Conclusion: I still believe that there is potential in the concept of a cake with fluids circulating inside, but I think it requires either a) a different form factor, b) a more competent isomalt handler, or c) both.


