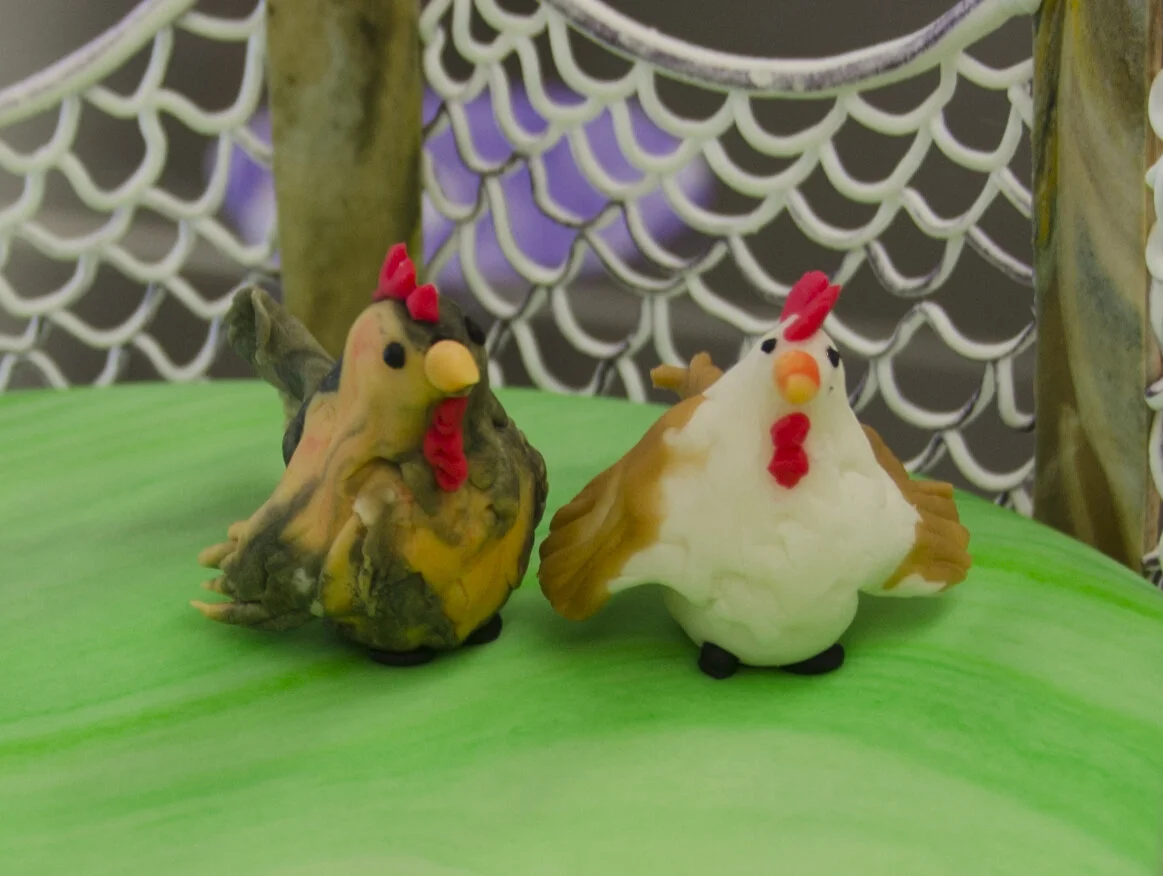
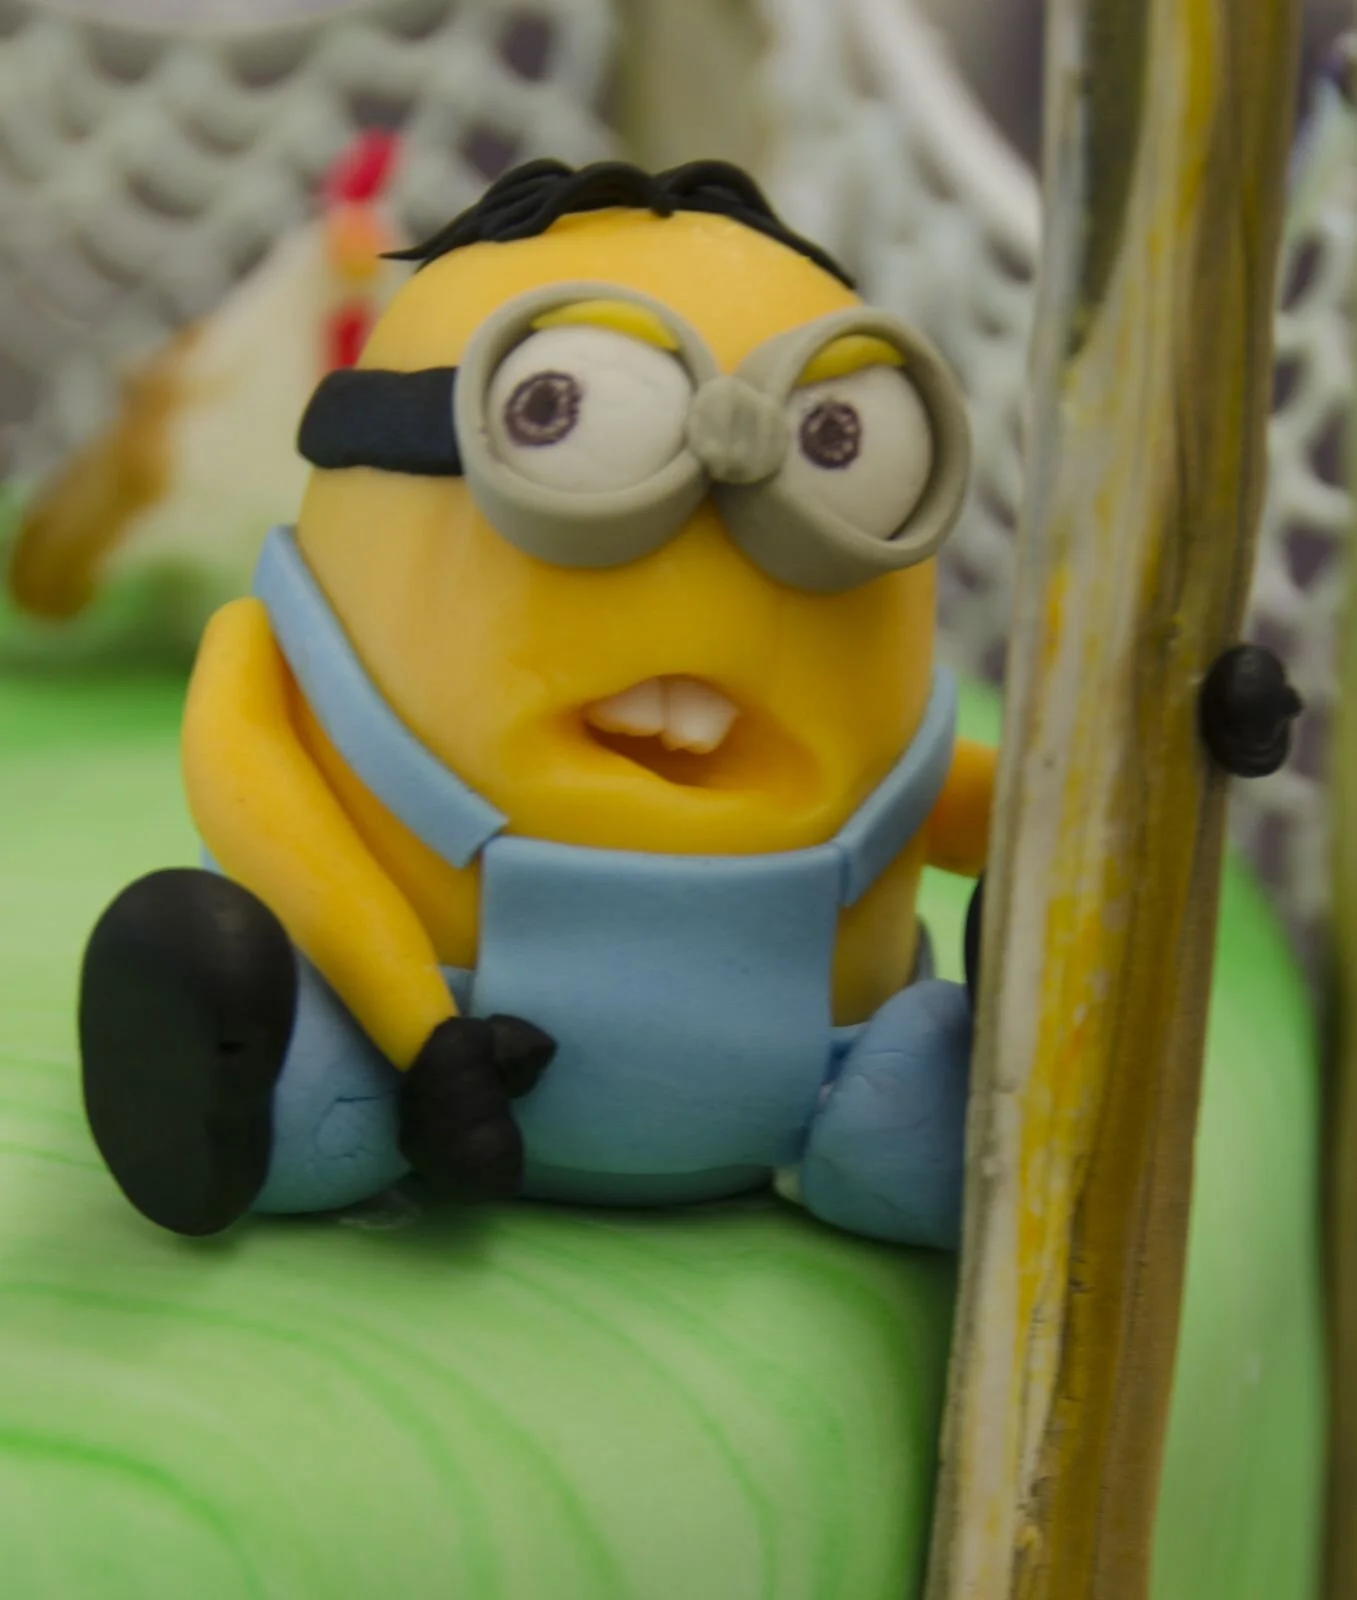
Minion Chicken Coop Cake
While my mom and I were taking a cake class at the Wilton School, we had a very nice Skype call with my niece and nephew. They told us that they were planning to be minions from Despicable Me for Halloween. We also had a very entertaining conversation about whether or not they were building me a chicken coop. So I made the cake I was making for class a minion / chicken coop cake.
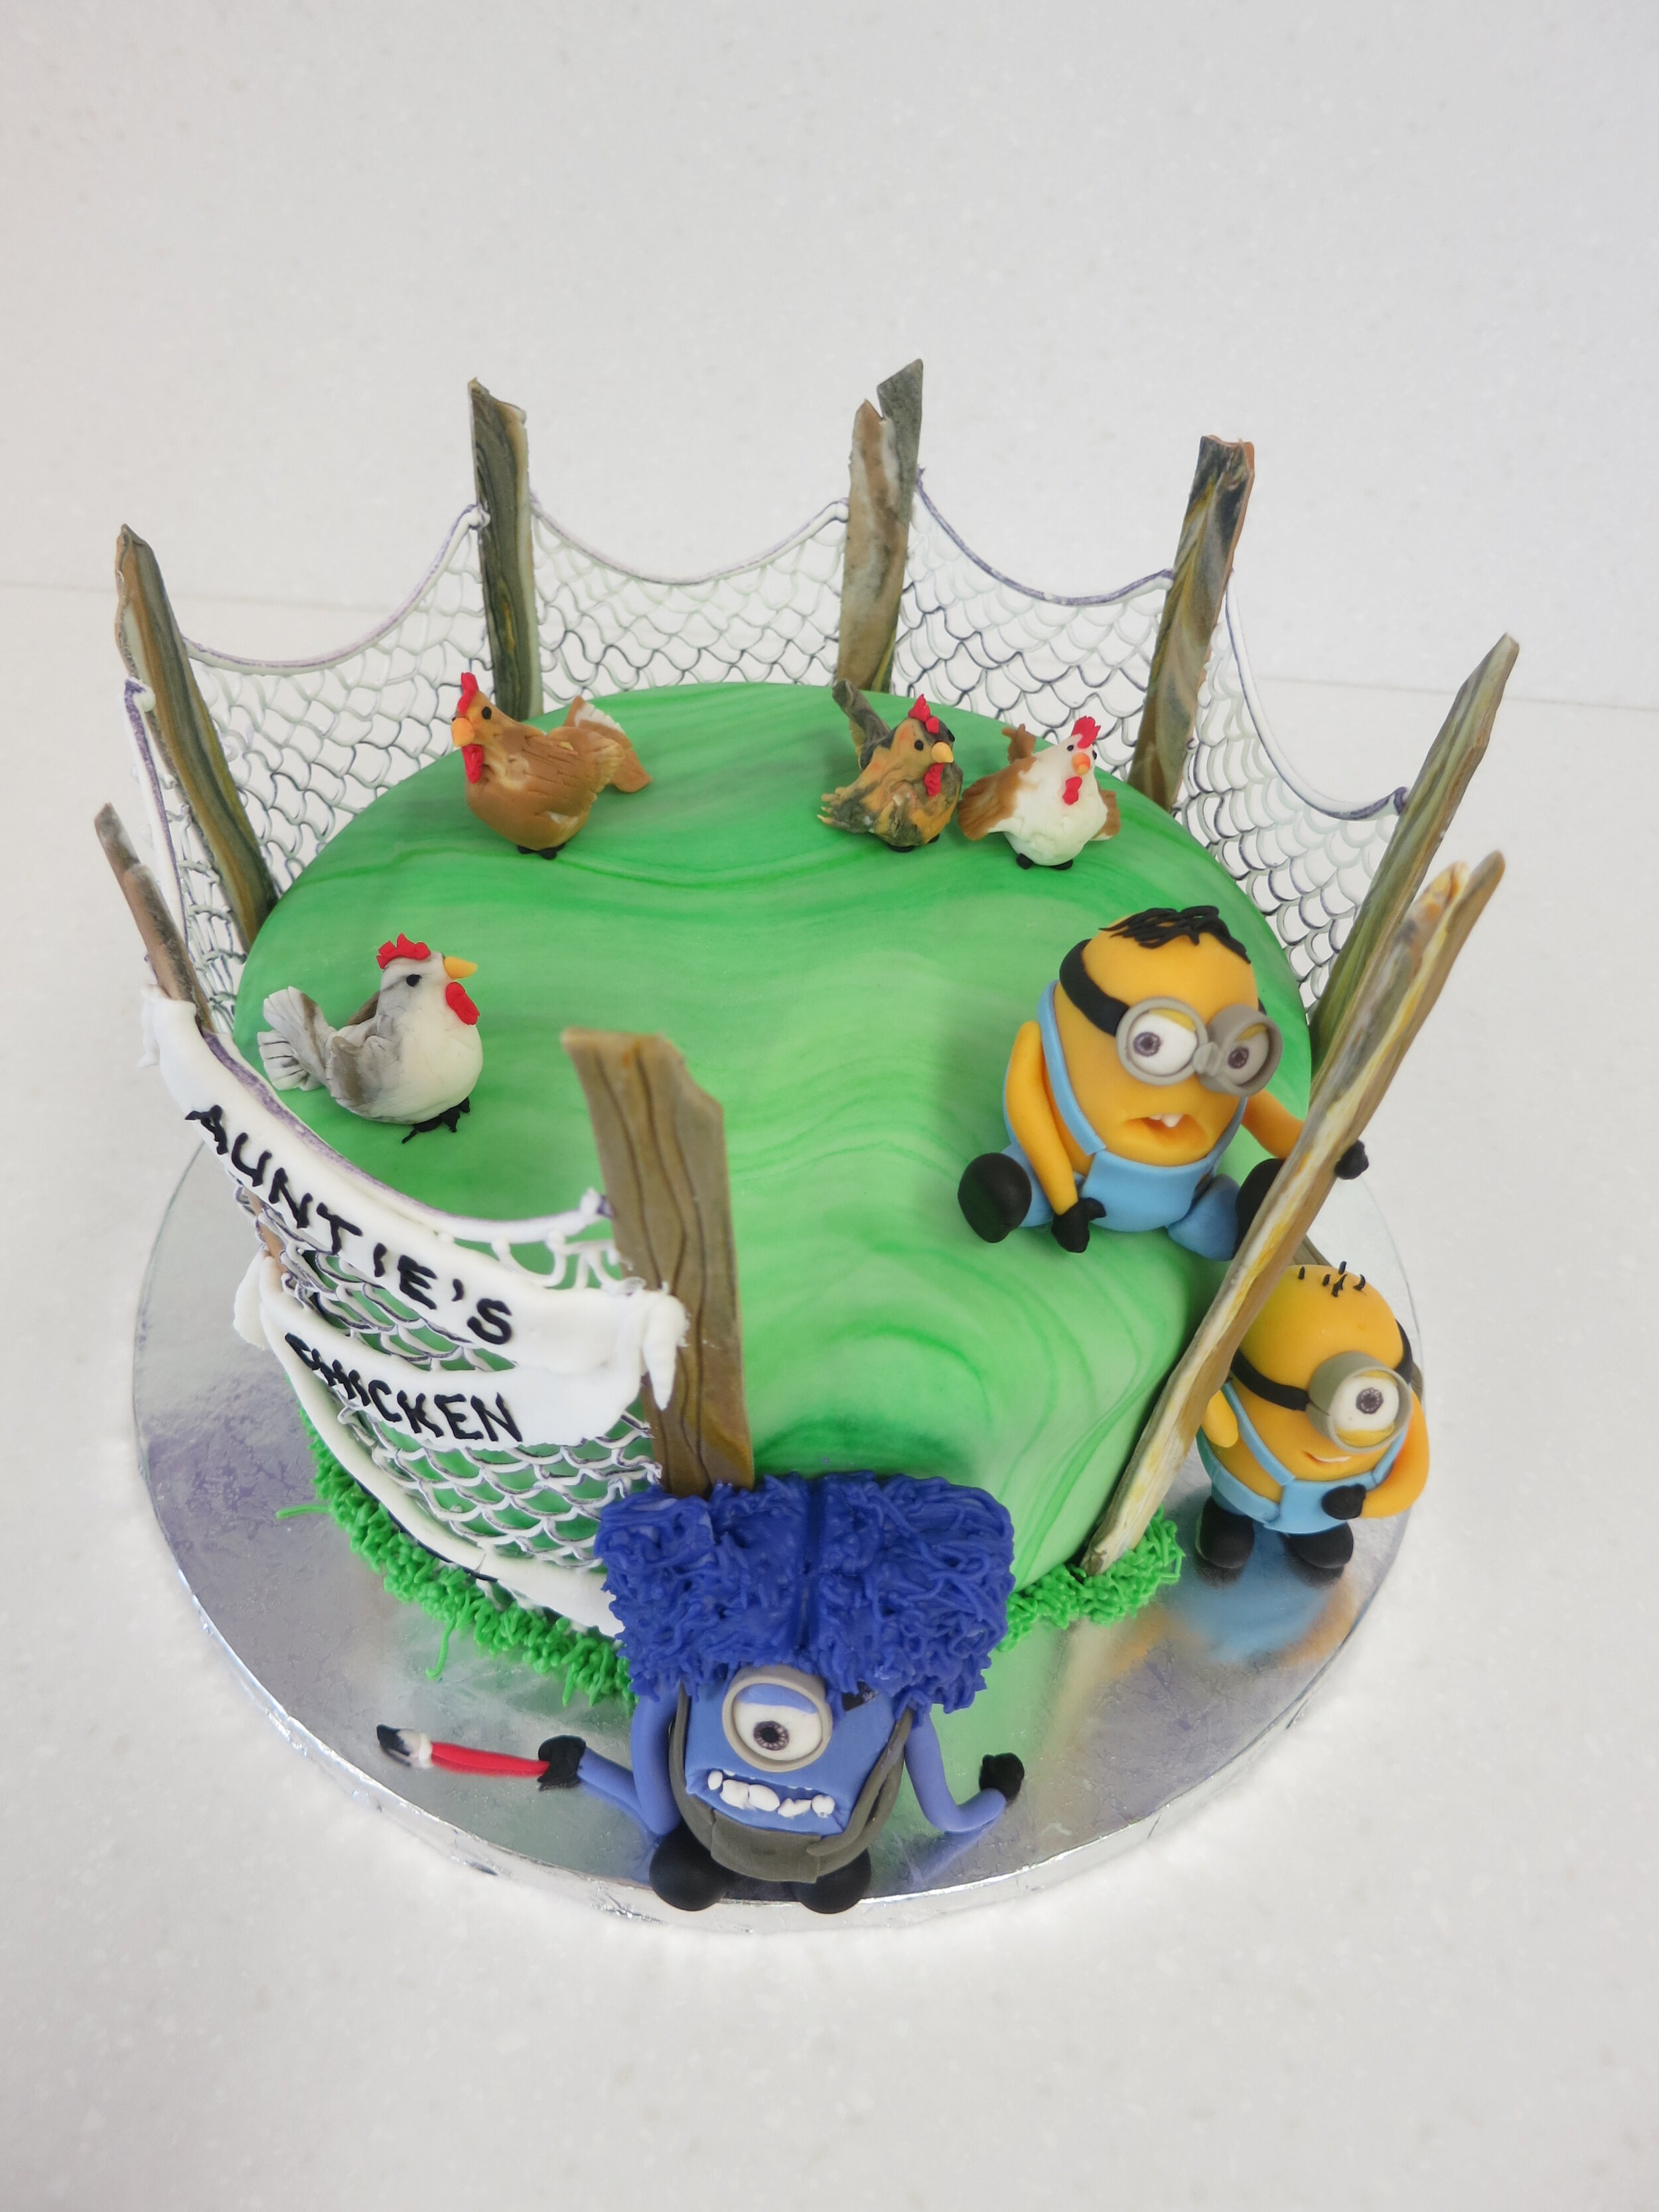
While my mom and I were taking a cake class at the Wilton School, we had a very nice Skype call with my niece and nephew. They told us that they were planning to be minions from Despicable Me for Halloween. We also had a very entertaining conversation about whether or not they were building me a chicken coop. The details of the chicken coop joke are kind of hard to explain, but basically I decided to take the joke to the next level.
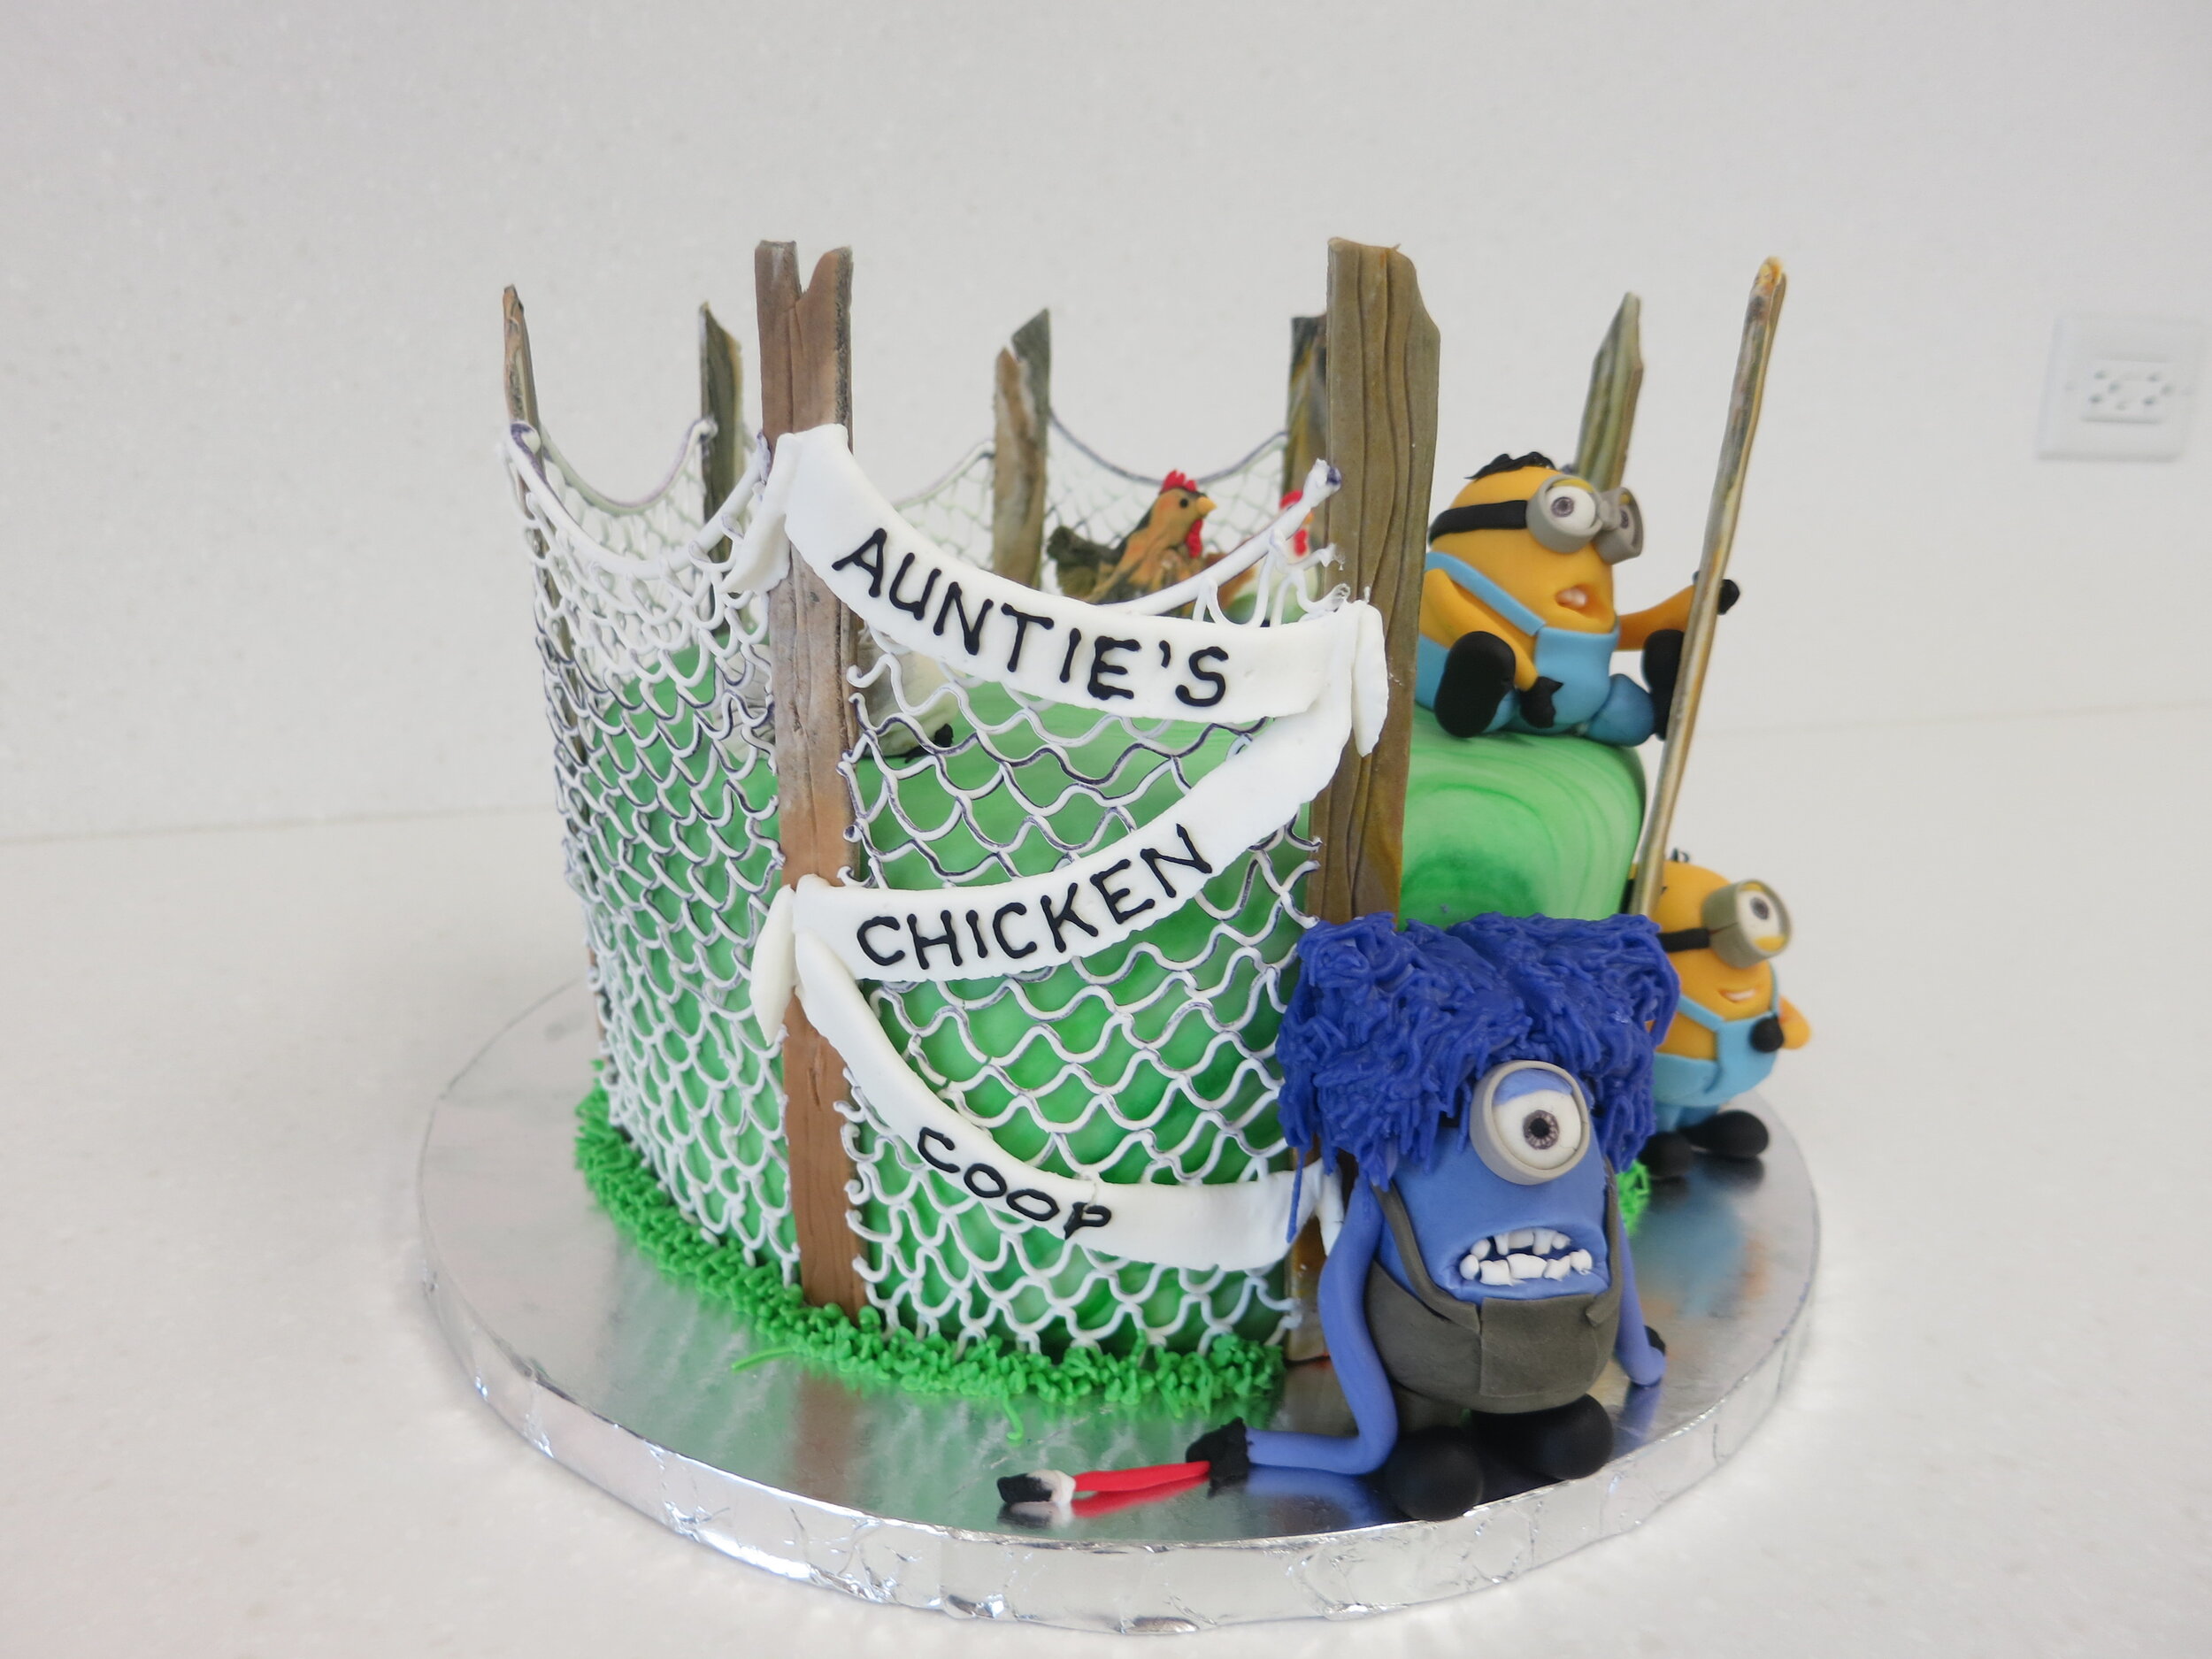
So I made the cake I was making for class a minion / chicken coop cake. Then I carried it back home on the plane. It was greeted with shrieks of joy.


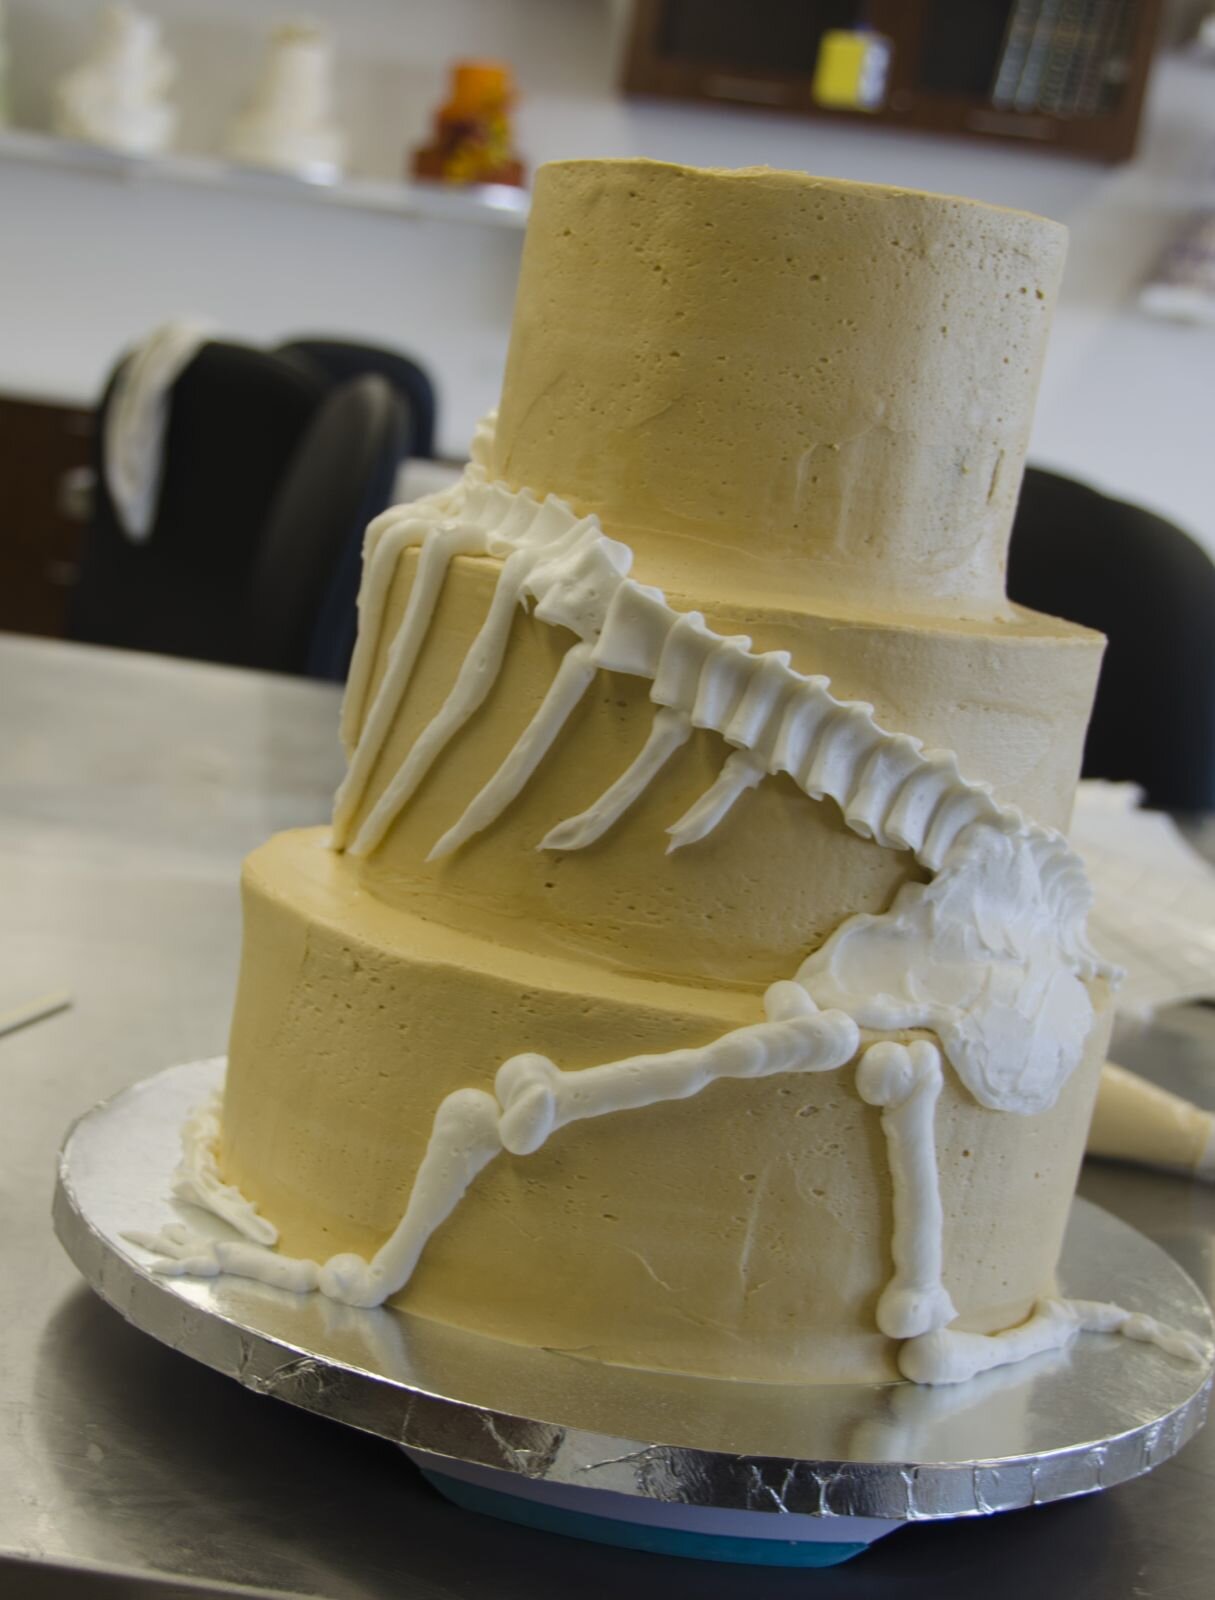
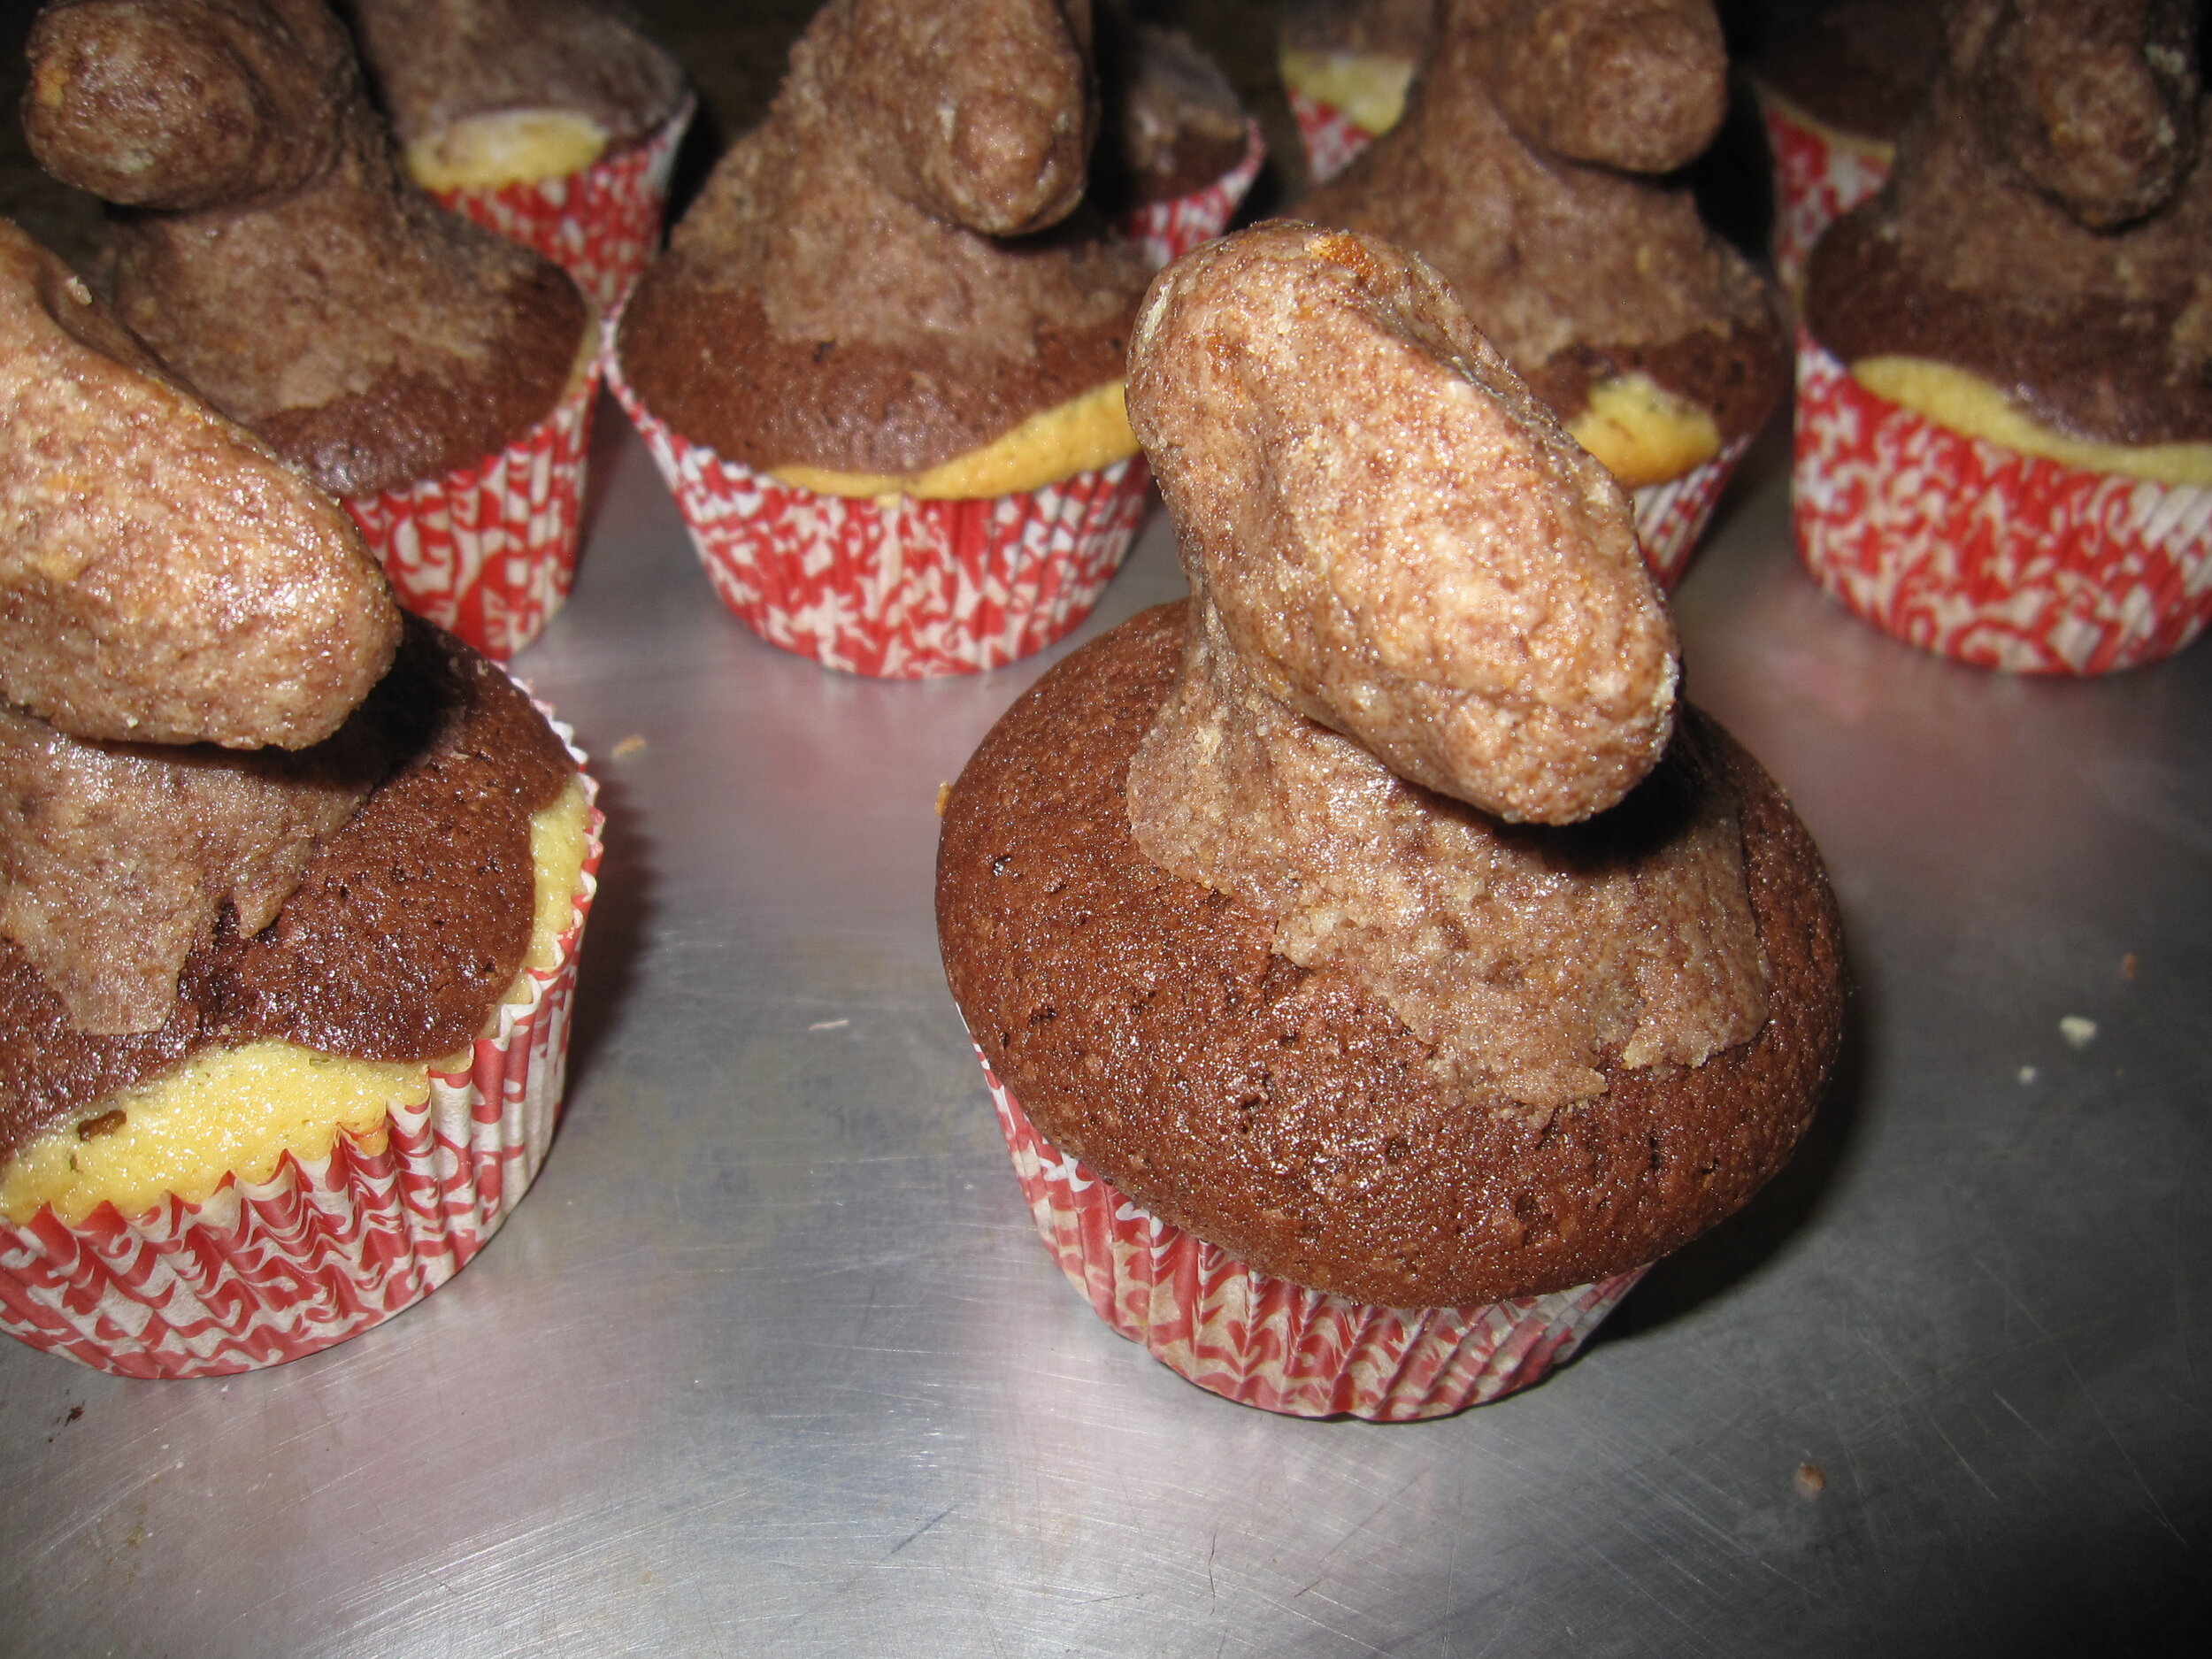
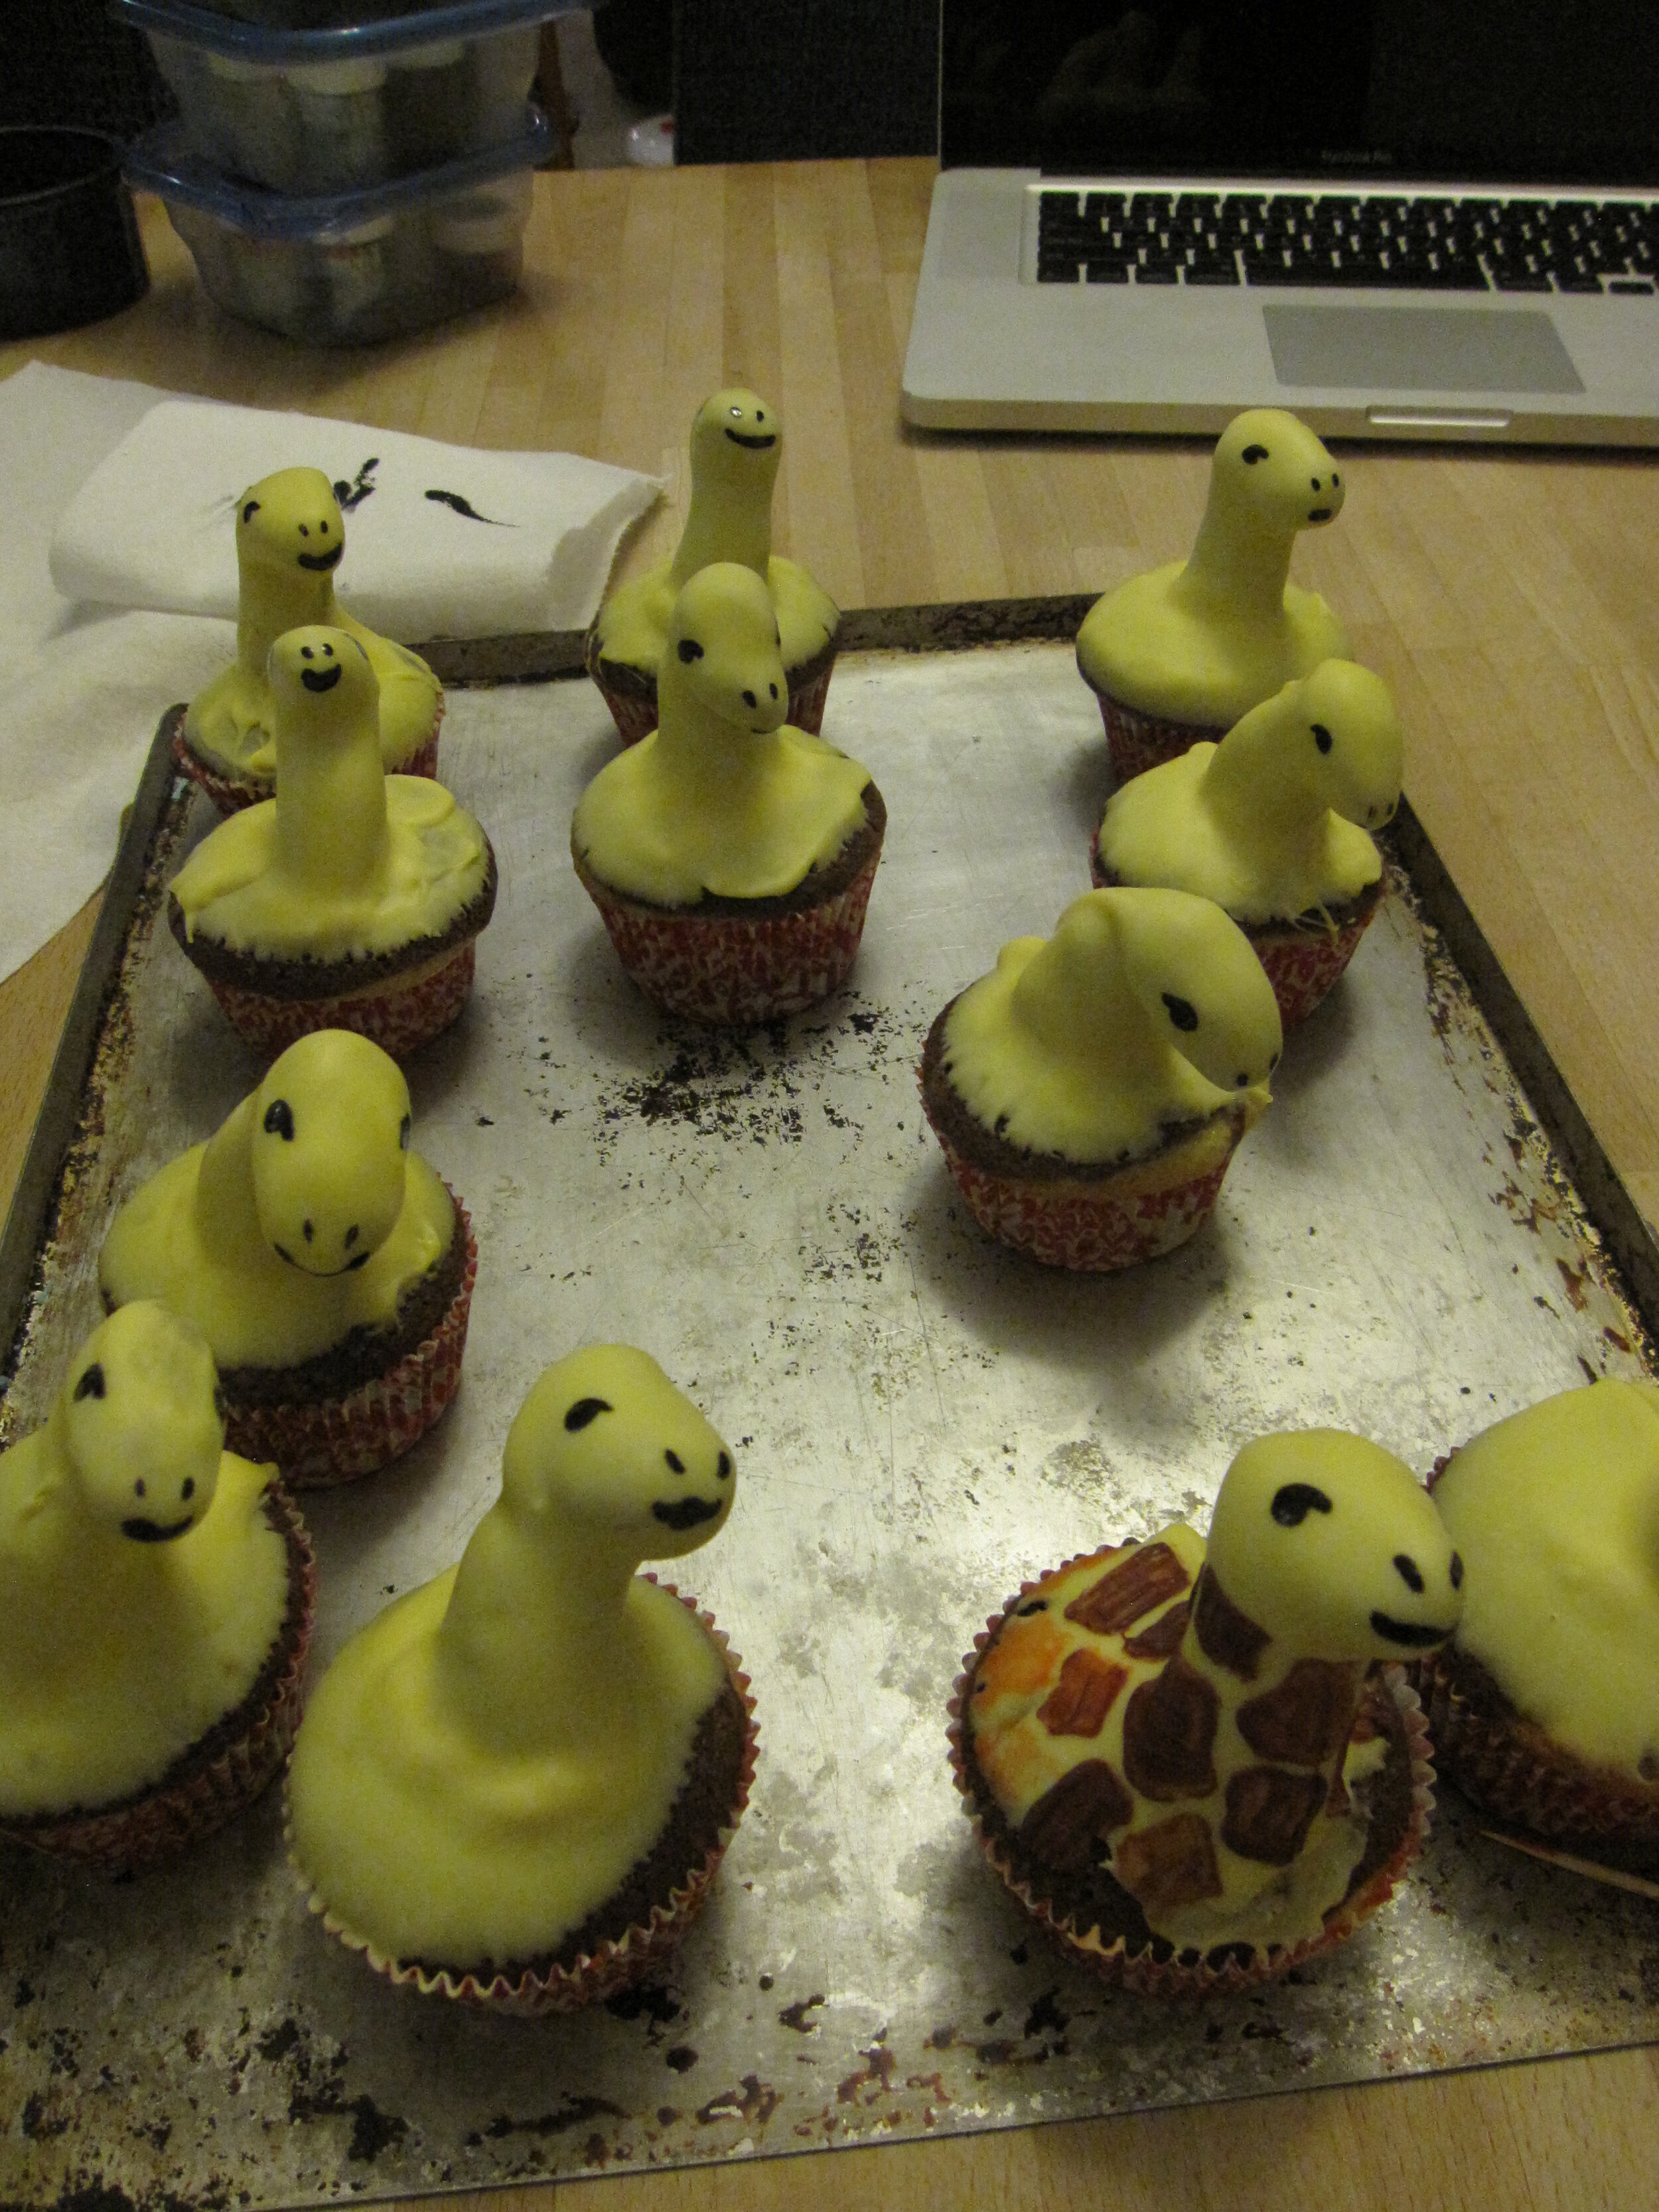
Dinosaur Skeleton Cake
This is a cake that I made for a class at the Wilton School on tiered cakes and buttercream. I don’t do many buttercream cakes or many traditional tiered cakes, so I’m pretty pleased with the results.

This is a cake that I made for a class at the Wilton School on tiered cakes and buttercream. I don’t do many buttercream cakes or many traditional tiered cakes, so I’m pretty pleased with the results. It’s not as impressive as many of my cakes, but I think it’s still pretty fun.
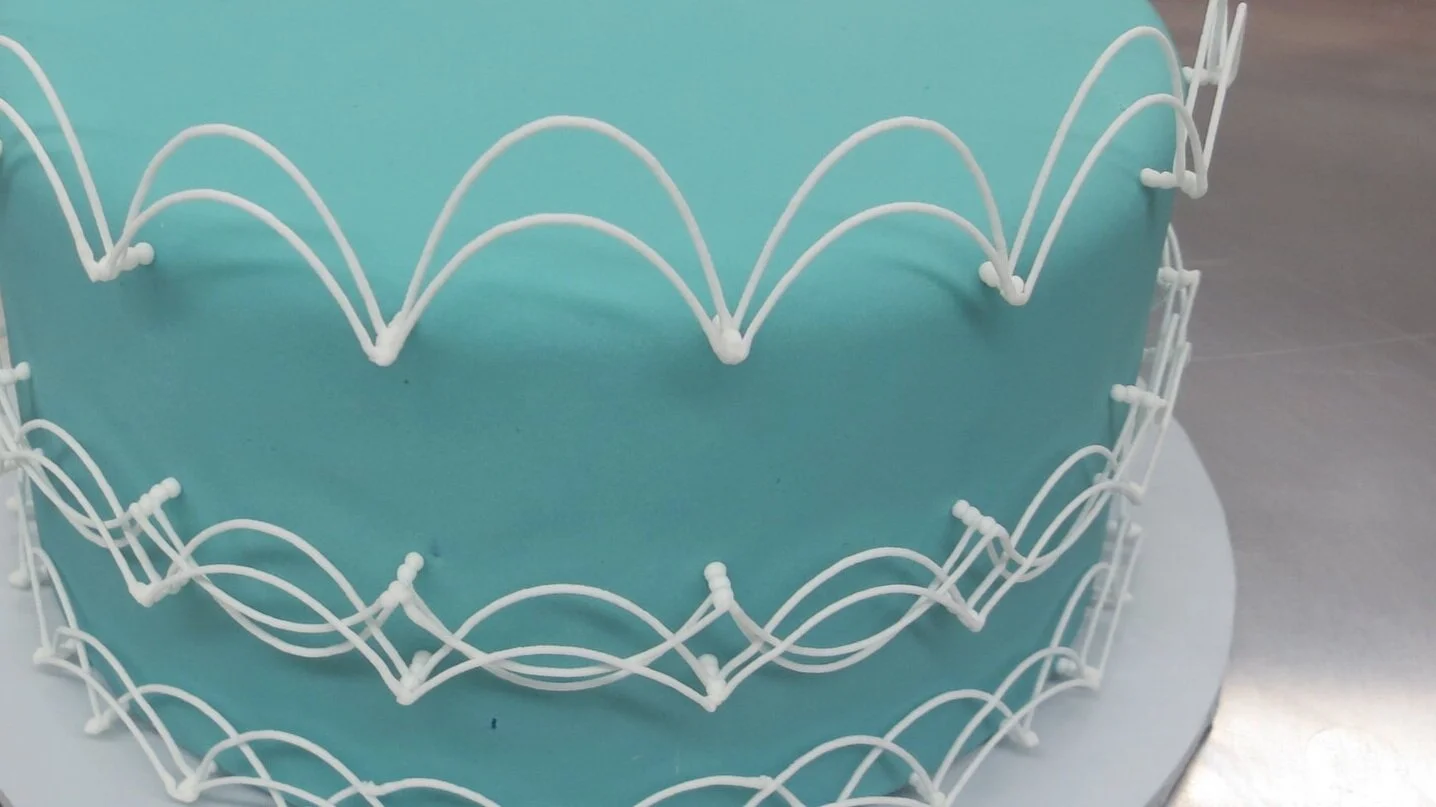
Extreme Stringwork
Mom and I took an Extreme Stringwork class.
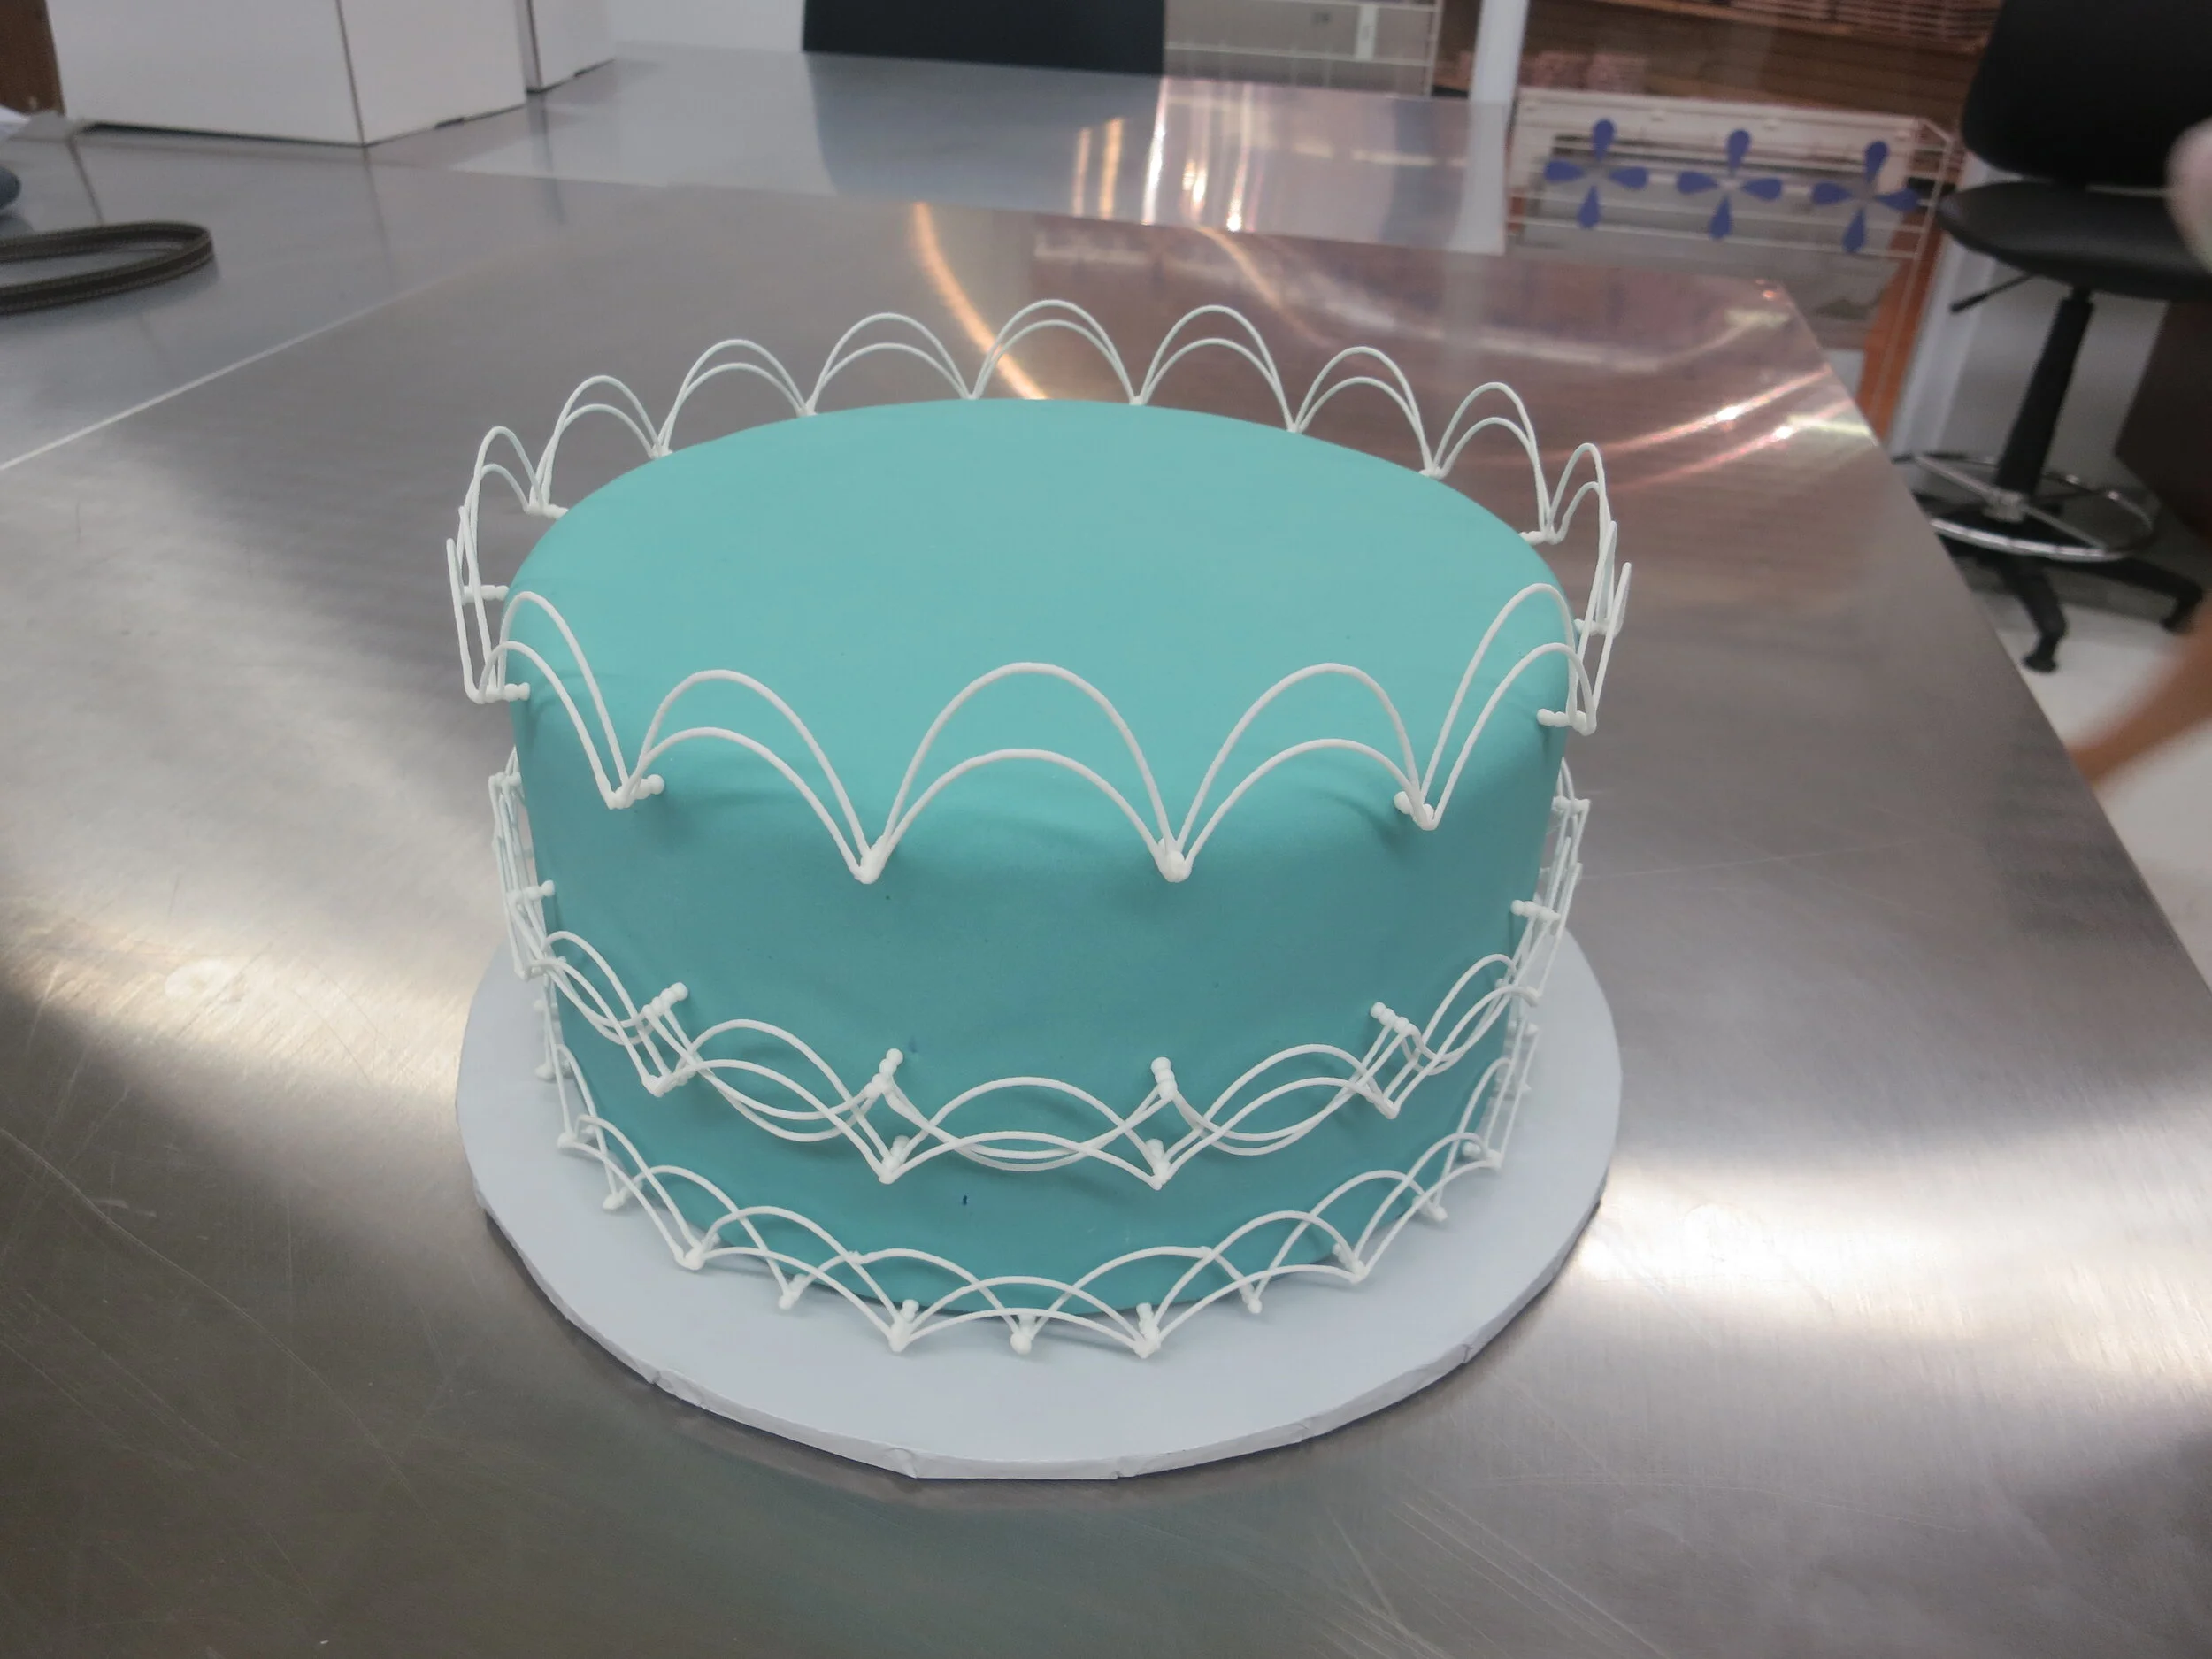
Mom and I took an Extreme Stringwork class.


Woyzeck
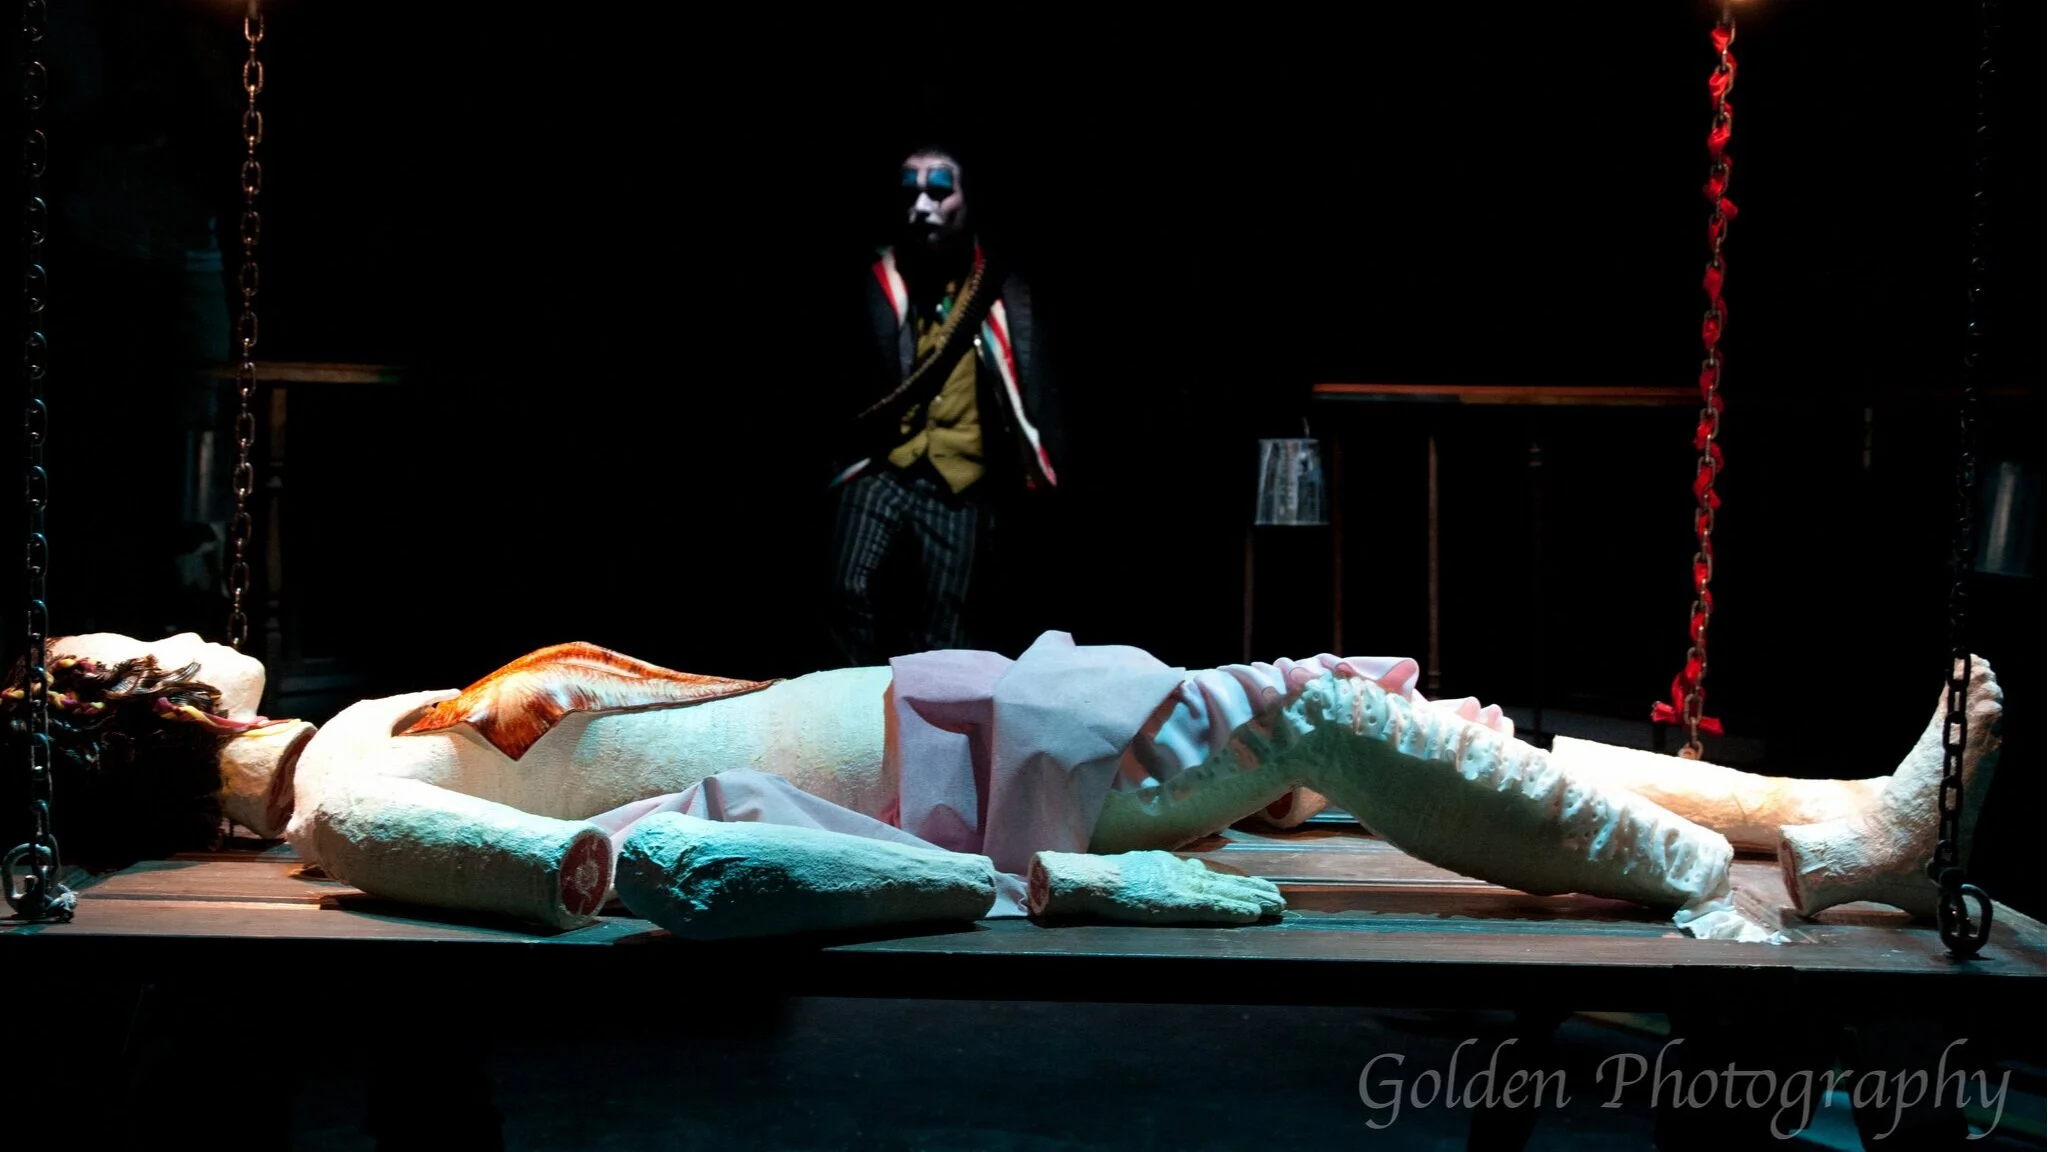
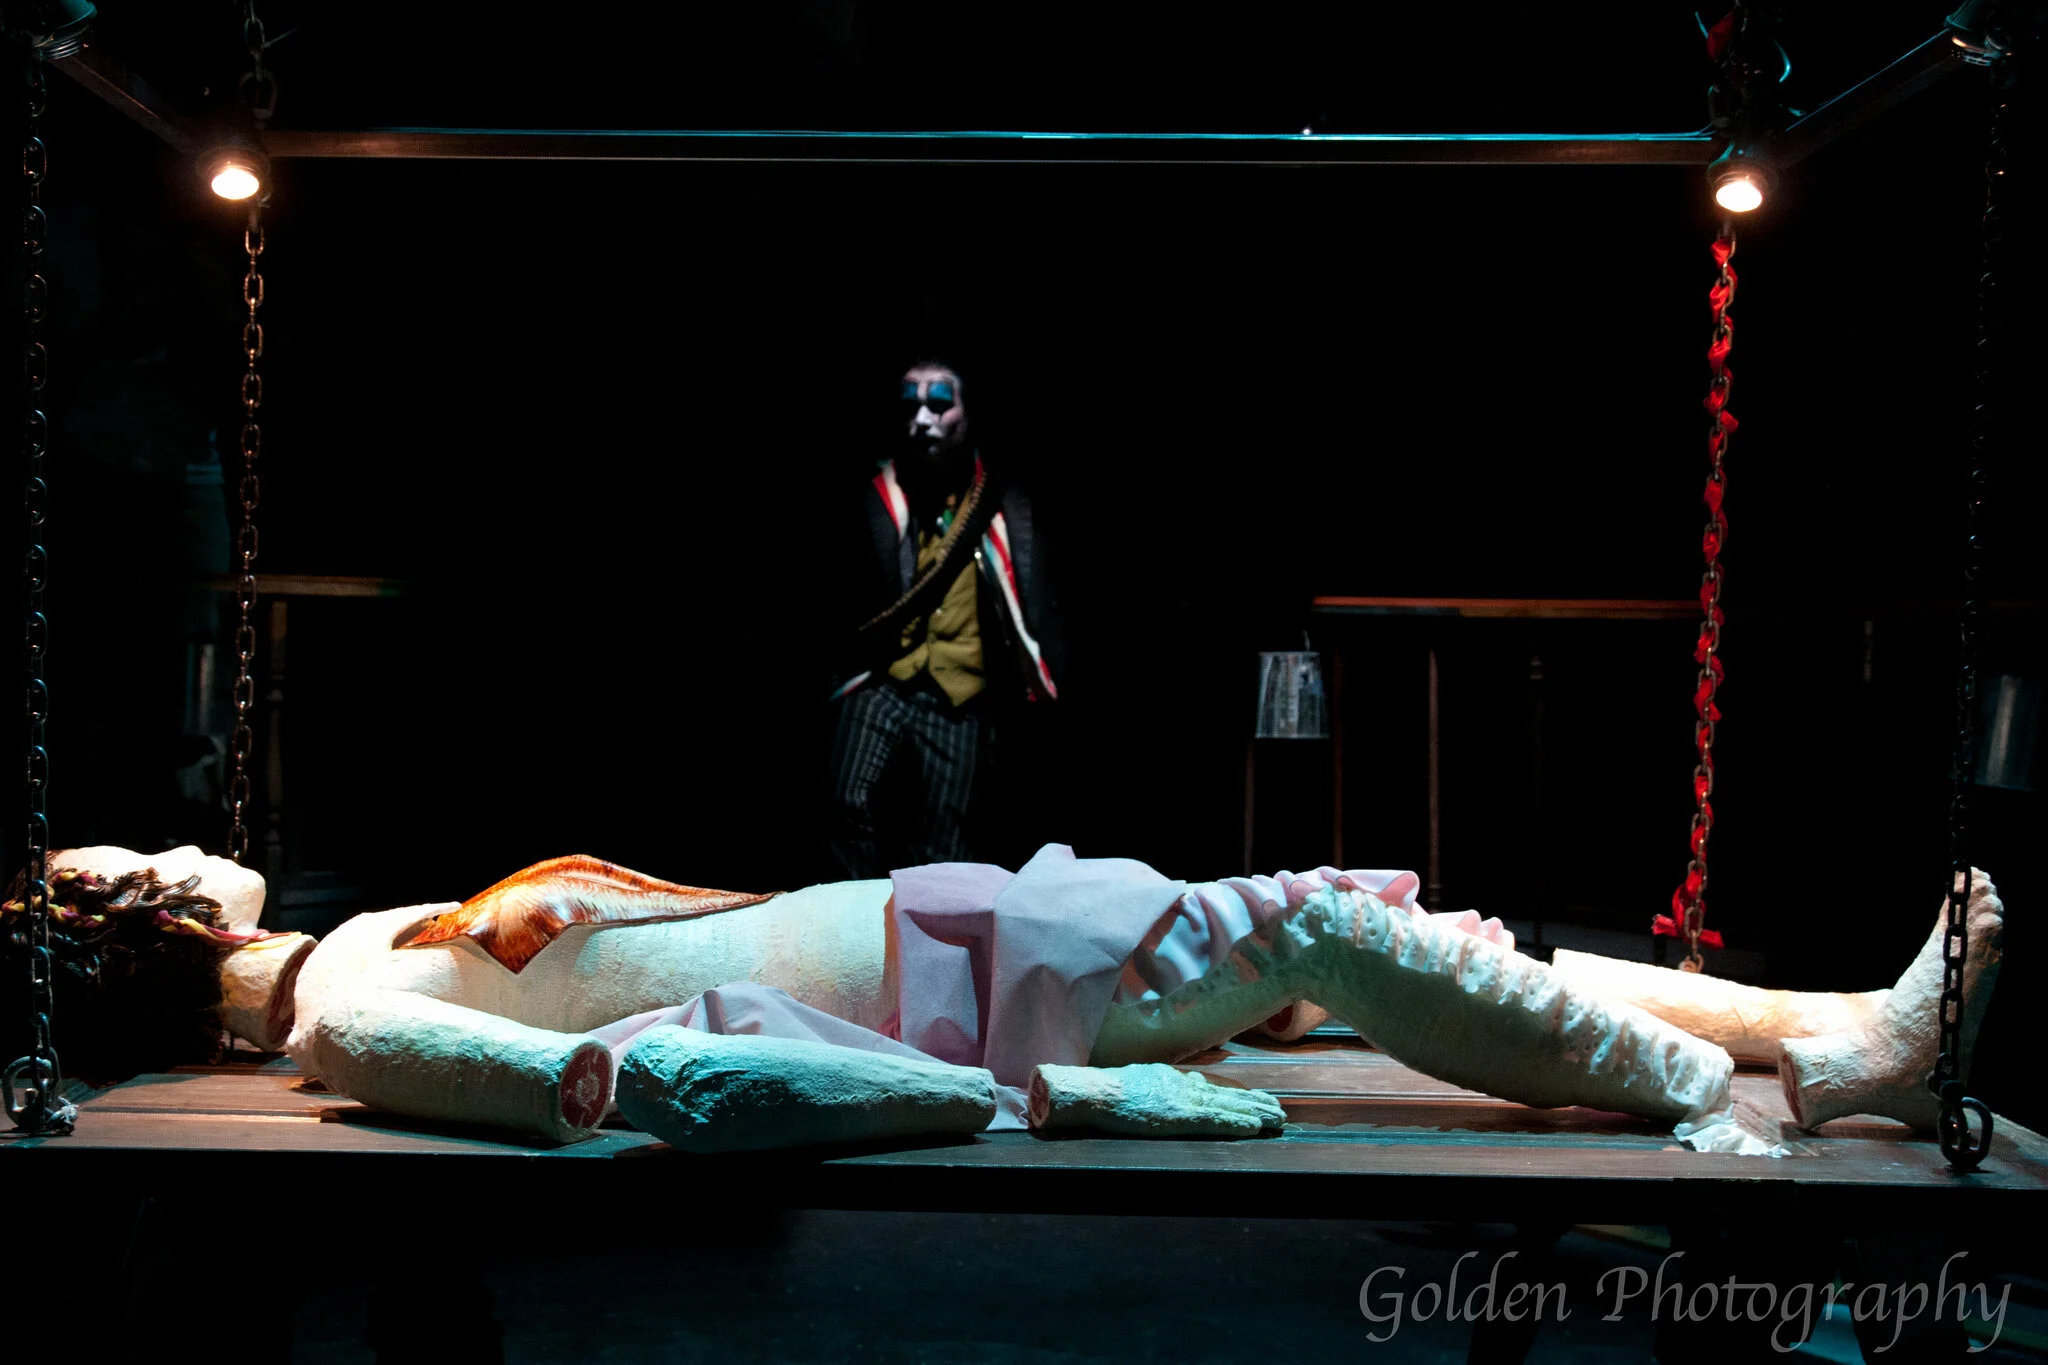
I was the production designer for a production of Woyzeck at the University of Wisconsin - Madison’s University Theatre. At the end of the play, the corpse of Woyzeck’s murdered lover Marie was lowered from the ceiling. The corpse was made of styrofoam, but I used fondant to decorate it as I would a cake. The open chest cavity was full of pea-flavored cake balls.
I was the production designer for a production of Woyzeck at the University of Wisconsin - Madison’s University Theatre. The title characters eats nothing but peas, so the director, Kristin Hunt, and I created a pea-flavored tasting menu that we served to the audience over the course of the play.
The tasting menu began with a single pea and included pea flavored gum, pea flavored soda, and pea flavored jello. At the end of the play, the corpse of Woyzeck’s murdered lover Marie was lowered from the ceiling. The corpse was made of styrofoam, but I used fondant to decorate it as I would a cake. The open chest cavity was full of pea-flavored cake balls. As the audience filed out of the theater, they were invited to take a cake ball from the corpse.
Star Wars cake
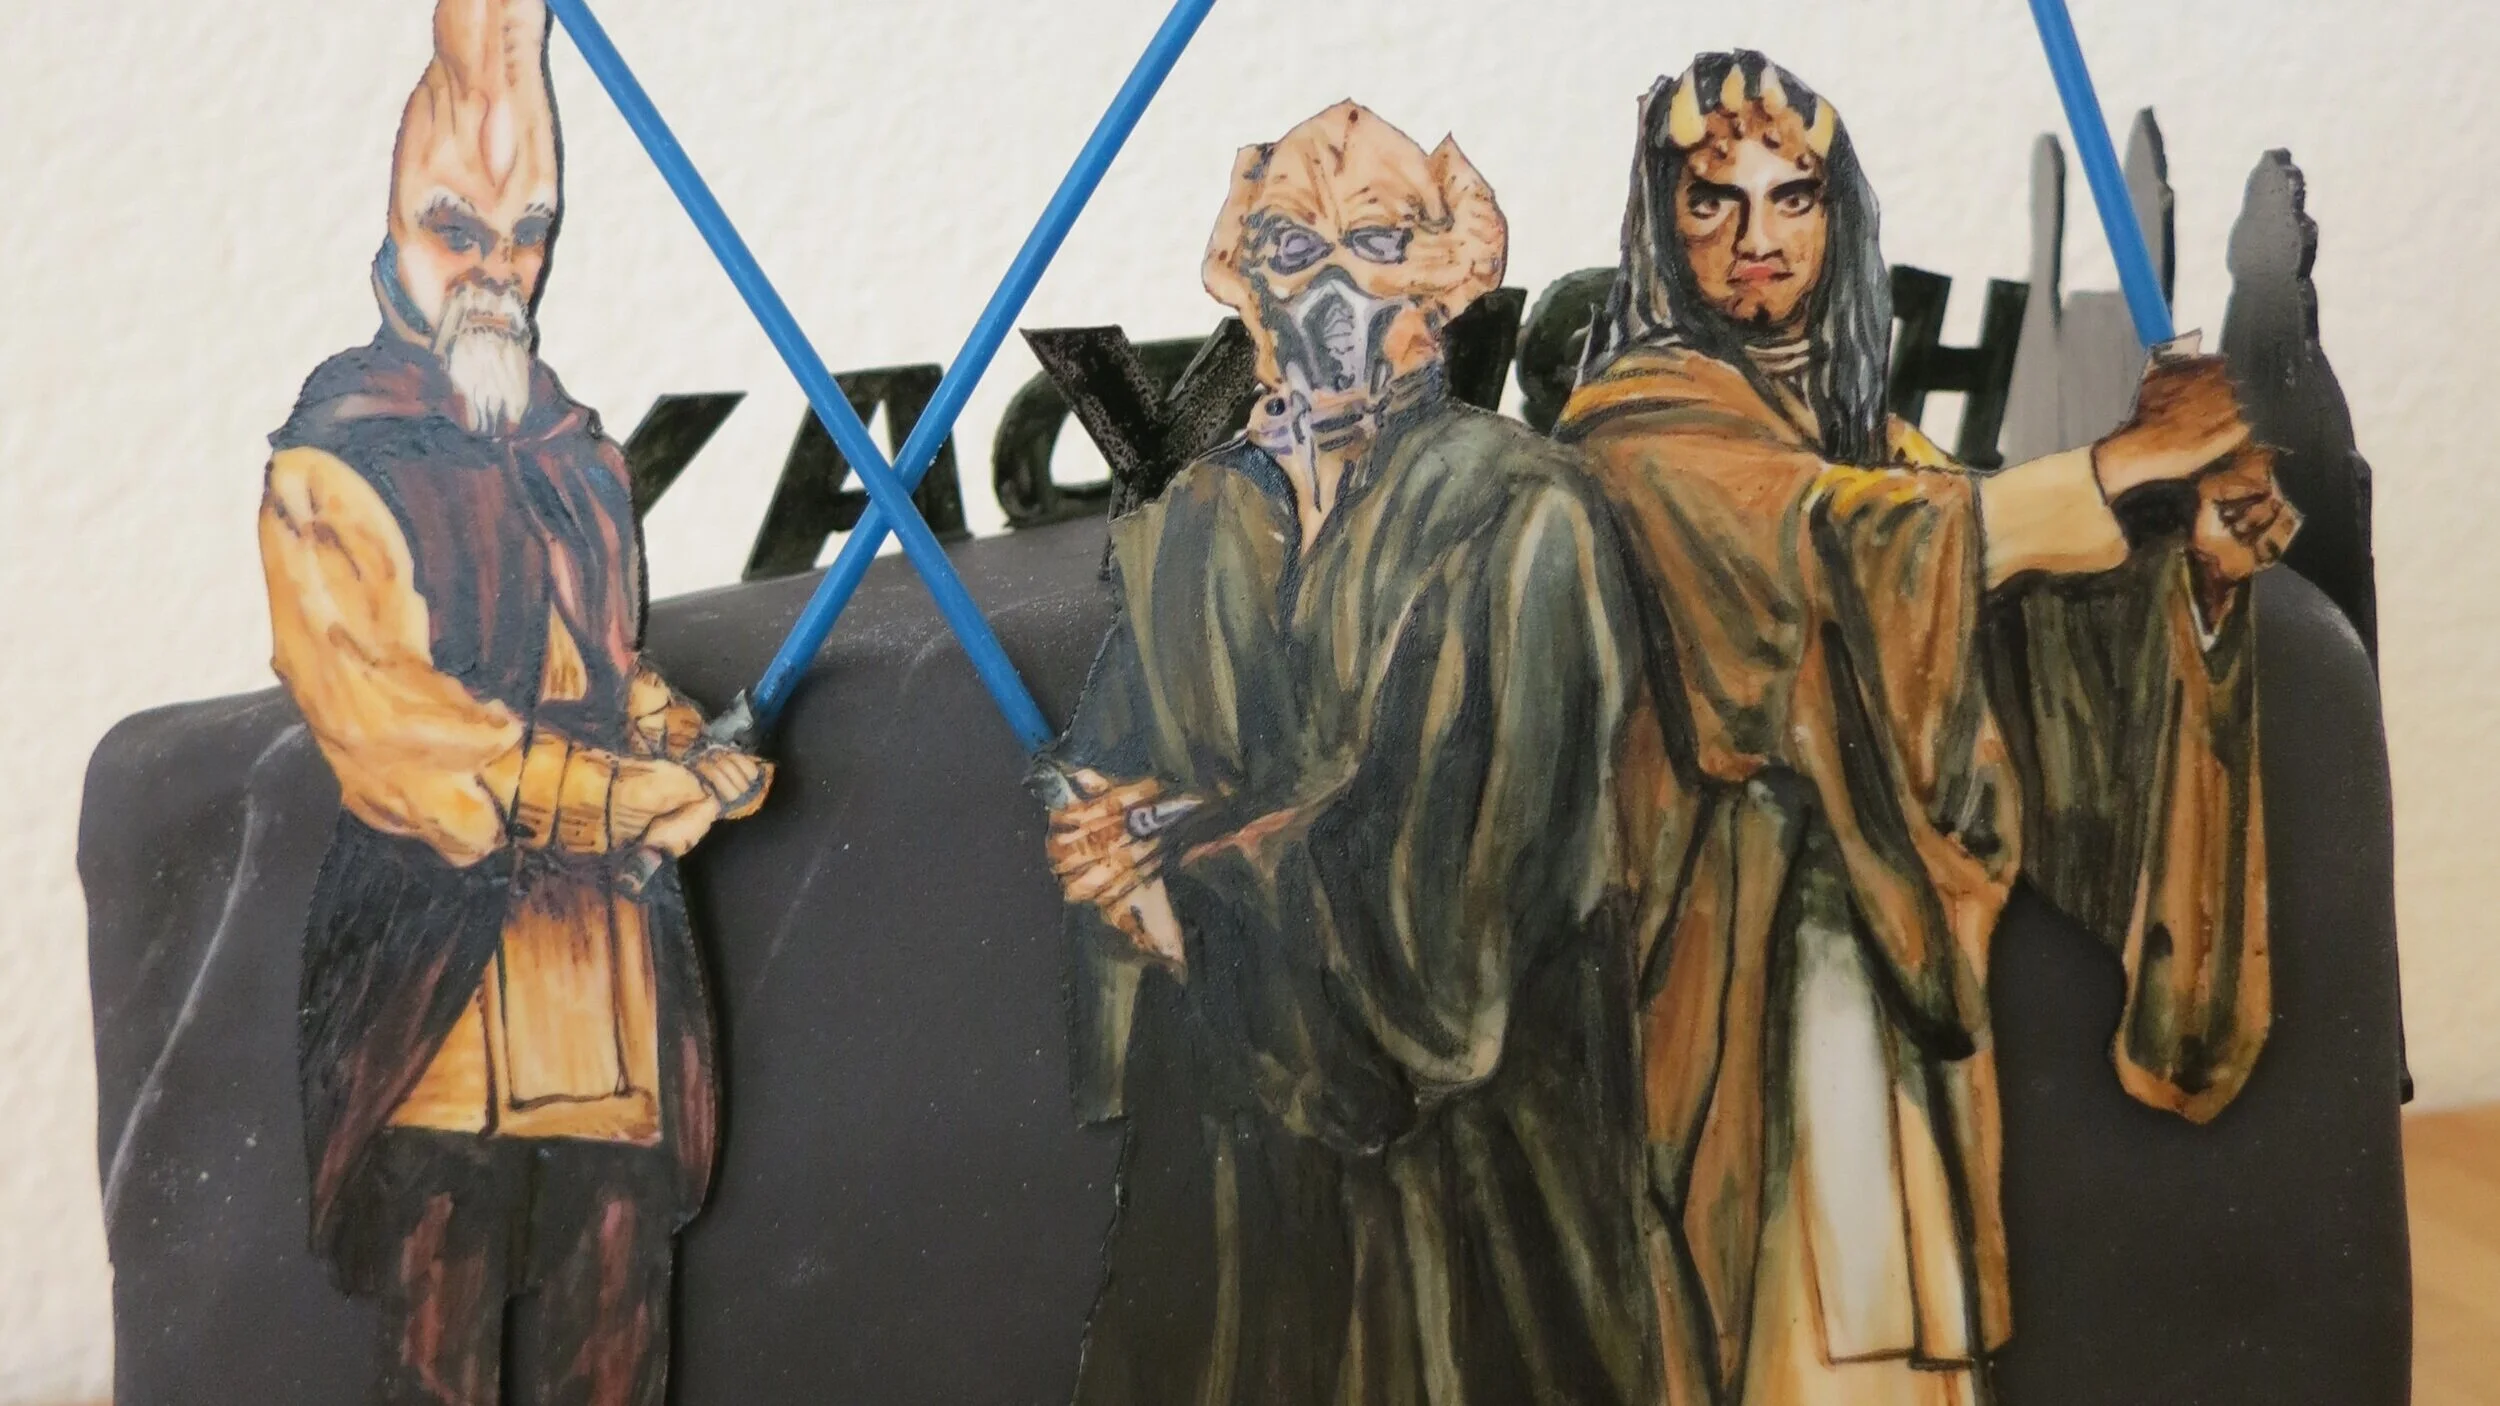
For her seventh birthday, Alex had very specific cake specifications. She wanted a cake being cut in half by a light saber with “Jedi trainers” around the sides.
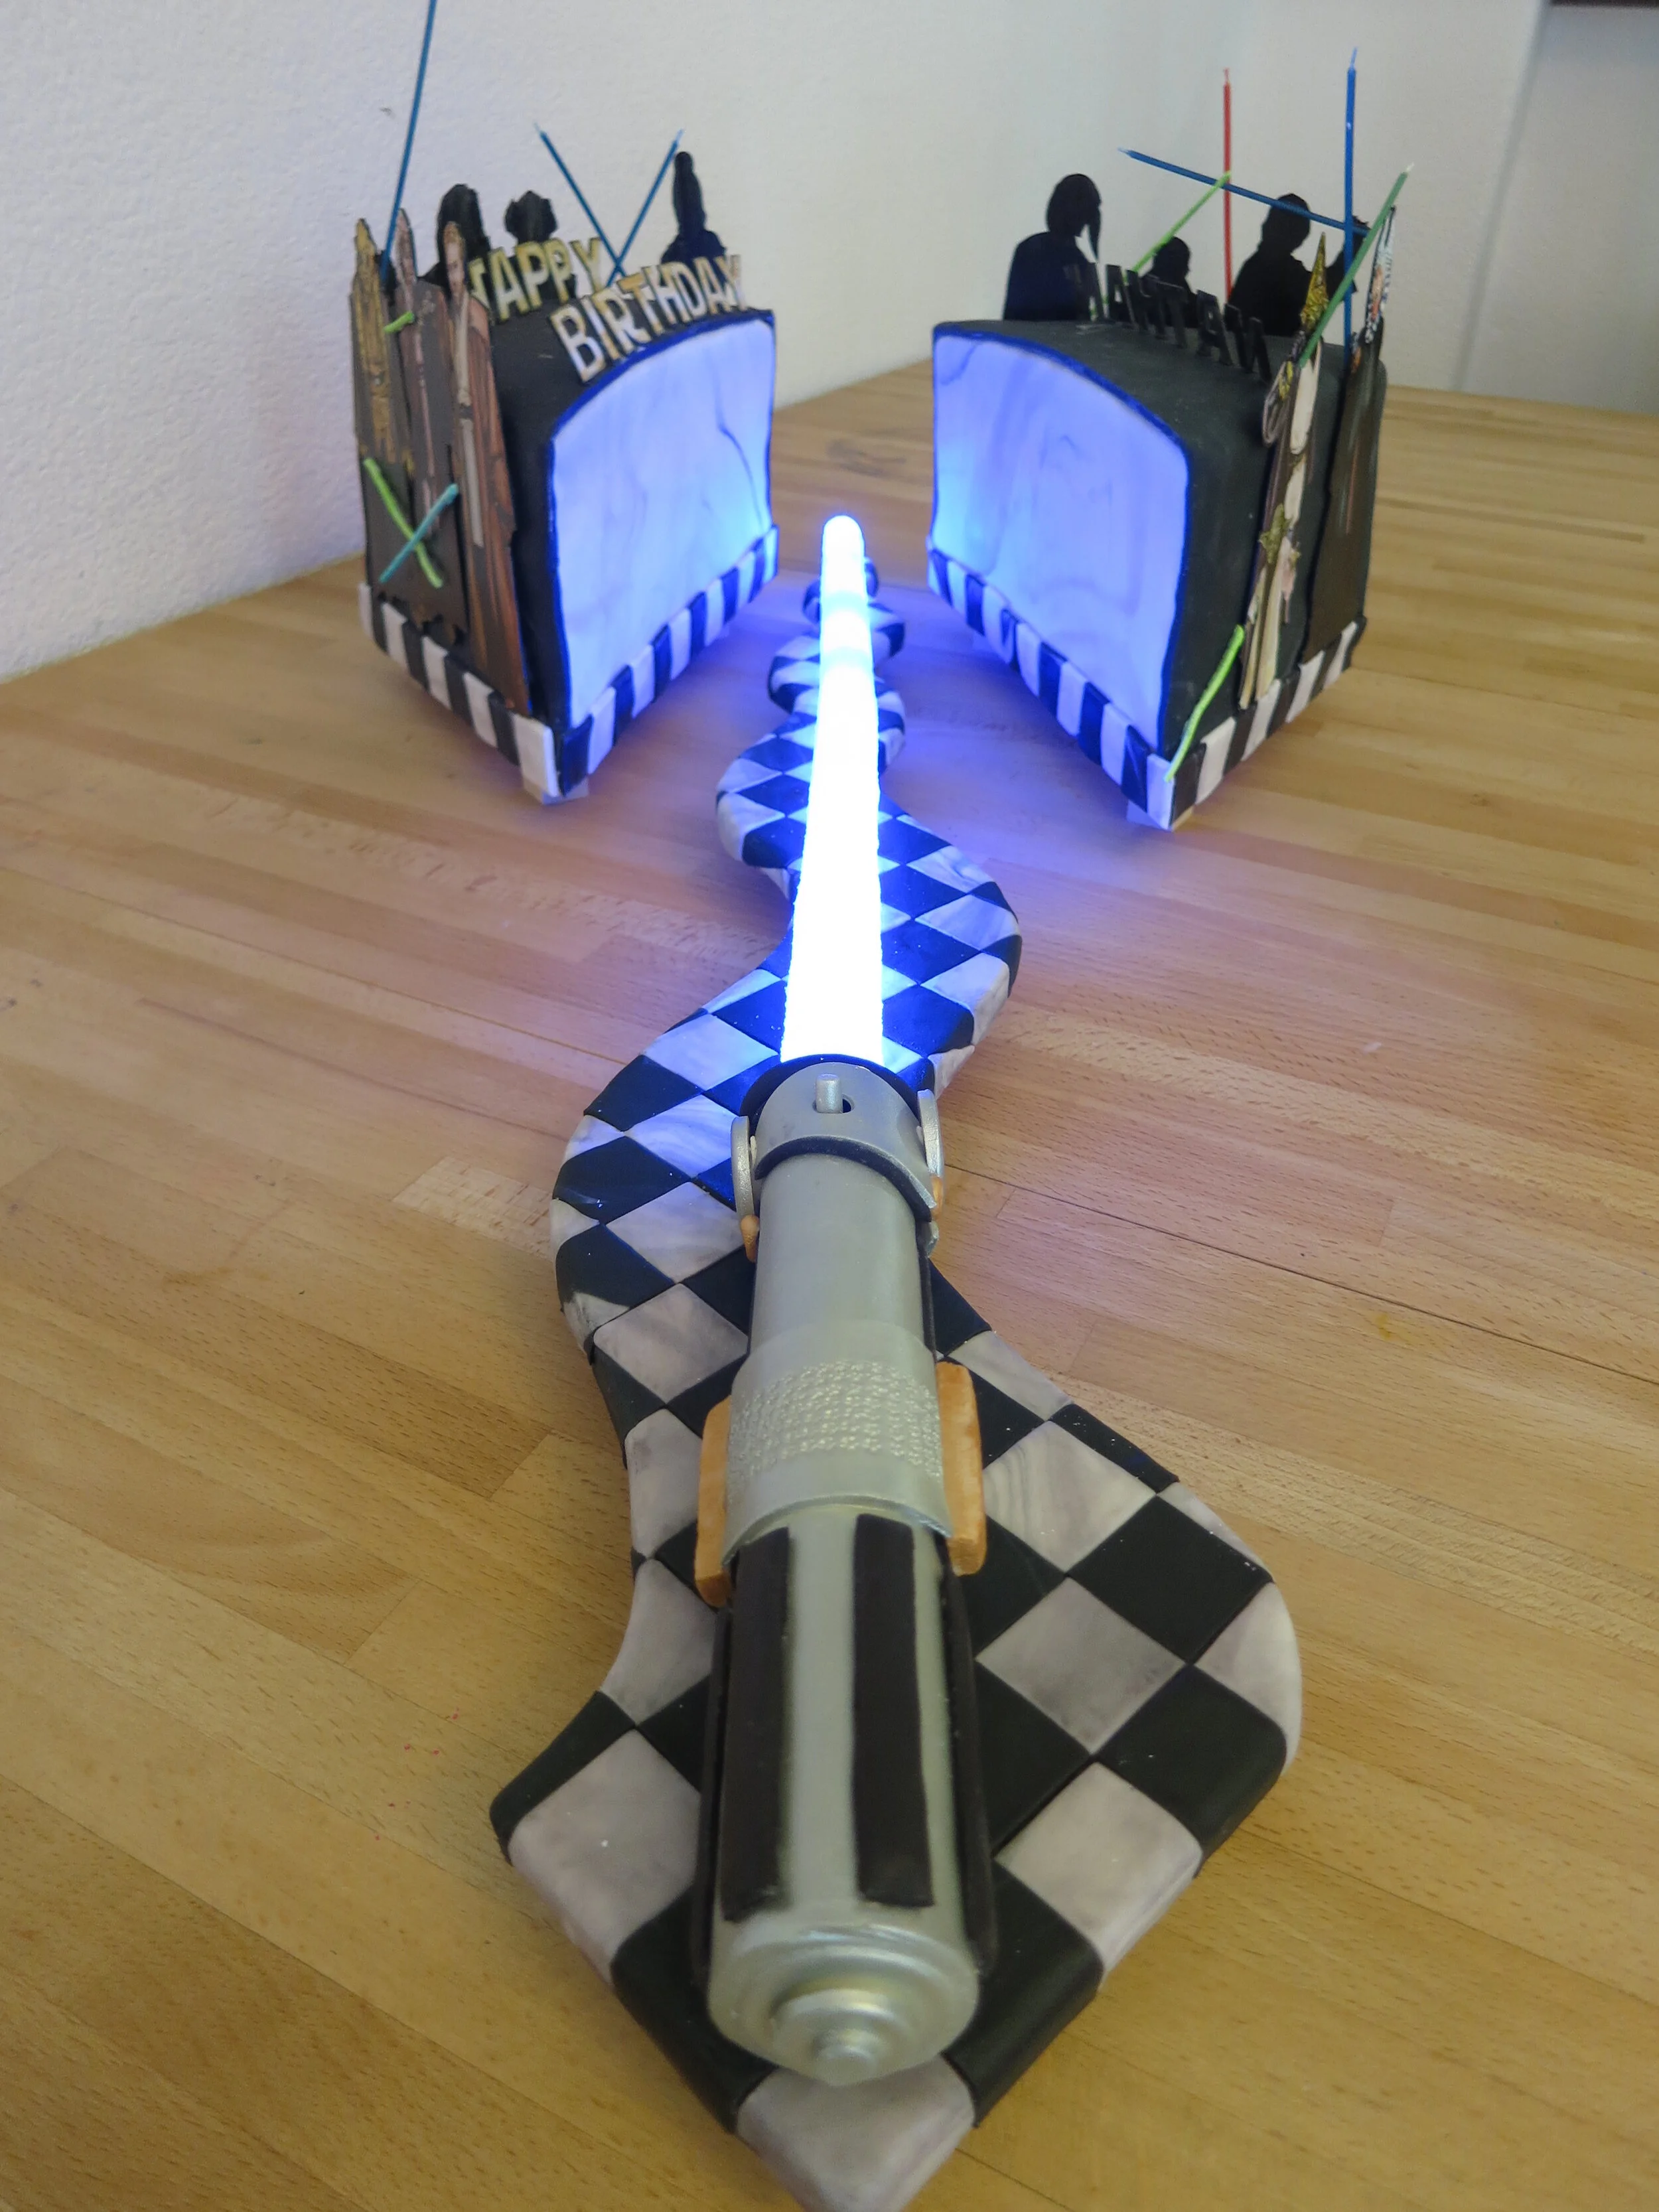
For her seventh birthday, Alex had very specific cake specifications. She wanted a cake being cut in half by a light saber with “Jedi trainers” around the sides. The only Jedi trainers she could specifically name were Yoda and Obi-Wan, which isn’t surprising, because she’s only seen Episodes IV, V, and VI. So I found a picture of the Jedi Council and went with that.
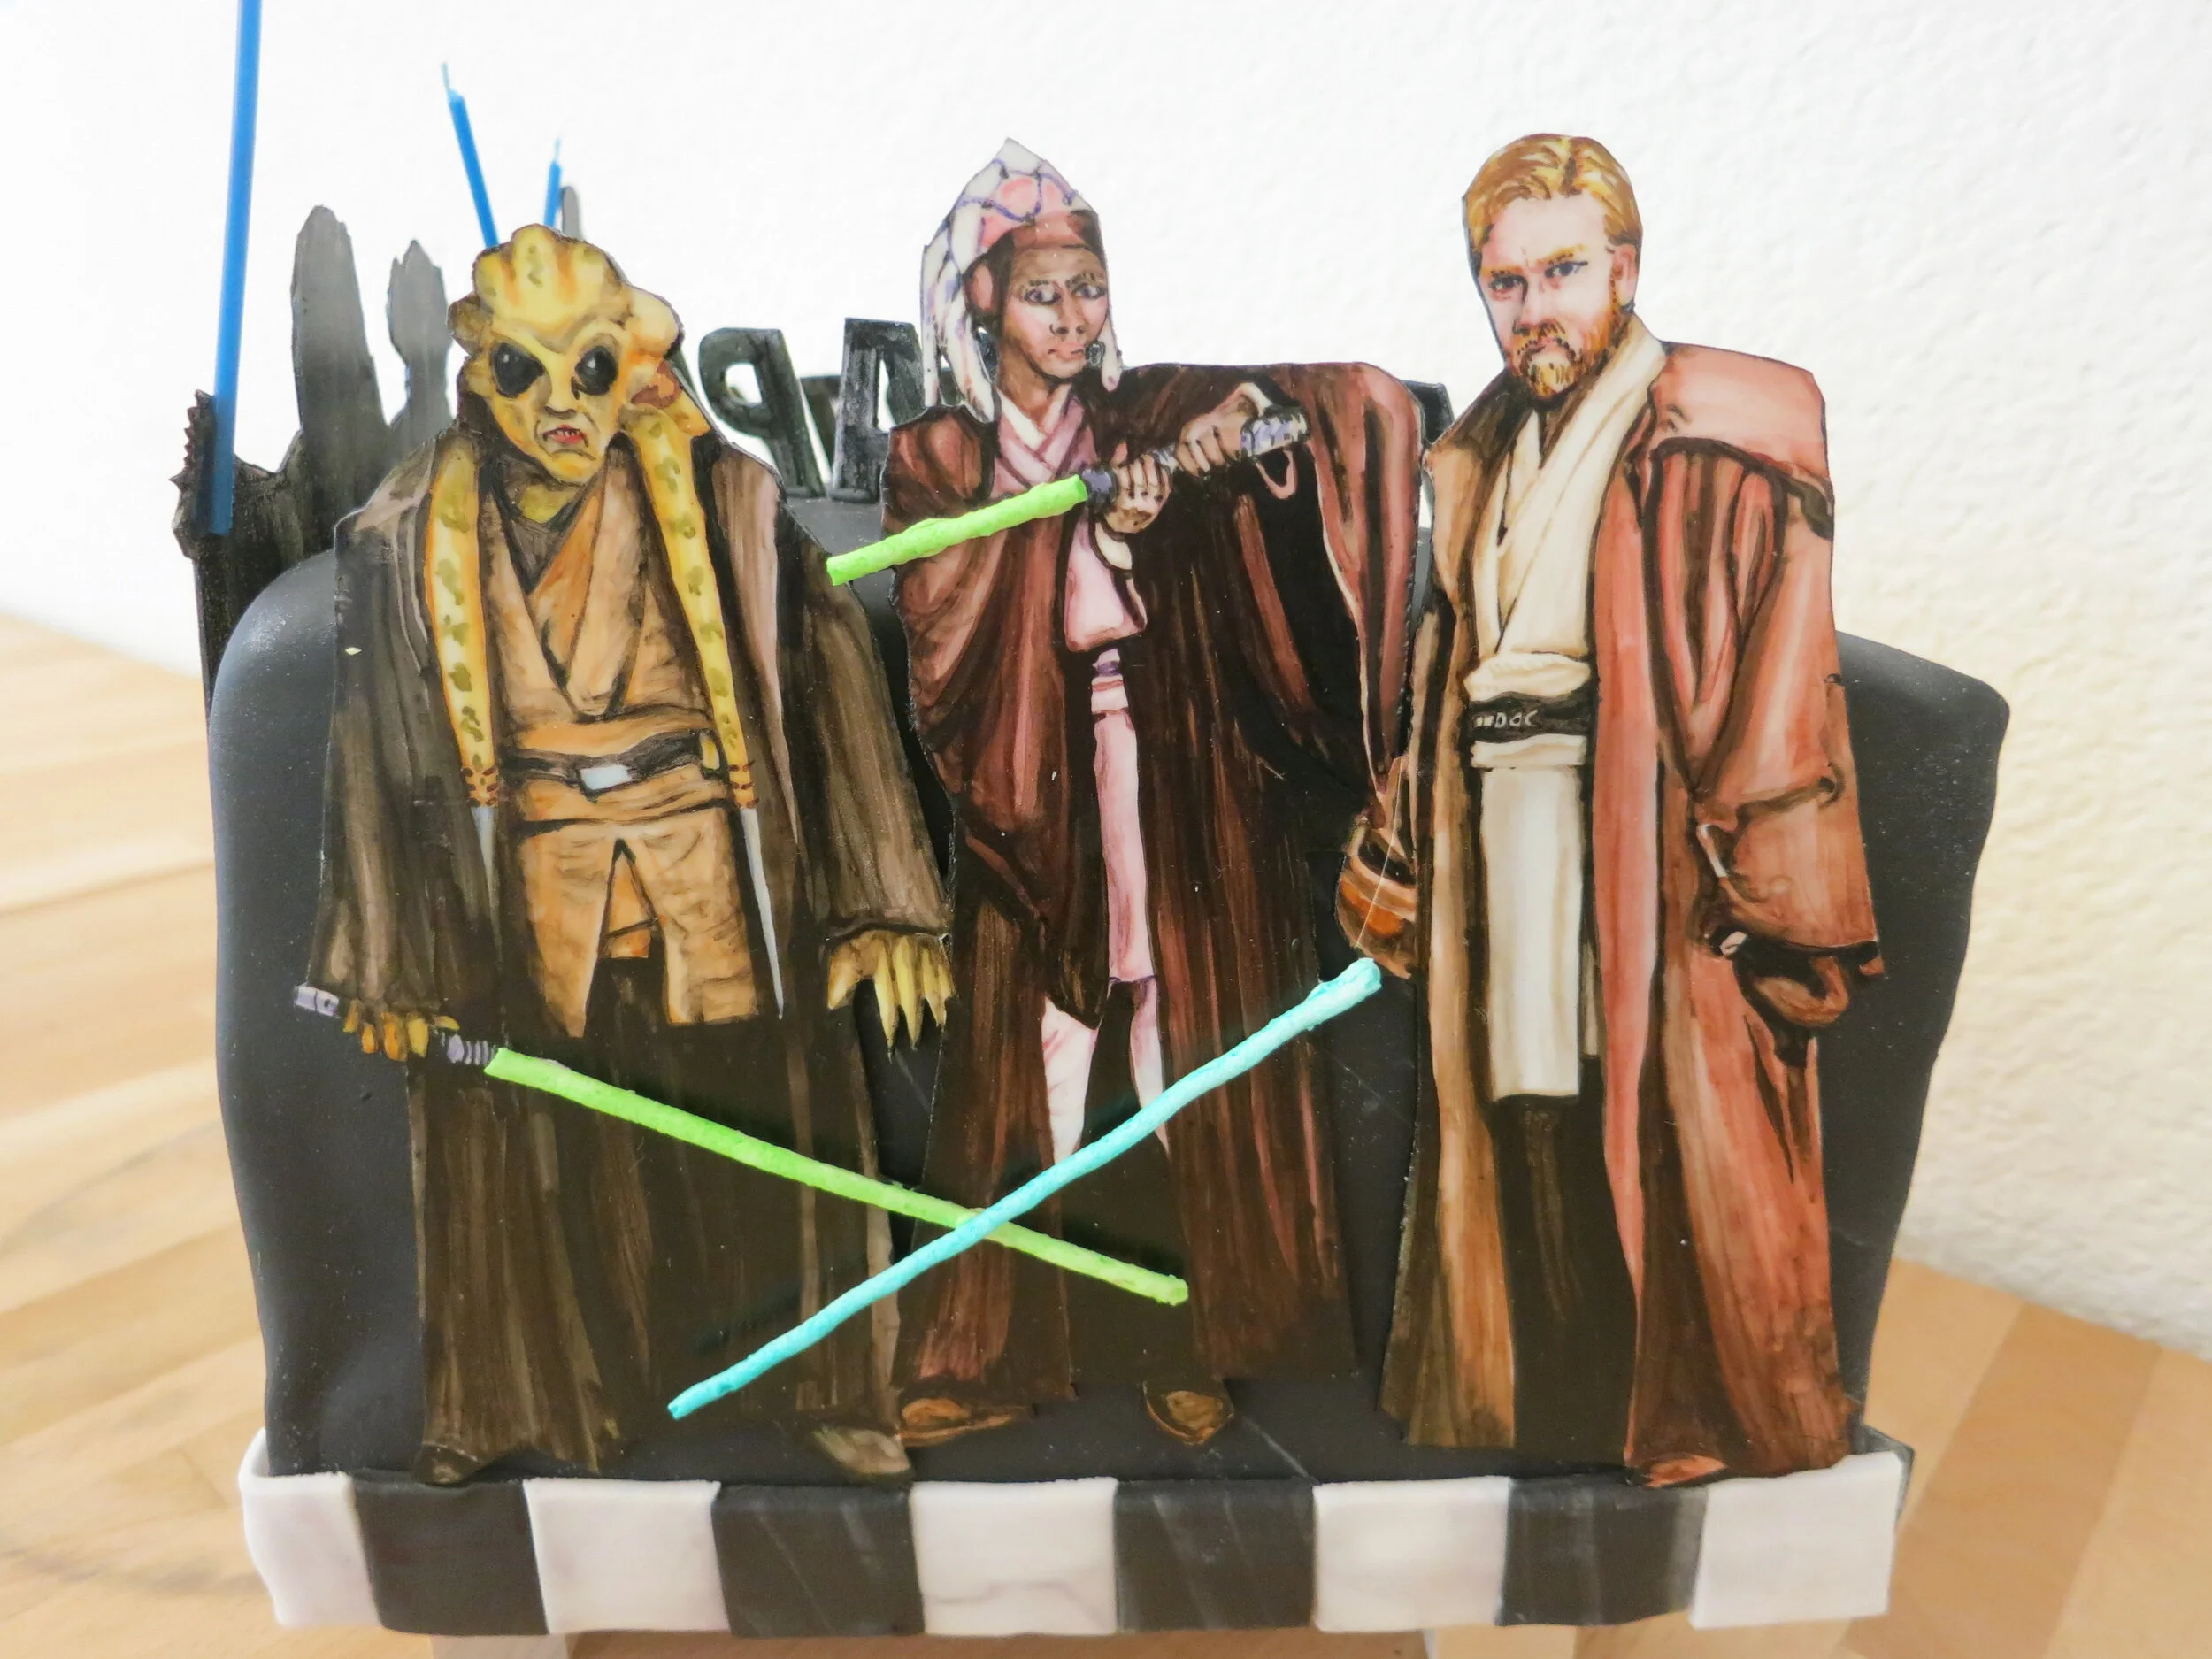
The light saber is a combination of poured sugar and pressed sugar with a string of LEDs embedded in it. The handle of the light saber is gum paste. The Jedi trainers are also gum paste, hand painted with food coloring. I’m particularly pleased with the candle light sabers.

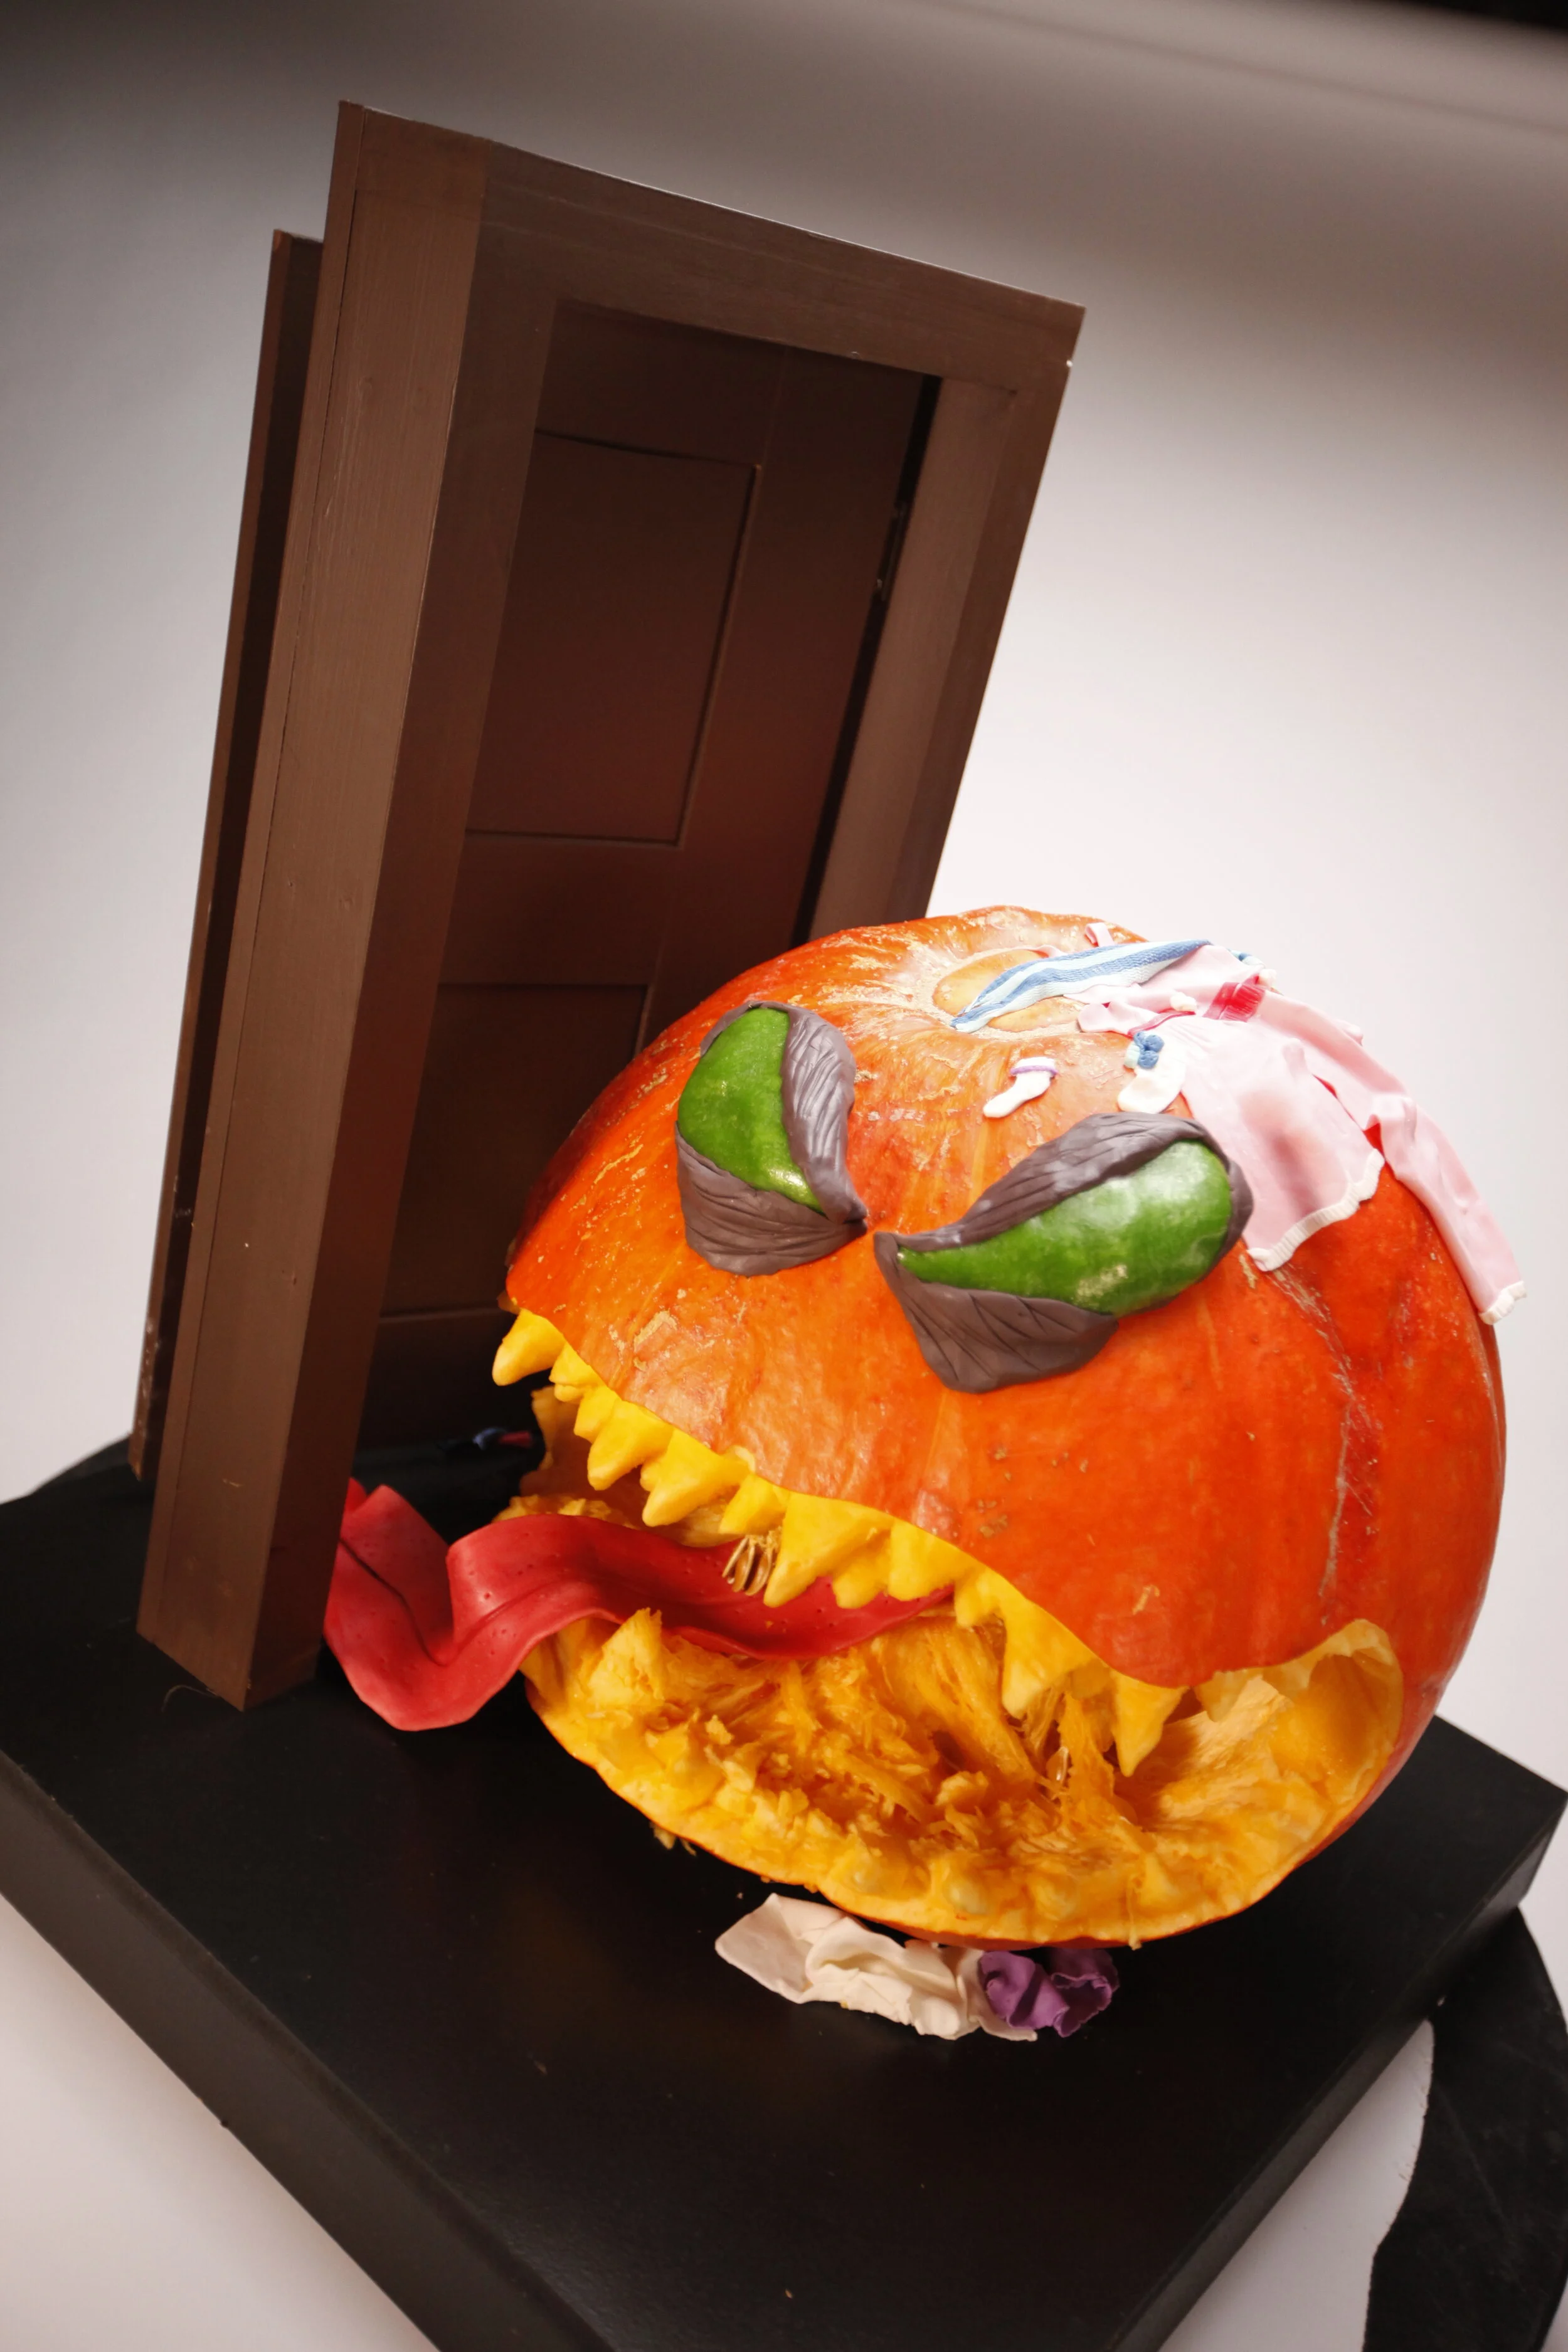
Head Chopping Cake
When I asked Sam what cake he wanted for his fourth birthday, of course he wanted an Axe Cop cake like his sister had.


When I asked Sam what cake he wanted for his fourth birthday, of course he wanted an Axe Cop cake like his sister had. I didn’t have time to make Sam quite as large a cake as I made for Alex, so I just went with a simple 8” round cake with a row of bad guys around the perimeter.

I stuck a motor in the middle, so that I could attach chocolate axes to chop the bad guys’ heads off. I really needed a stronger motor and a better way to attach the chocolate axes, but we did eventually manage to decapitate and/or knock over all the gum paste bad guys.
Sugar Dome
I’m back on Food Network, on the Sugar Dome episode “When Toy Stores Come to Life at Night!”


Halloween Wars!
Check it out – I’m a warrior of Halloween Wars! You can watch my TV debut on Food Network, October 7th at 9:00 Eastern and Pacific.

Check it out - I'm a warrior of Halloween Wars! You can watch my TV debut on Food Network, October 7th at 9:00 Eastern and Pacific.
UPDATE: Here are the pieces we made.


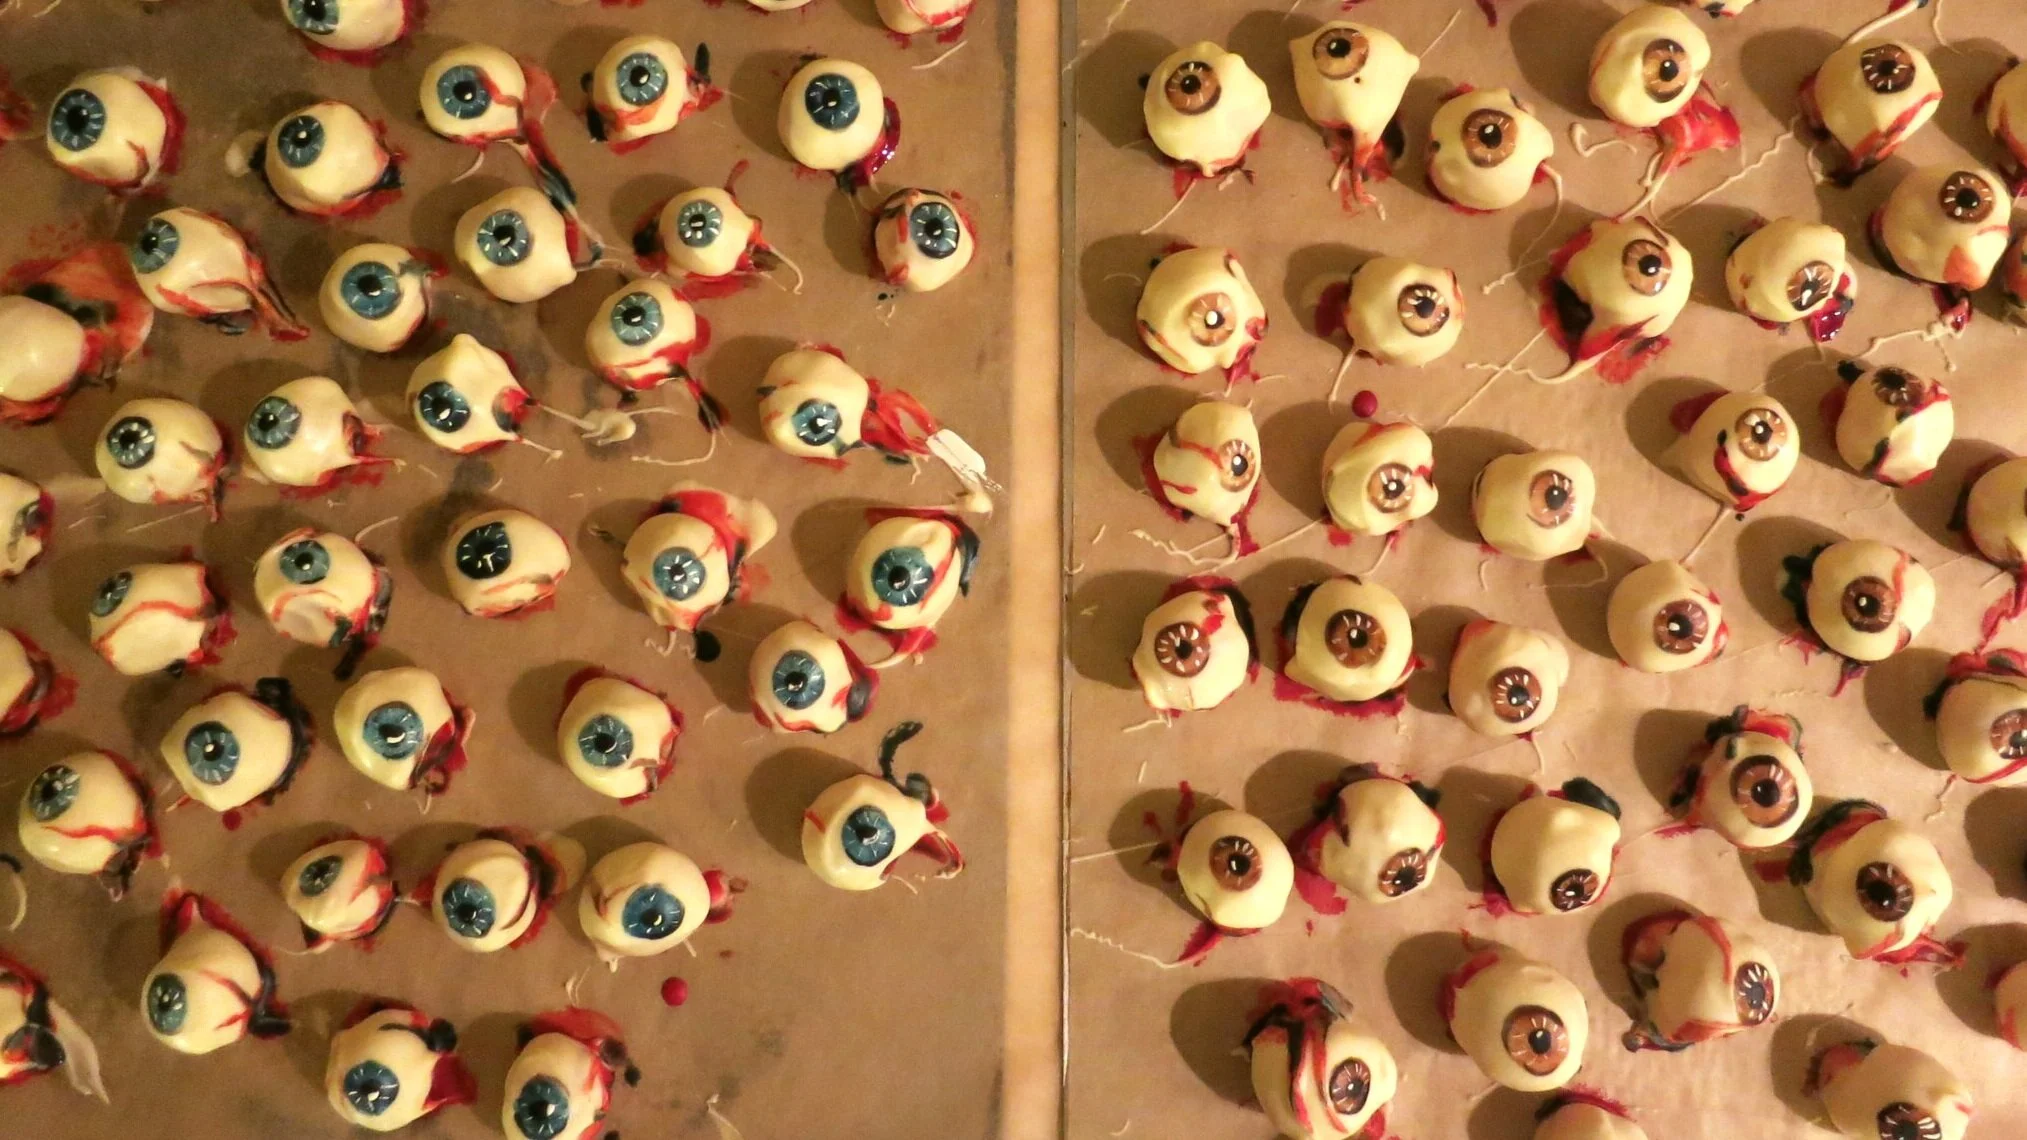
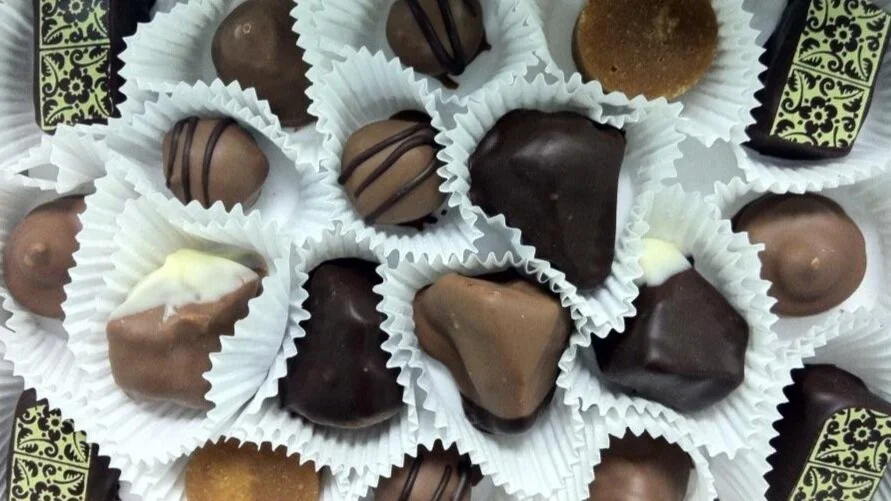
Eyeball Cordial Cherries
One of my personal favorite candy invention. They squish just like a real eyeball (maybe?) when you bite into them and they taste delicious!
One of my personal favorite candy inventions. They squish just like a real eyeball (maybe?) when you bite into them and they taste delicious! The color of the iris distinguishes between the brandy-soaked and non-brandy soaked varieties.
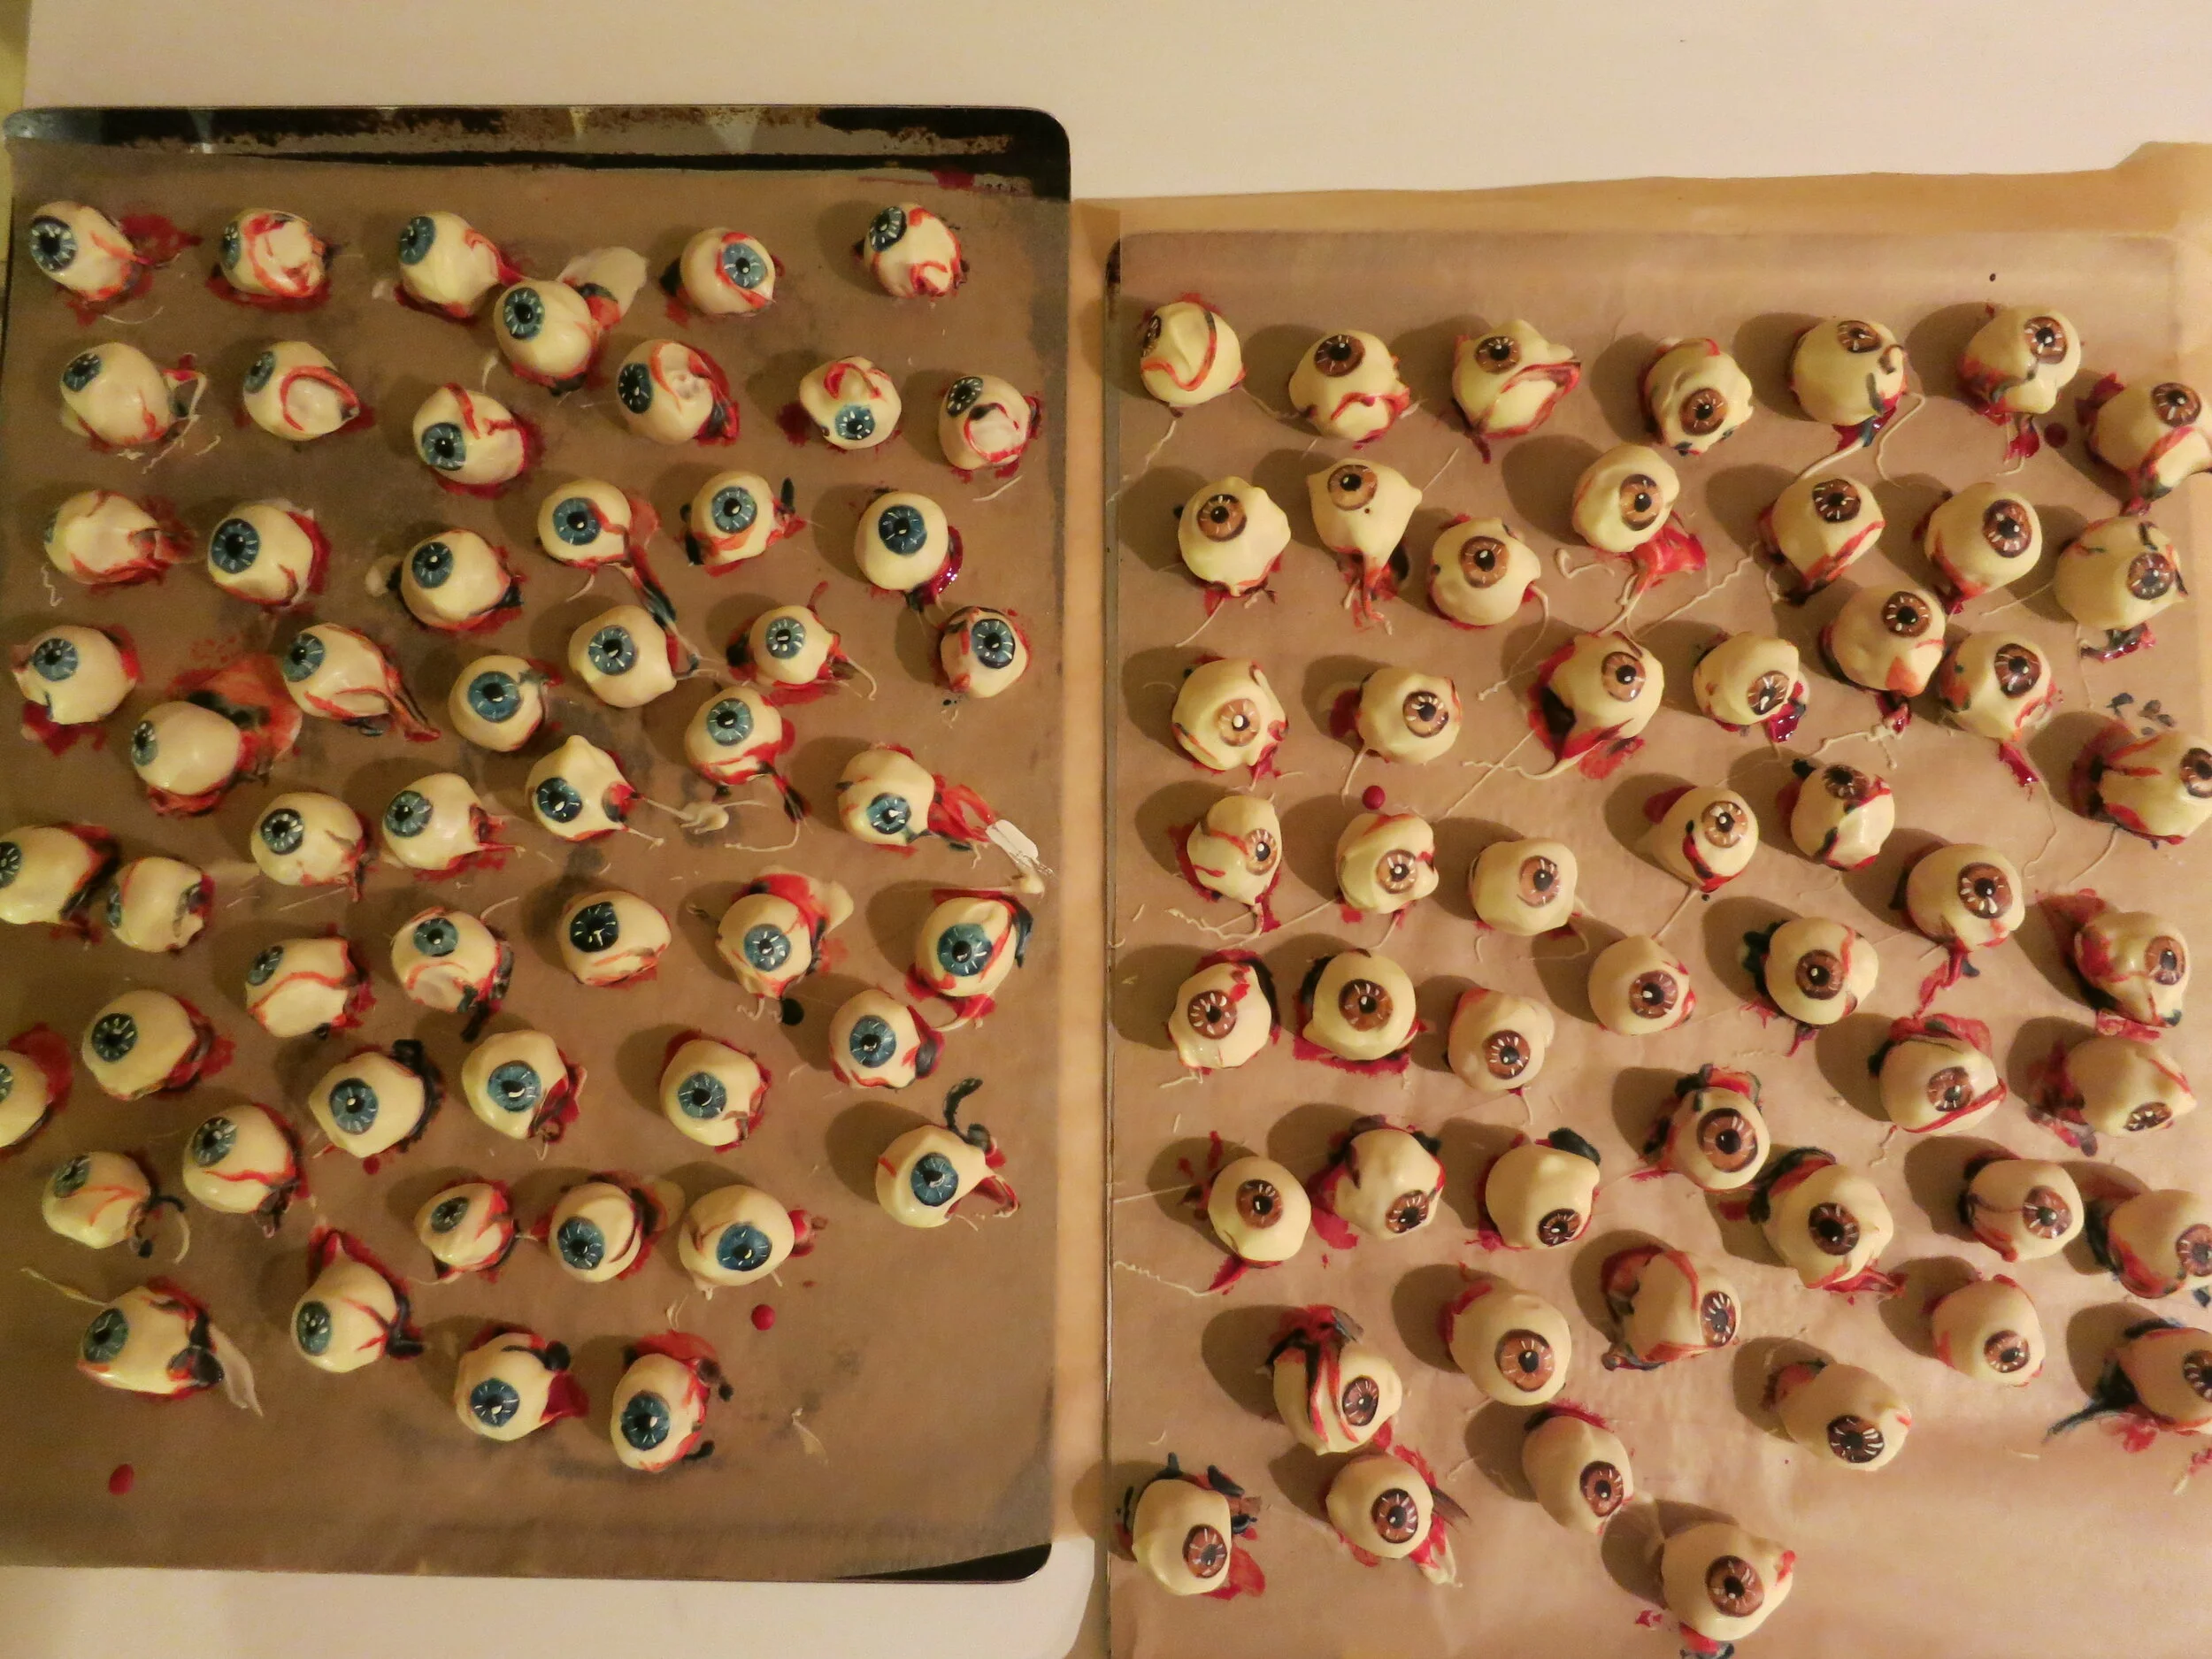
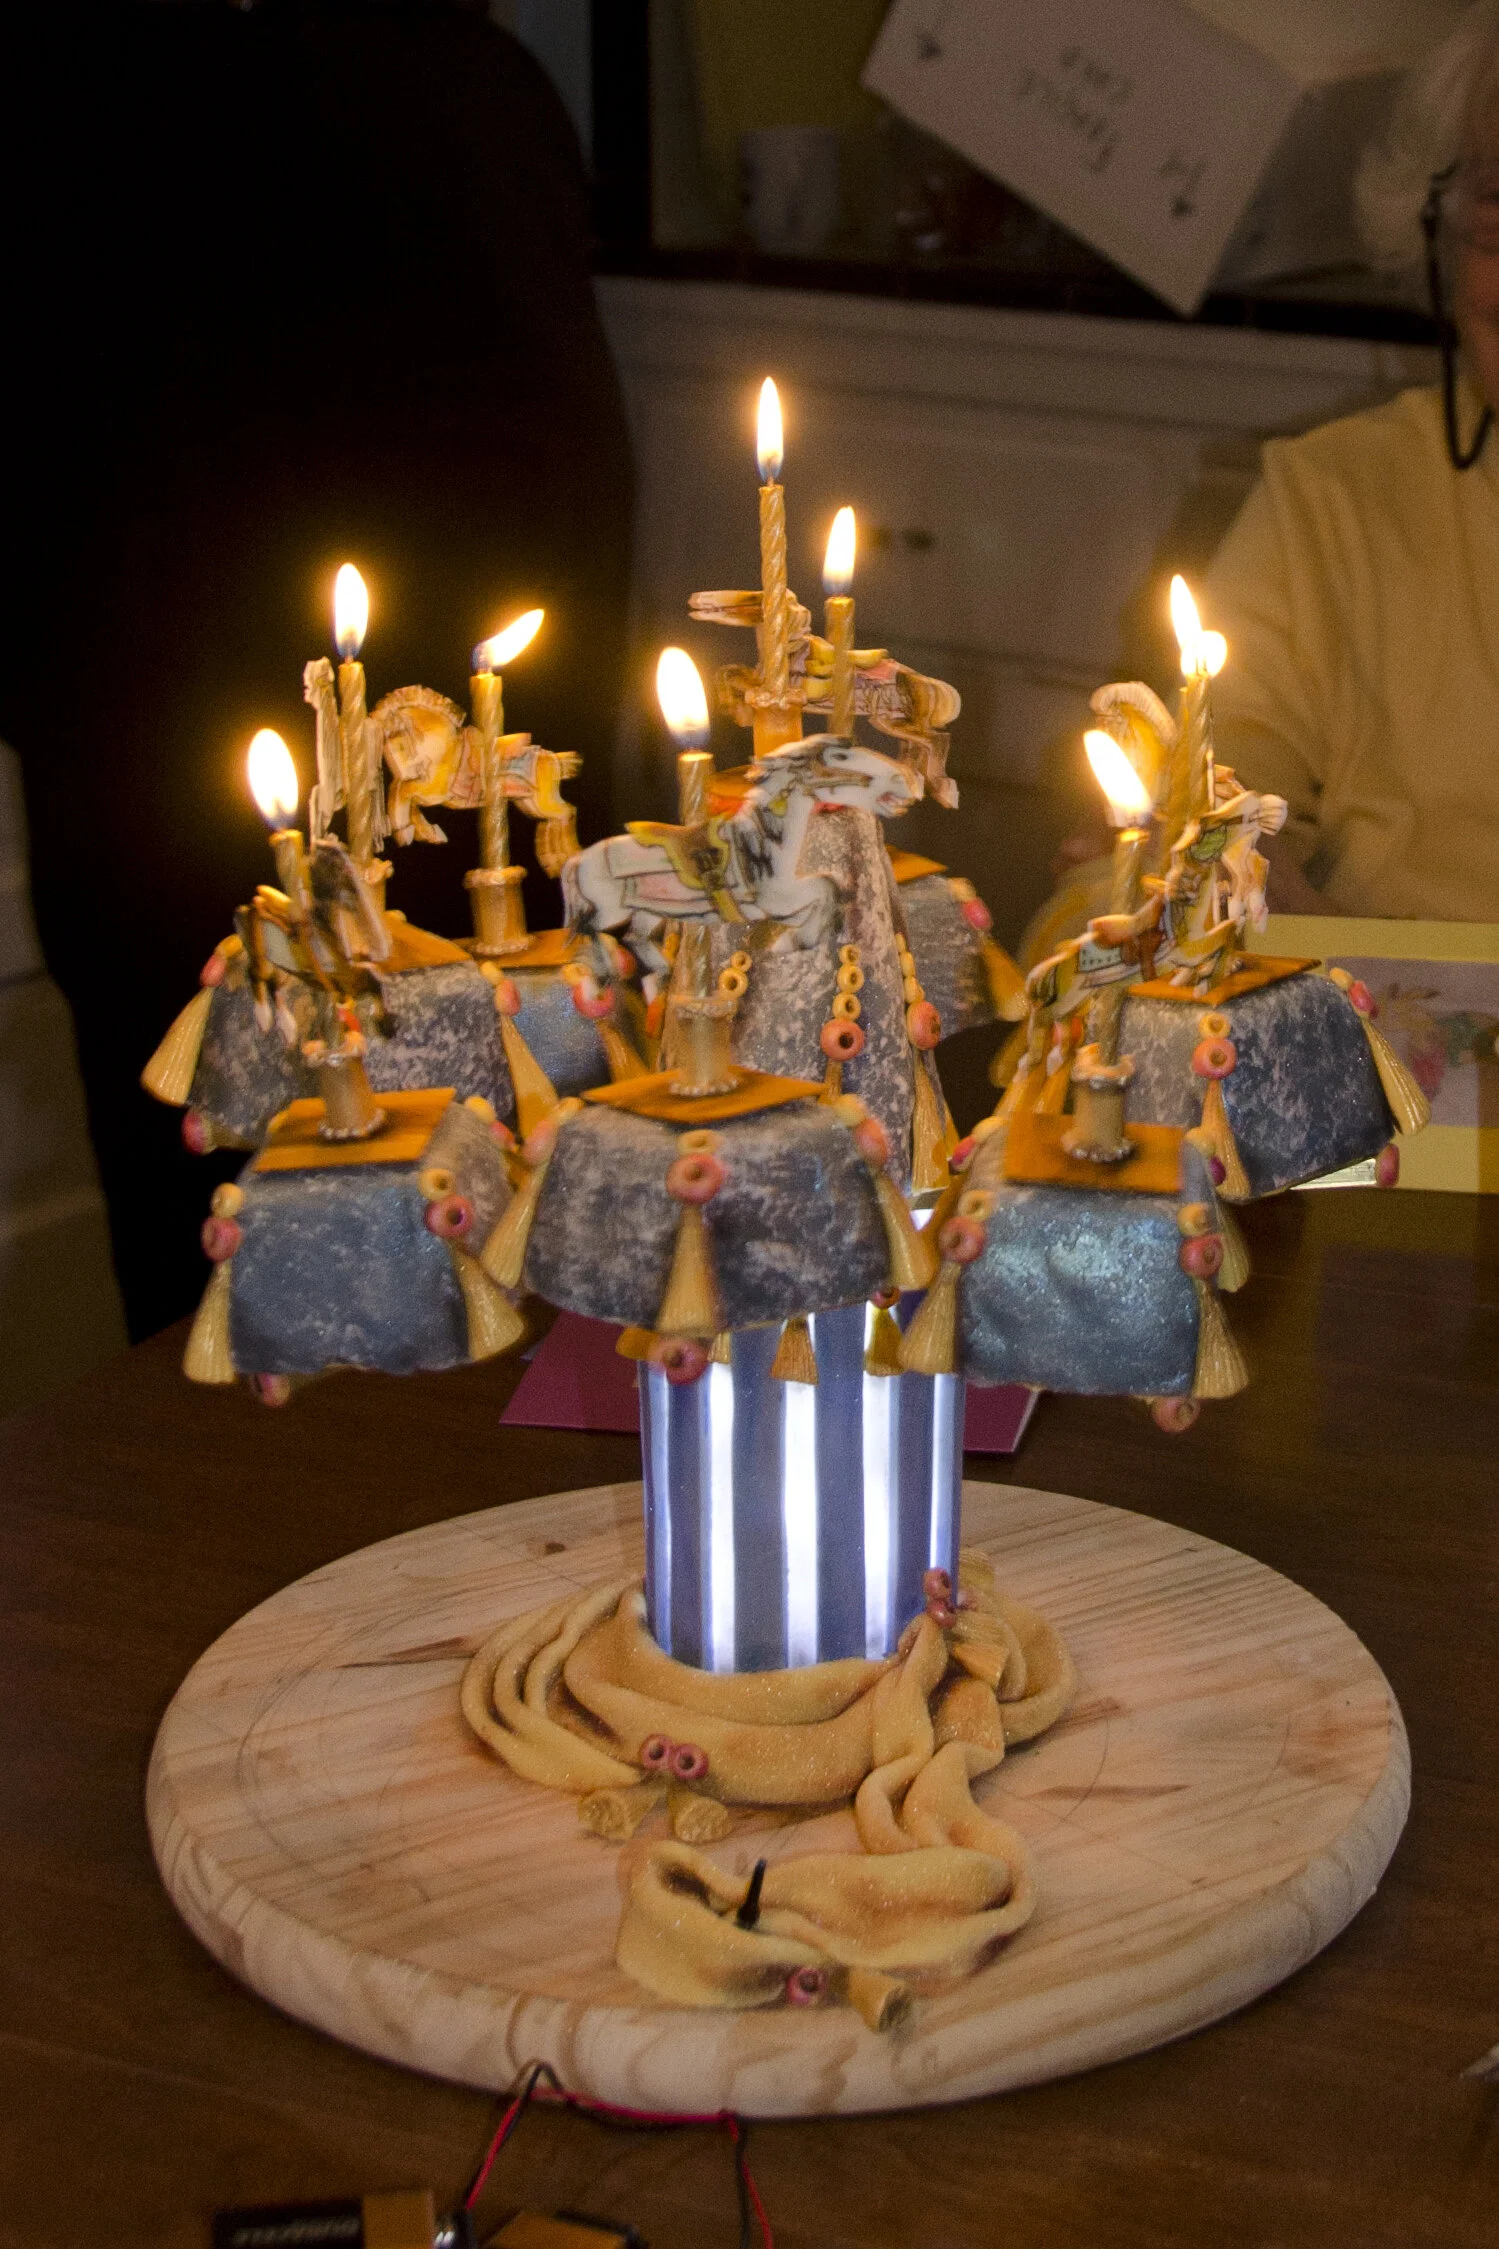
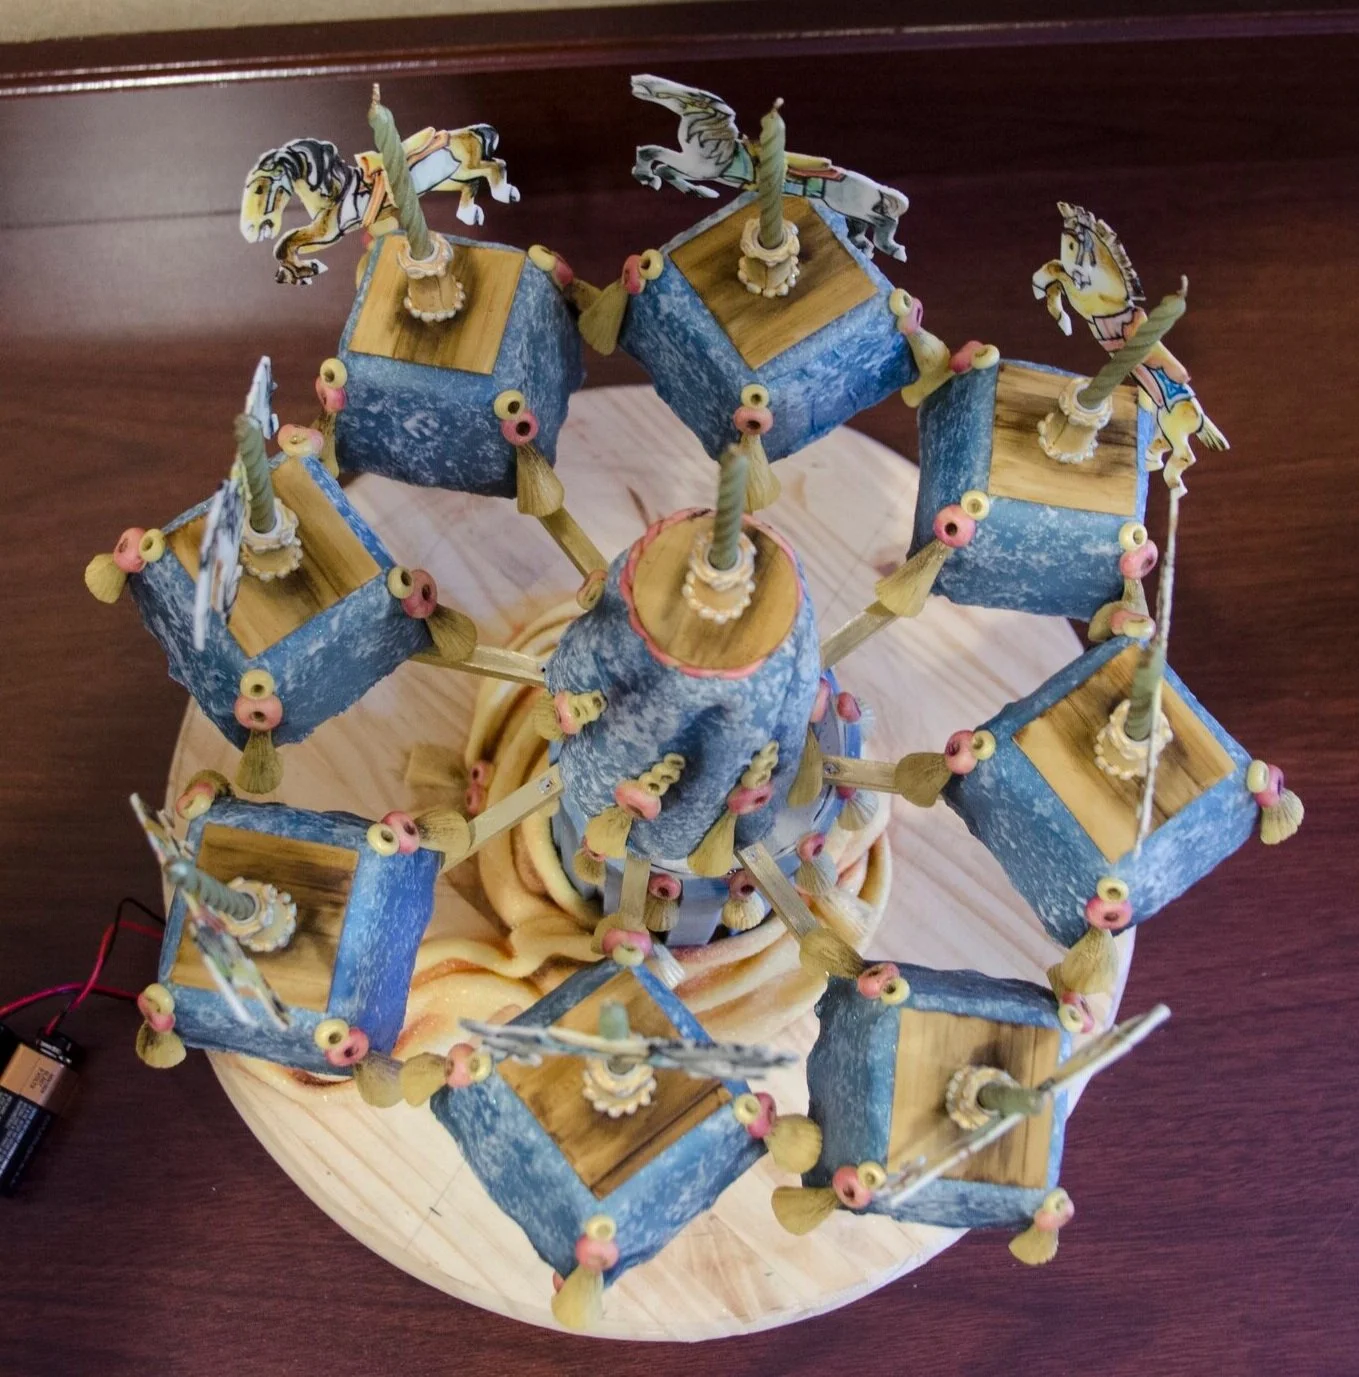
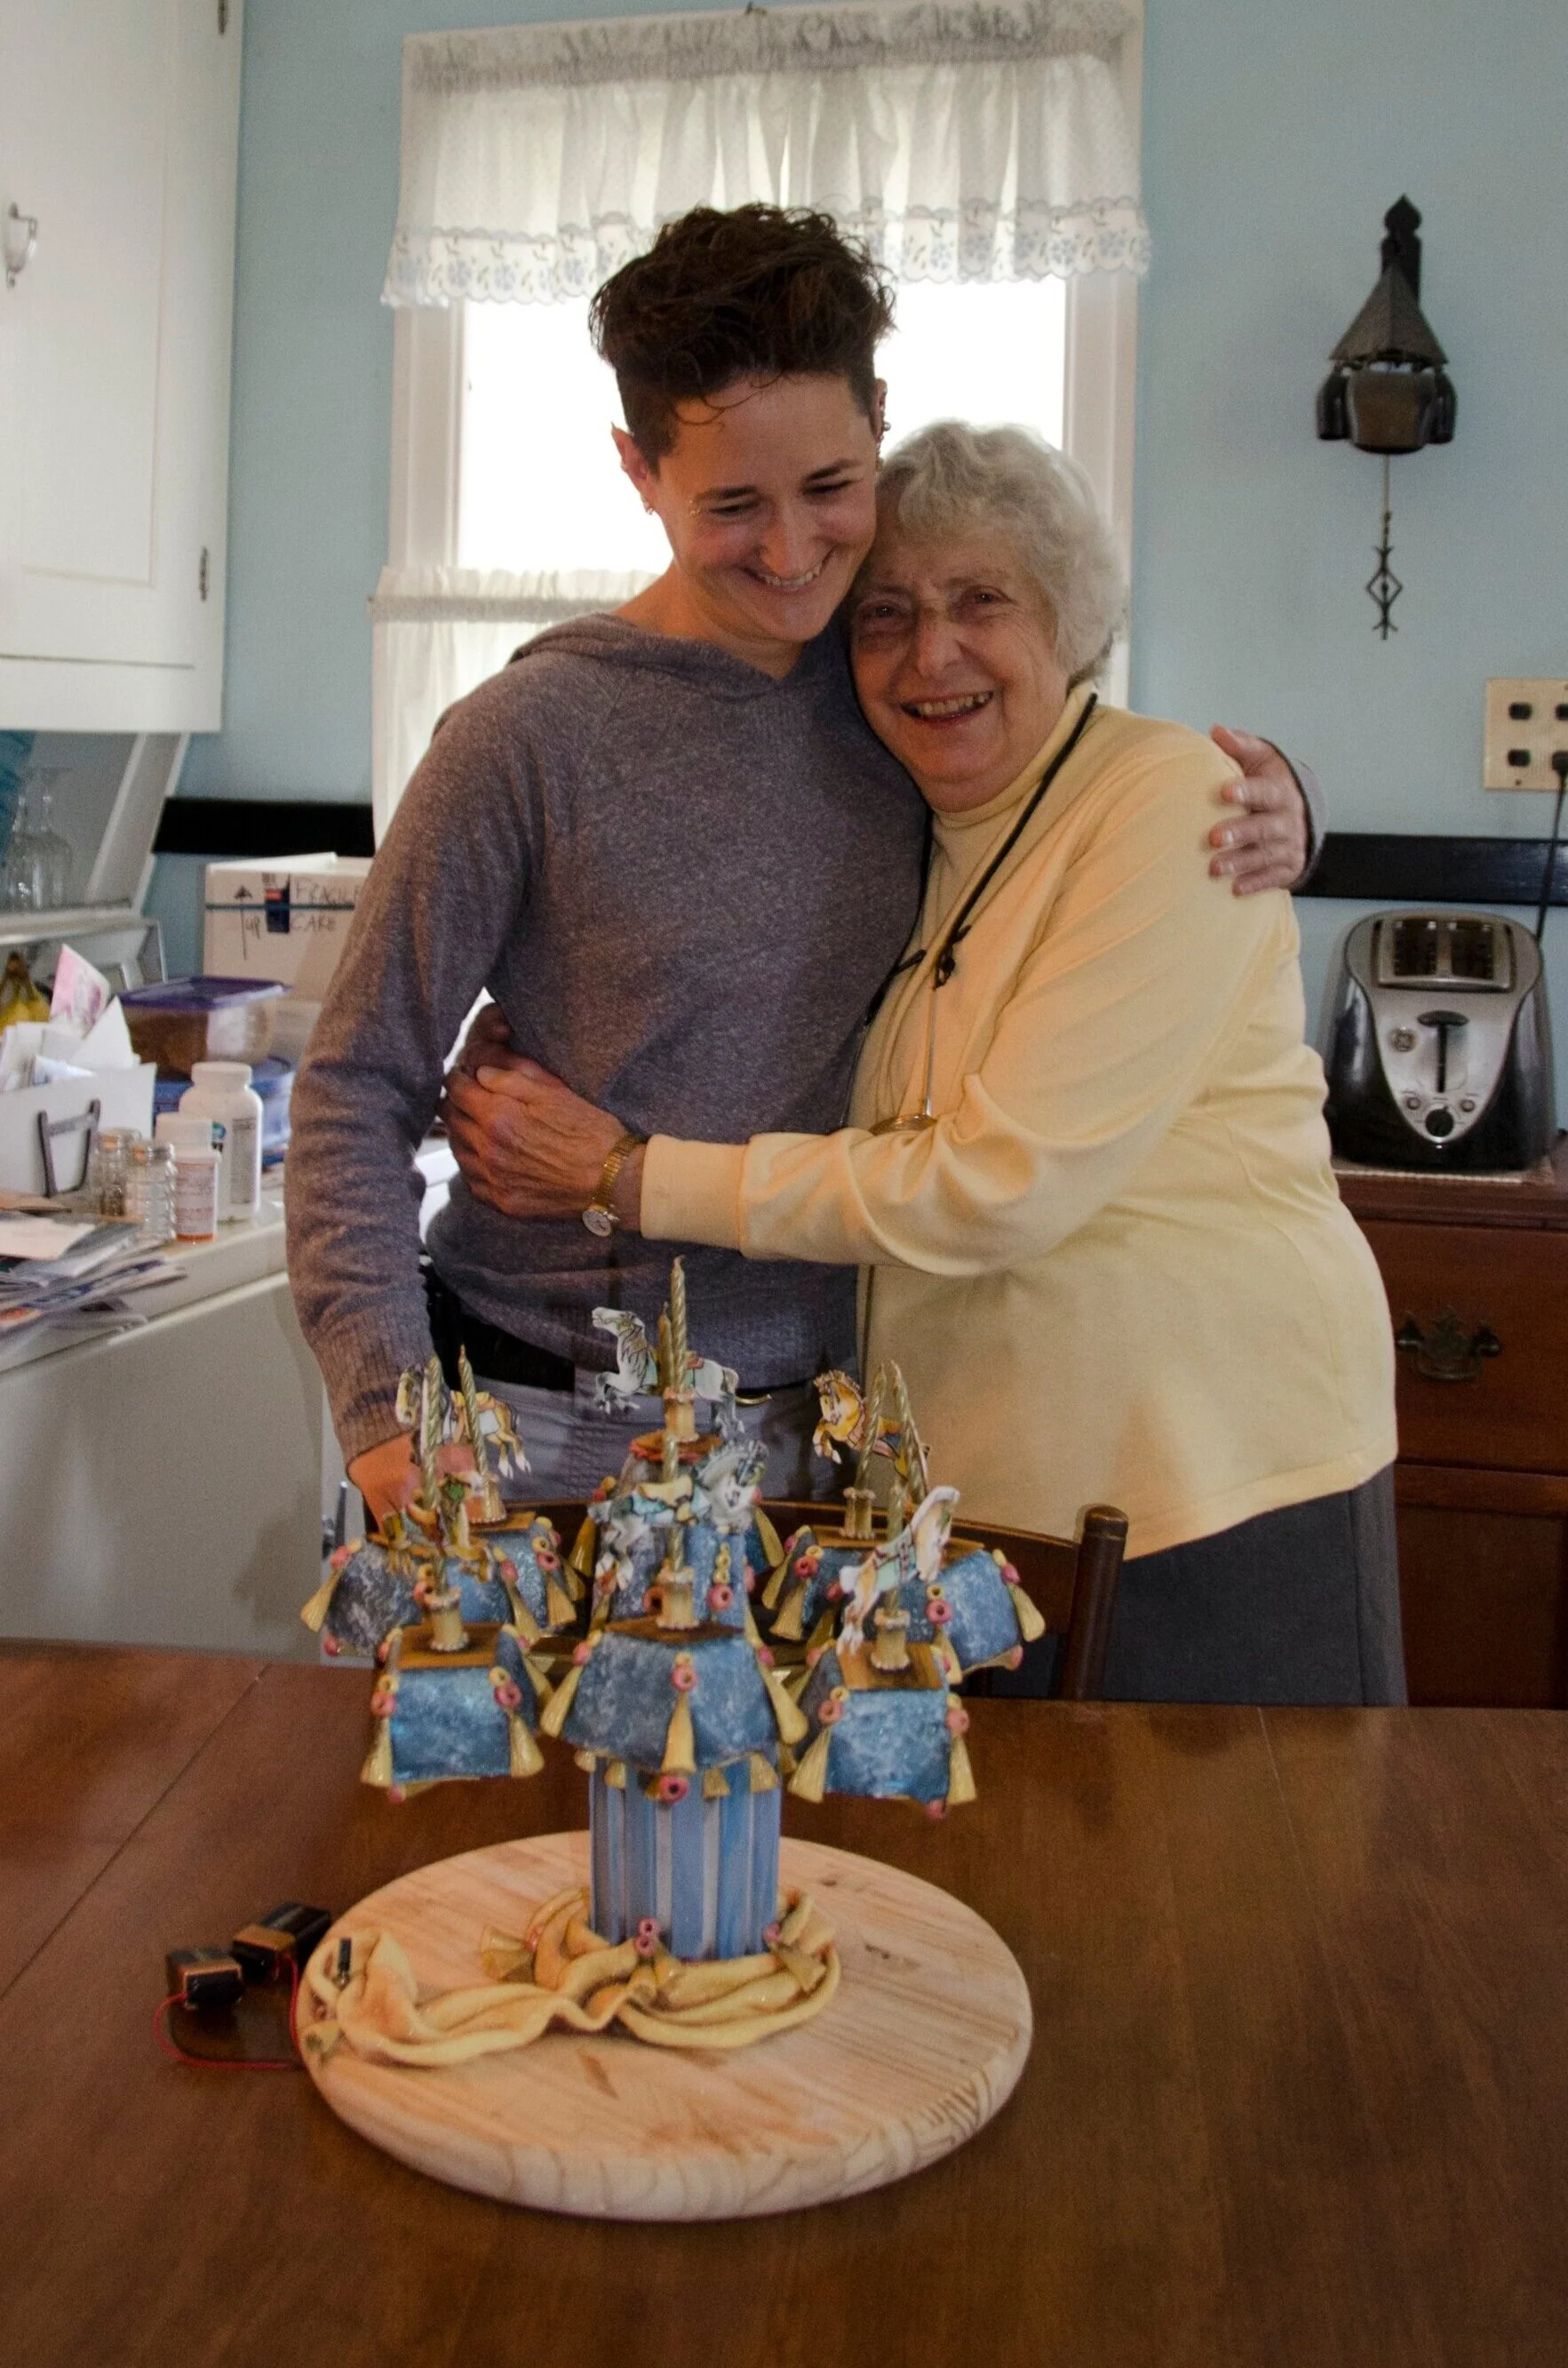
Carousel Cake
My grandmother lives near a beautiful old carousel from the 1920s. When we visited her when we little, she would always take us to ride it. When I was designing her 90th birthday cake, I got to thinking about riding the carousel with her, and this is the result.
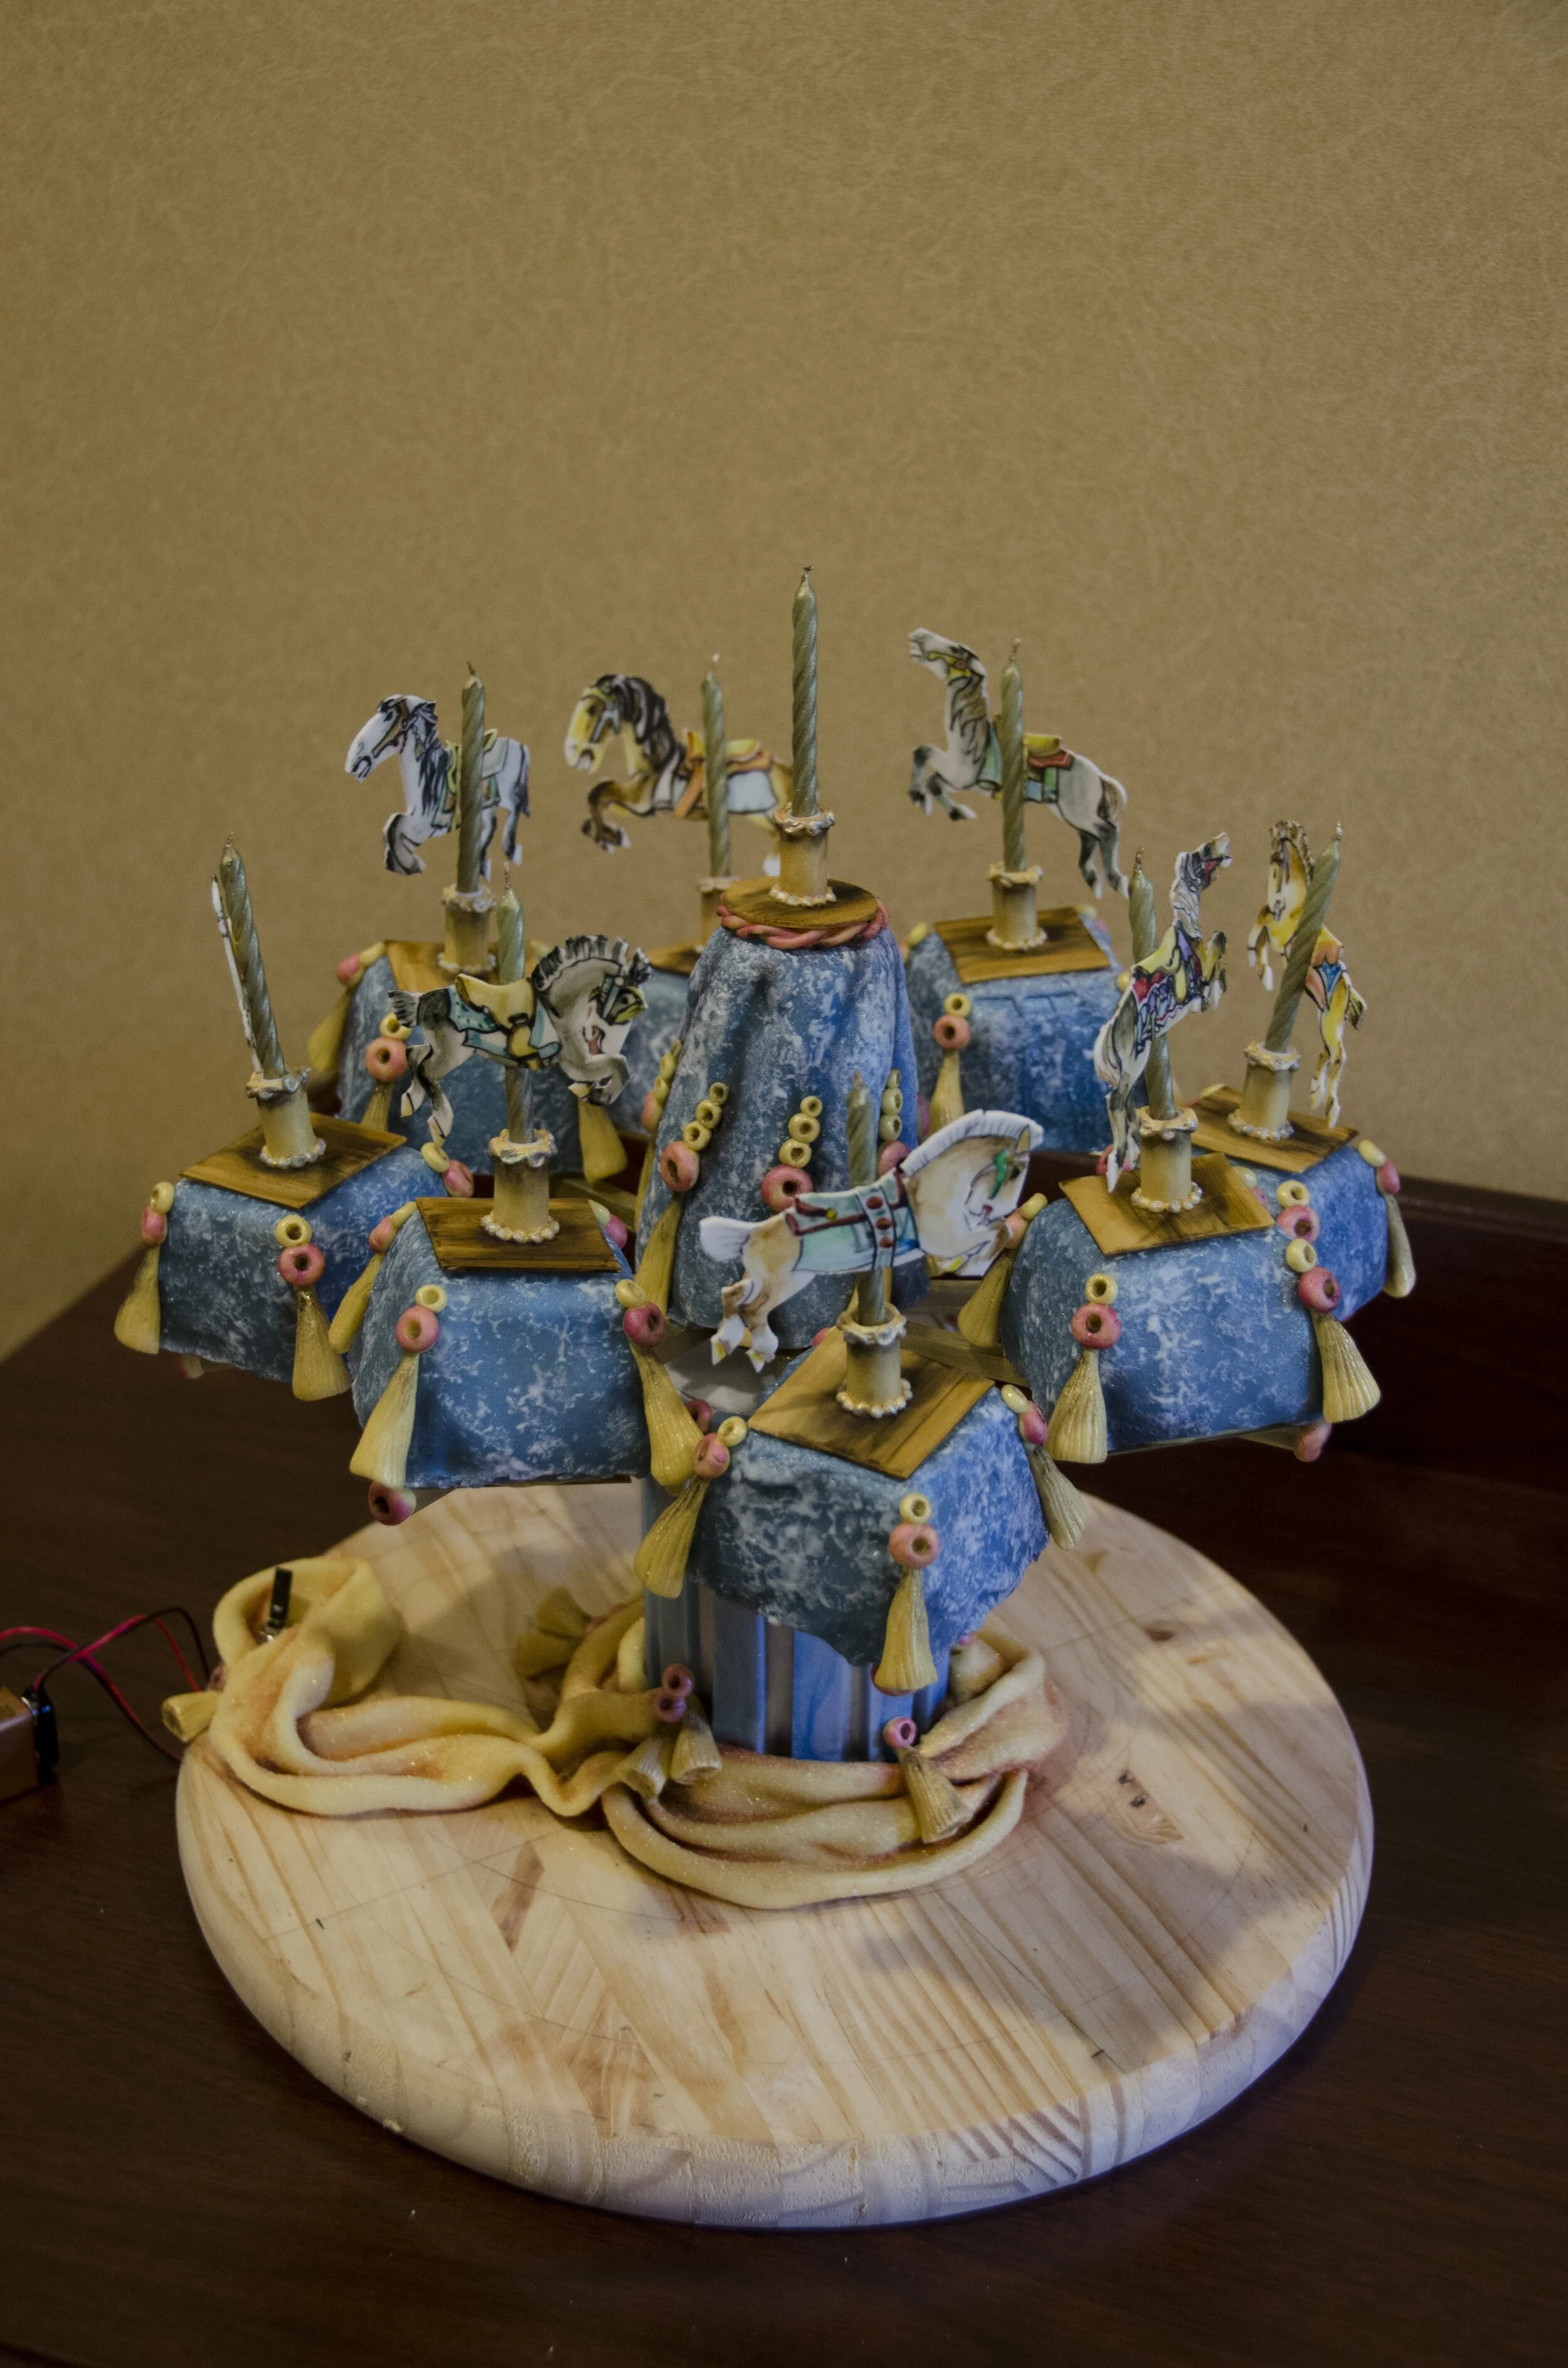
My grandmother lives near a beautiful old carousel from the 1920s. When we visited her when were little, she would always take us to ride it. When I was designing her 90th birthday cake, I got to thinking about riding the carousel with her, and this is the result.
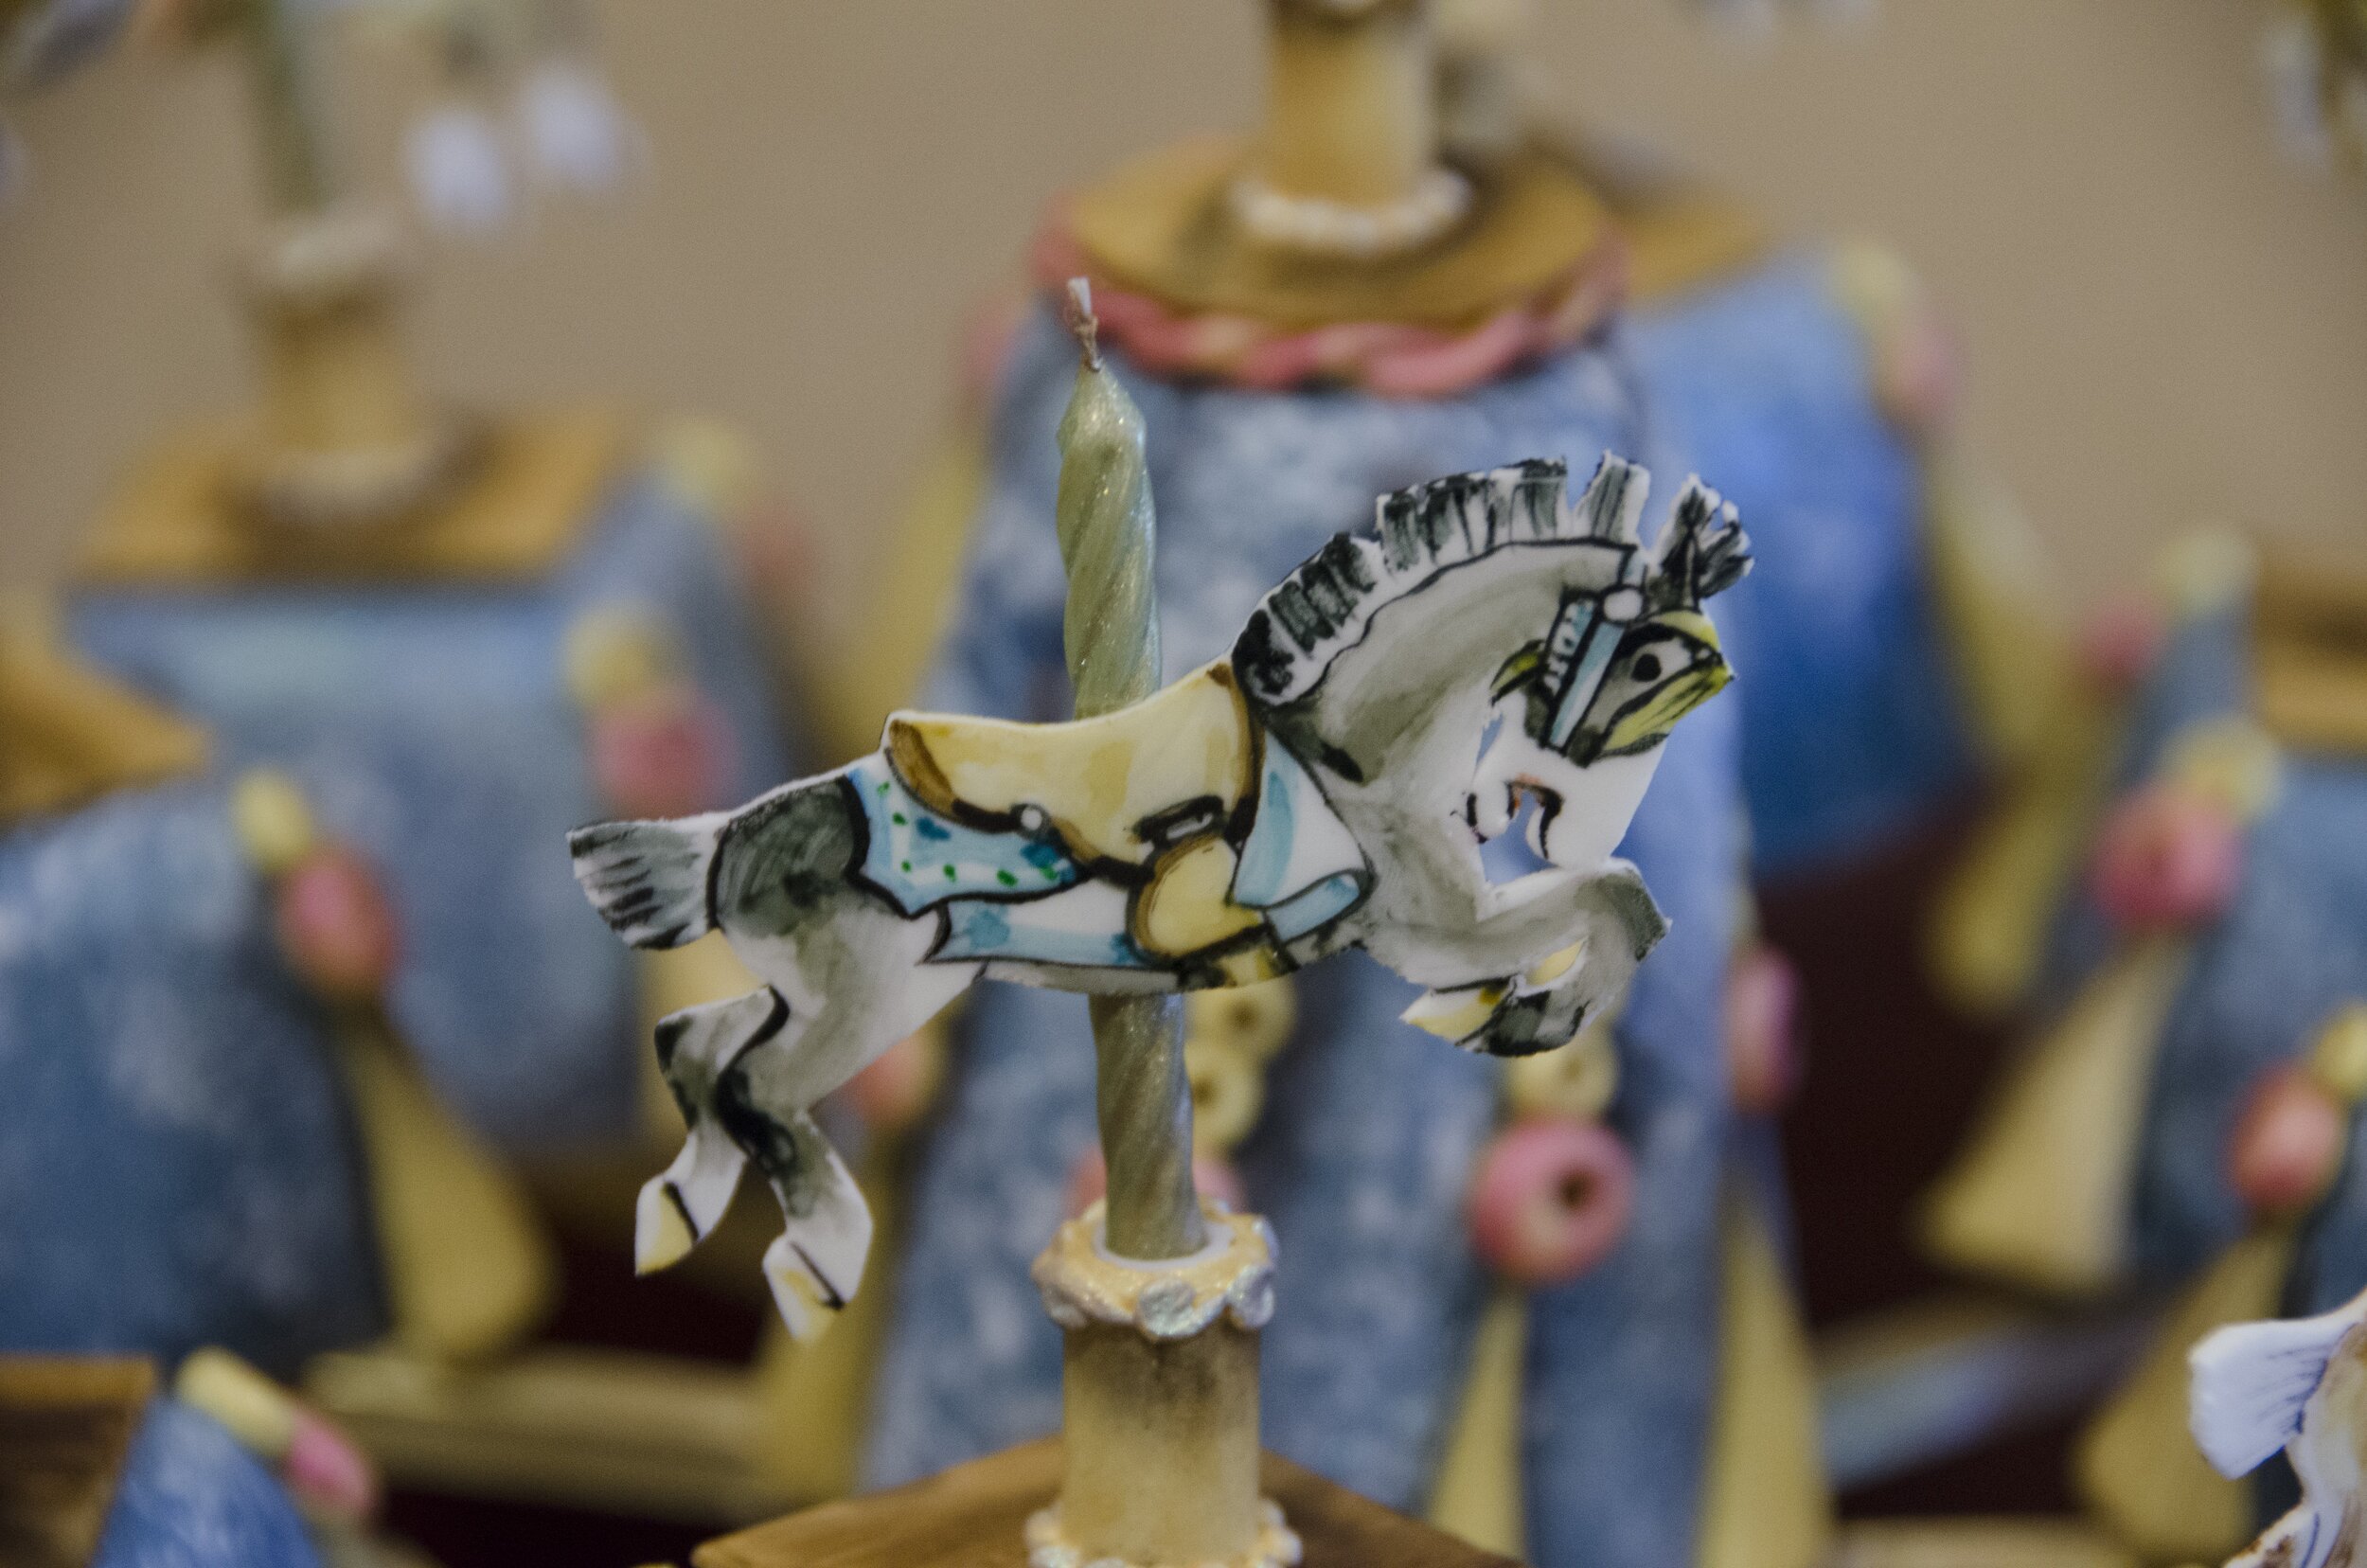
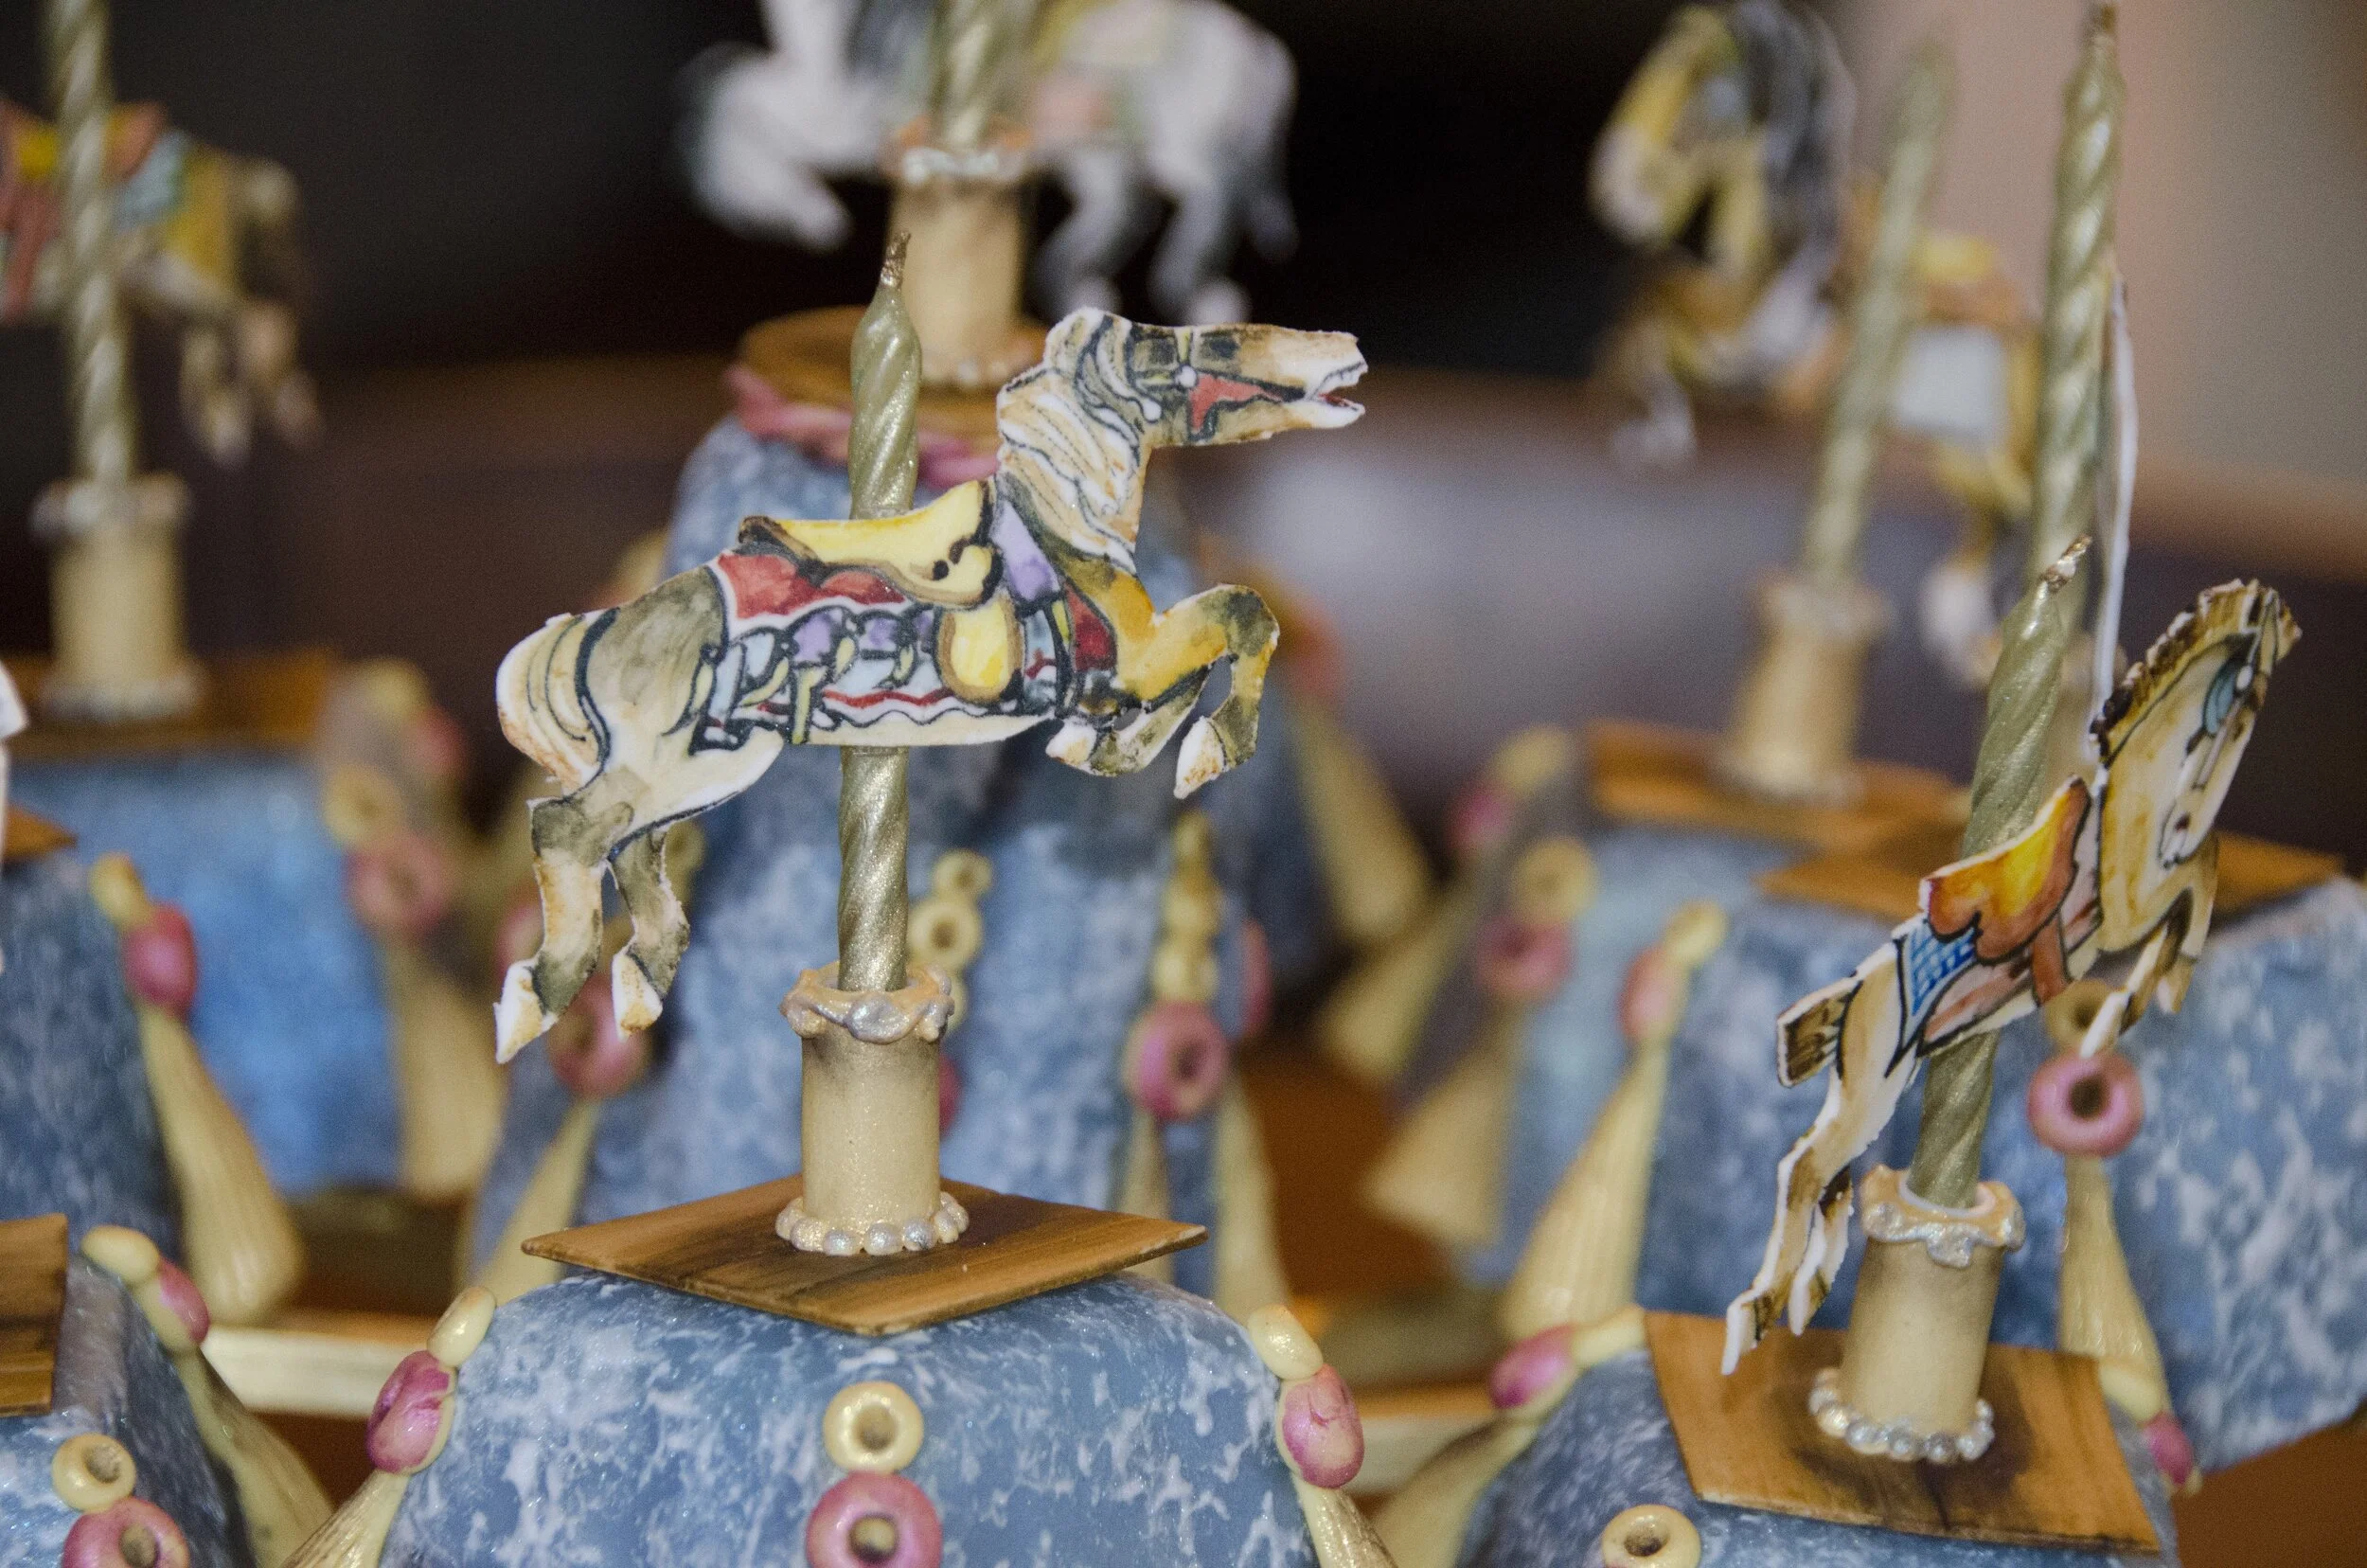
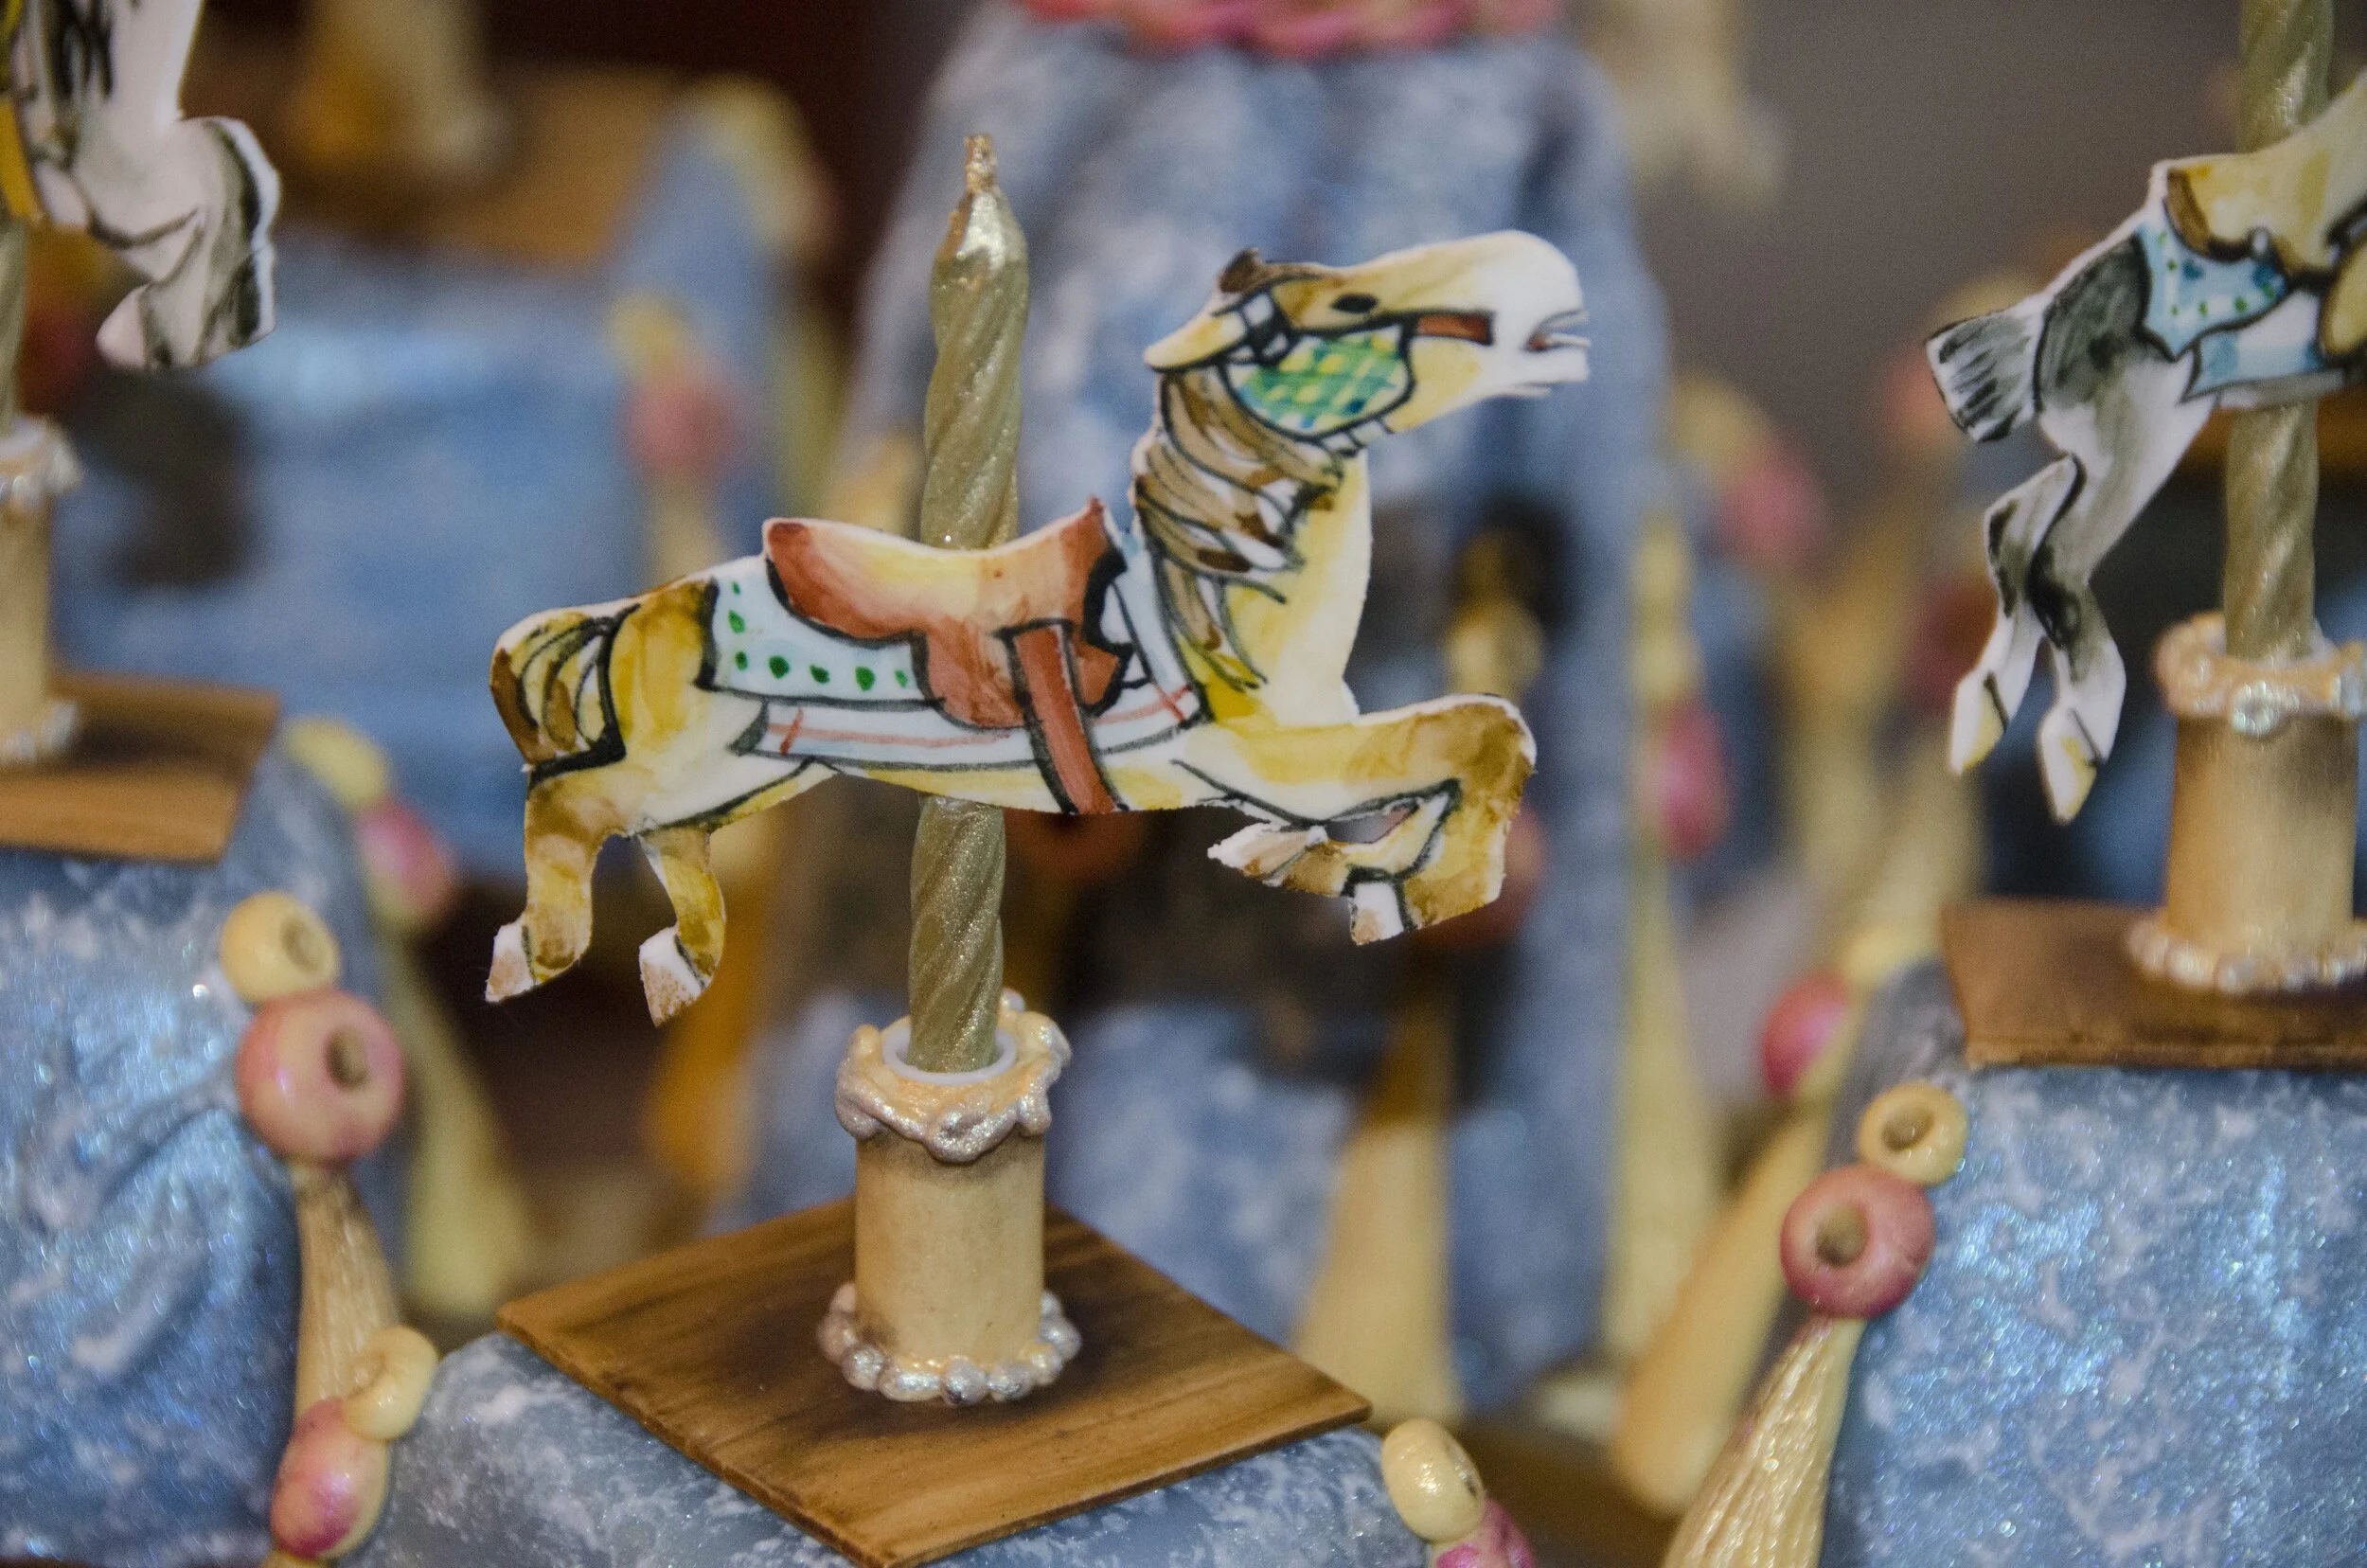
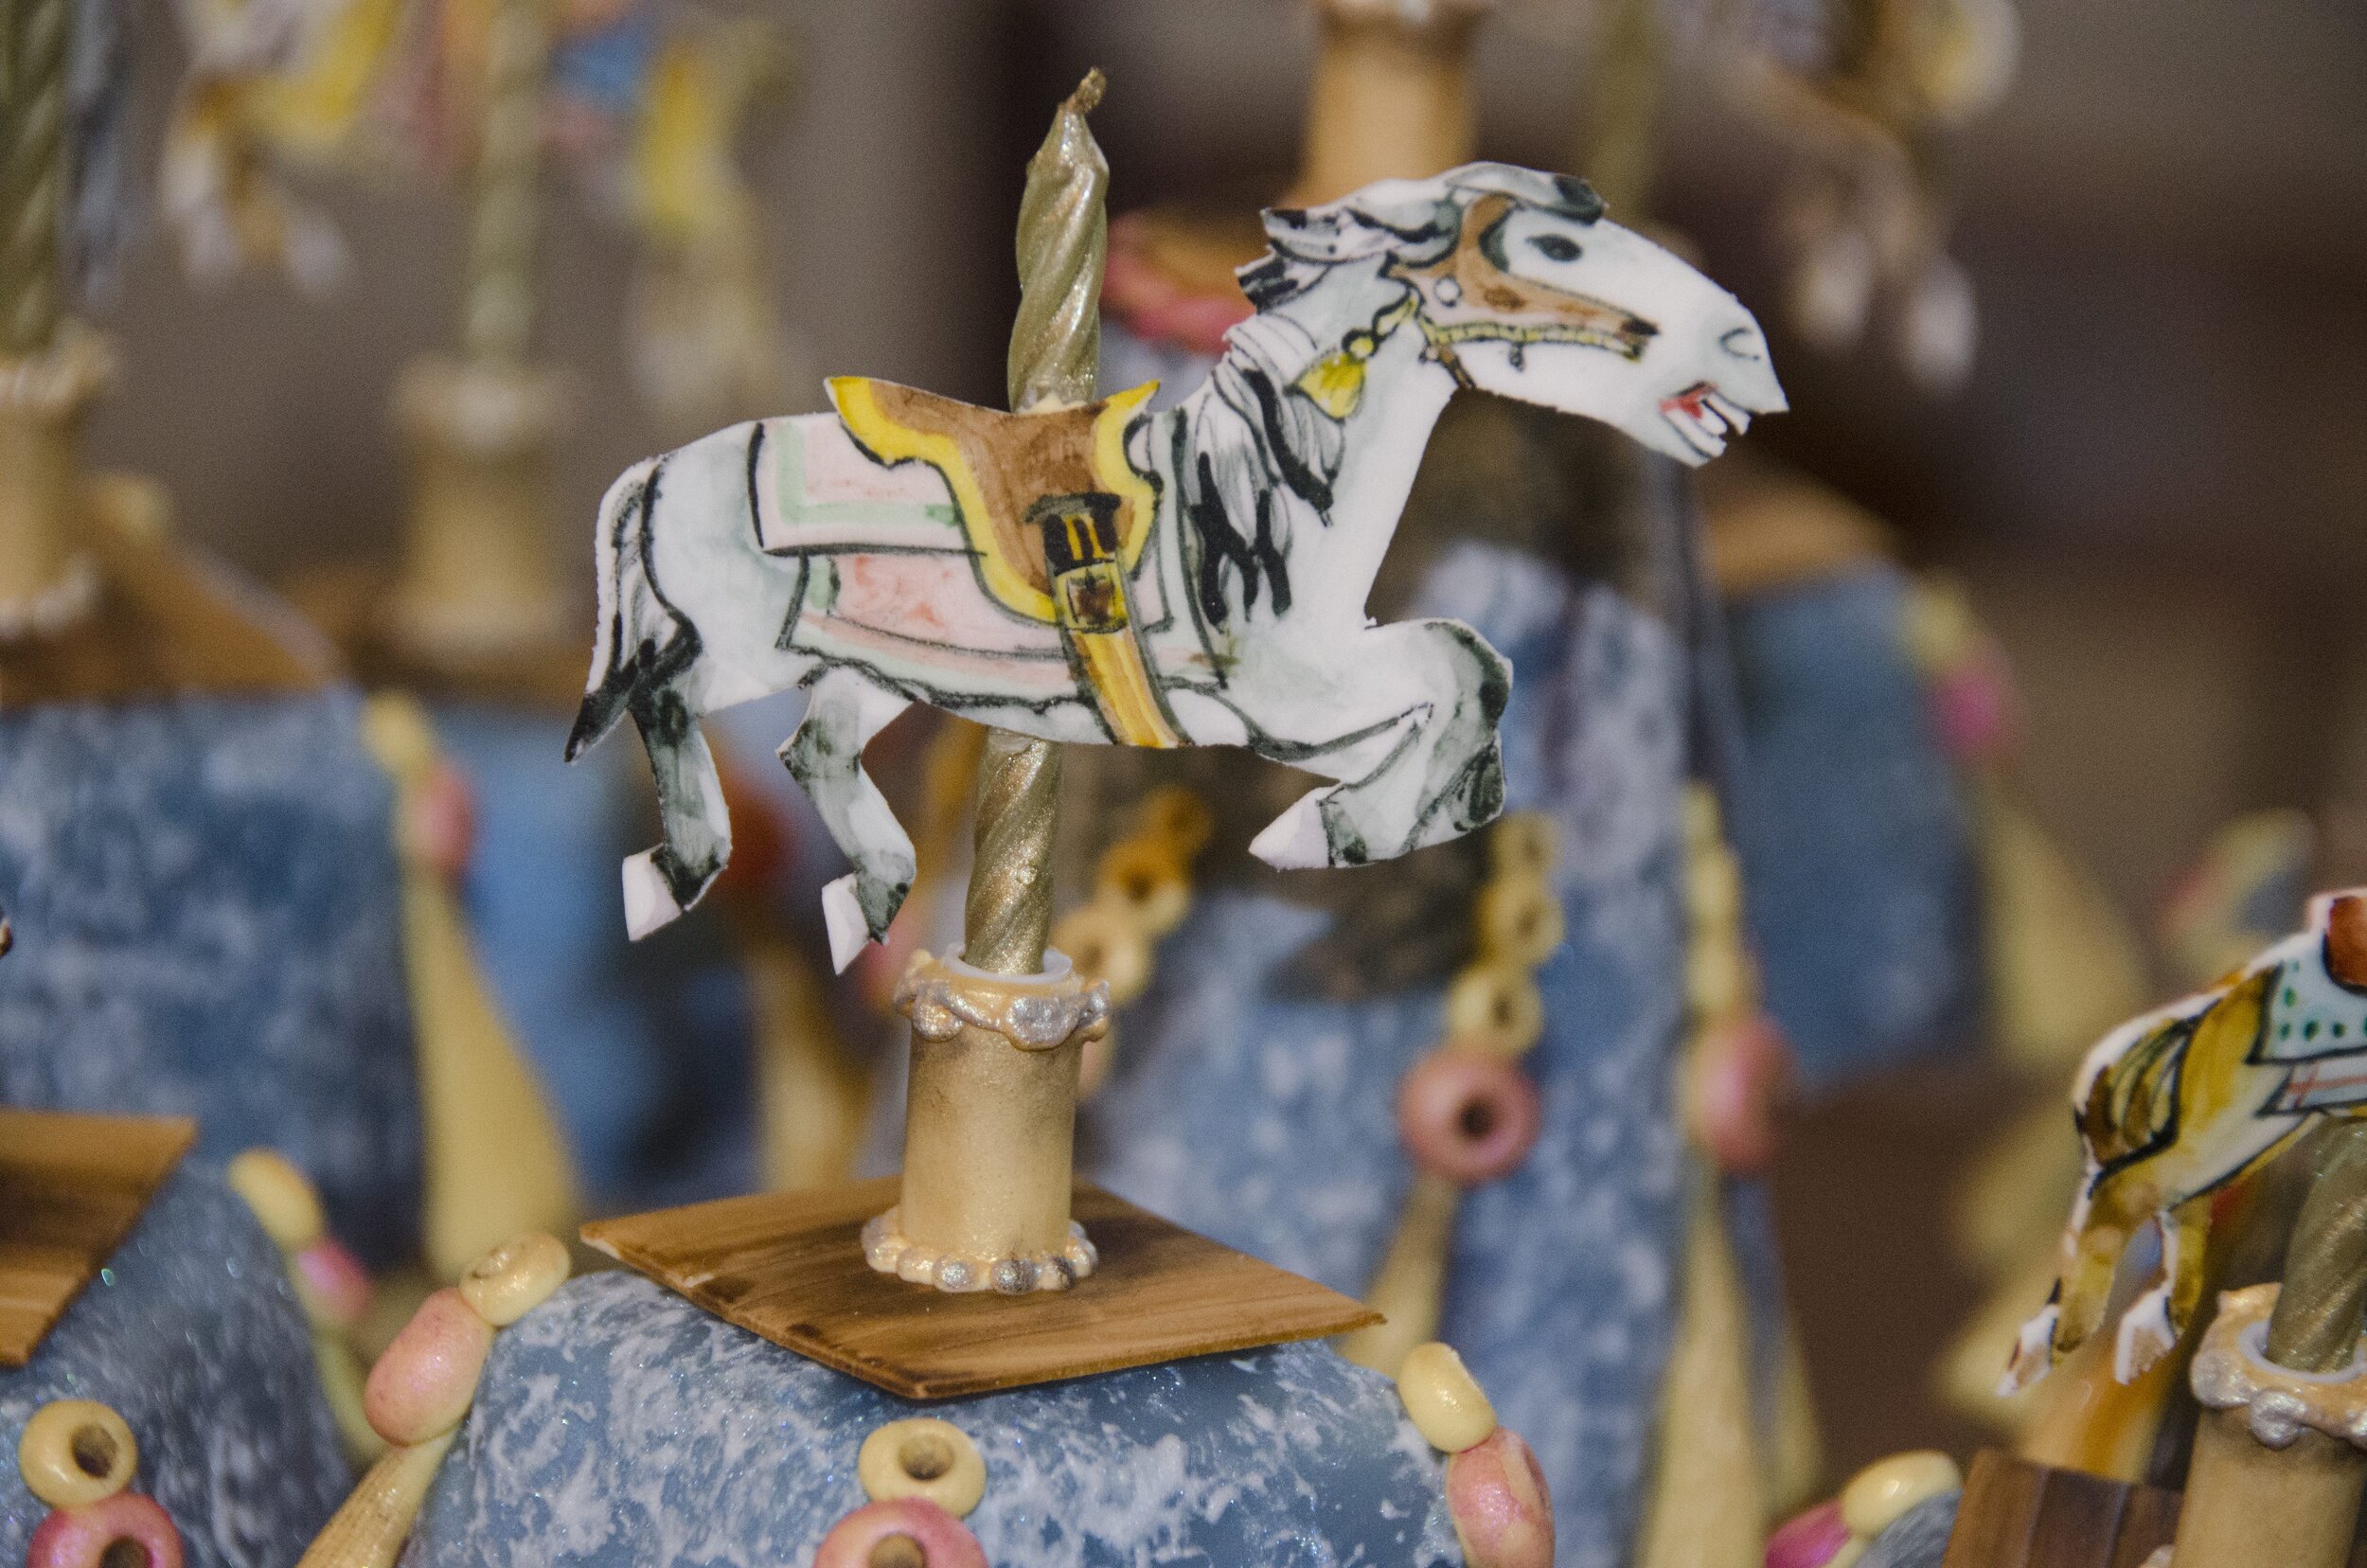
Obviously, it rotated and lit up. The little gum paste horses on the candles are modeled after horses on the real carousel.
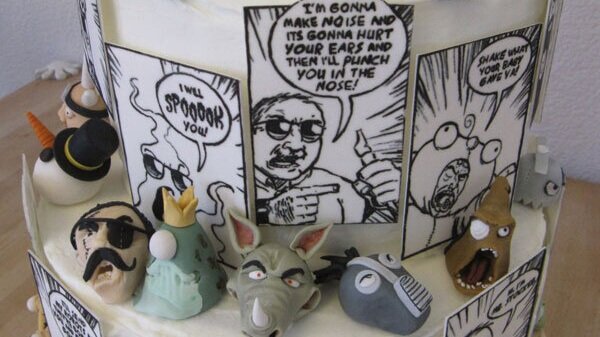
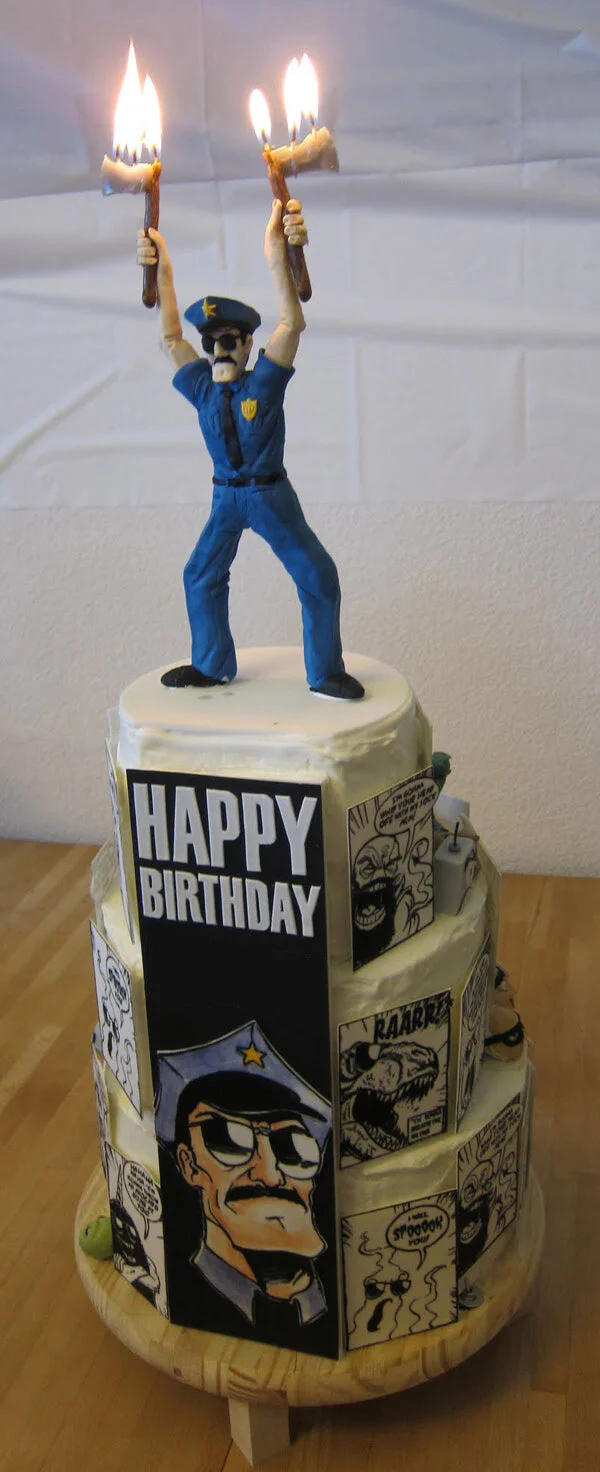
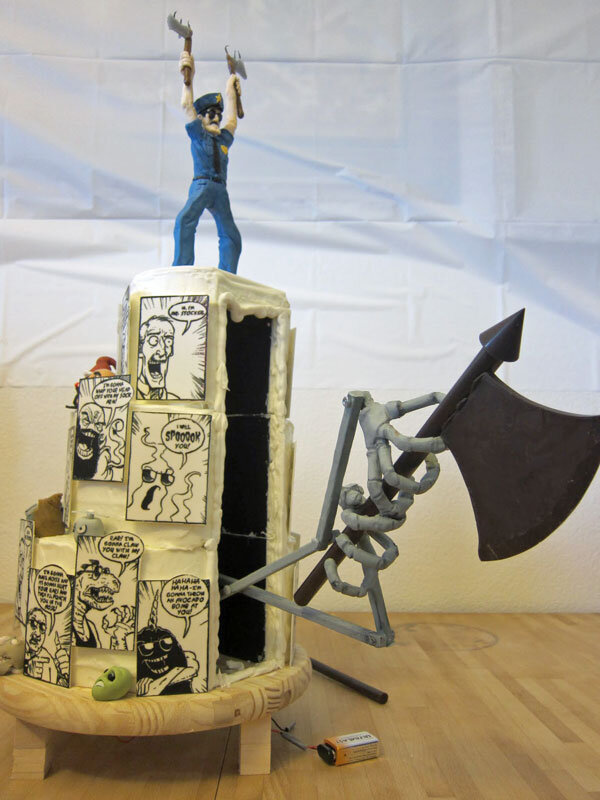
Axe Cop Cake
For my niece’s sixth birthday we decided on an Axe Cop theme. Axe Cop’s favorite food is birthday cake with a candle of himself on it, so I took that as my starting place for the cake.

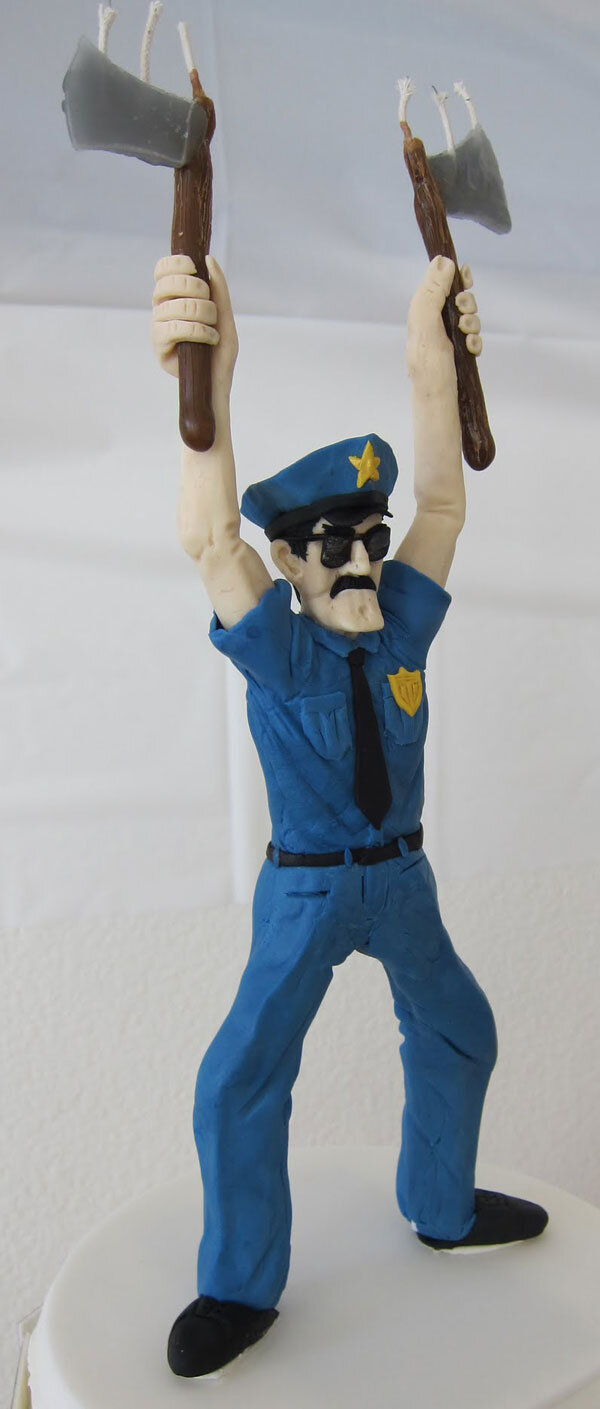

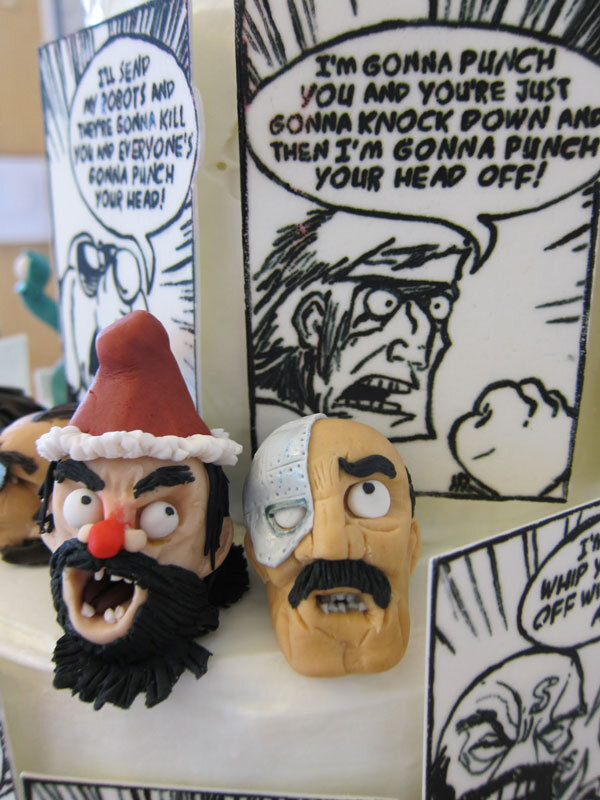
The cake topper is gum paste with axe candles in his hands. The gum paste comic panels around the sides are all of Axe Cop’s team members with their catch phrases. The gum paste heads are bad guys’ heads that Axe Cop has chopped off.
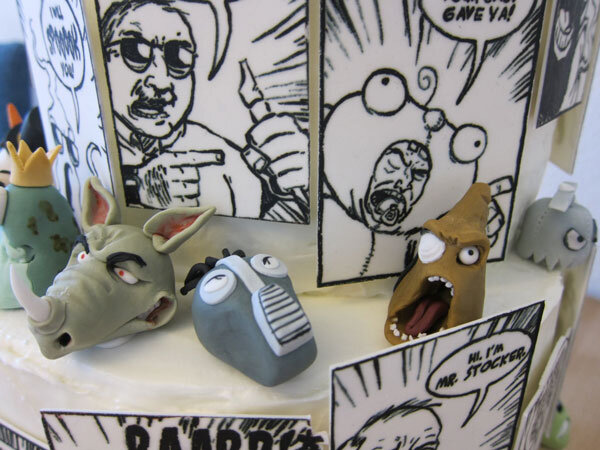
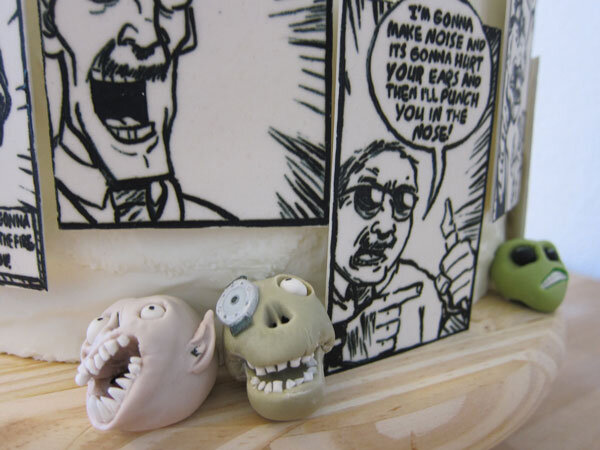


Axe Cop also has a robot that lives in his moustache and hands him weapons at need. So I made robot arms holding a chocolate axe and concealed them inside the cake. Right before we served the cake, Alex flipped the switch and the arm smashed dramatically out of the cake. Sadly, the chocolate axe broke on the way out, but I had a spare on hand for the photo op.
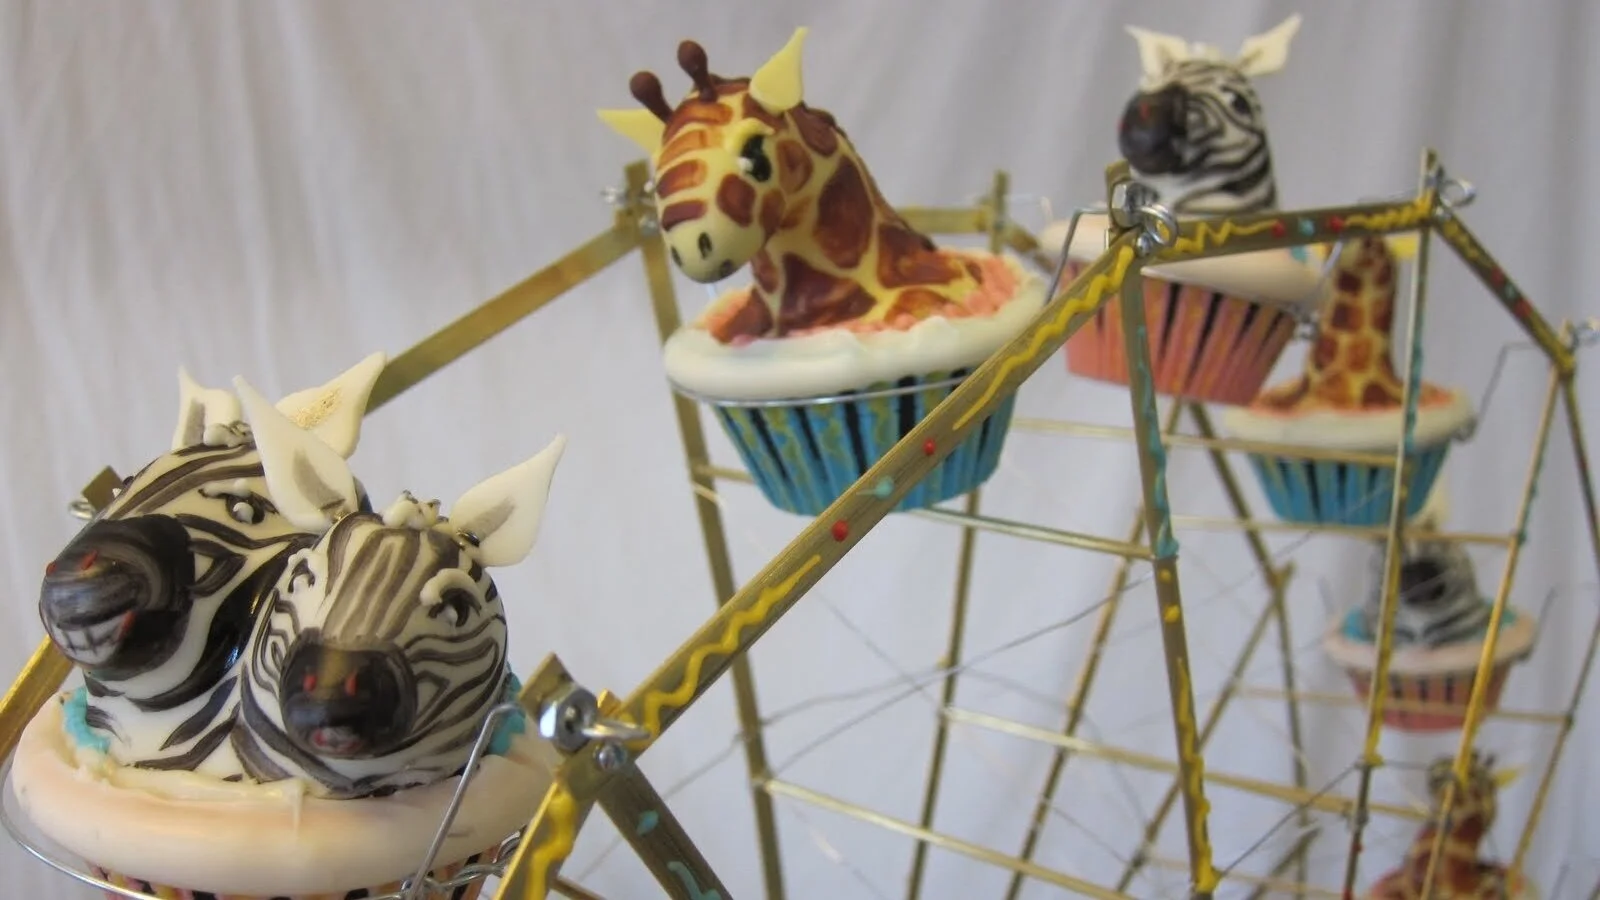
Zebra Cupcakes
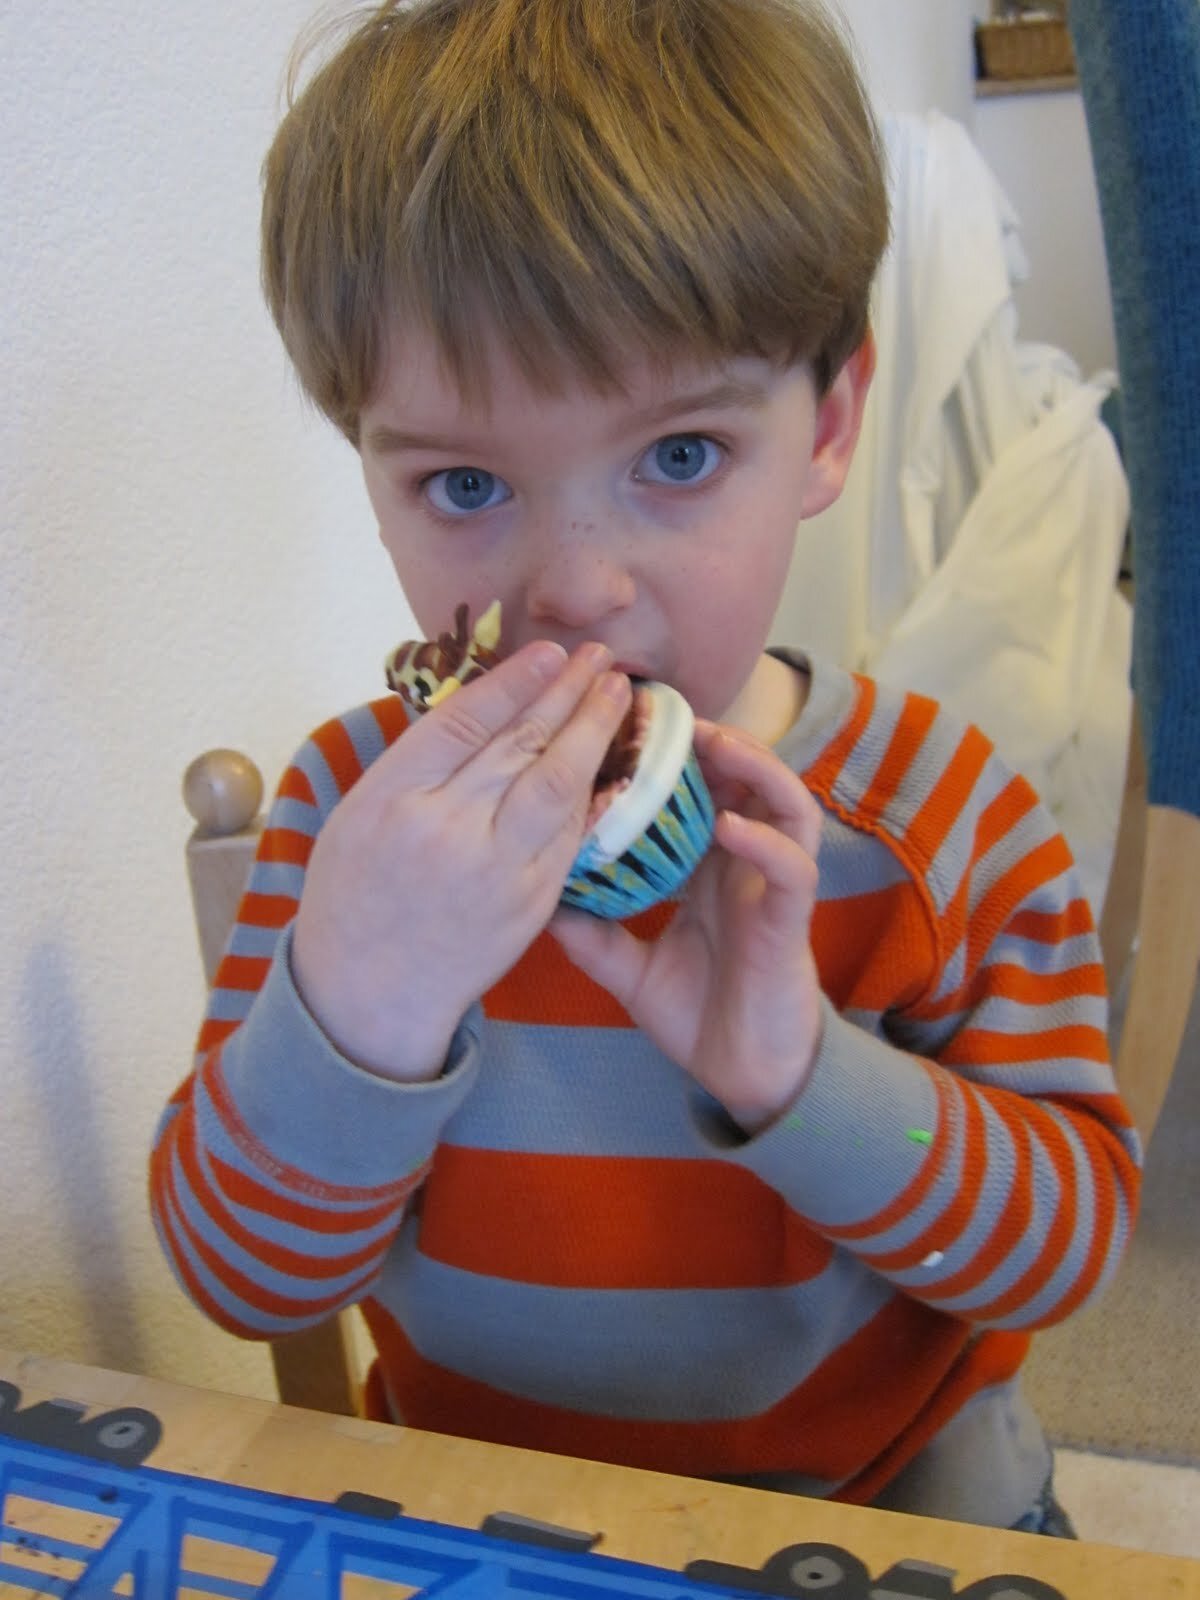
When I asked my nephew Sam what he wanted for his third birthday cake, he immediately responded, “Zebra cupcake!" I have no idea where he got this idea, or what exactly he thinks a zebra cupcake looks like.

When I asked my nephew Sam what he wanted for his third birthday cake, he immediately responded, “Zebra cupcake!” I have no idea where he got this idea, or what exactly he thinks a zebra cupcake looks like. To my knowledge, he has never seen anything that could reasonably be called a zebra cupcake. I tried to encourage him to elaborate on the idea of a zebra cupcake, but he wasn’t very forthcoming. So I was left to interpret his request as best I could.
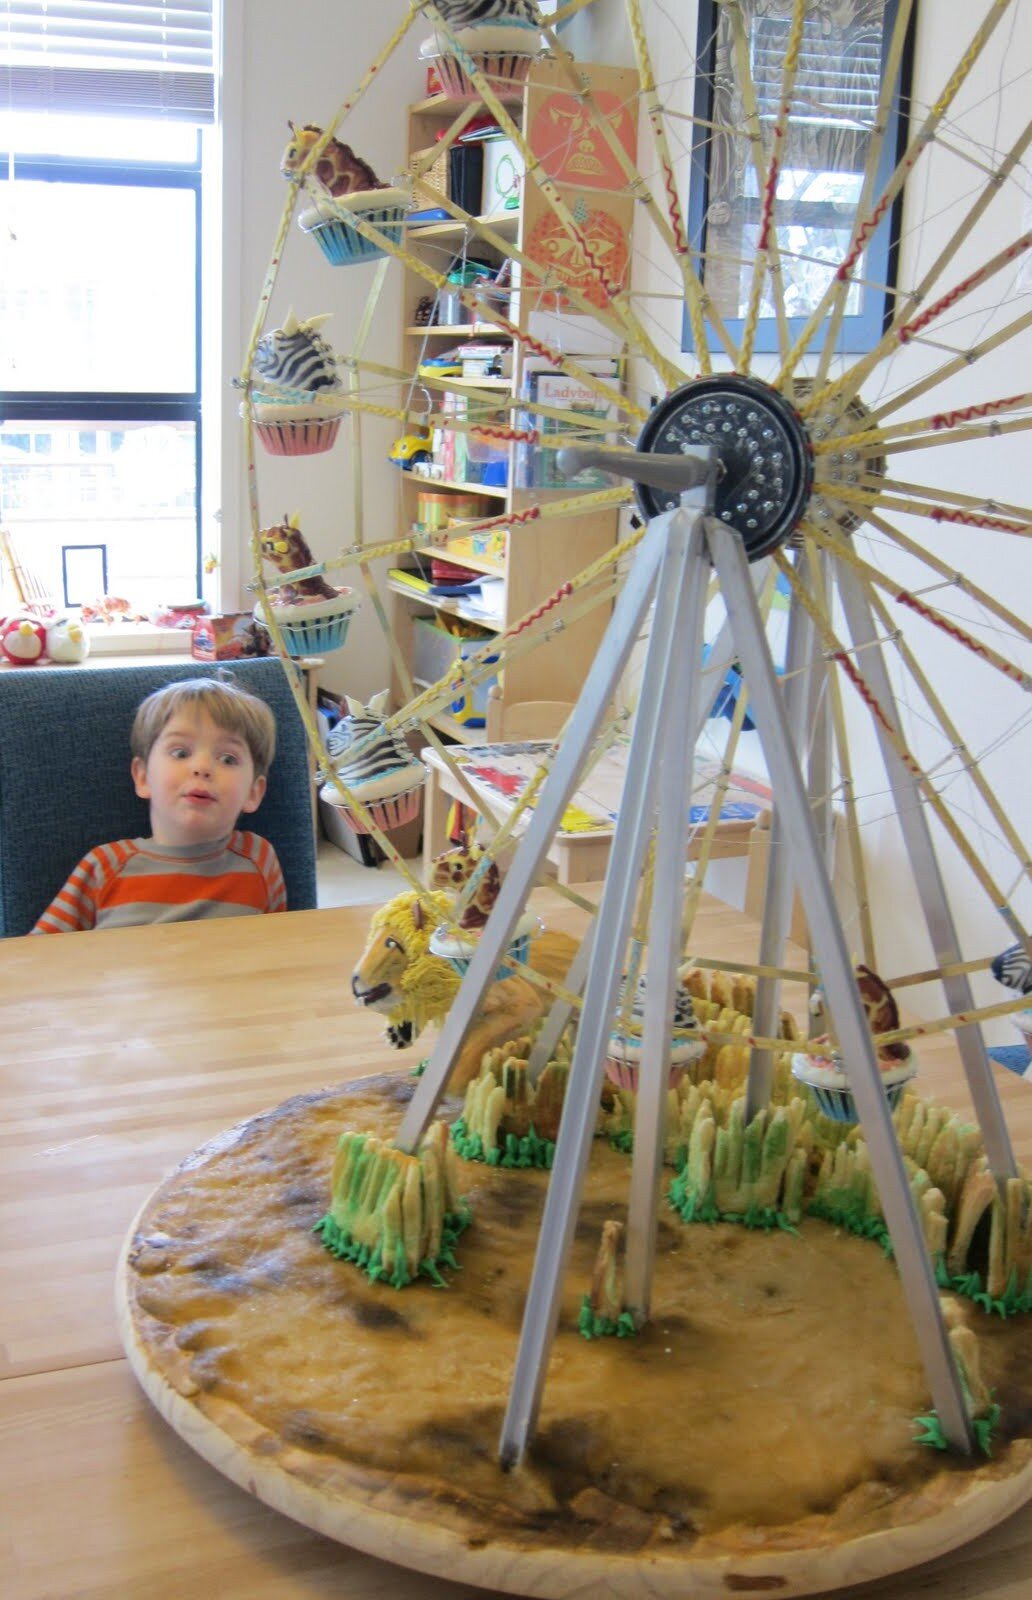
I don’t quite recall my thought process, but I ultimately decided to make zebras riding a big ferris wheel with a lion jumping up to try to get them. Mostly, I probably just wanted to see if I could make a ferris wheel. Initially, I had considered making the ferris wheel motorized, but after consulting Sam’s mom and his big sister, Alex, I decided that Sam would like it more if he could operate the ferris wheel himself with a hand crank. Based on the usual size of cupcakes, I calculated that, in order to accommodate the sixteen cupcake cars that I planned to make, the ferris wheel would need to be about two feet in diameter.

I was at a little bit of a disadvantage in building the ferris wheel because I was visiting my sister and didn’t have my jigsaw with me, so I had to come up with a way to build a ferris wheel with a minimal number of cuts. I began by making each of the sixteen spokes out of brass strips joined by brass tube and steel wire, scratching the heck out of my fingertips in the process. I joined all of these together, using lots of tiny bolts and quart paint can lids as the hubs. On the perimeter of the wheel, I connected the spokes with more brass strips and more teeny tiny bolts. Unfortunately, I didn’t get the two halves of the hub aligned exactly perfectly, so the spokes wound up a tiny bit torqued. It didn’t ultimately impact the functionality of the wheel, but I’ll know to pay more attention to that next time. You know, the next time I make a zebra cupcake ferris wheel. Though the lesson would probably be applicable to other African animal cupcake ferris wheels as well.

For the frame to hold up the ferris wheel, I used half-inch aluminum channel, bolted together and embedded in the wooden base. To my surprise, the wheel turned perfectly as soon as I mounted it in the frame and attached the crank handle. The next challenge, though, was to make the cars work.
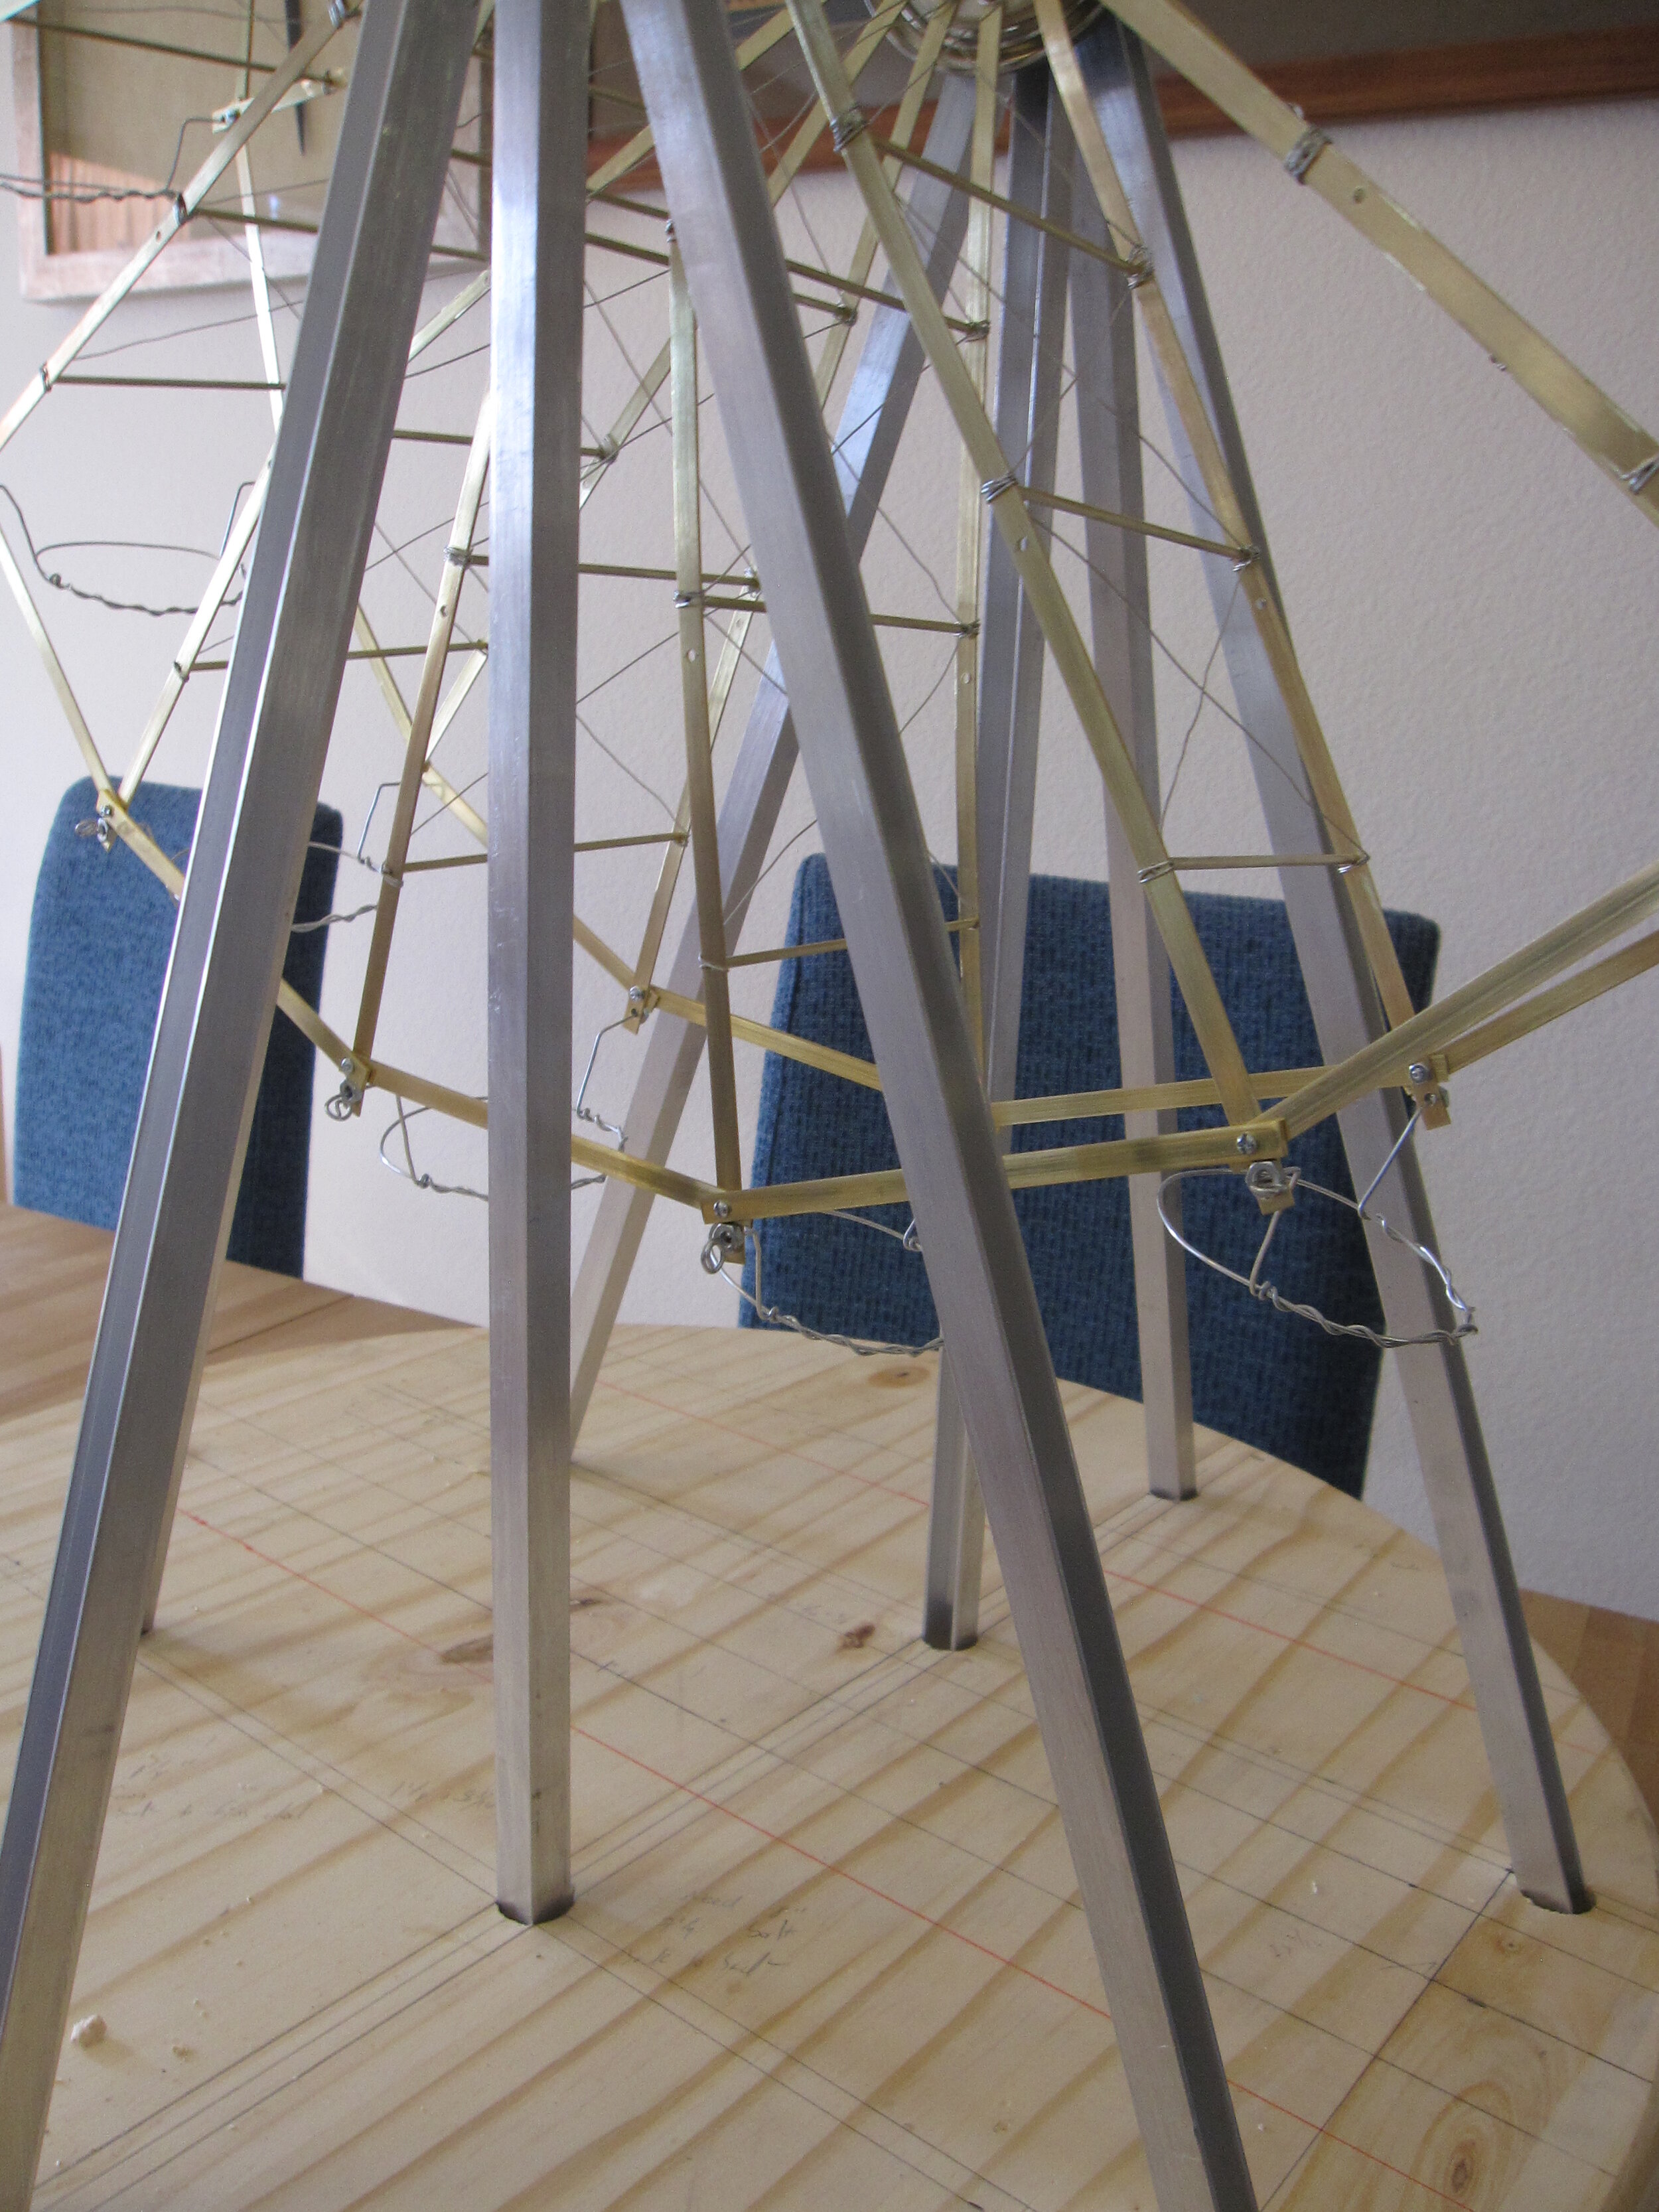
I really wanted people to be able to pick up the entire cupcake car and eat the entire thing. So I made basically little wire rings to set the cupcakes in. Obviously, these had to spin freely so that the cupcakes stayed upright all the way around the wheel (this being the essence of a ferris wheel). This would have been very easy if I had kept the strips connecting the spokes back from the end of the spokes about an additional half an inch. As it was, I had a bit of a struggle to keep the rings from catching on the brass strips, but in the end I managed it. One more thing I’ll know to do differently the next time I make a cupcake ferris wheel.
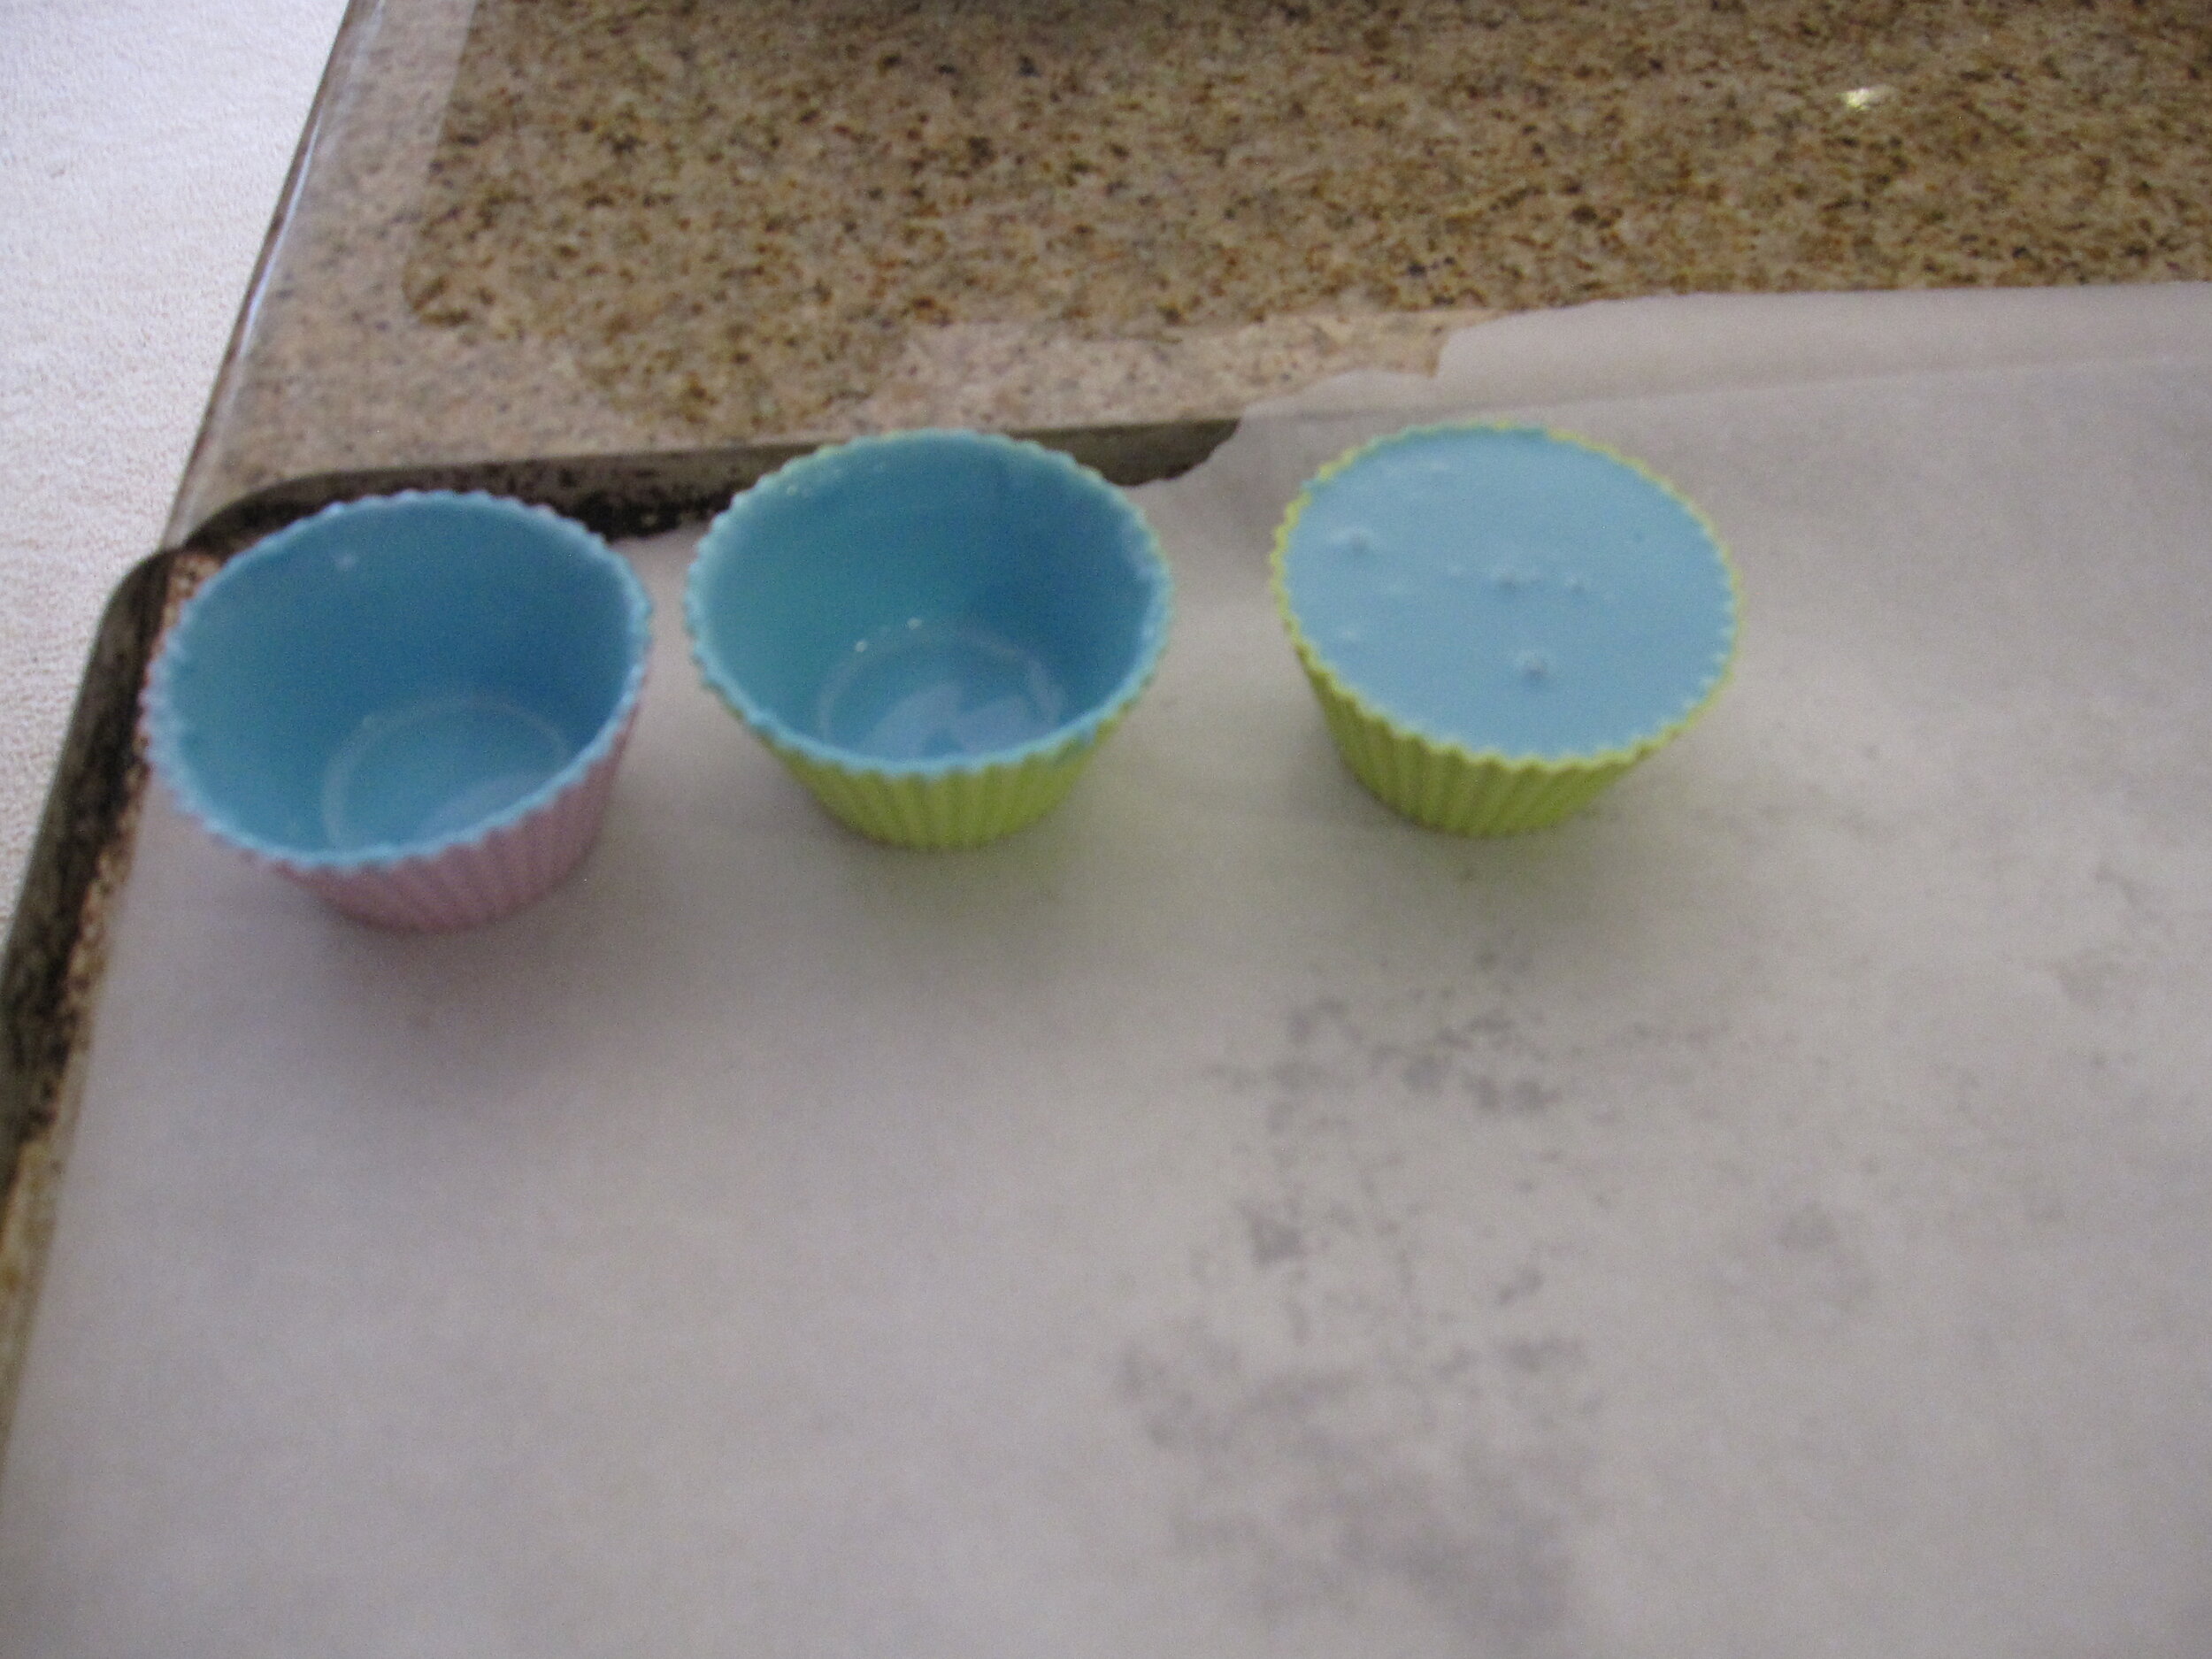
In order to make the cups themselves edible, I poured candy melts into silicone cupcake cups. For many years, I have been vehemently opposed to candy melts because I think they taste disgusting and the colors they come in are generally not in tune with my aesthetic, but my sister gave me that trendy little cake pop kit for Christmas, and I wanted to try out some of the techniques. I have been confirmed in my belief that they taste disgusting, but I suppose that they do have their uses. After all, I use fondant, too, and that doesn’t taste very good either.
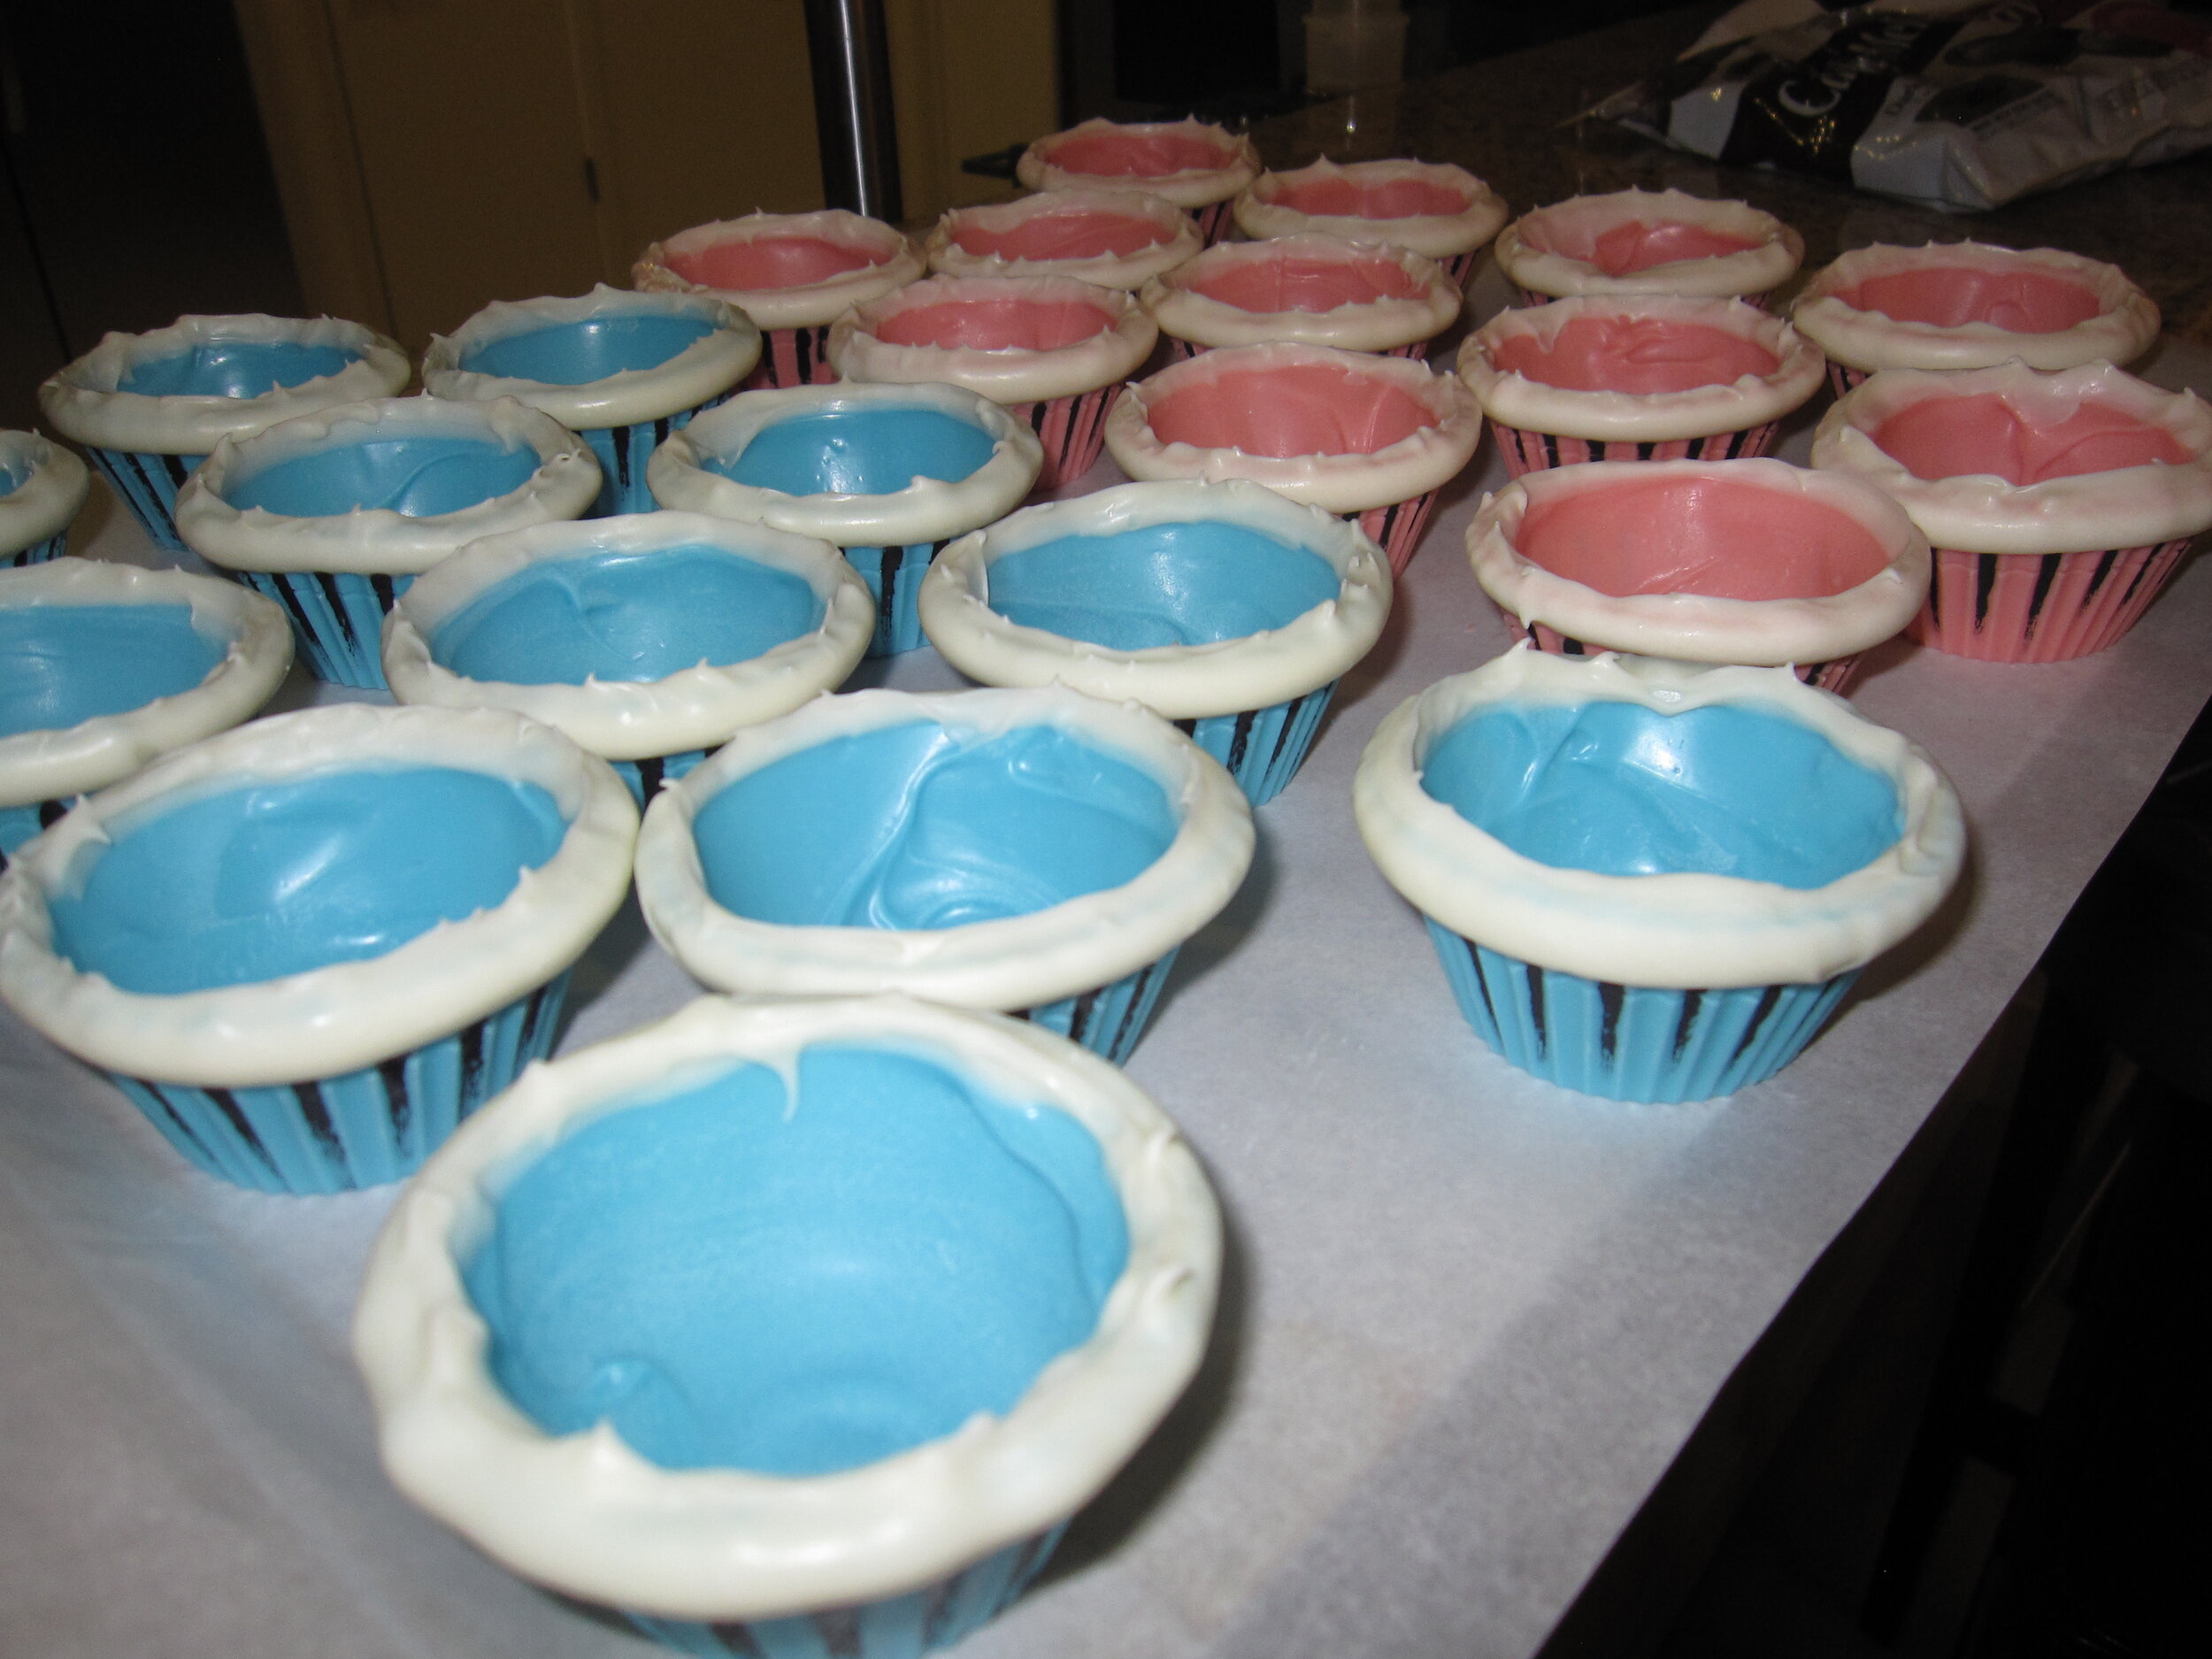
I let Sam pick out the colors of candy melts that he wanted for the cups and he chose pink and baby blue. Much like candy melts in general, this is basically the exact opposite of my aesthetic (and, as my sister pointed out, made it look a bit like a baby shower cake) but, hey, it’s his birthday. Who am I to argue? I gave the cups a second coat of candy melt on the inside to give them added structural stability and to make sure that the weight of the cupcake was concentrated in the bottom so they wouldn’t flip upside down. I dipped the top edge in white candy melt to give them a decorative rim that would also serve to hold them in the wire rings more effectively. I then attempted to ameliorate the pastel-ness of the cups by giving them distressed black streaks in some of the flutes of the cupcake cups. I told myself I was striving for a vaguely Victorian steam-punk aesthetic. I’m not sure that I entirely got there.
A few days before the party, I made a very important discovery. Sam’s grandparents gave him an awesome set of Little People animals for his birthday, which he absolutely loved. He even refused to eat dinner because he was too busy playing with them, which, coming from Sam, is a huge complement. He pulled the giraffe out of the bag and proudly exclaimed, “Zebra!” Uh oh. I remembered that Sam does not always differentiate between zebras and giraffes. So I pulled out the zebra and the giraffe and asked him which one was a zebra cupcake. First he pointed to the giraffe. Then he pointed to the zebra. So I decided to hedge my bets and make both zebra and giraffe cupcakes.
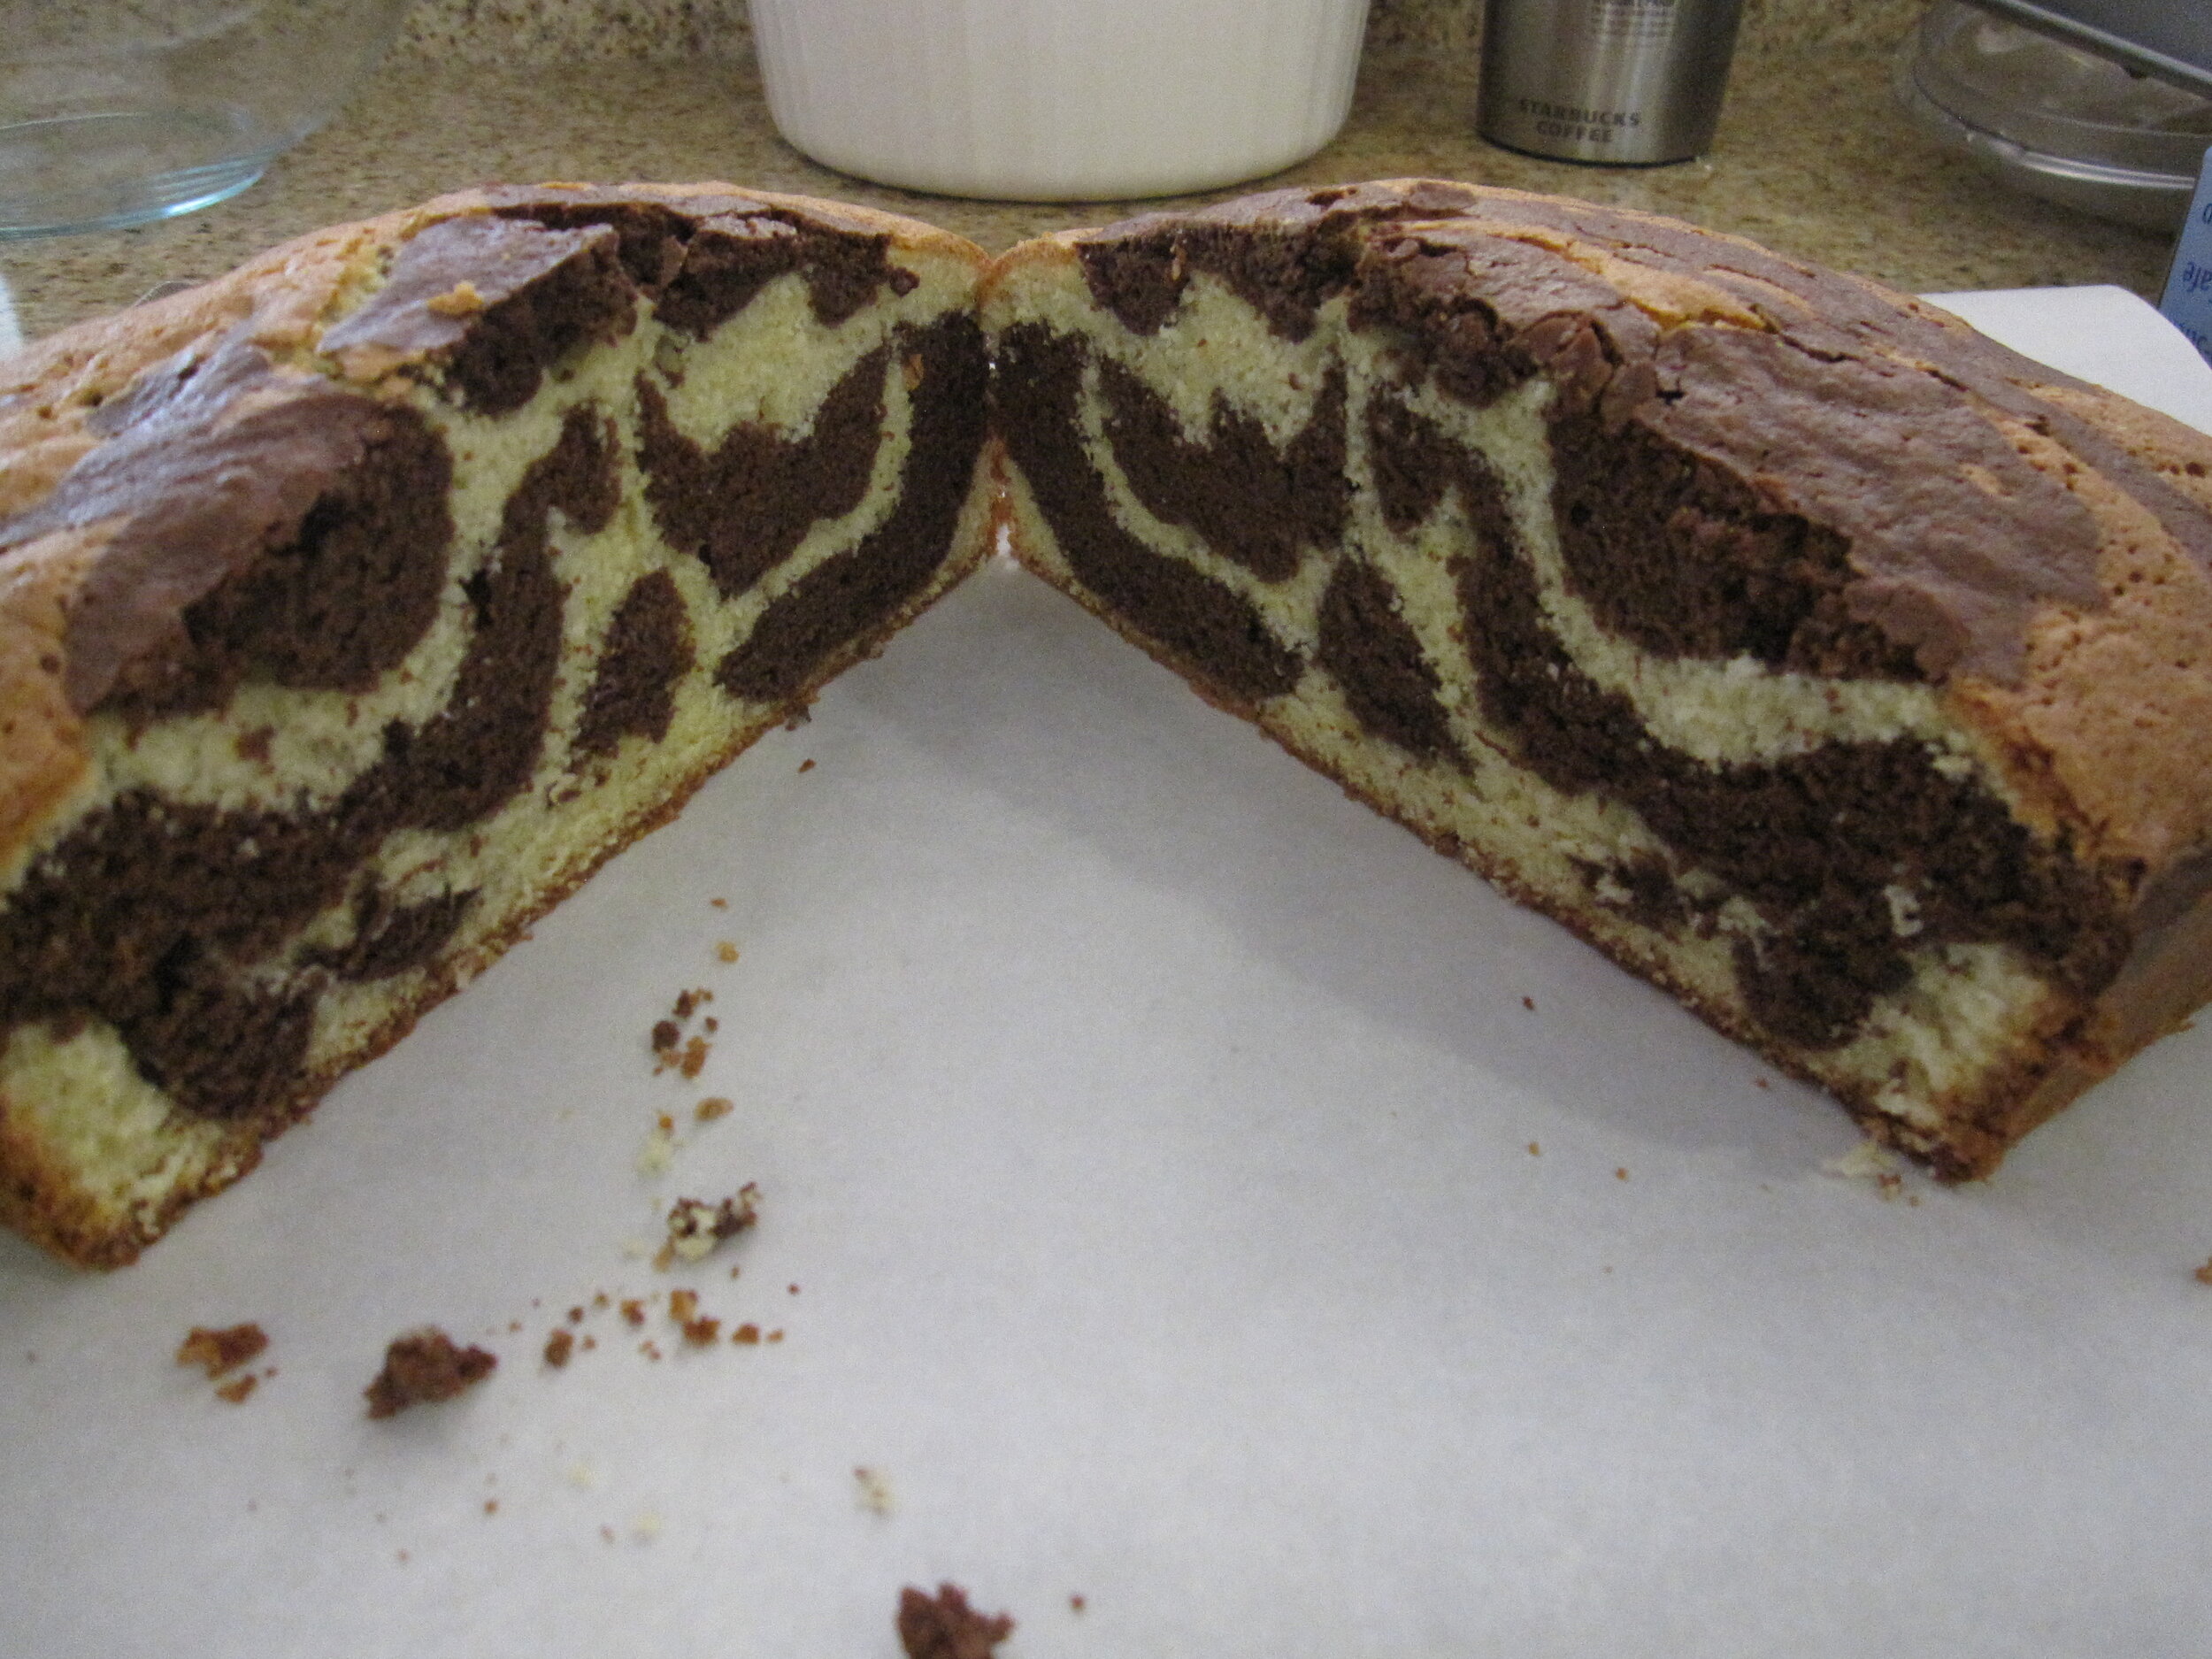
For the cake recipe, I used a new marbled olive oil cake recipe. I had initially chosen this recipe because the marbling resembled zebra stripes. It actually turned out to be perfect because the marbling, both in color and in pattern, is about halfway between a zebra and a giraffe. It also turned out to be quite delicious. Generally, when I’m making a cake, the last thing I want to do is eat cake, but I snacked on this cake the entire time.
Once the cupcakes were baked, I used essentially the cake pop technique to add zebra and giraffe heads to them. This involves crumbling up cake and mixing it with frosting to make a thick paste and then shaping it as desired. To make the zebra heads, I did this directly on top of the cupcakes. Because the giraffes needed long, thin necks, I made them separately then popped them in the refrigerator to harden up enough that I could then embed them in the cupcakes.
I dipped the zebras in white candy melts and the giraffes in yellowish candy melts. Once this hardened, I peeled the paper off the cupcakes and set the cupcakes in the candy melt cups. Then I used food coloring and candy melts to paint on the patterns, mouths, and eyes. I tried to make them look smug about the fact that the lion couldn’t reach them. I think that next time I should make the eyes more prominent by using something three-dimensional like a candy sprinkle. I also added candy melt ears, manes, and (in the case of the giraffes) horns.
To make the lion look like it was in mid-lunge, I made a base for it using brass strips and foam core so that only the back two feet would be touching the ground. I bolted this to the cake base and built the lion on top of it. I wish that the base had been a little bigger, because I couldn’t really place the lion in the way I would have liked. He wound leaping more alongside the ferris wheel than at the ferris wheel. I also wish I had waited until the cake cooled completely before I put it on the base, because then I would have had less trouble with the cake melting the icing and sliding on the base. After I carved the cake and added a little mass with some of the cake pop goo, I used buttercream icing for the fur and candy melt for the ears and tail. In the end, I wasn’t particularly happy with the way the lion turned out. It was more awkward than scary, but not cartoony enough to be fun. Just as I was feeling most disappointed in how the lion turned out, Sam woke up and saw it. He gave a squeal of unmitigated delight and yelled “A lion!” So apparently, my lion wasn’t such a failure after all. For days after the party, Sam wandered around saying, “I ate the tail!”
At an early point in the process, I had planned to dip the entire ferris wheel in candy melt. Fortunately, I gave this idea up before I tried it, as the results would doubtless have been disastrous. However, I also couldn’t leave it entirely unadorned. For one thing, it clashed with the baby shower pink and blue cupcake cups. For another, Alex pointed out to me that ferris wheels are colorful. So I decorated it with red, blue, and yellow candy melt squiggles and dots. I was reasonably pleased with this effect and Alex also gave it her stamp of approval.

The final touches were to decorate the base. By this time it was the morning of the party and I had been up all night working on the cake. So the base sort of got short changed. I threw down a layer of pressed sugar dirt and then brushed on some different shades of brown food coloring. I didn’t have my airbrush with me, so the results weren’t as subtle as I would have liked. I also tried something new to make the savannah grasses. I used puff pastry, brushed with green food coloring, and cut into grass shapes. In the end, it looked more like french fries than grass, but it was still a fun experiment.
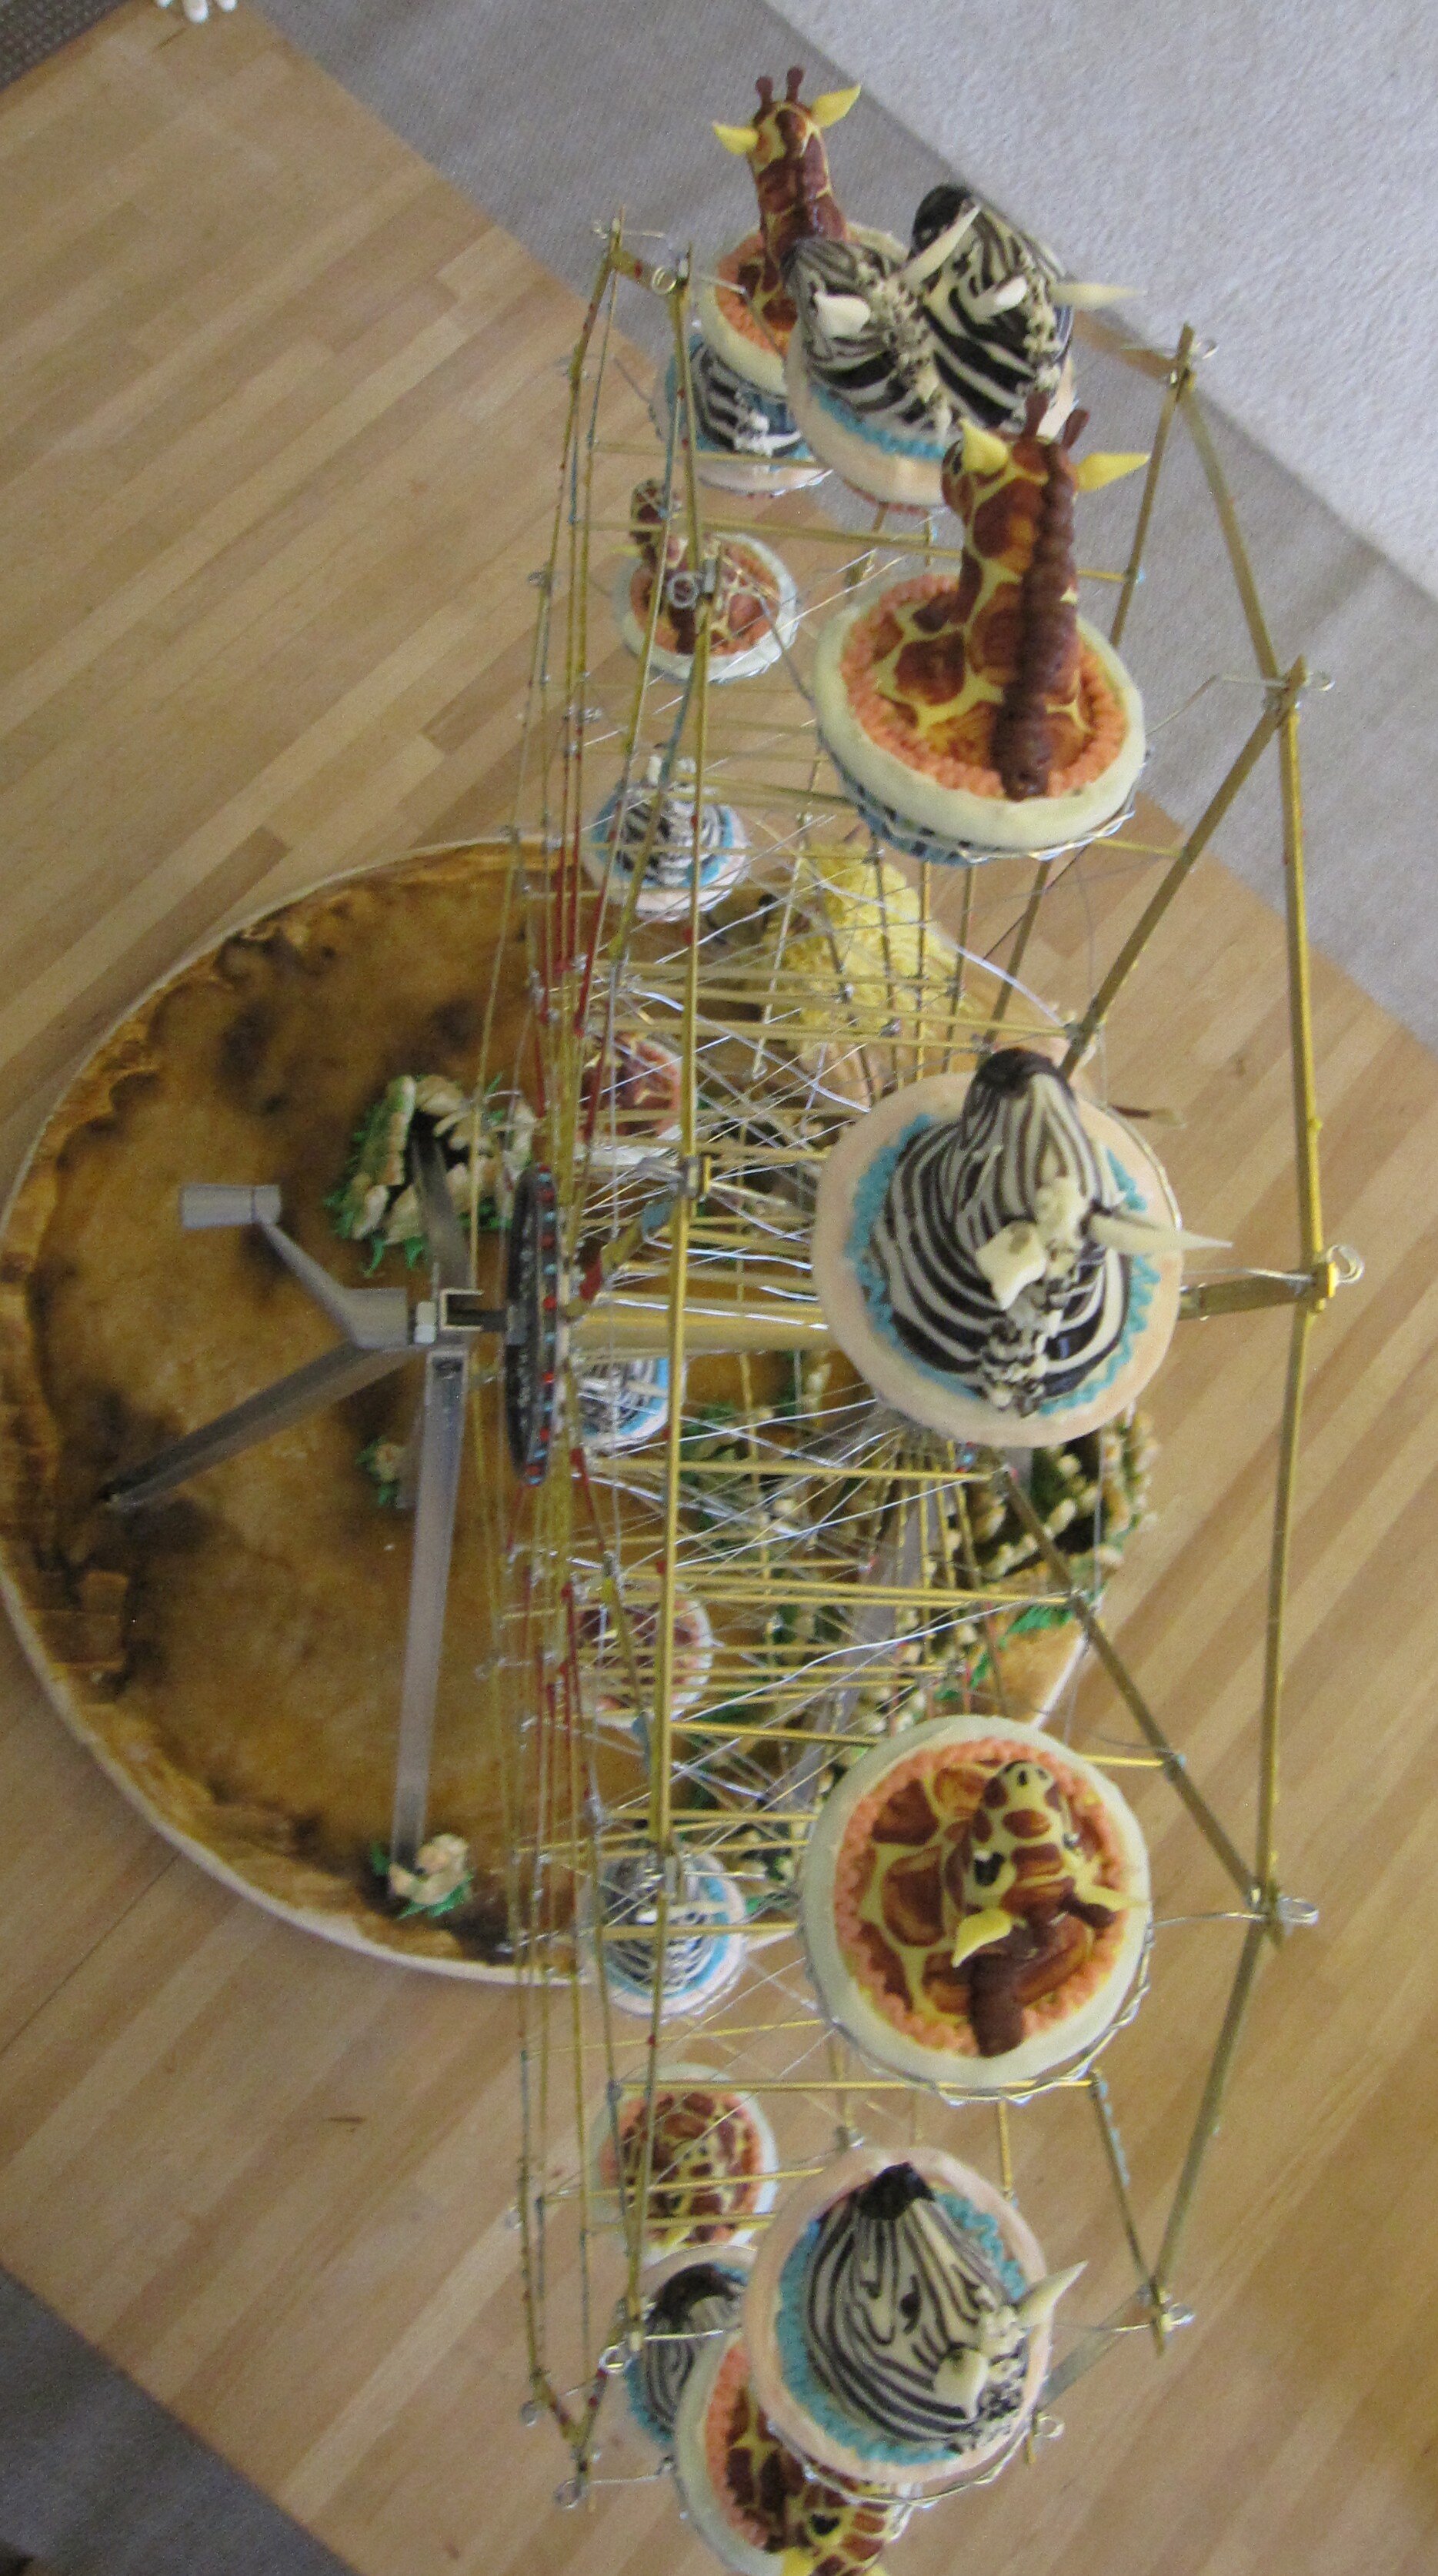
Right before the party, I set all the animals in the ferris wheel. I had to make a few tweaks to get them all to rotate freely, but all in all it really worked remarkably well. Only one zebra fell out in the process, but I had extras, so it wasn’t a problem.The party was great. All the kids took a turn spinning the ferris wheel and they were all very serious about not spinning it too fast. I served the lion to the adults, because it didn’t have candy melt all over it. The kids, of course, loved the candy melts. In fact, Alex ate only the candy melt portion and ignored the actual cake. Of course, I still have no idea what Sam actually imagined that zebra cupcakes are, but he seemed pleased with what I came up with, which is really all that matters. And now he has a two-foot diameter metal ferris wheel to treasure forever.

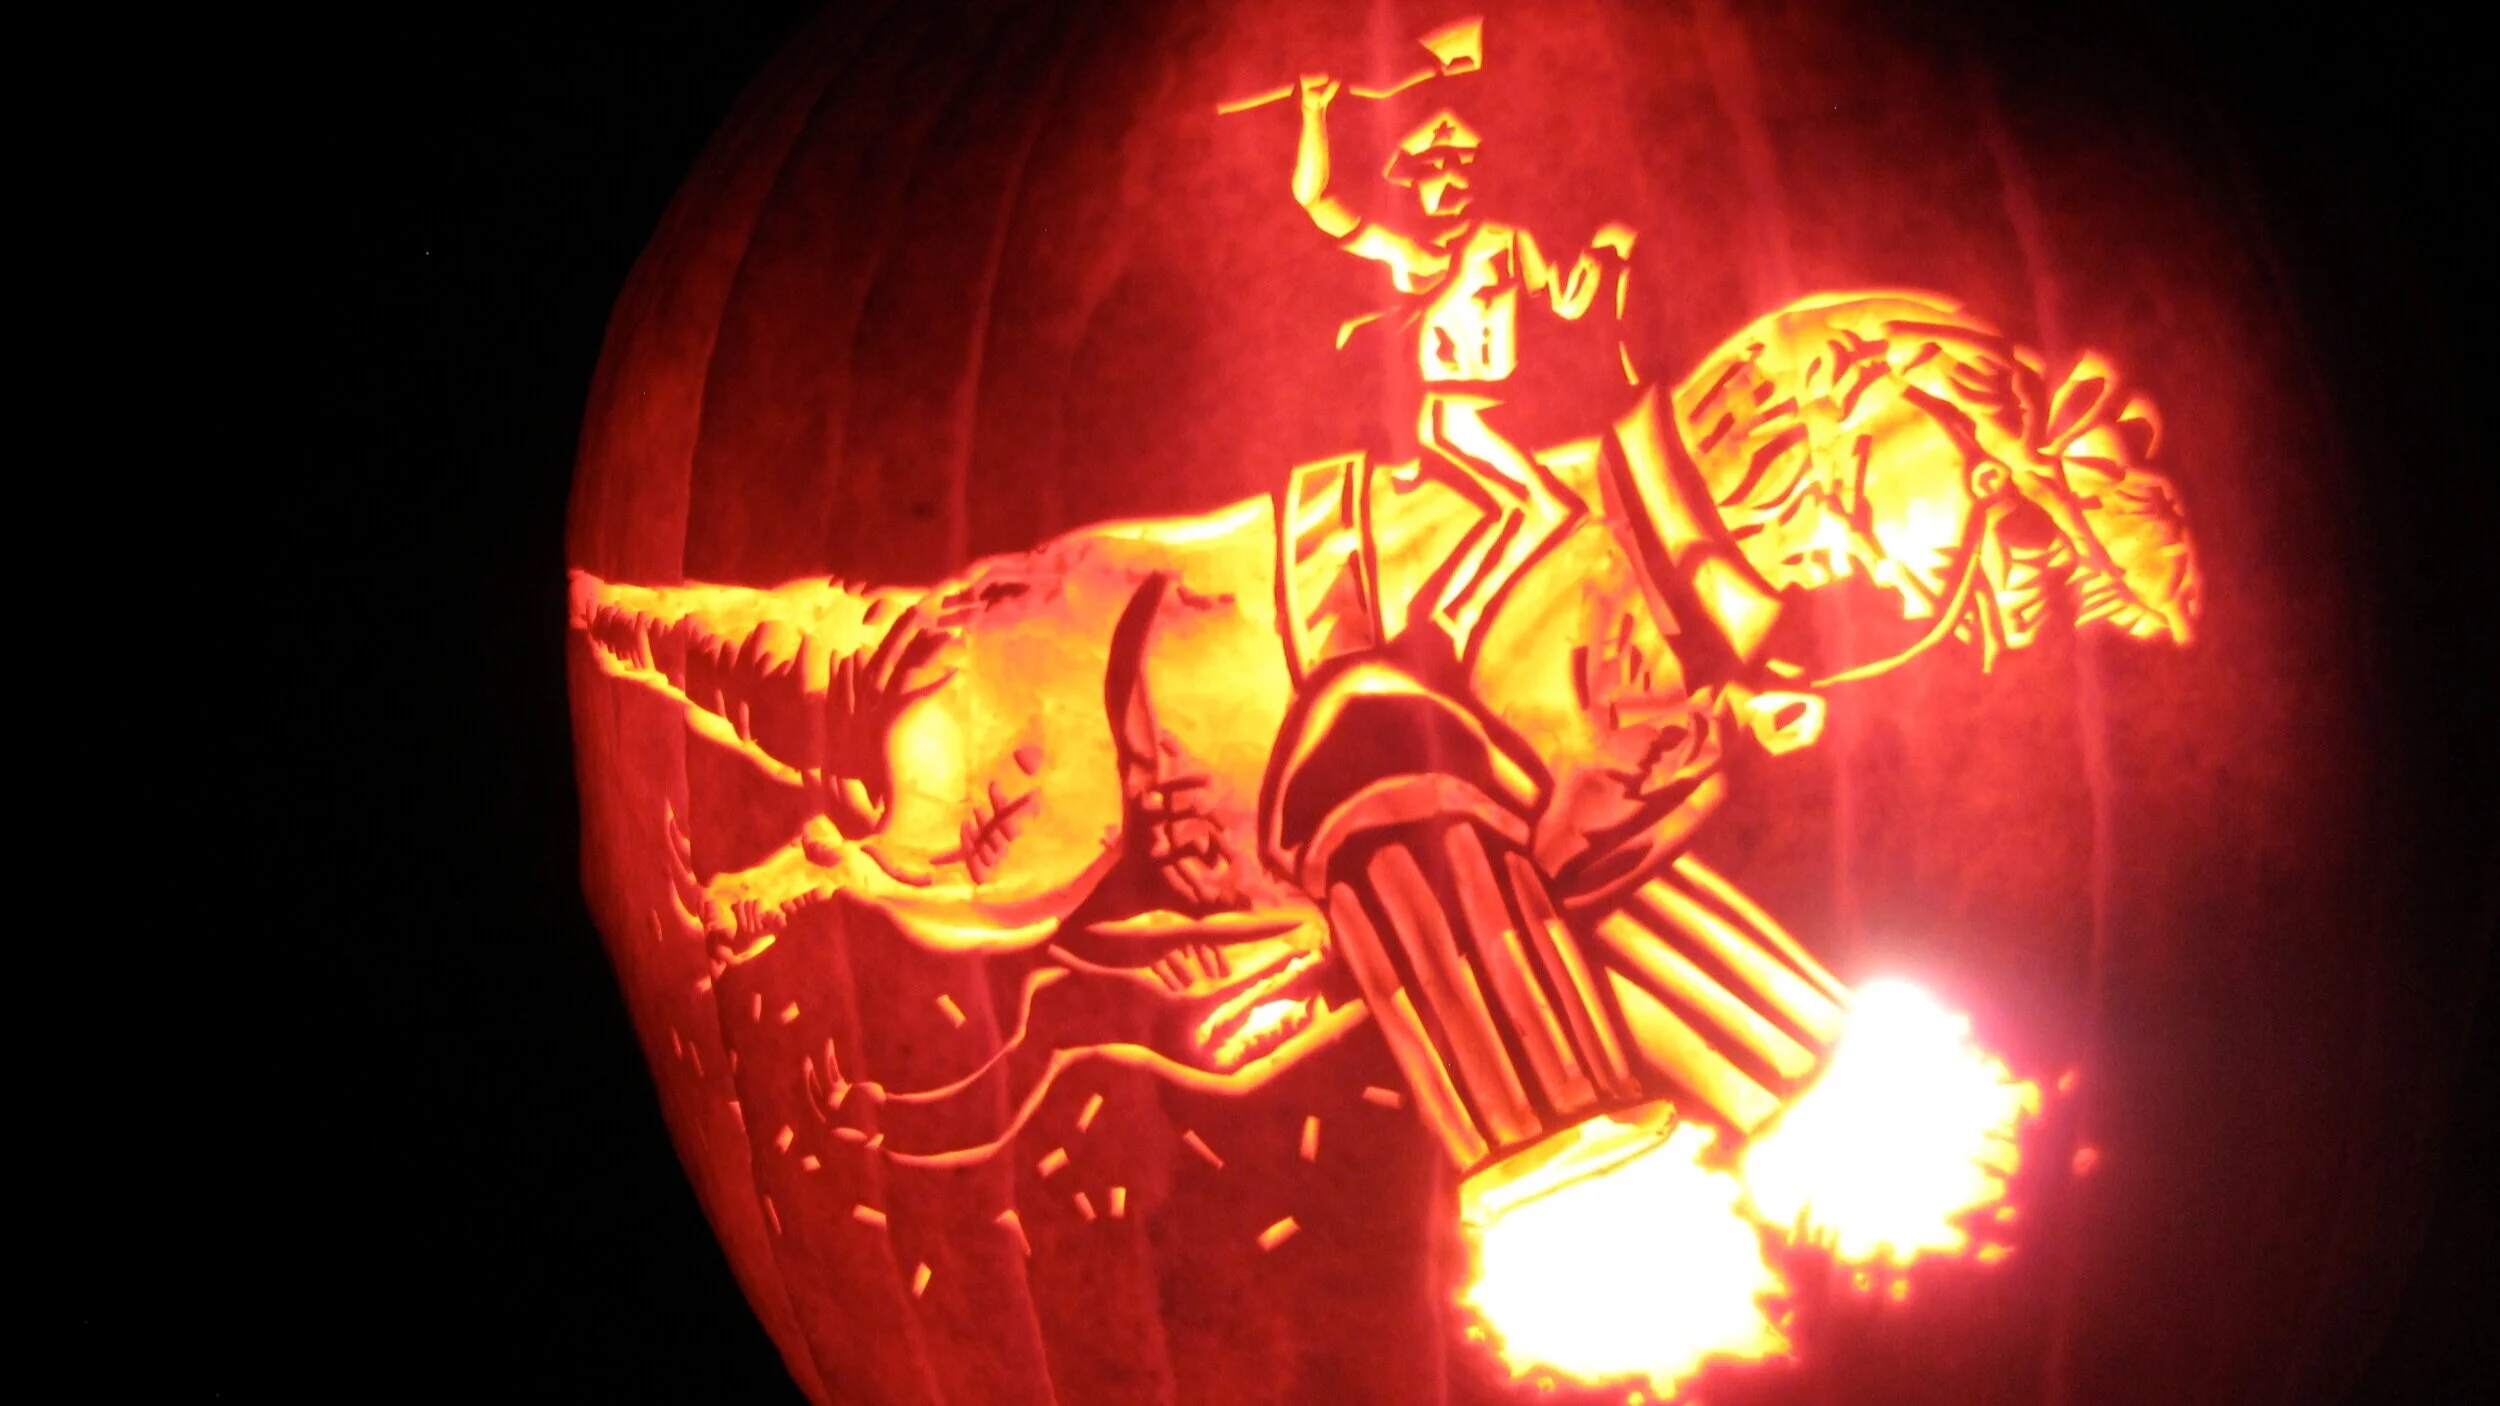
Axe Cop Pumpkin
Wexter and Axe Cop are off to fight bad guys on the moon.
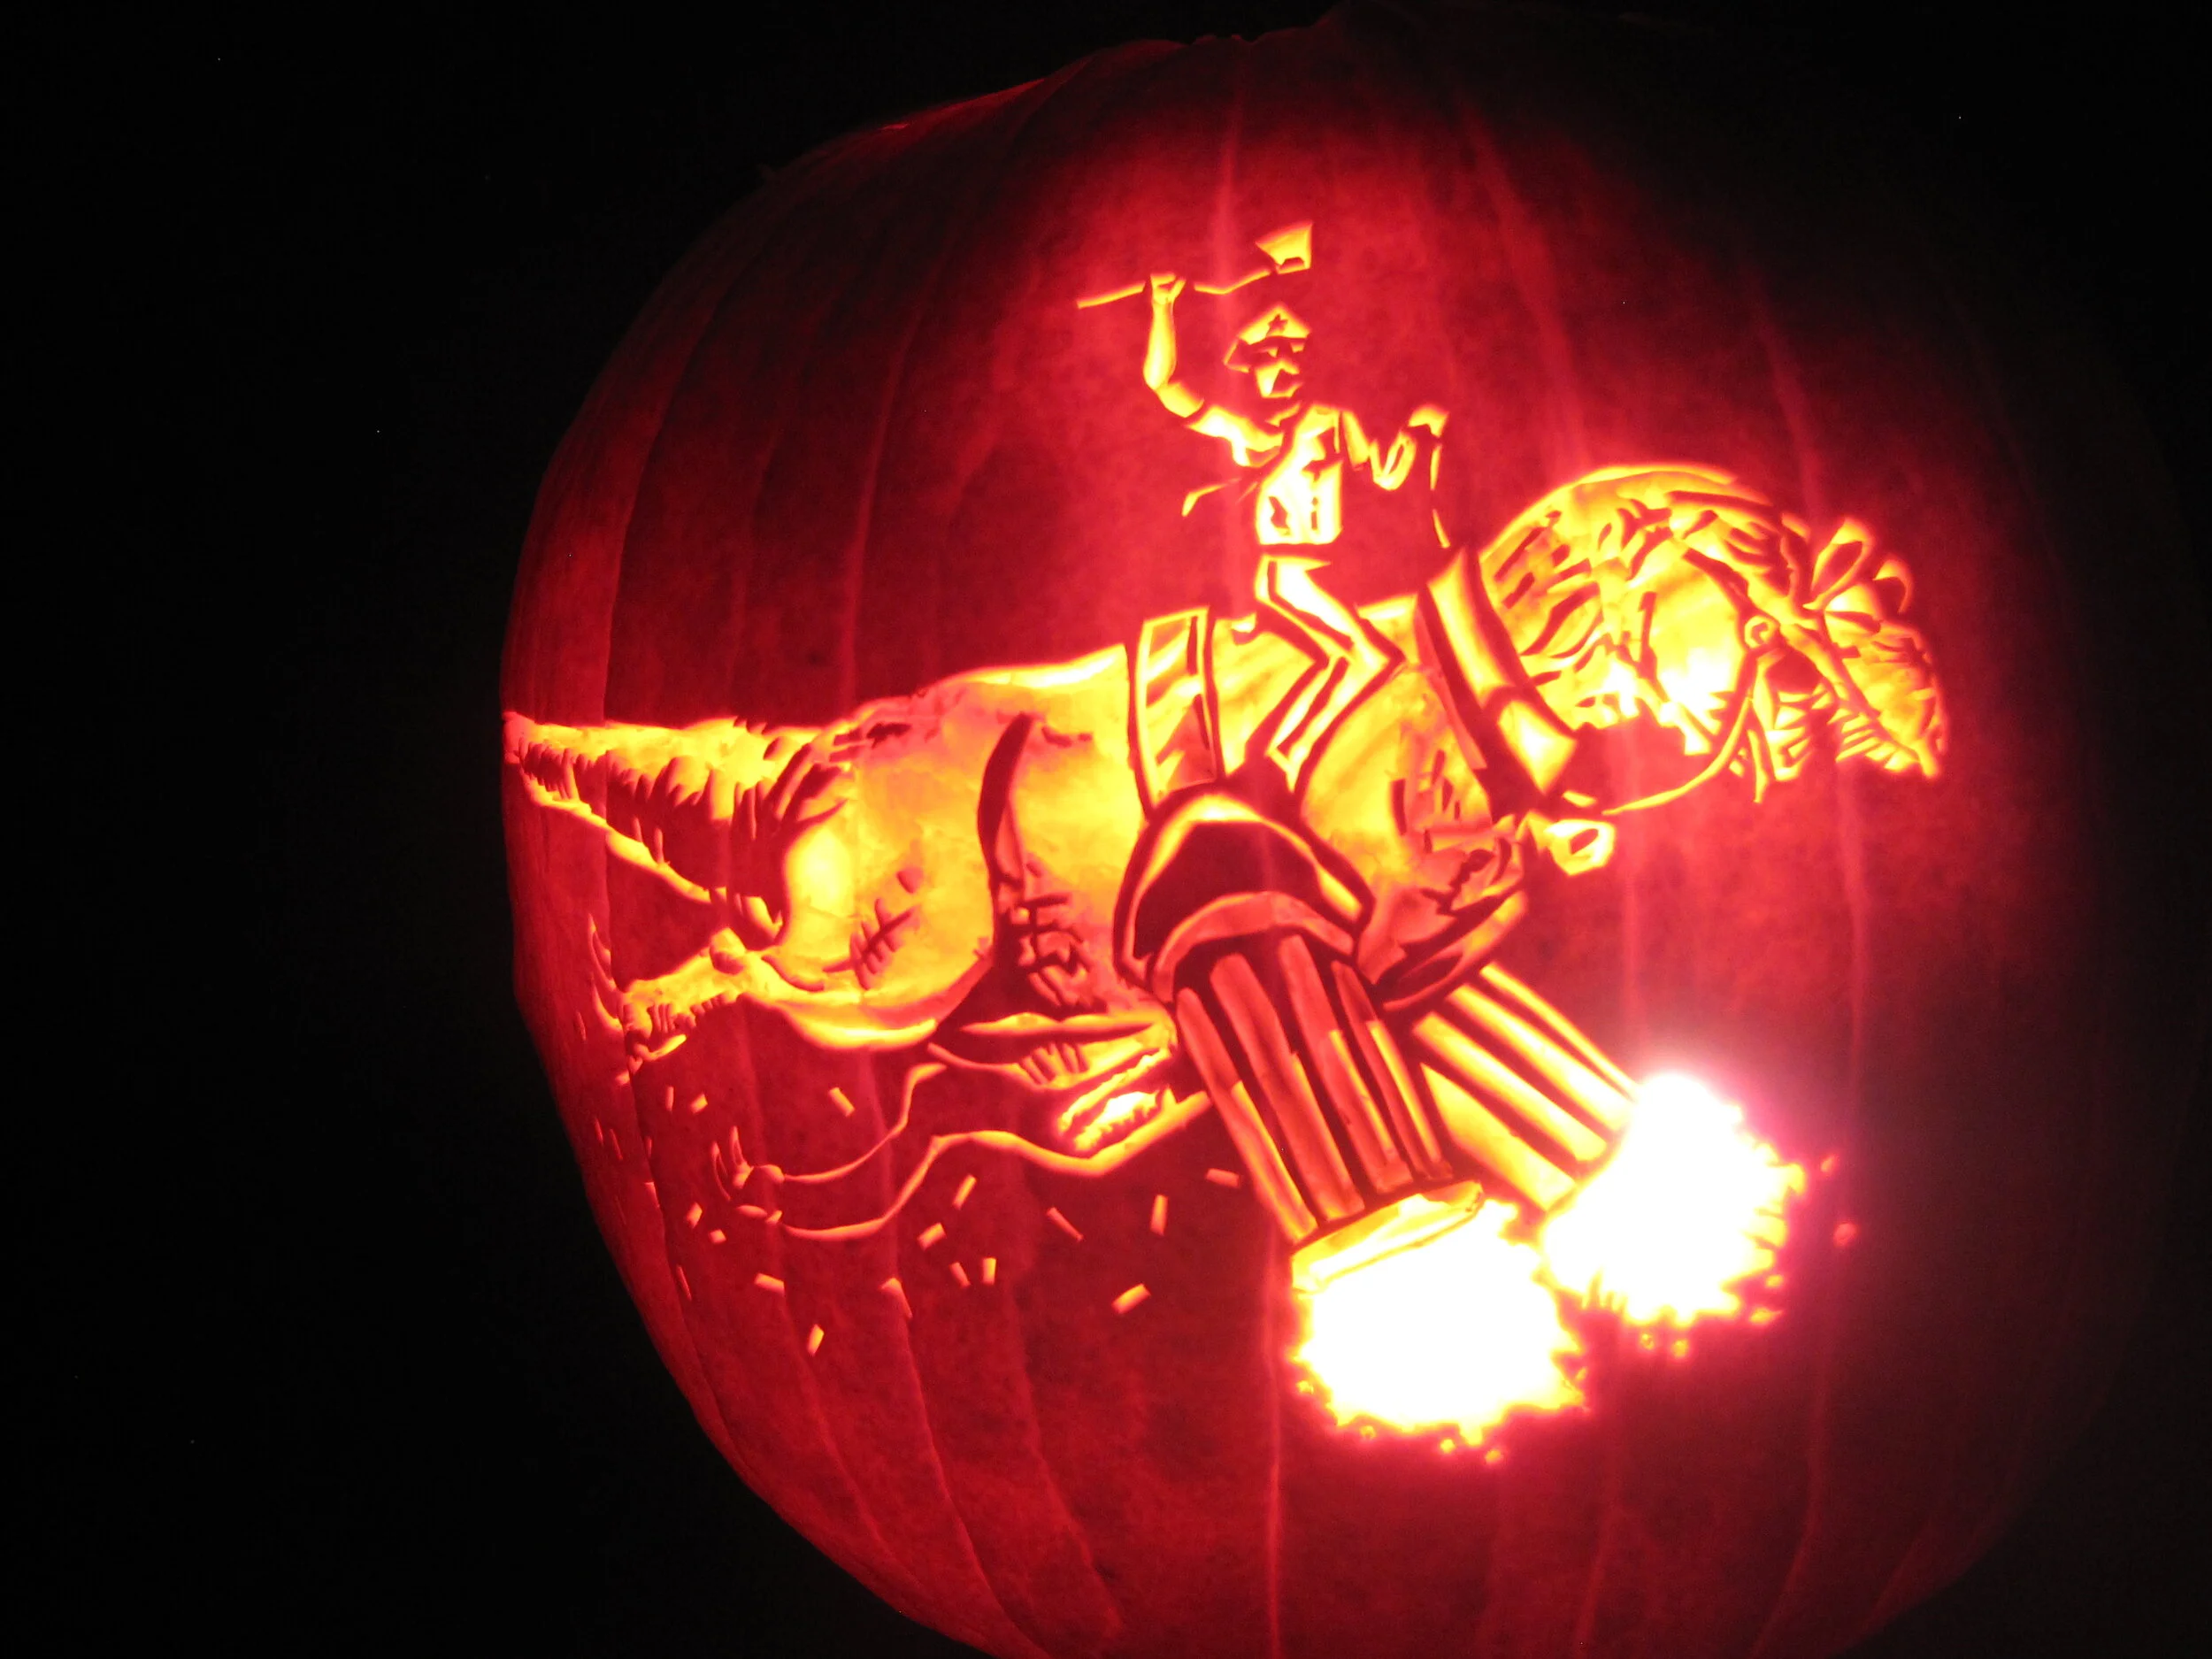
Wexter and Axe Cop are off to fight bad guys on the moon.
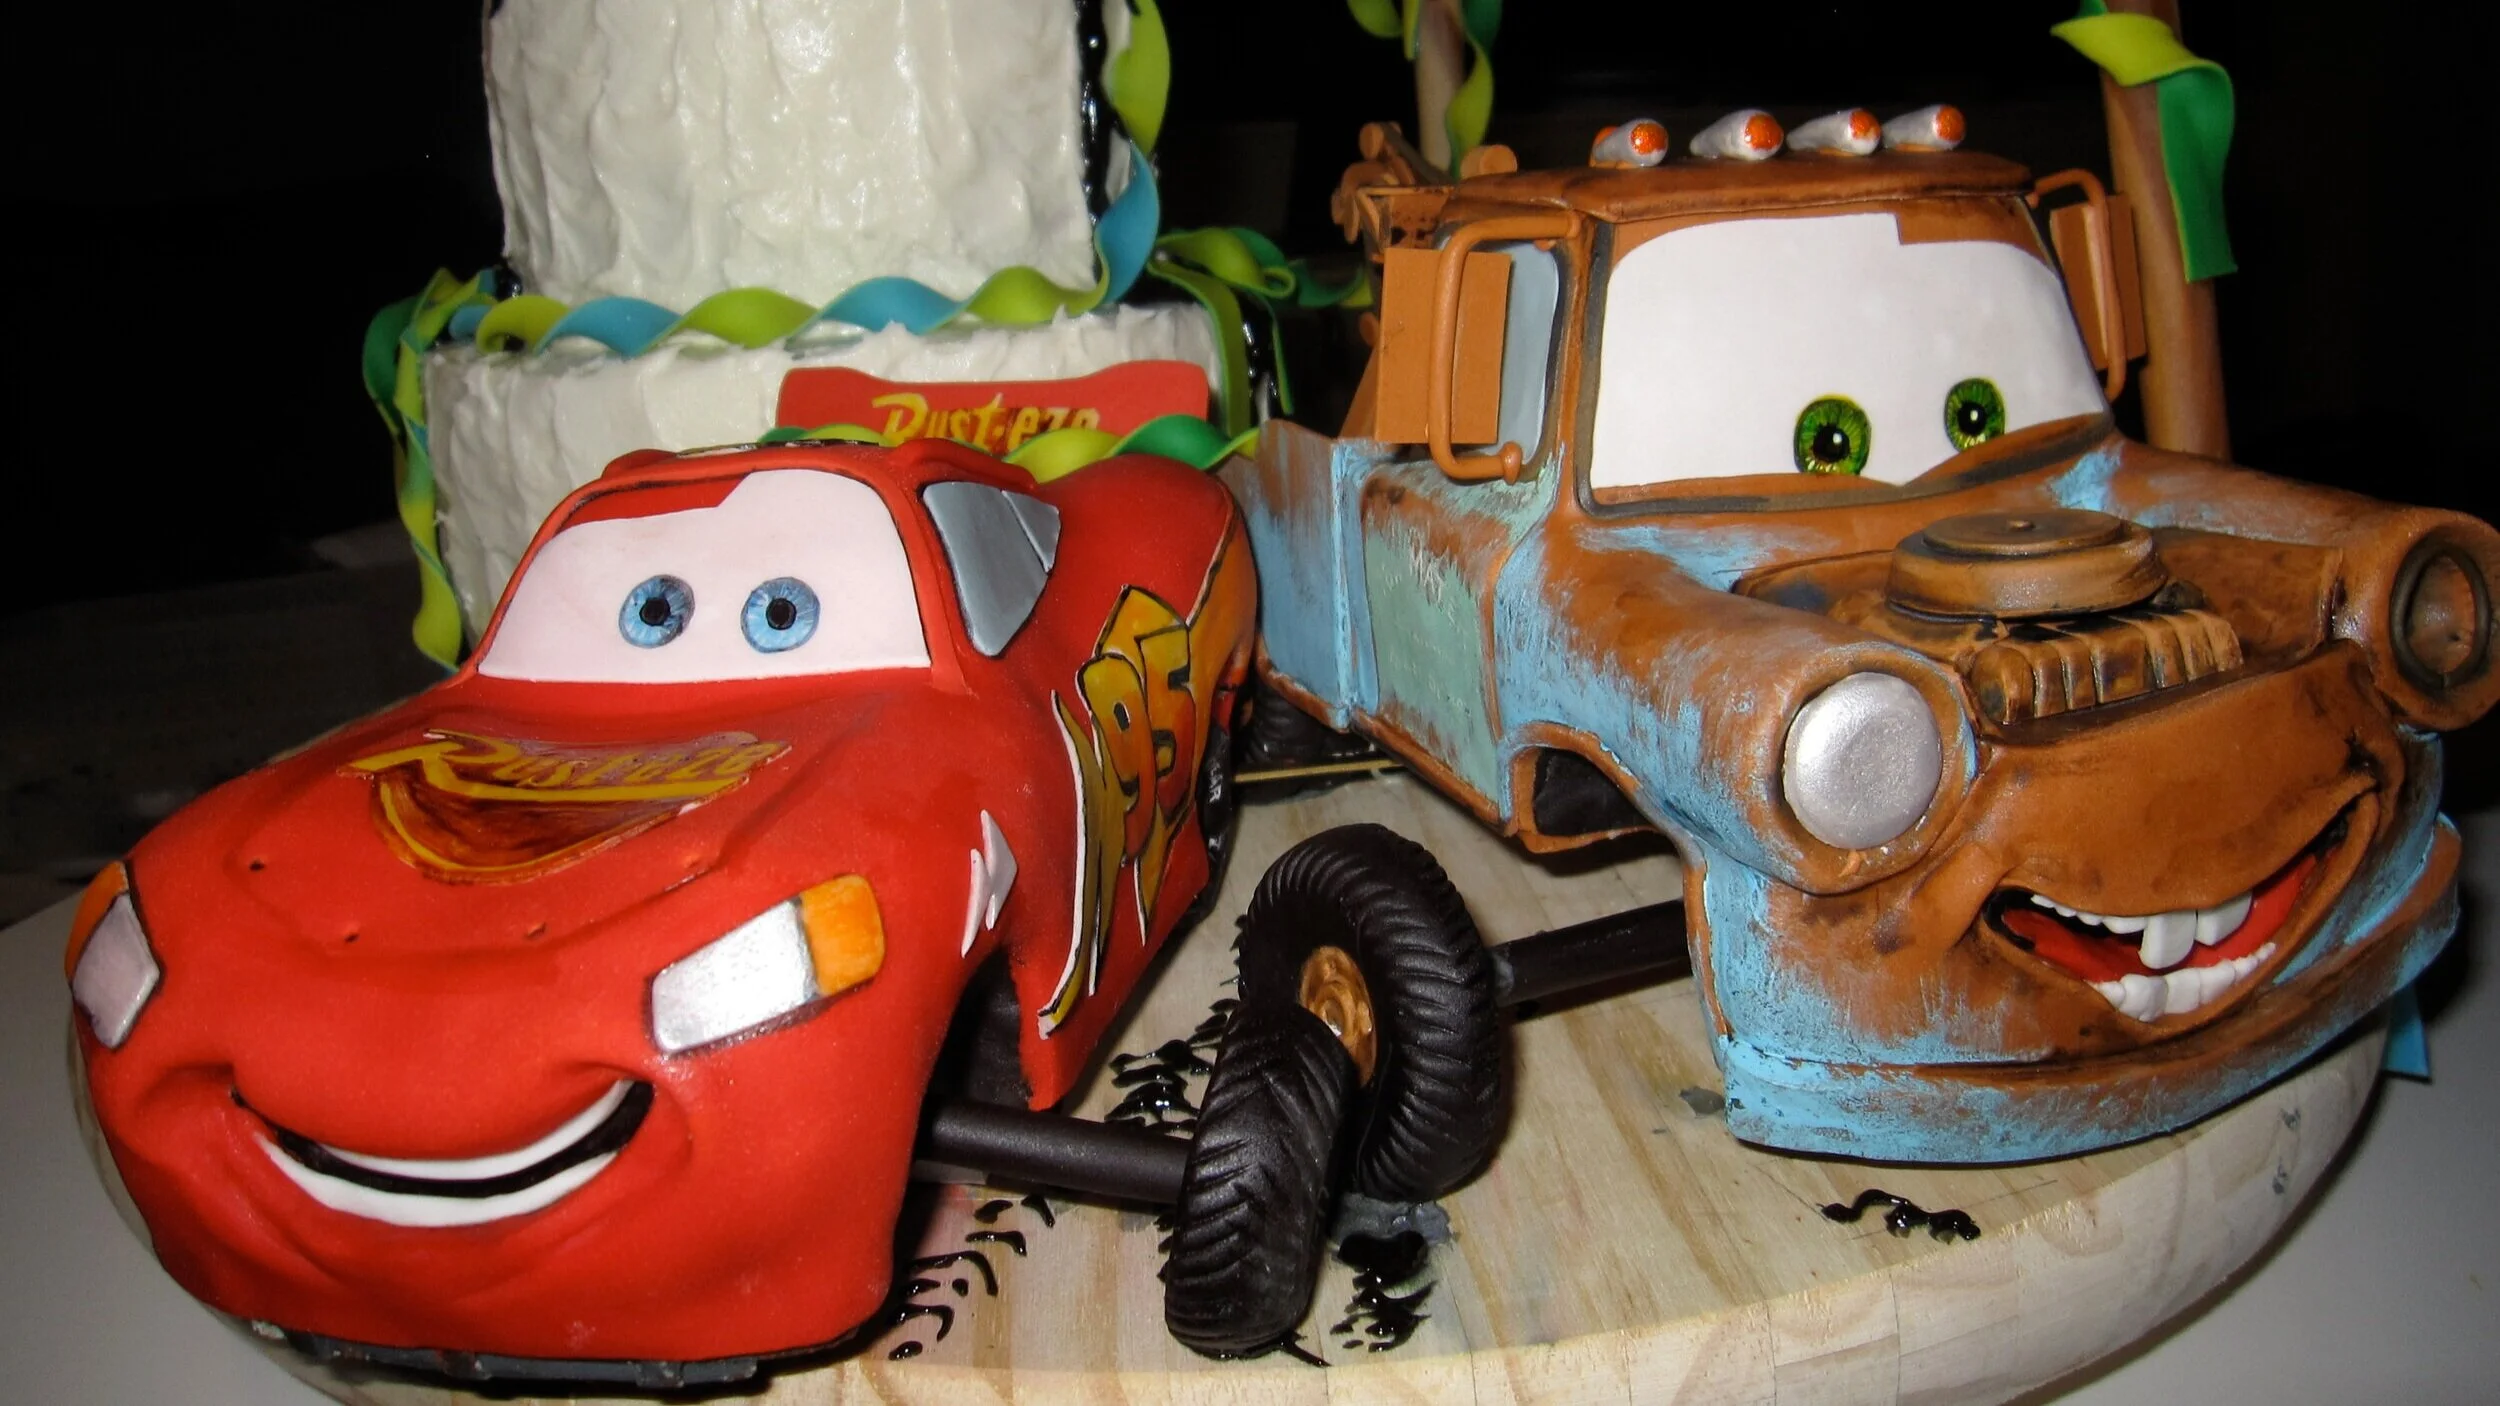
Mater and Lightning McQueen Cake
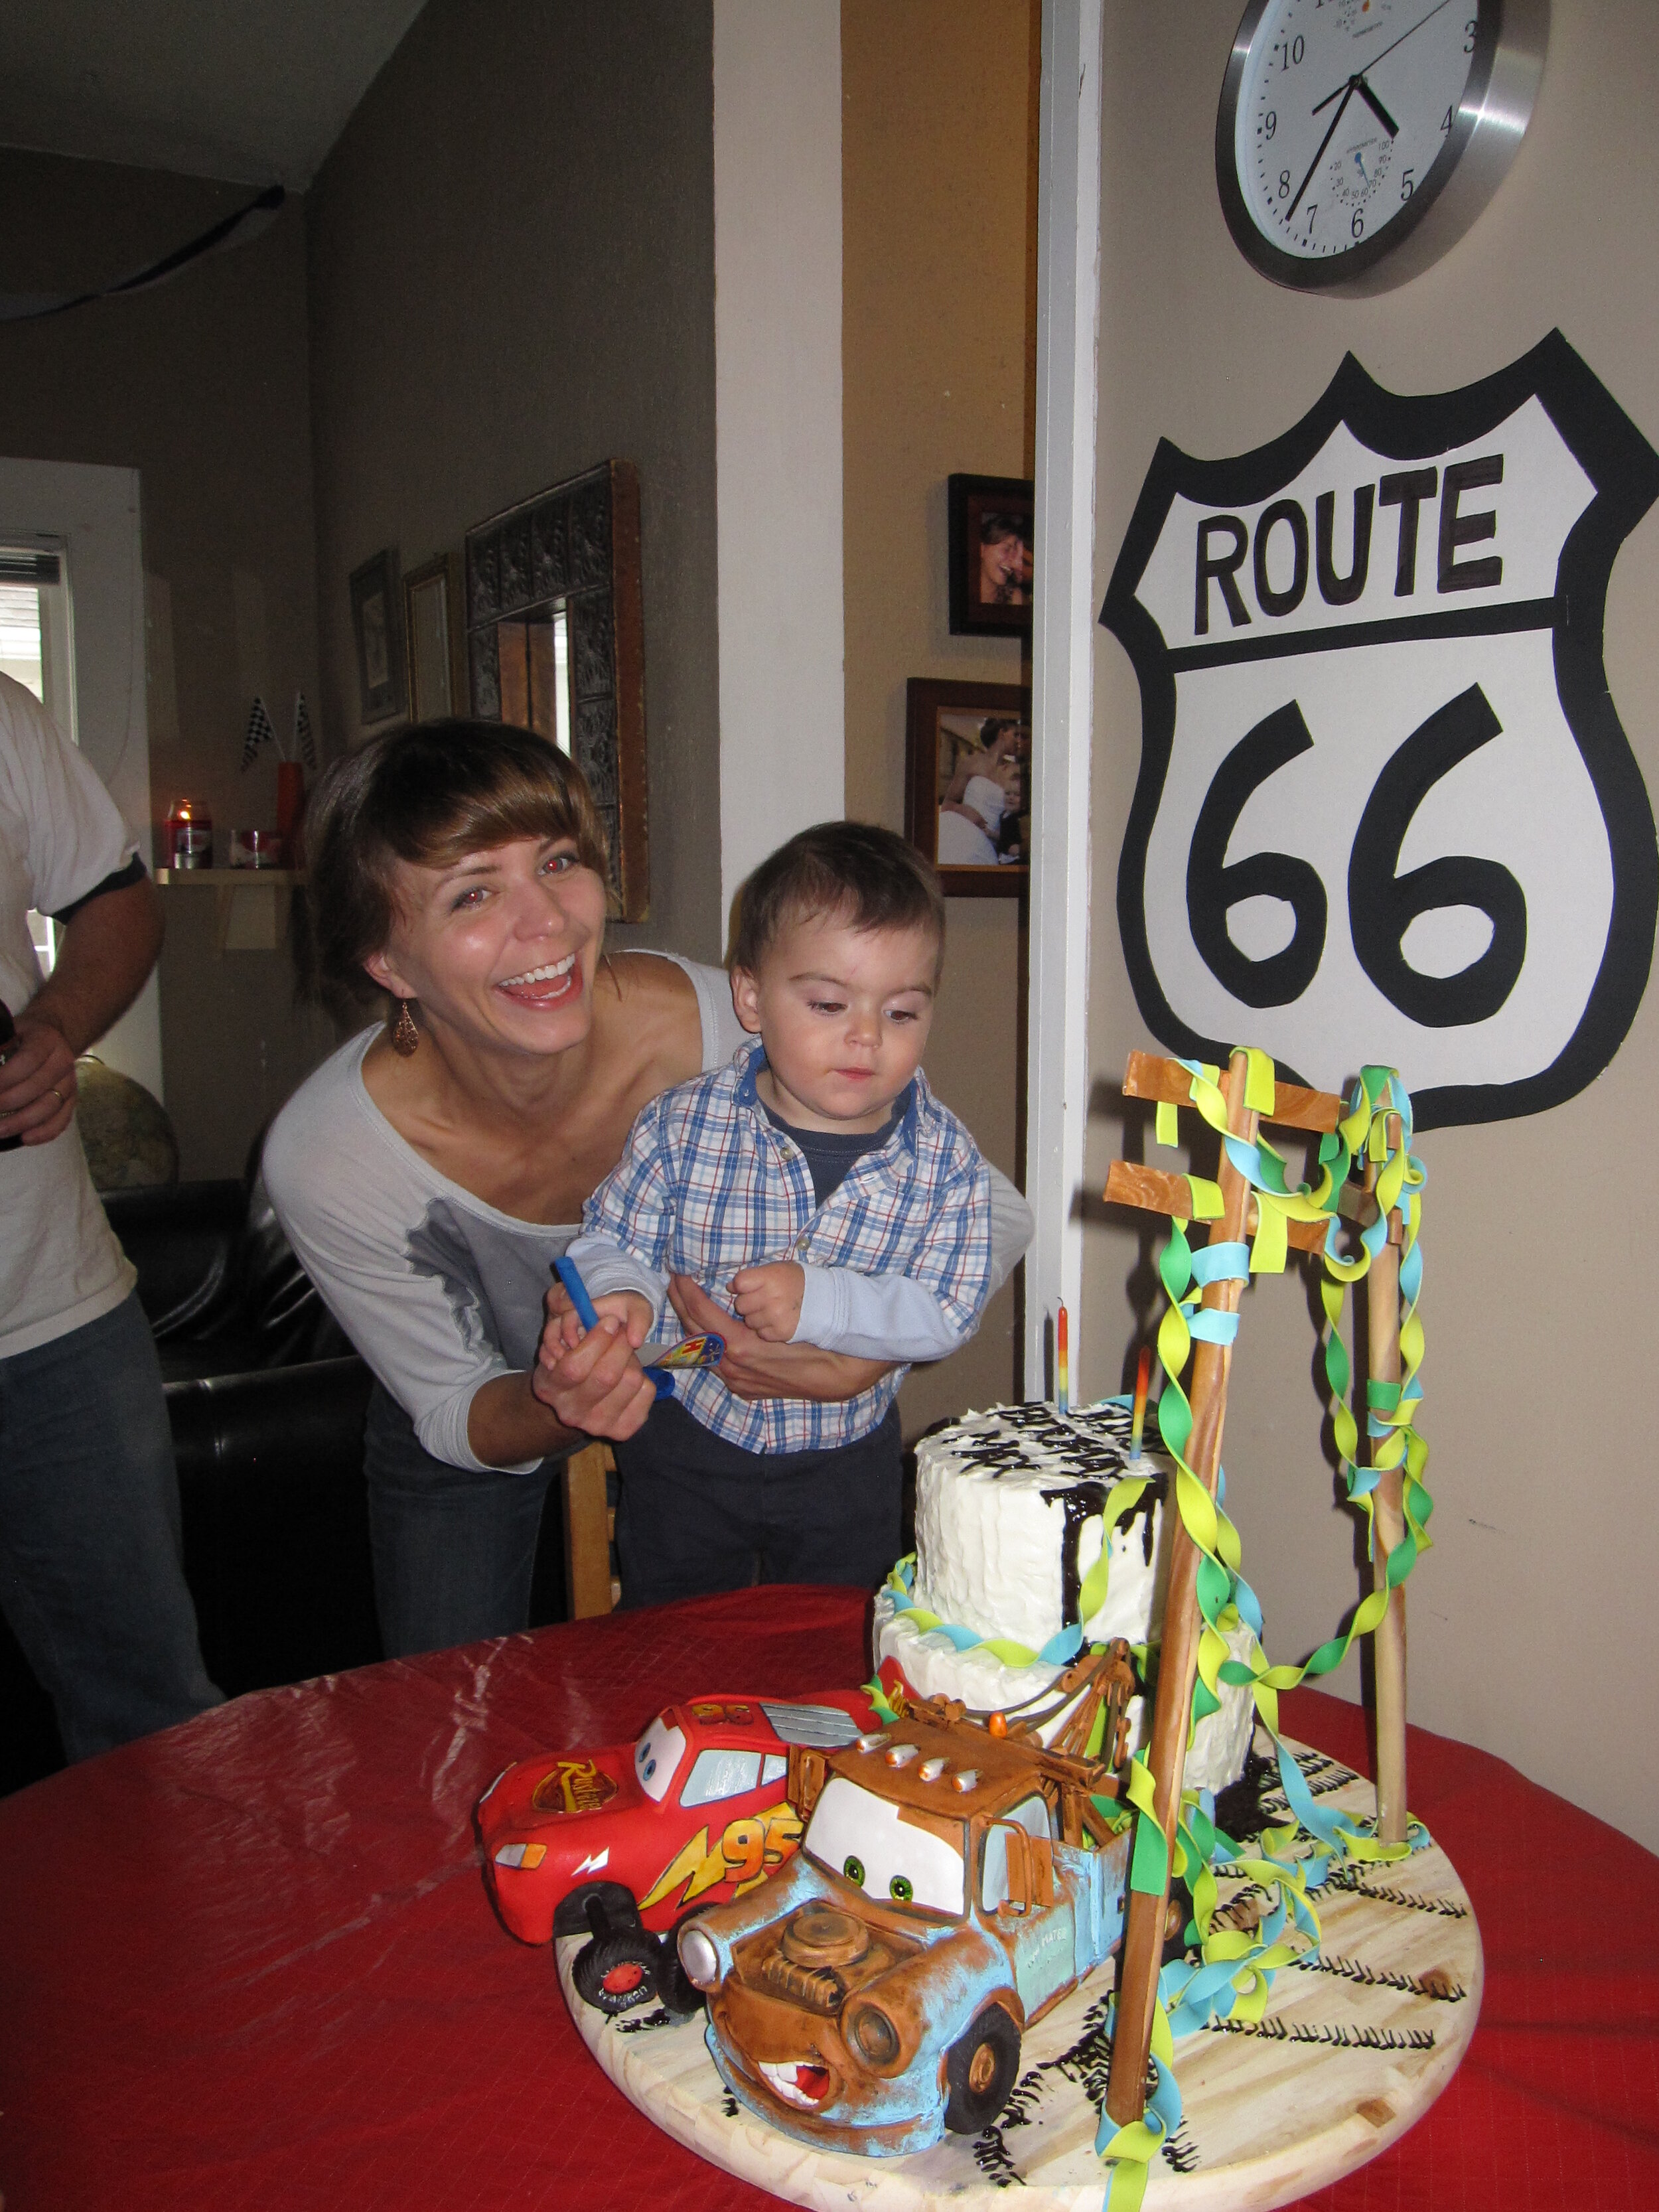
For my little friend Max’s second birthday cake, the only guideline that his parents gave me was that the party was Cars themed. So I asked my five-year-old niece for her expert advice on designing a Cars cake. She suggested that I make Mater and Lighting bumping tires.
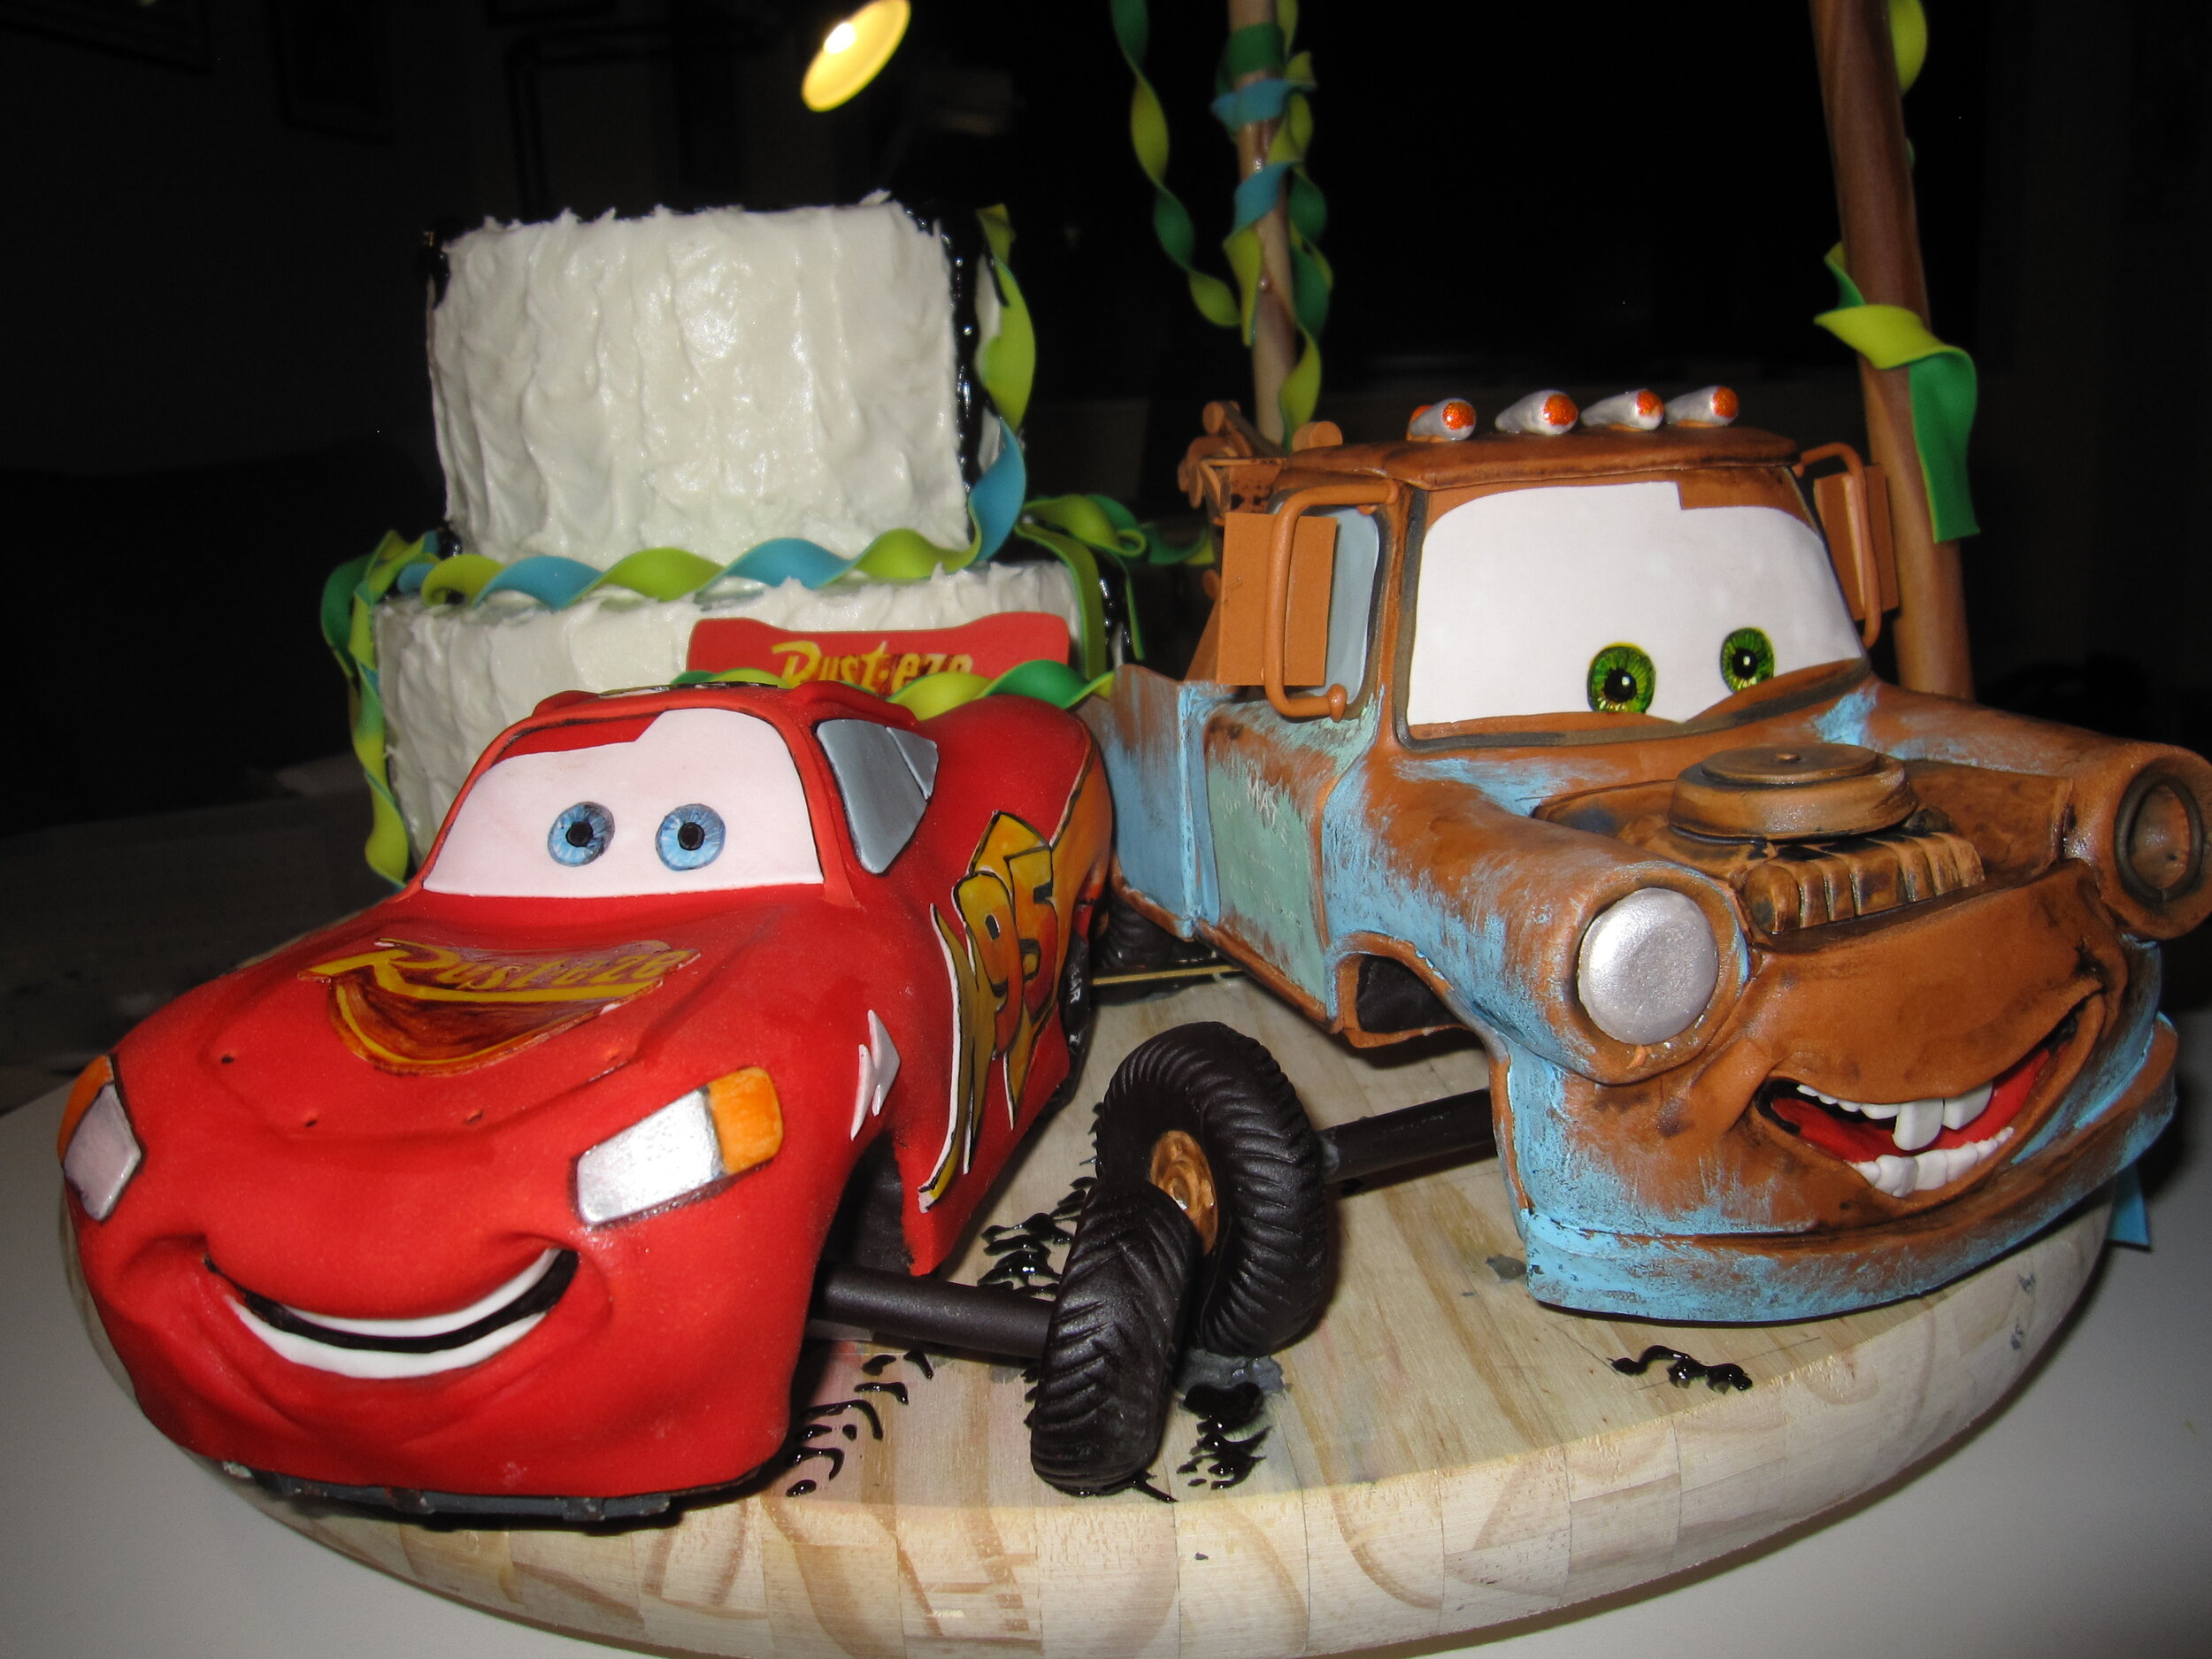
For my little friend Max’s second birthday cake, the only guideline that his parents gave me was that the party was Cars themed. So I asked my five-year-old niece for her expert advice on designing a Cars cake. She suggested that I make Mater and Lighting bumping tires. What she meant by this was the Cars equivalent of the fist-bump. So the idea that I came up with was a scene wherein Lightning and Mater had just made a cake for Max and decorated it with oil (because that would be delicious to a car). Of course, Mater and Lightning probably haven’t had much experience with making cakes and decorating for parties, so they’ve made a bit of a mess of things, with oil spills and torn streamers. My plan was to have Lightning hanging from birthday streamers wrapped around telephone poles, as if he’d gotten himself tangled while hanging them. This was, of course, meant to be reminiscent of the scene in Cars where Lightning gets tangled in the telephone wires. In the end, this didn’t work out, but I still think the cake overall was a success (and that, next time, I could make the hanging effect actually work).
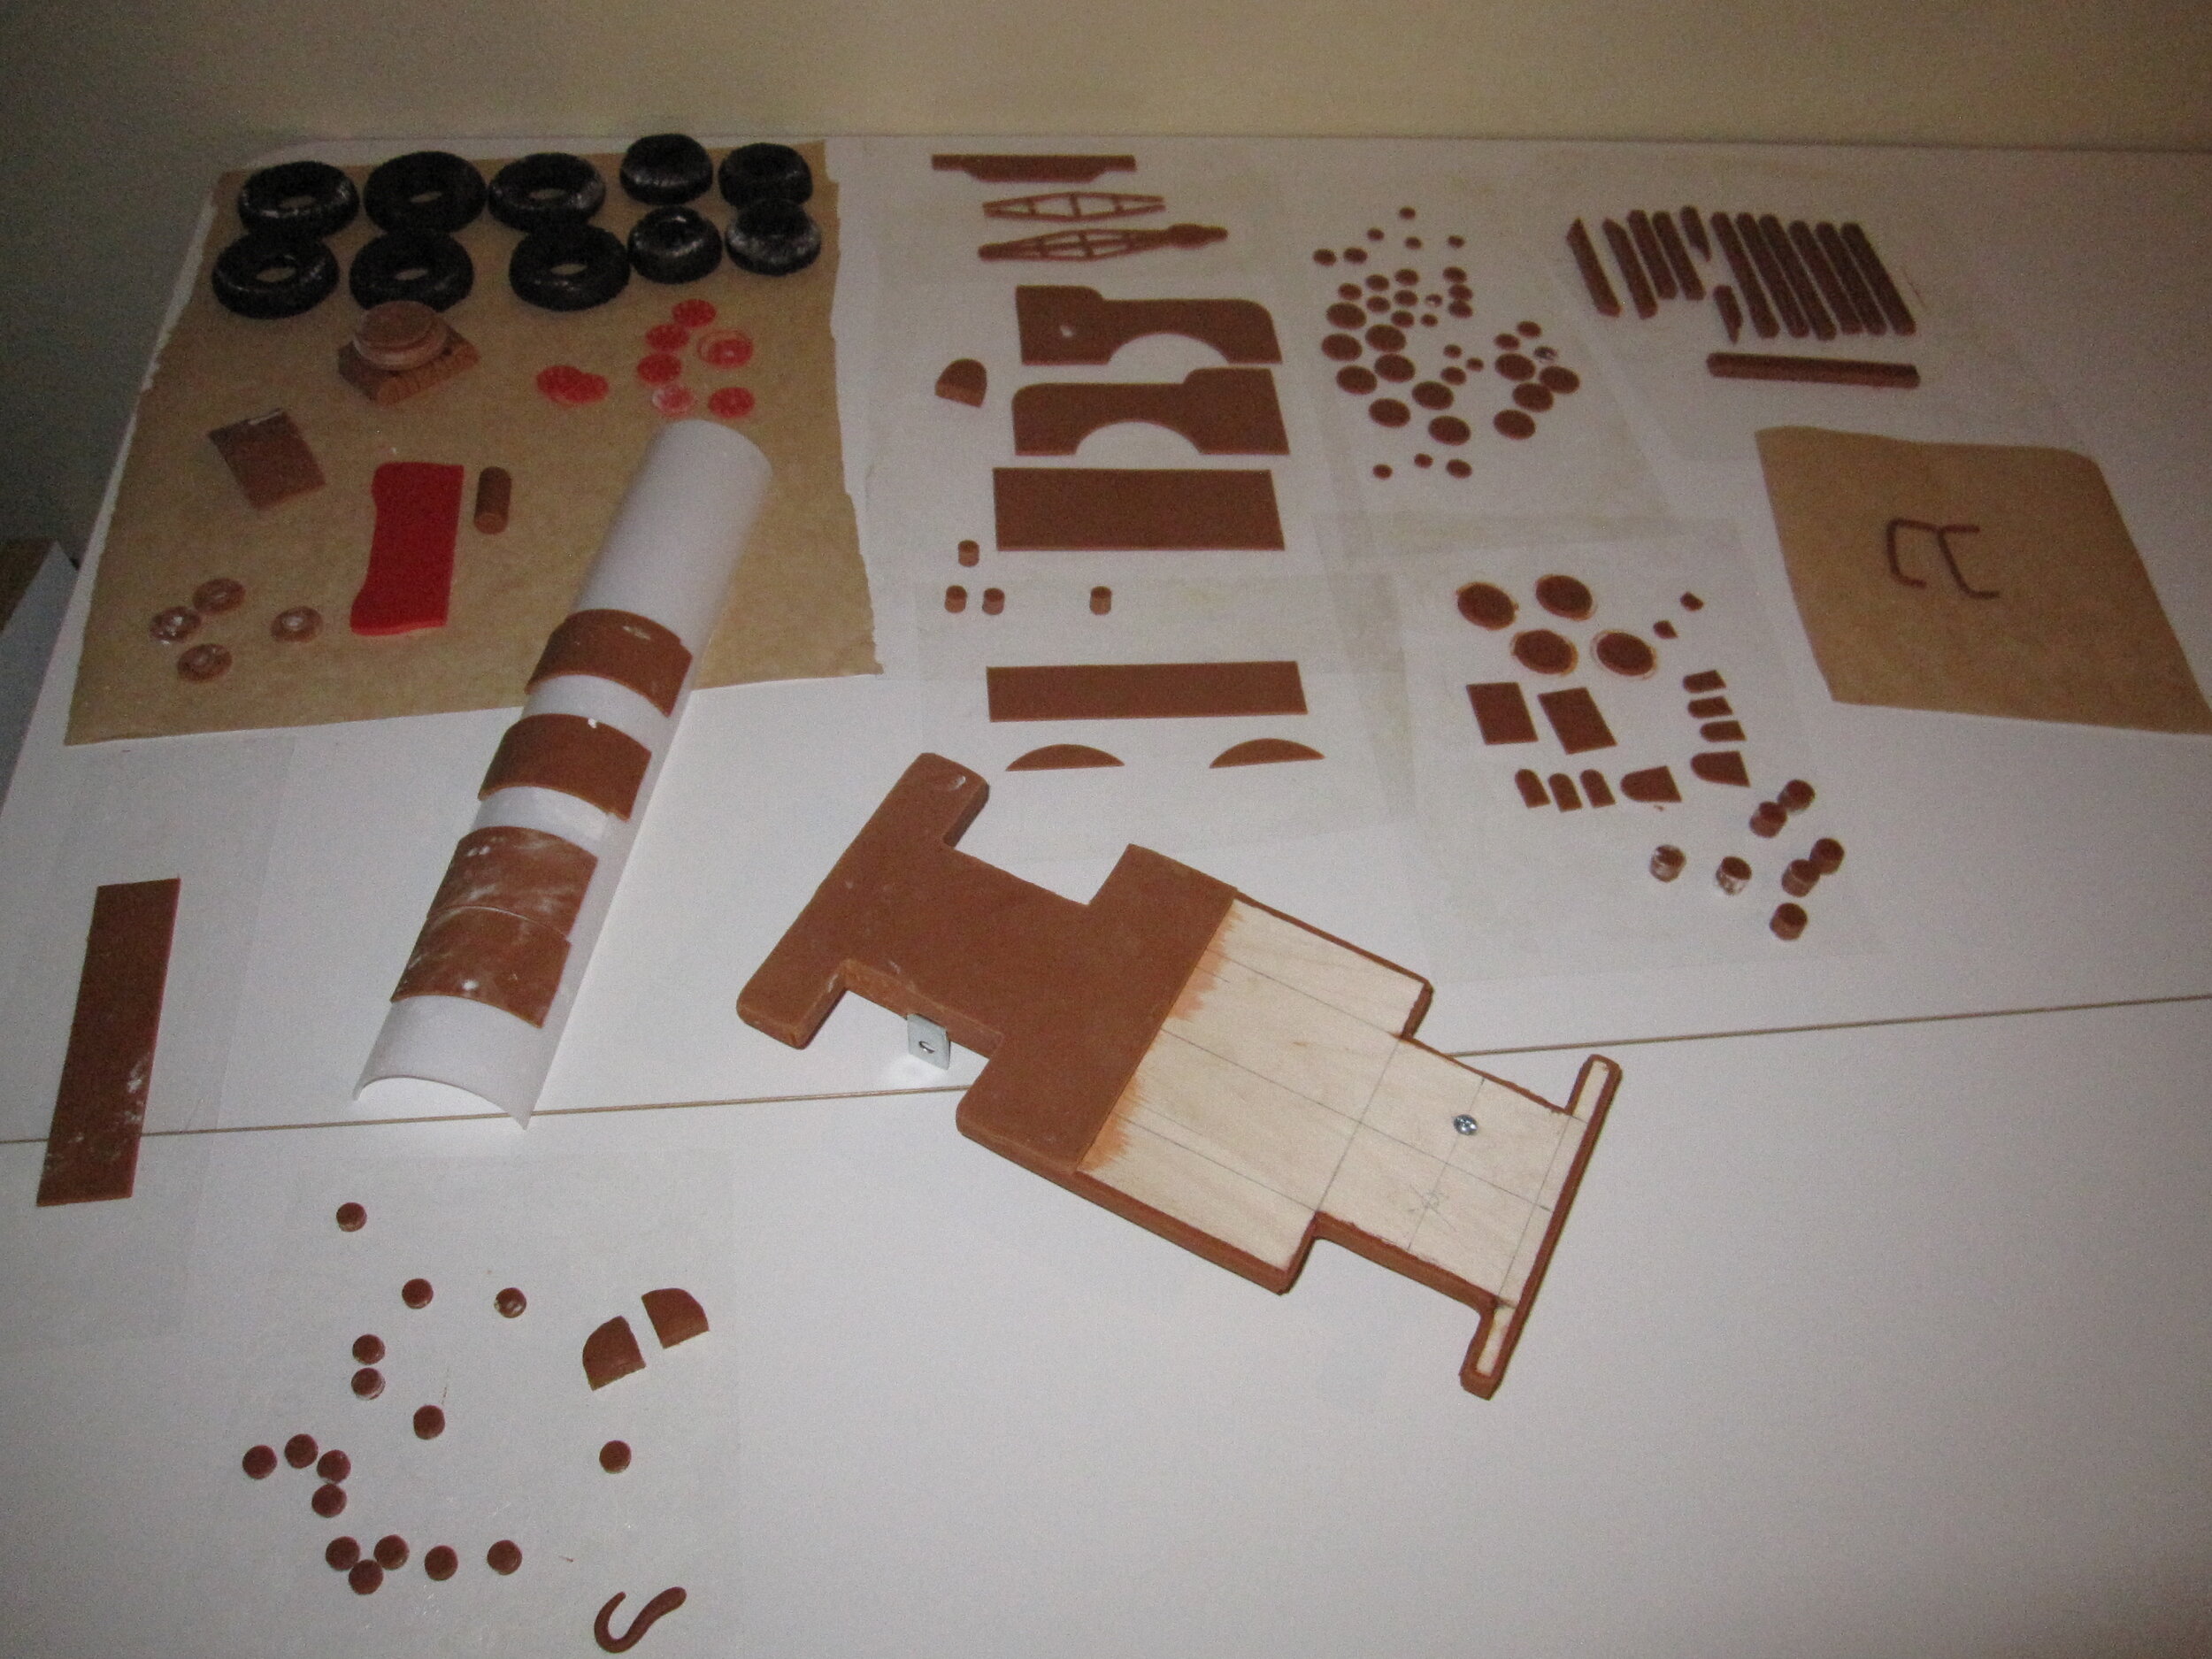
As with many of my cakes, I made a lot of gum paste pieces in advance, especially for Mater’s bed and tow hook. And, of course, I made fondant tires, which are coming to be quite a specialty of mine. I was especially pleased with Lightning’s tires, once I painted “Lightyear” on them.
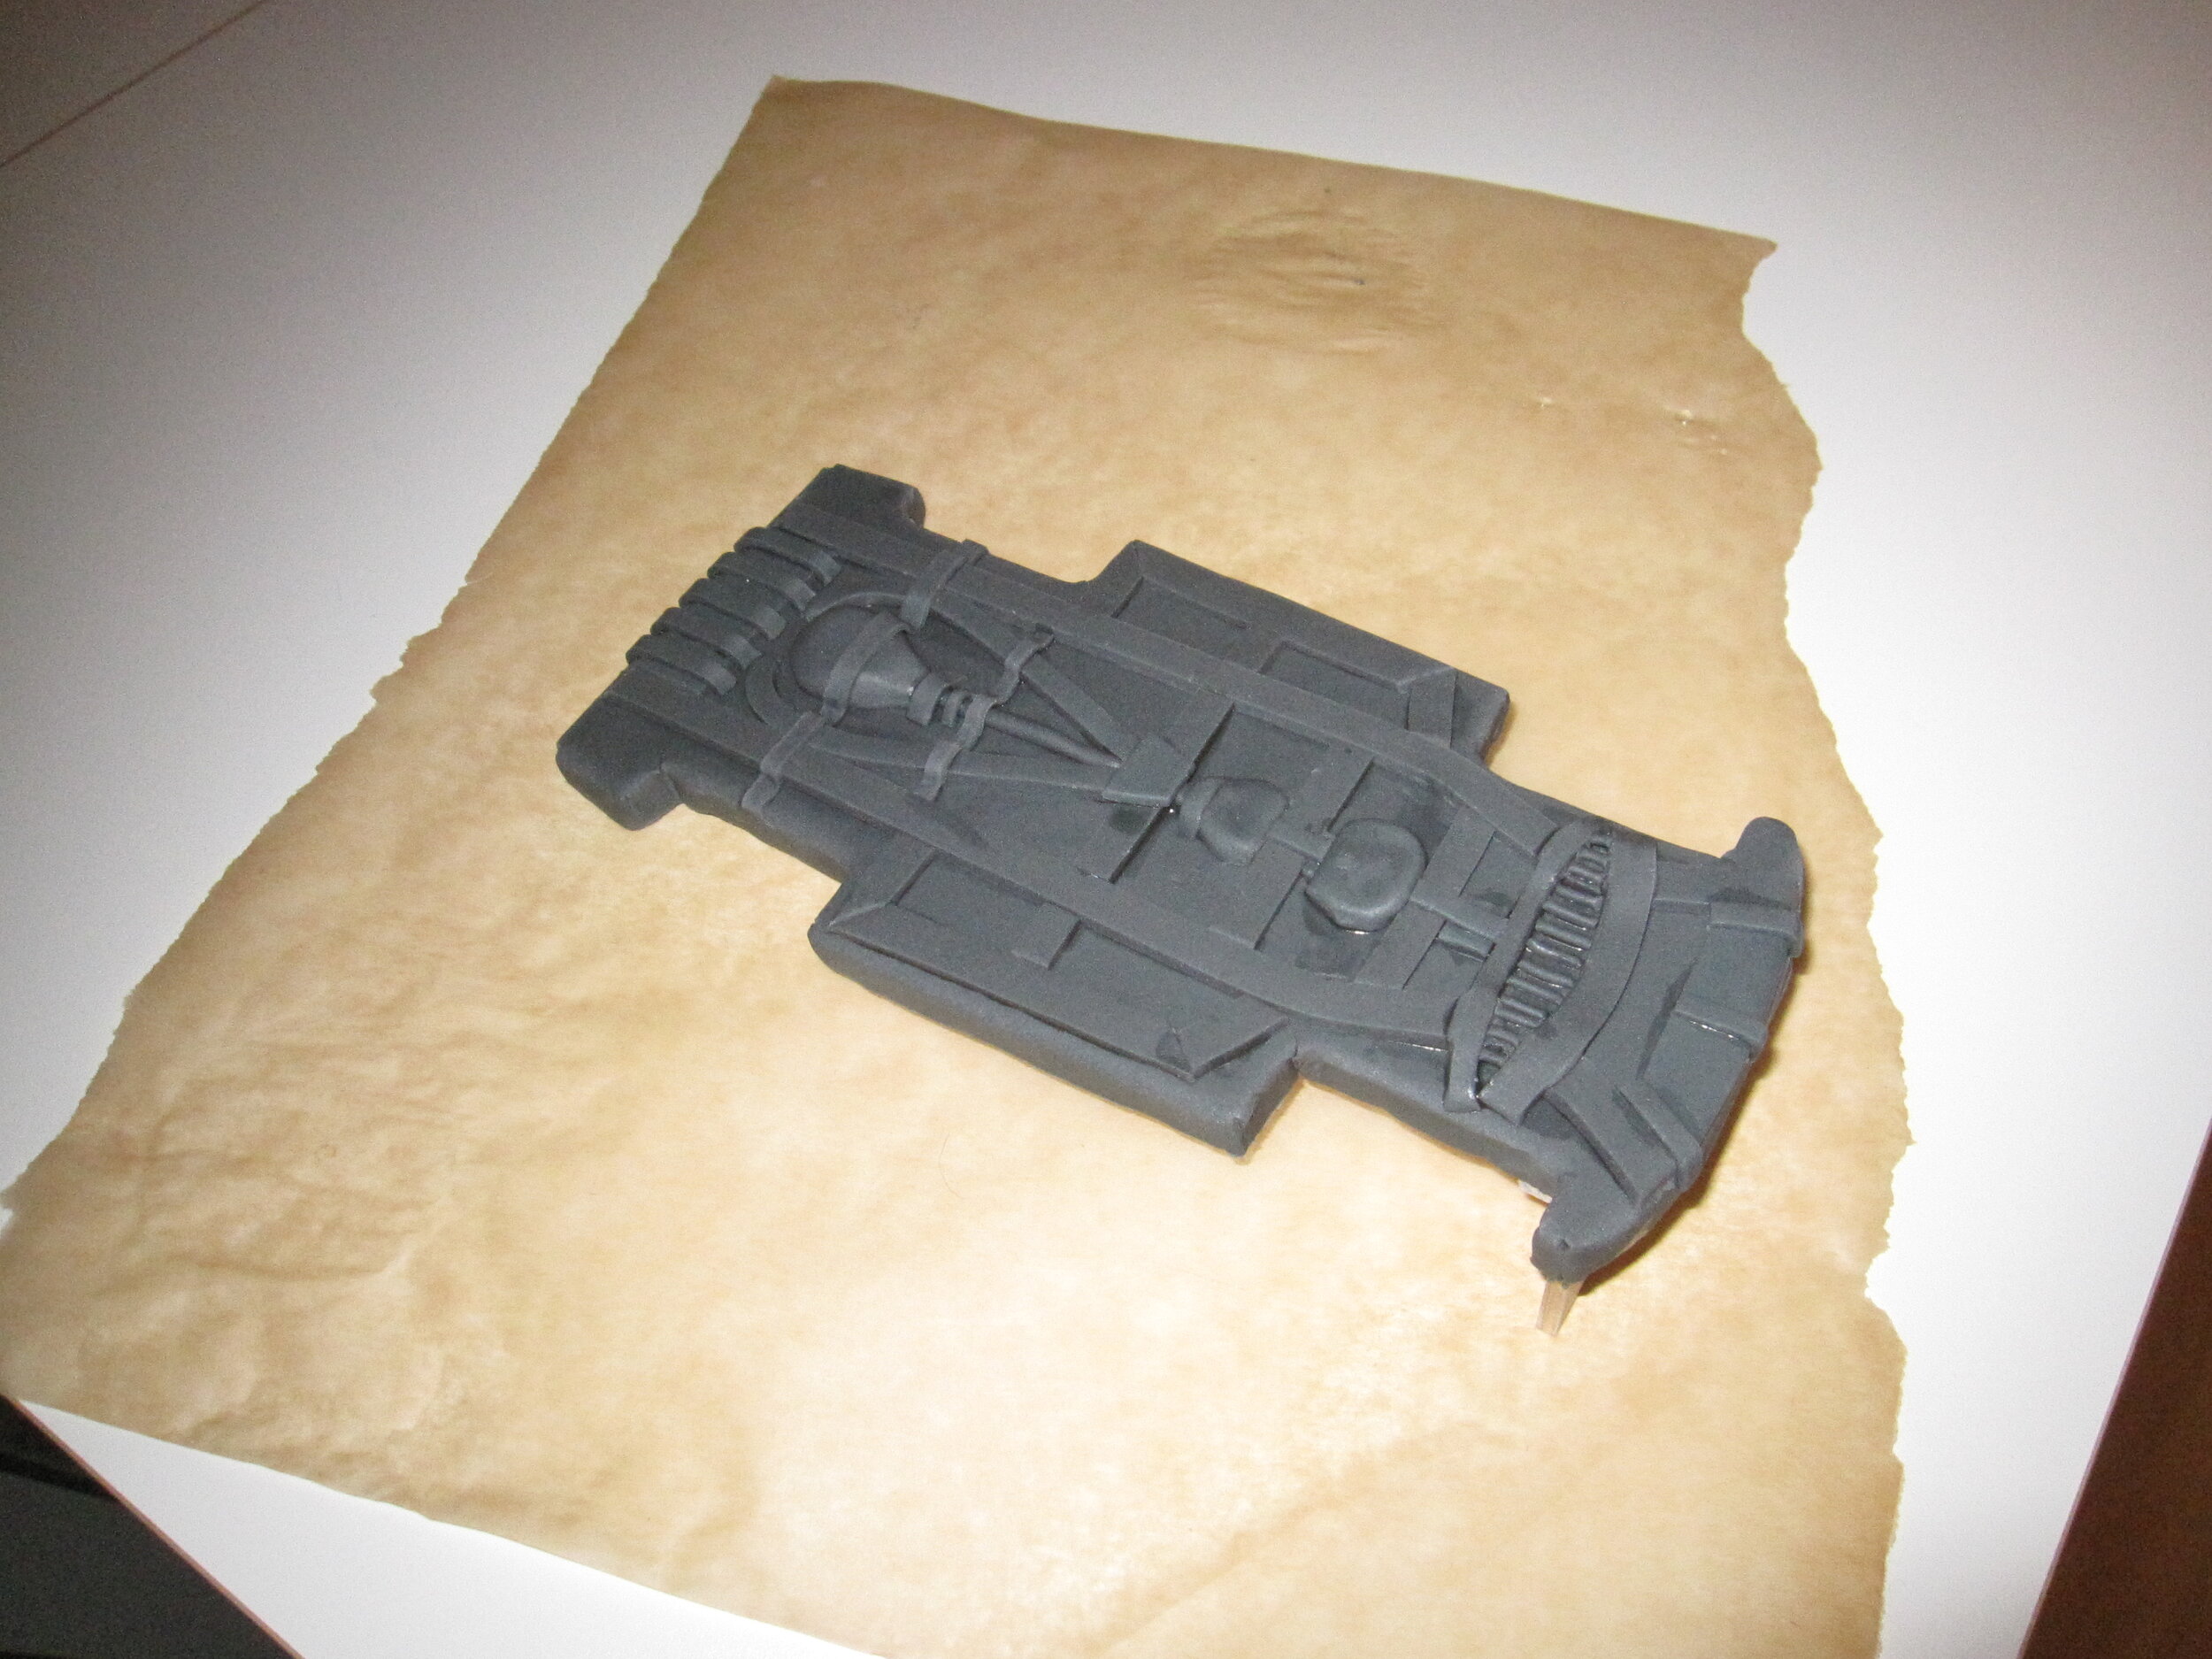
I made the telephone poles out of aluminum rod covered with fondant and I made a wooden base for Lightning with brass strips bolted to it, with which I planned to hang Lightning from the telephone poles. This meant that I had to make Lightning’s entire undercarriage, since it would all be visible. I’m not sure whether Lightning’s undercarriage is ever visible in the movie, but I found a Lightning toy that had a fairly detailed undercarriage for me to copy.
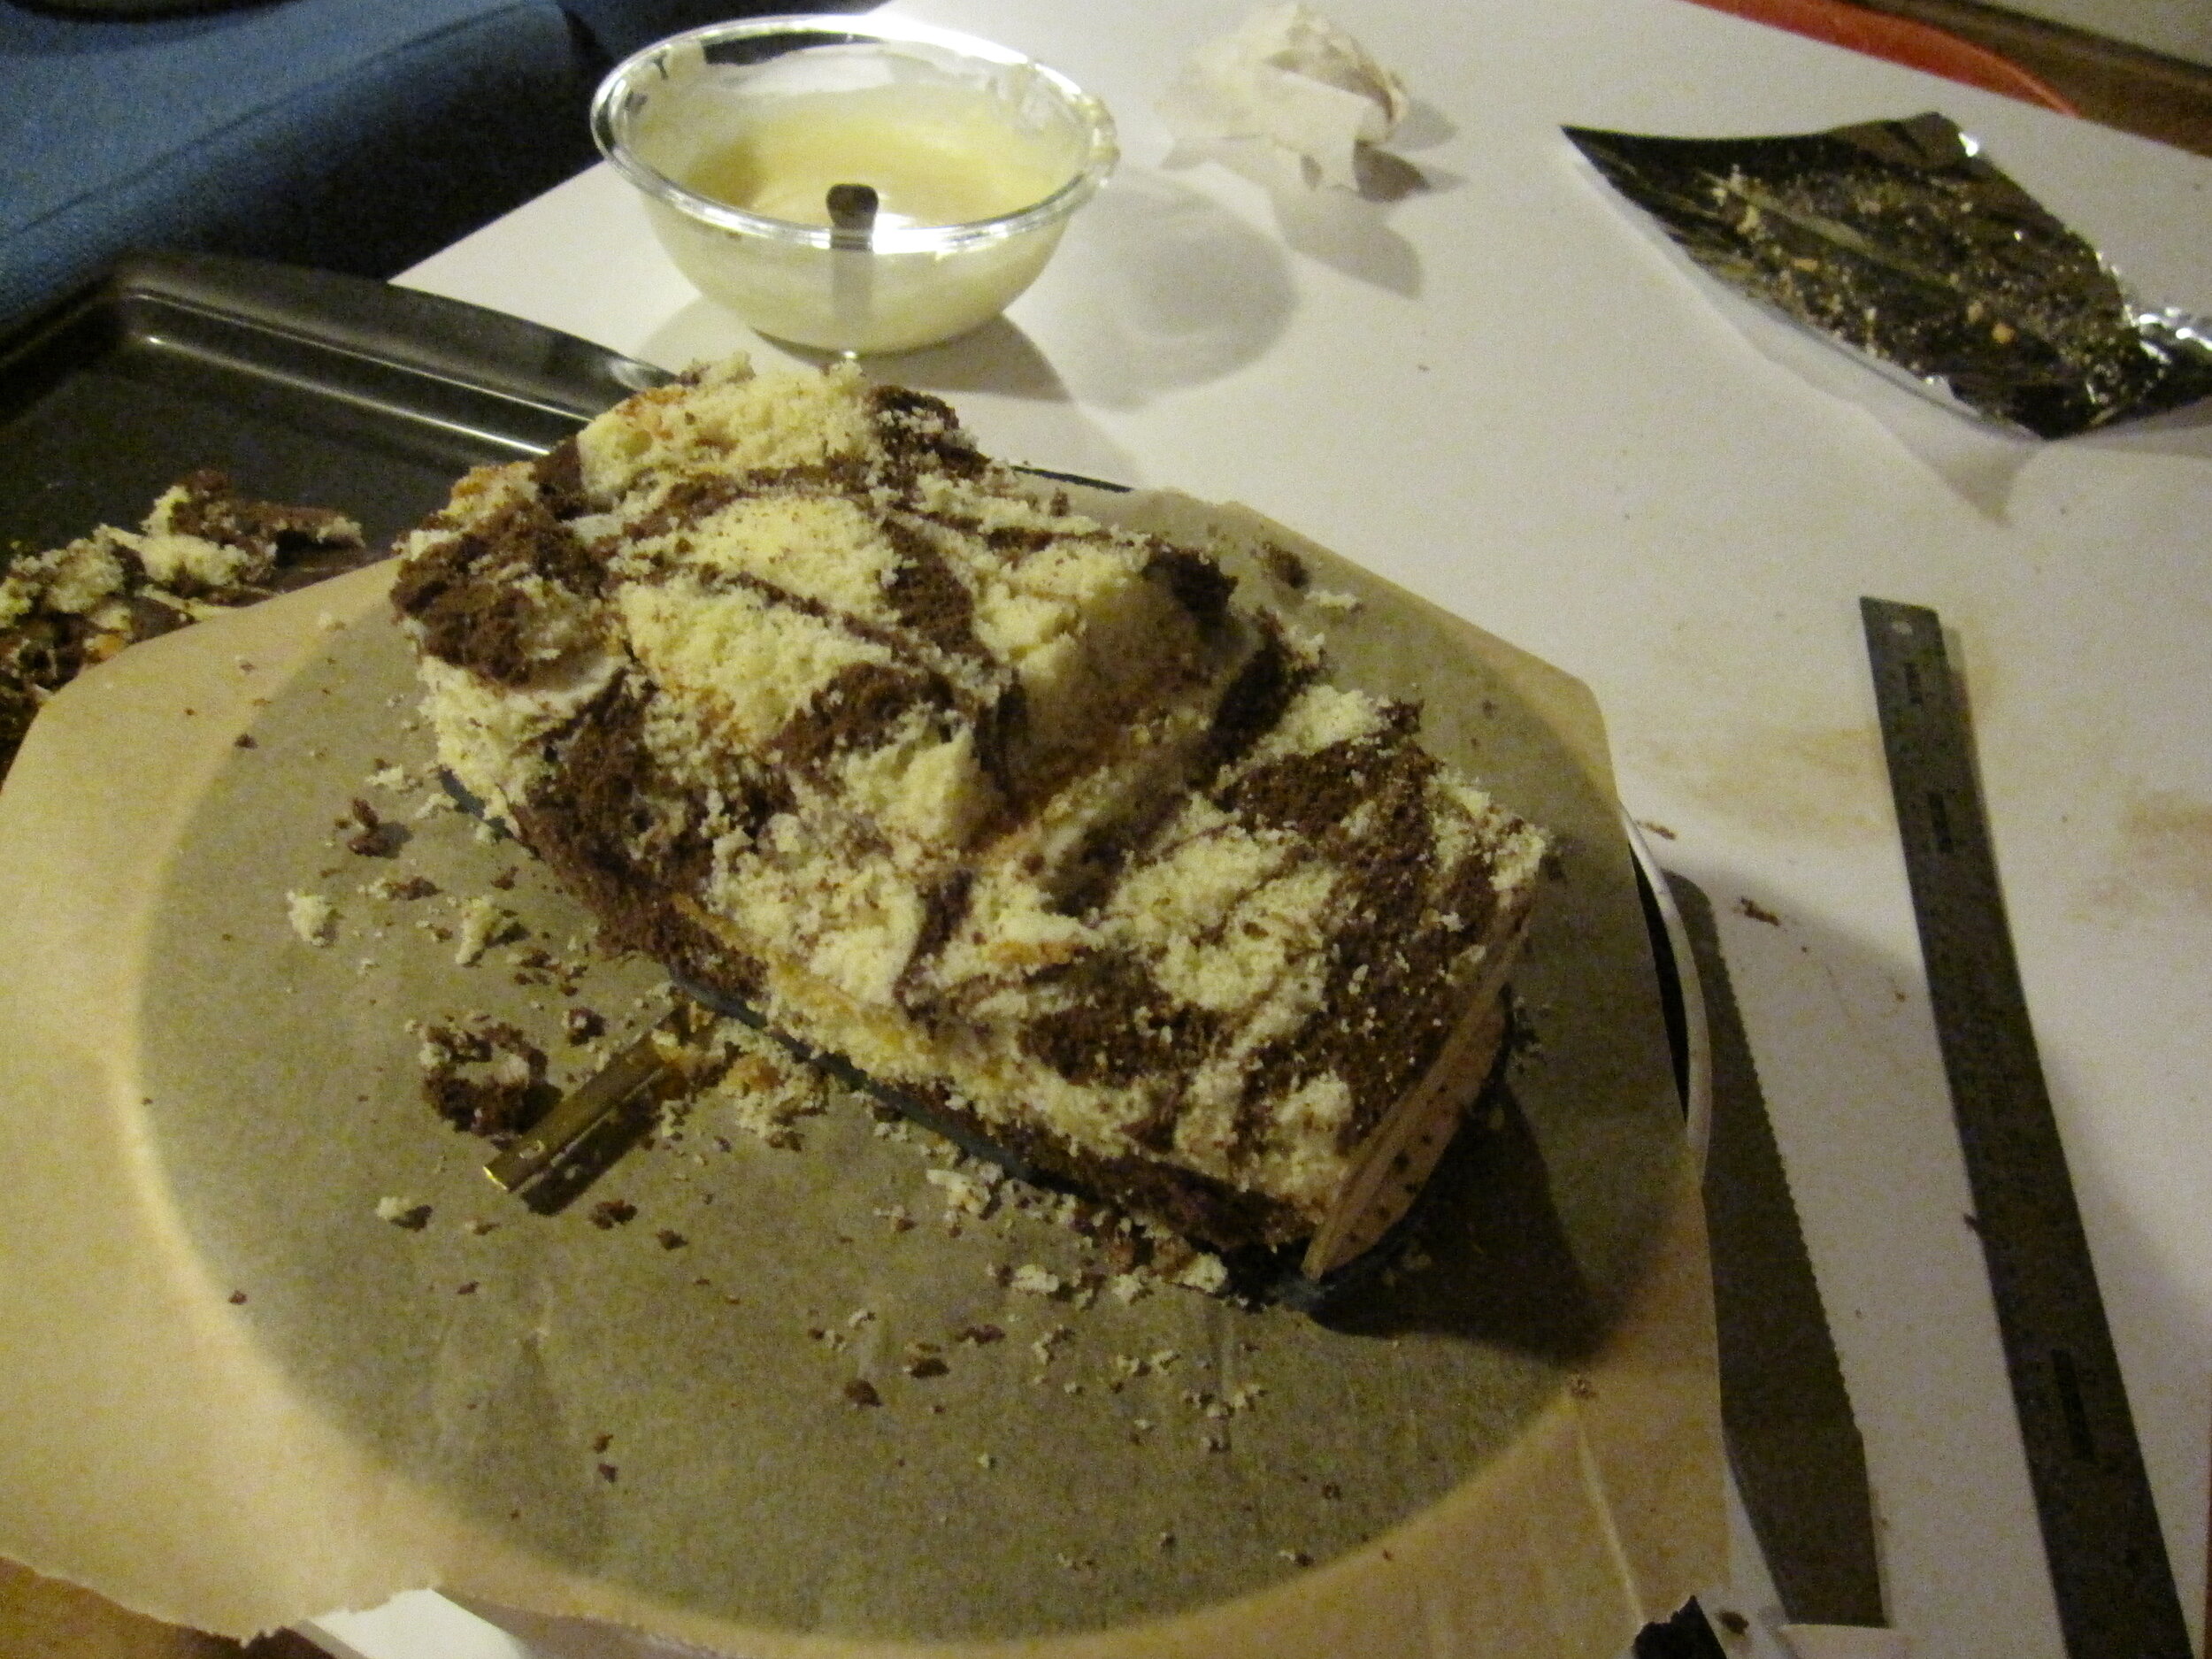
With the advance work done, it was time to make the cake. I tried a new marble cake recipe because Max’s mother told me that she likes marble cake. I think it was a tasty recipe, but, oddly, it was a little more challenging than a monochromatic cake to carve. The two colors made the shape of the cake a little harder to perceive as I was working on it.
The little birthday cake was pretty easy, even though I actually don’t do very many simple stacked cakes because they don’t generally interest me. I did a simple buttercream icing on it, and textured it a bit with a spatula. I was striving for that fine line between making the cake look like Lightning and Mater didn’t have much experience making cakes and making the cake look like I didn’t have much experience making cakes. I think I walked the line relatively successfully.
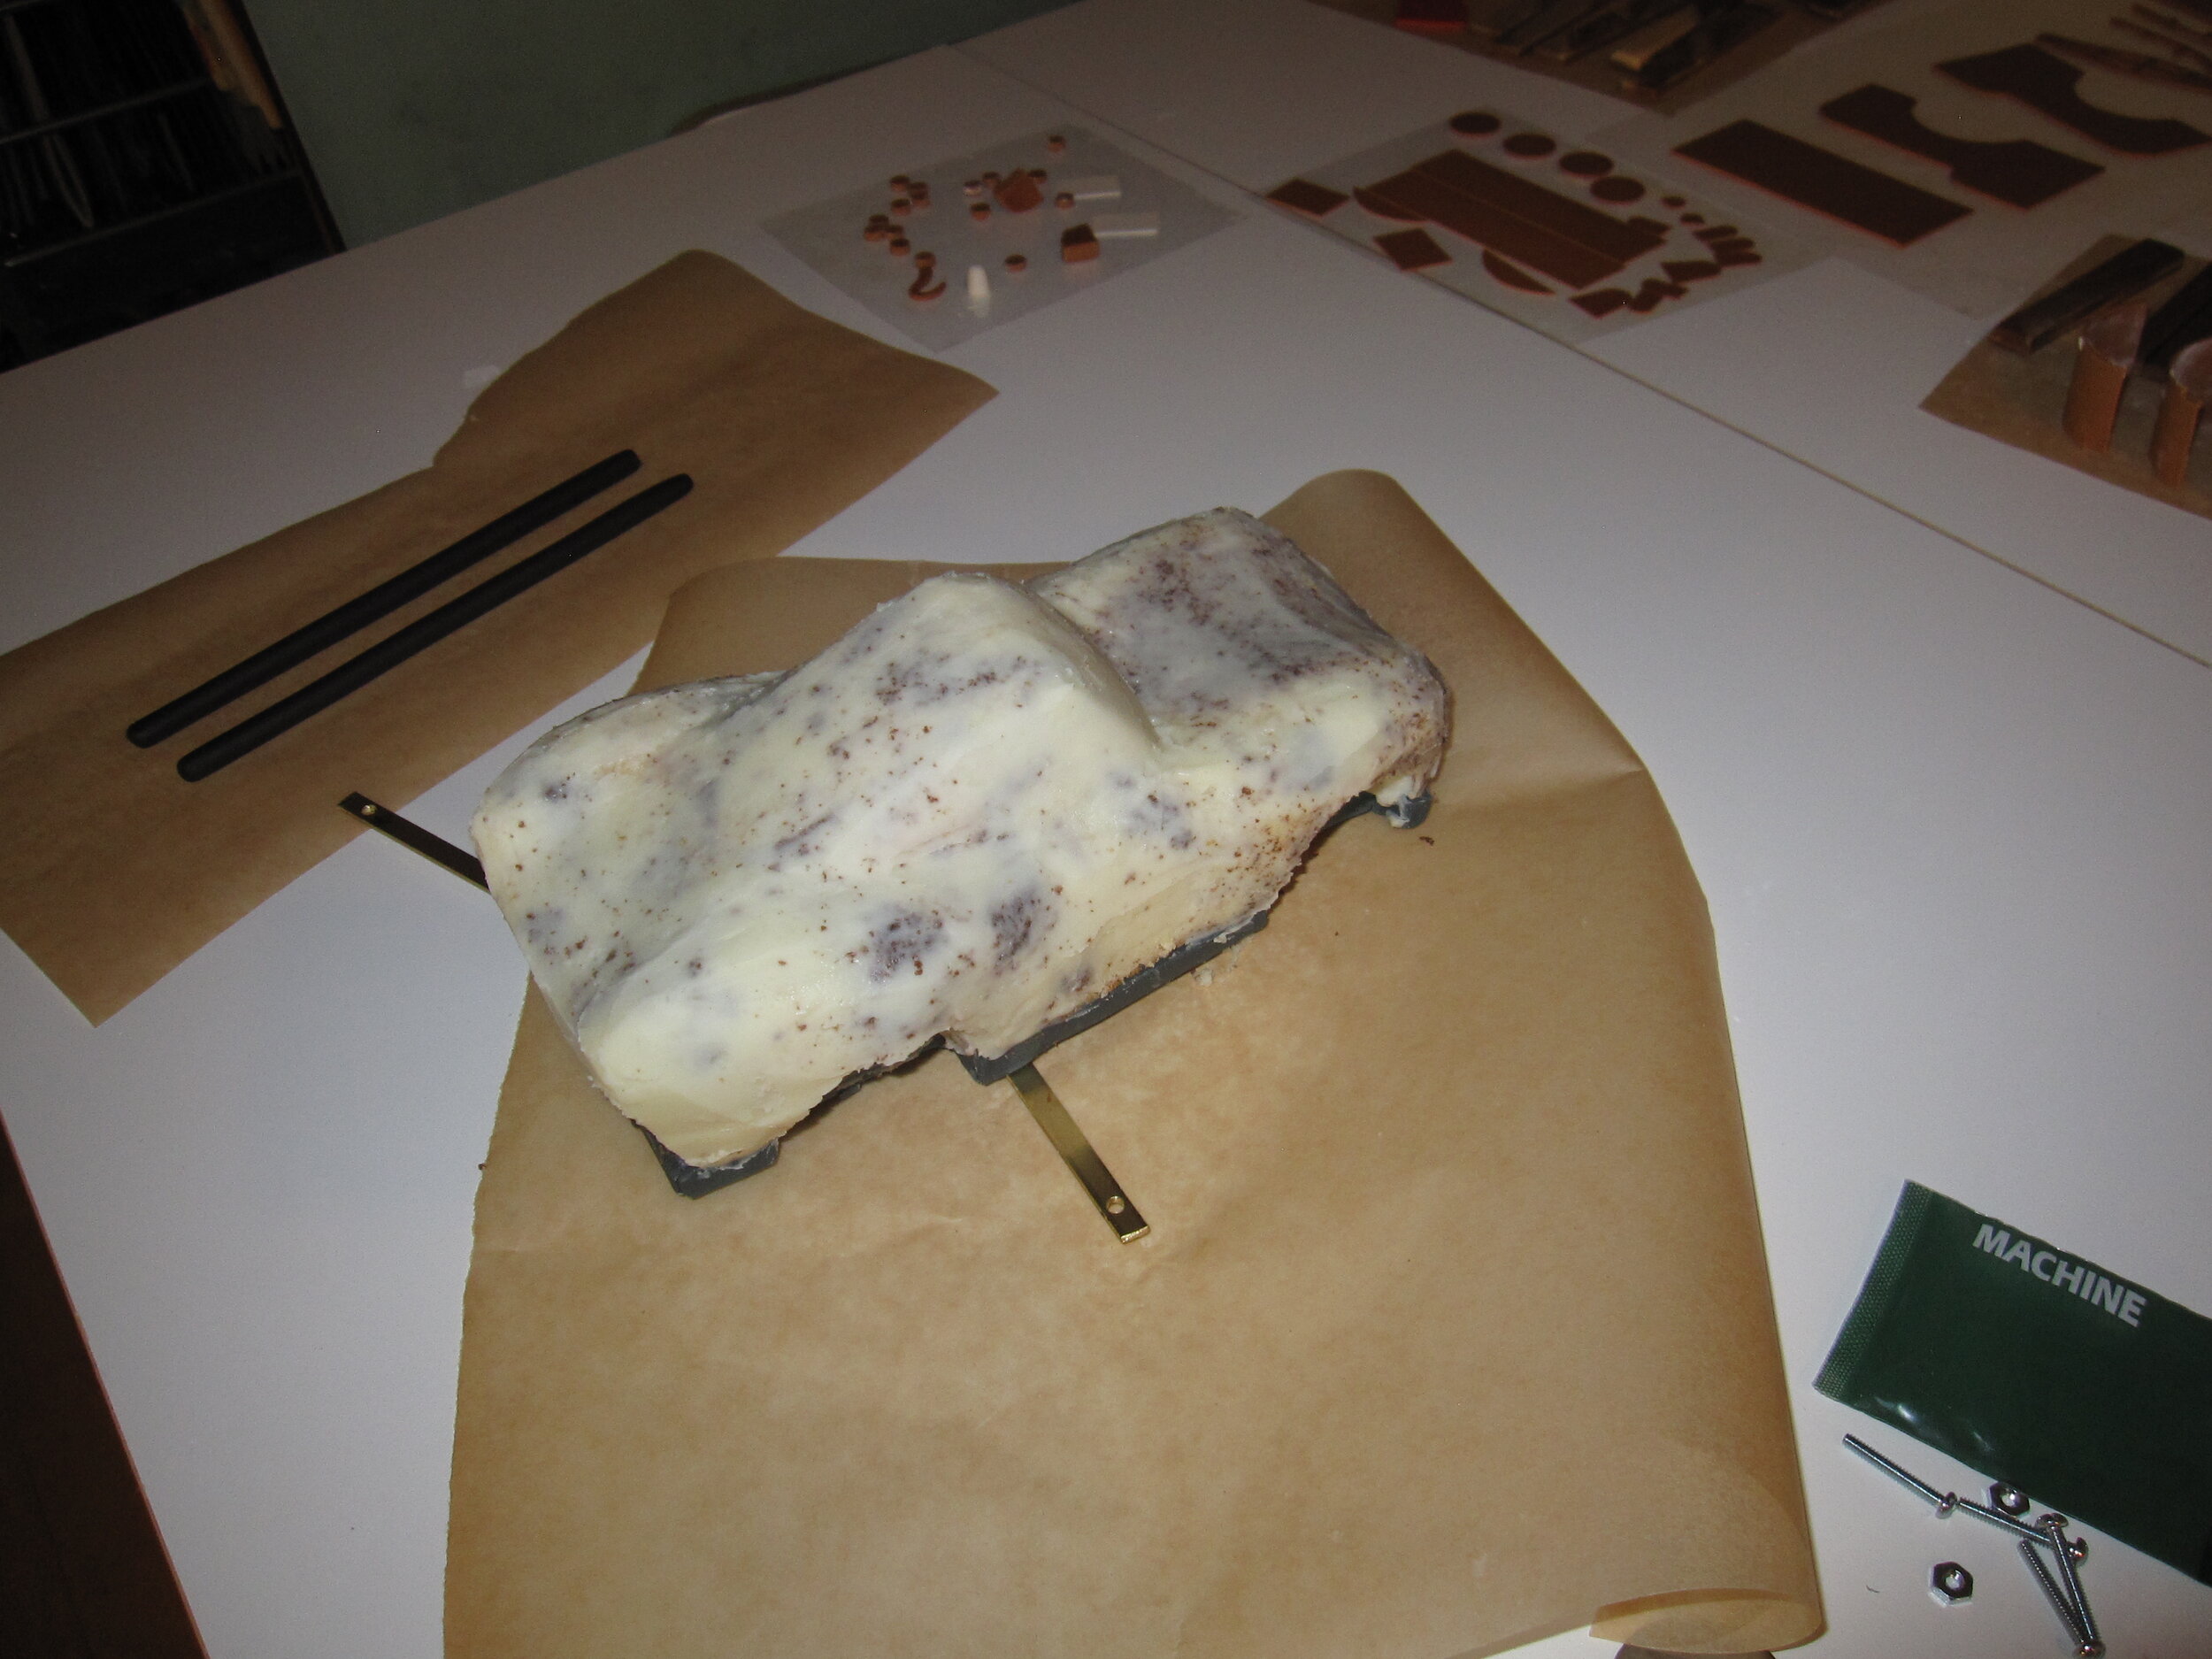
Carving Mater and Lightning went well, again using toys as helpful models. After a quick crumb coat, I was ready to cover them with fondant. Then the challenge was to get all the details on, since both Lightning and Mater have very specific paint jobs. (For those Cars aficionados out there, I went with the original Cars Mater and Lightning, as opposed to the Cars 2 Mater and Lightning, having ascertained that Max hadn’t yet seen Car 2 yet.)

Mater, of course, is so rusty that you start with the brown and then add the patches of blue and green paint on top. I assembled his bed and tow hook with royal icing, which took a bit of time, but it wound up sturdier than I was afraid it might be, which is good since I had to take the cake on a two hour drive to get to the party. I applied white gum paste for the eyes / windshield and blue-grey gum paste for the side windows and then added some extra brown gum paste trim.
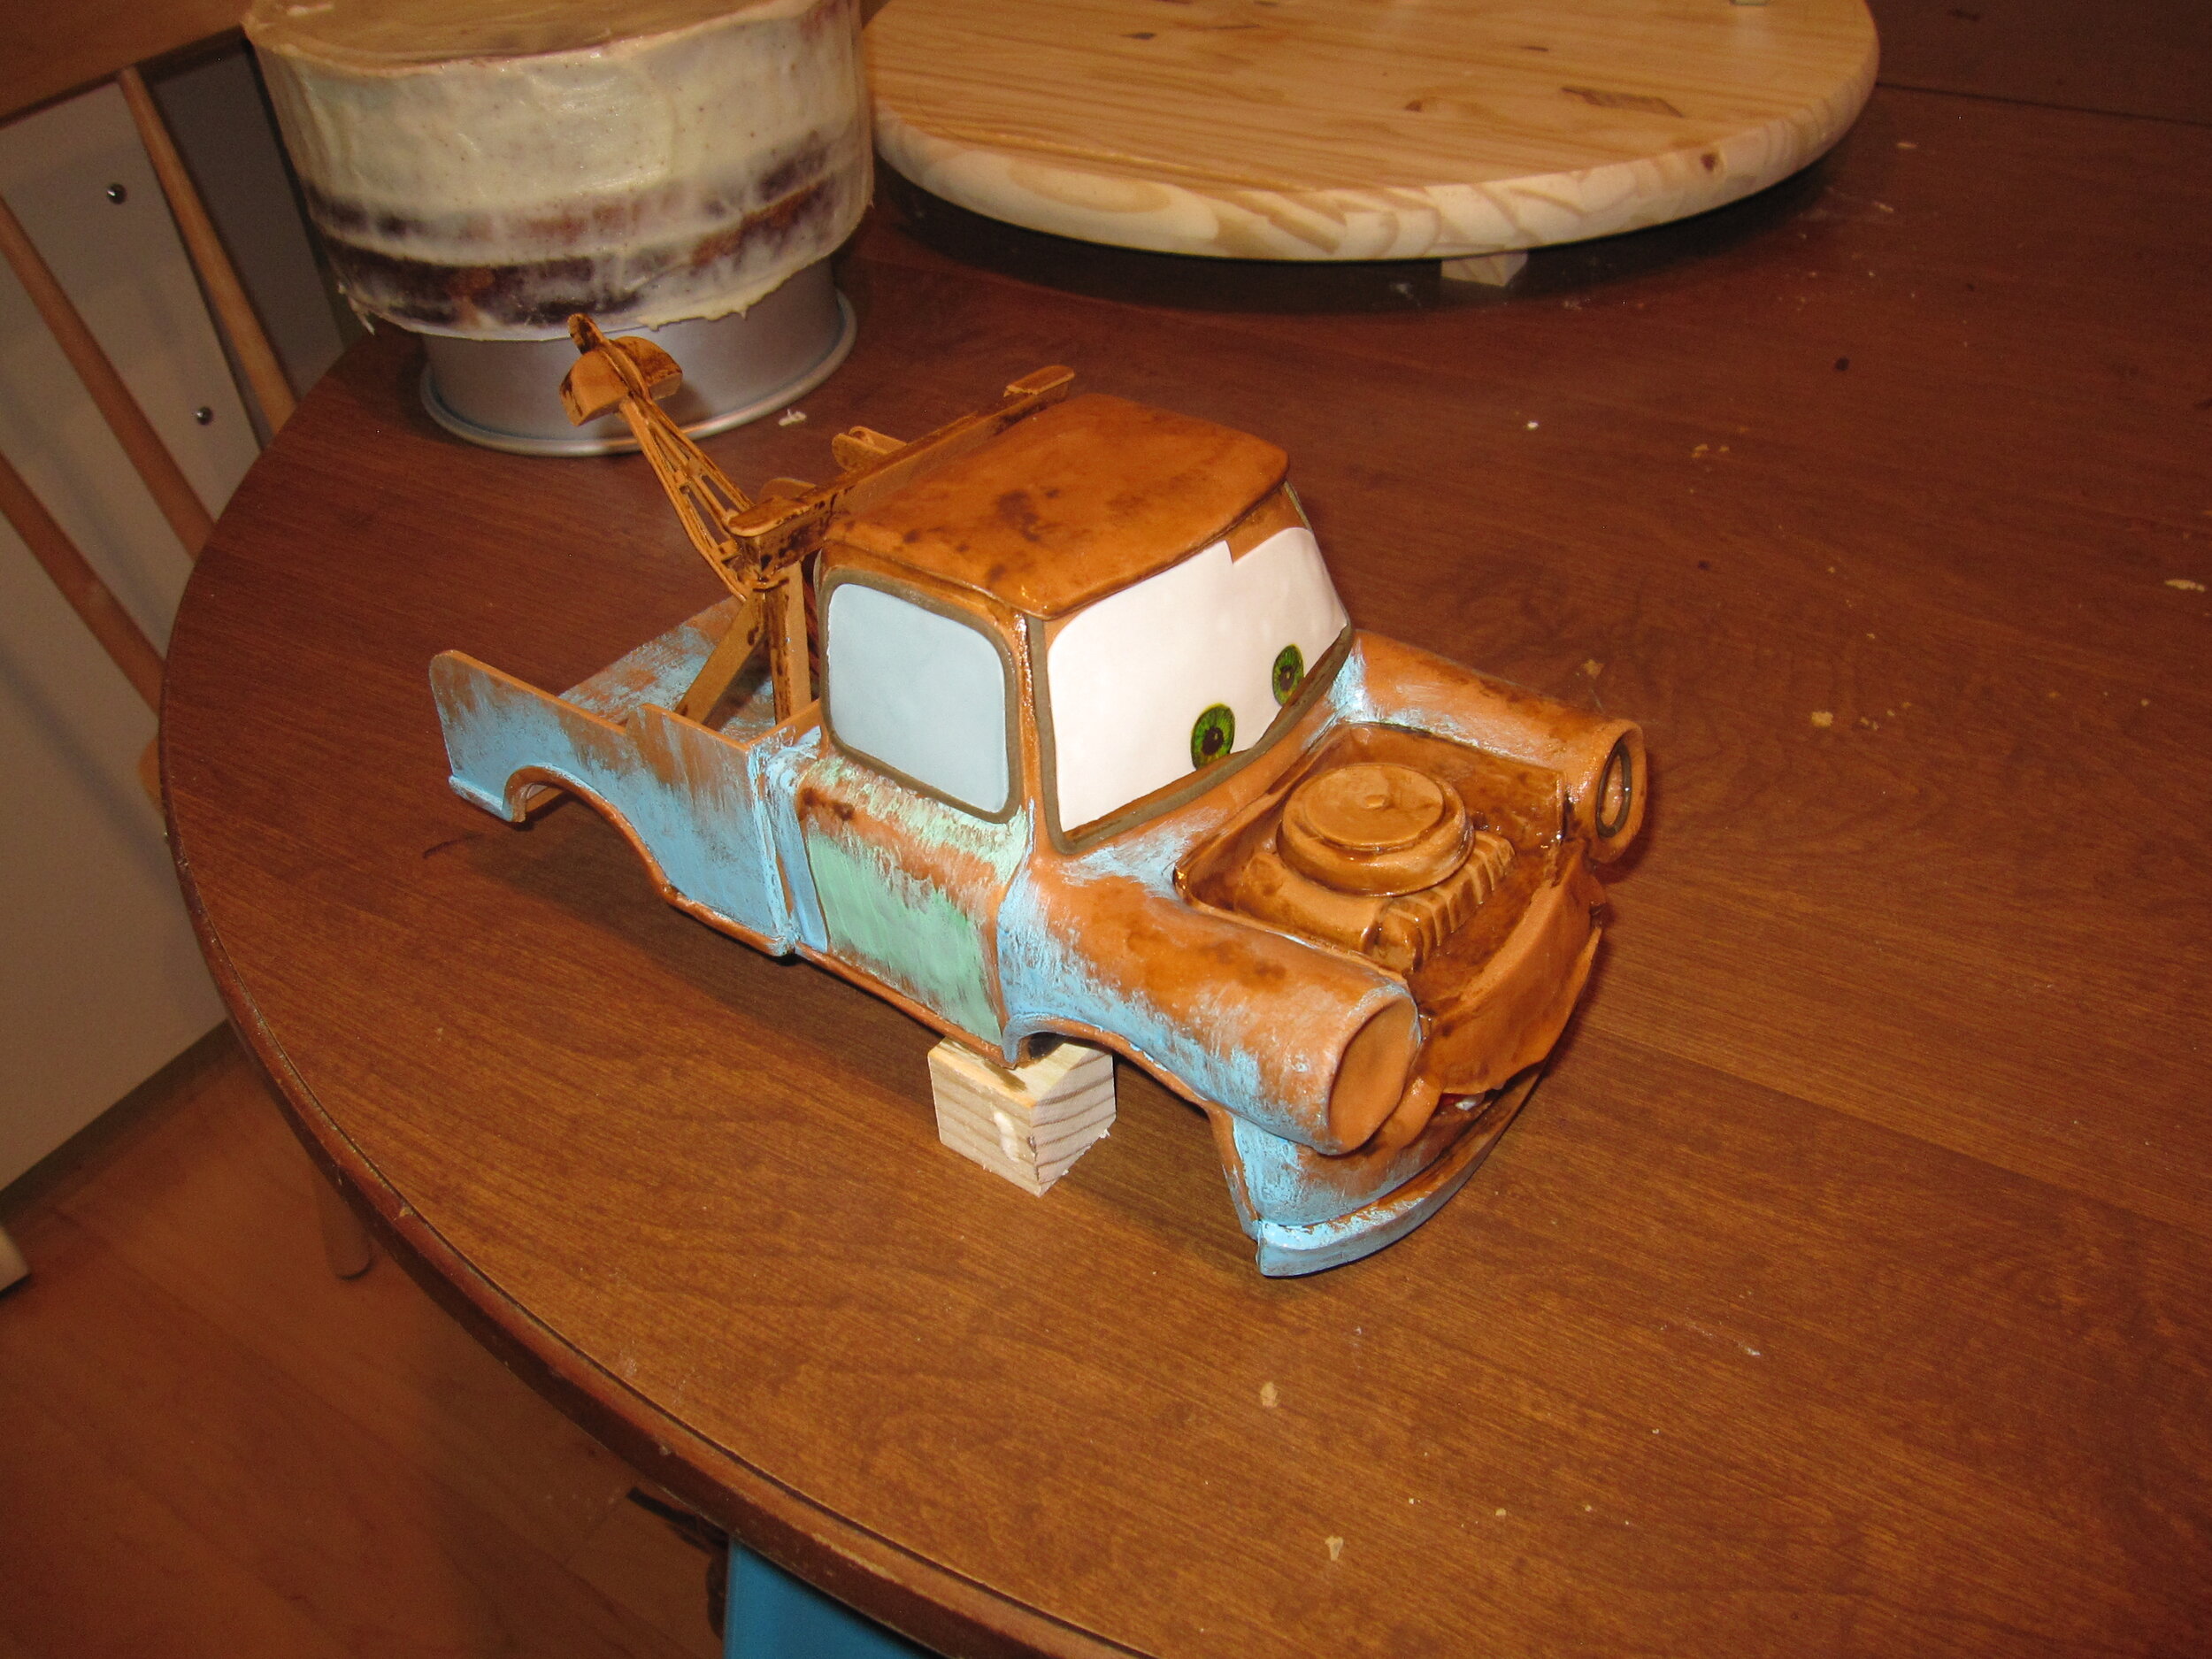
To paint the blue and green, I used white food coloring mixed with paste colors. The nice thing about this was that when I then went in with more white to write the text on Mater’s doors, it created a little dark shadow around the letters, where the green paint pulled very slightly away from the brown fondant underneath. This helped highlight the text really nicely. Then I went in with some darker brown to make the rusty parts more interesting before adding the final details like the lights on his head and his one headlight. The most important touches were, of course, his big white gum paste buckteeth, which, looking at them now, I think I made a little too small.
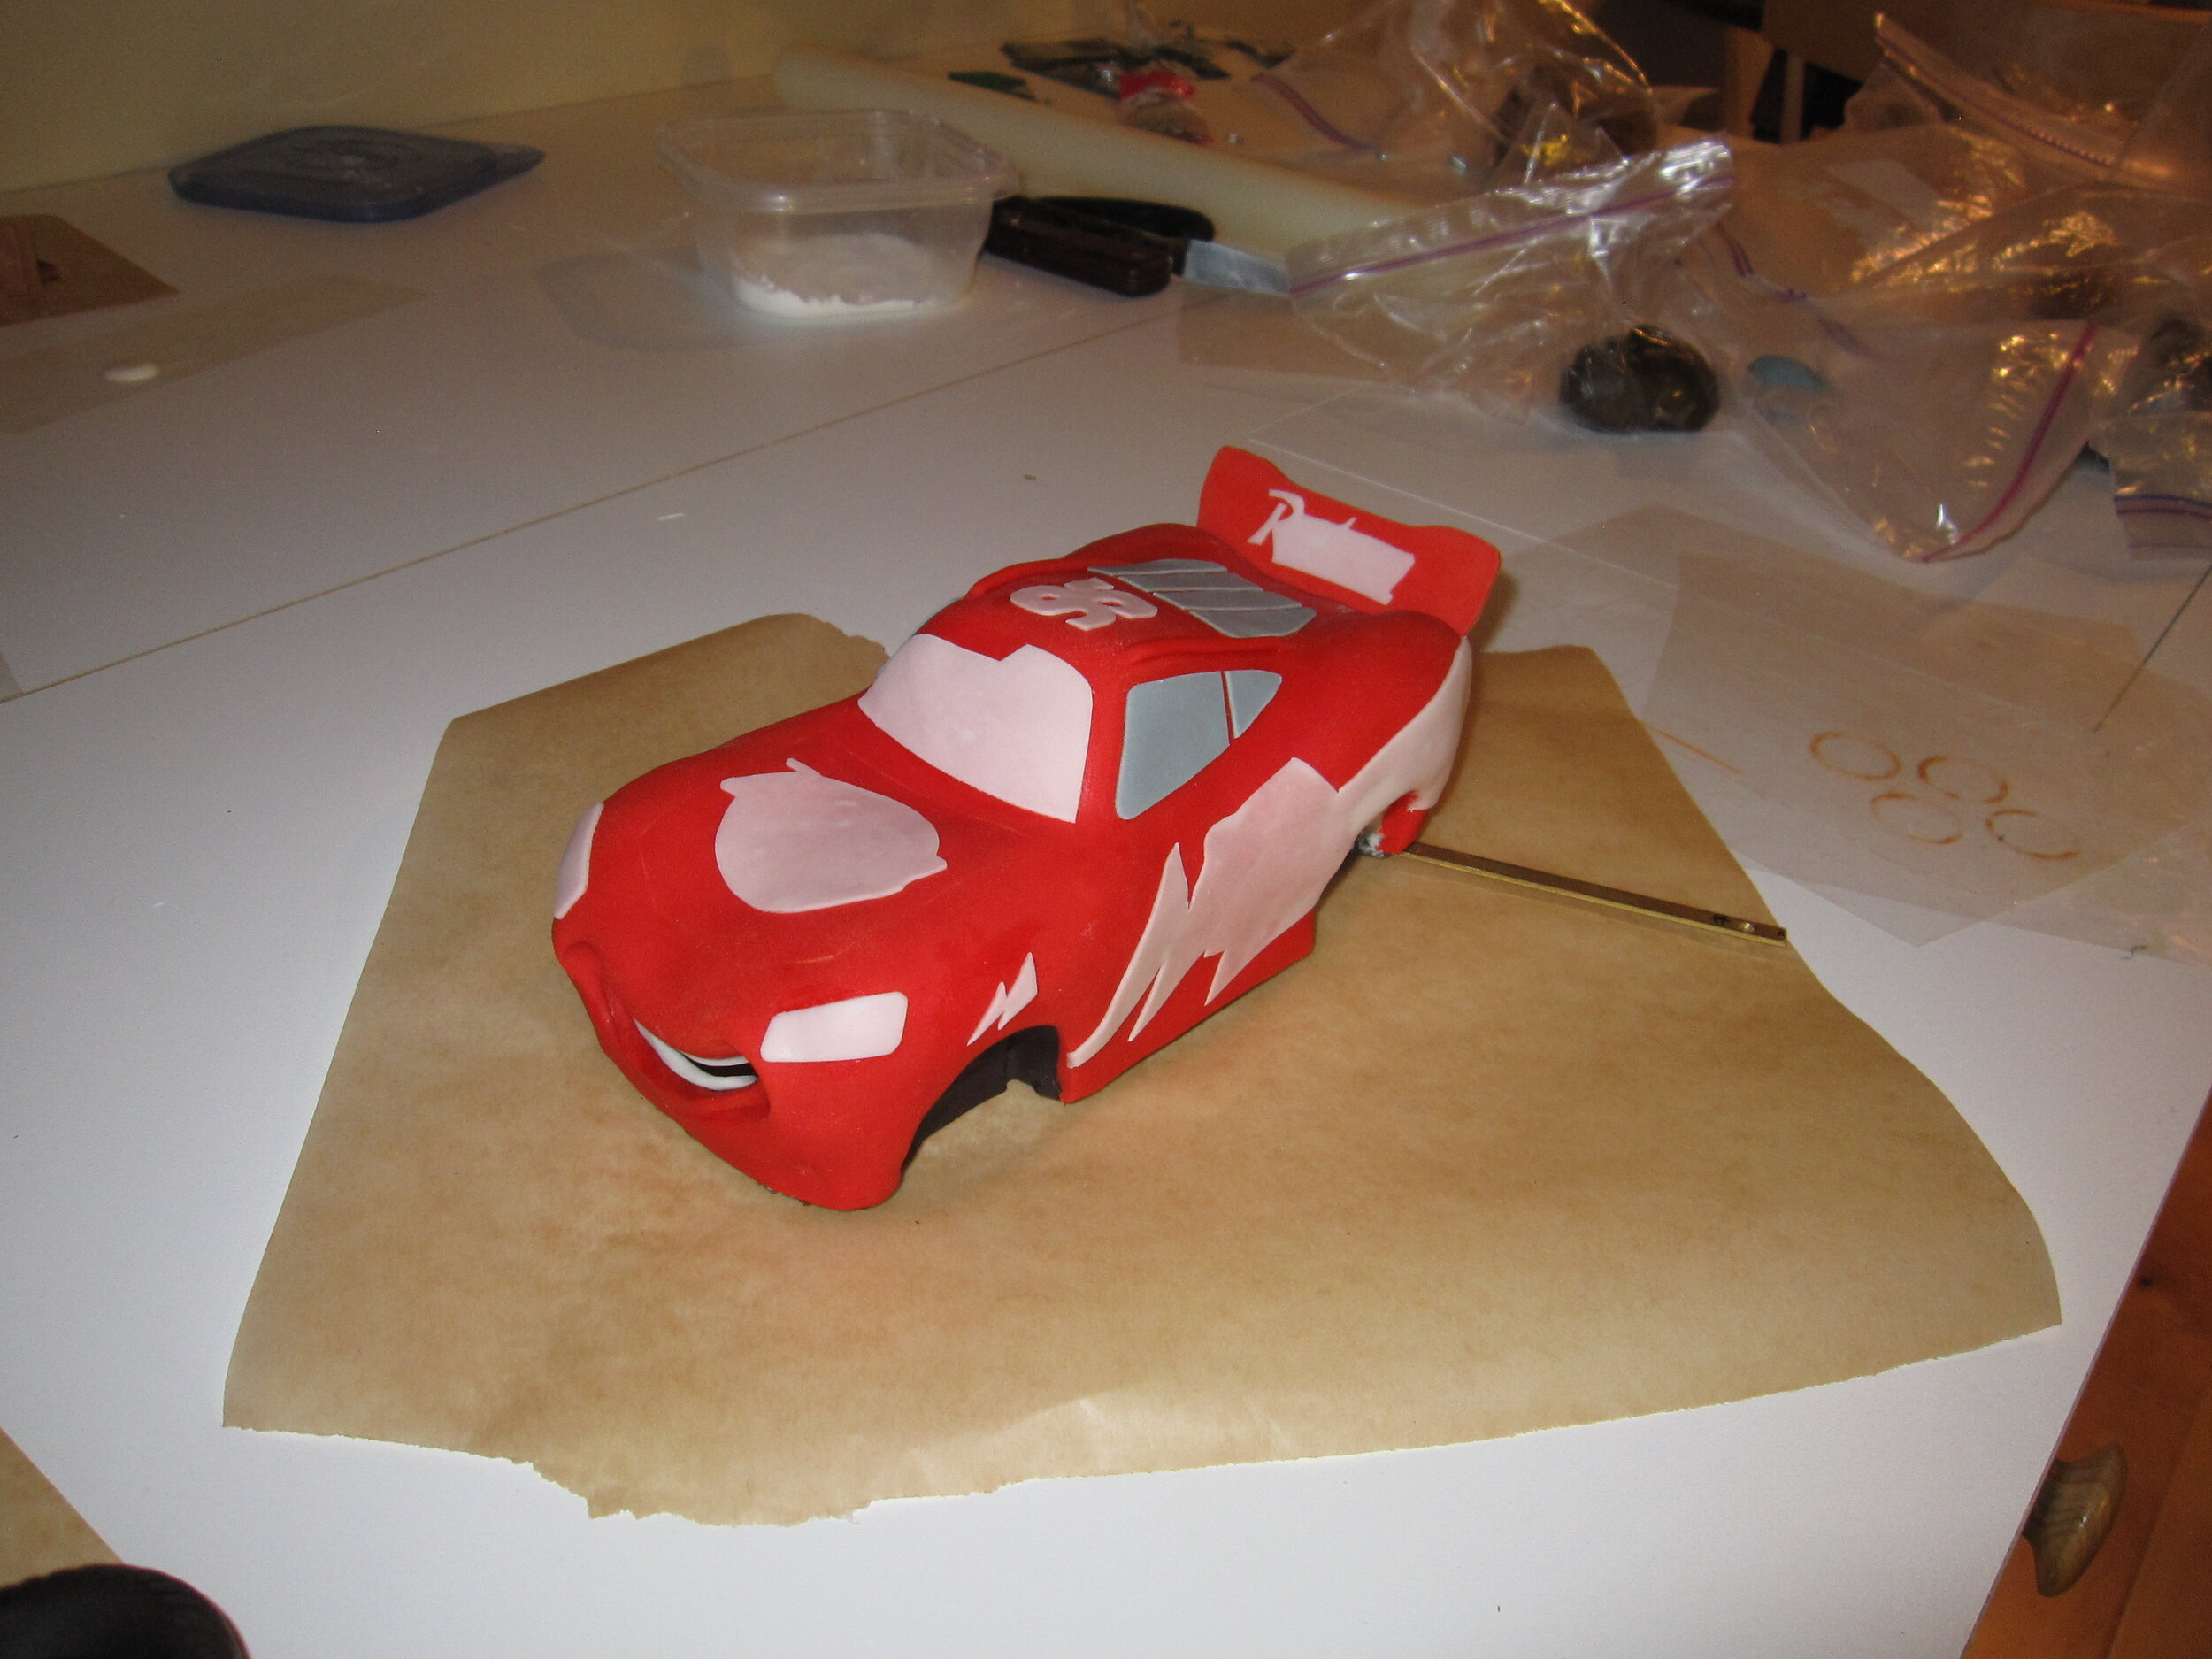
For Lightning, I made templates for all of the decals, and then cut them out of white gum paste and applied them.
I think I did a decent job painting in all the colors, though I wasn’t entirely happy with the Rust-eze sign on his nose, since the brushstrokes were still fairly evident. This is probably the sort of project where the ability to print edible images would really come in handy.
At this point, I made my attempt to hang Lightning. At first, this seemed to go fairly well. The poles were strong enough to hold him up and he seemed fairly stable. Unfortunately, after hanging there for a little while, he began to separate from his base and fall forwards. Fortunately, I noticed this and was able to catch Lightning before he did an actual header down from his perch. At this point, I decided it would be a lot smarter of me to take him down and put him on the ground – although I do maintain that, given another chance, I could have made this work.
With all three cakes – Mater, Lightning, and the birthday cake – in place on the base, it was time for final touches. The fist-bumping tires read well, I thought. I used piping gel colored black to write “Happy Birthday Max” on top of the cake, as well as to glob big oil drips all over the cake. I also added oil tracks crisscrossing the board, as if Lightning and Mater had tracked it around while setting up for the party.
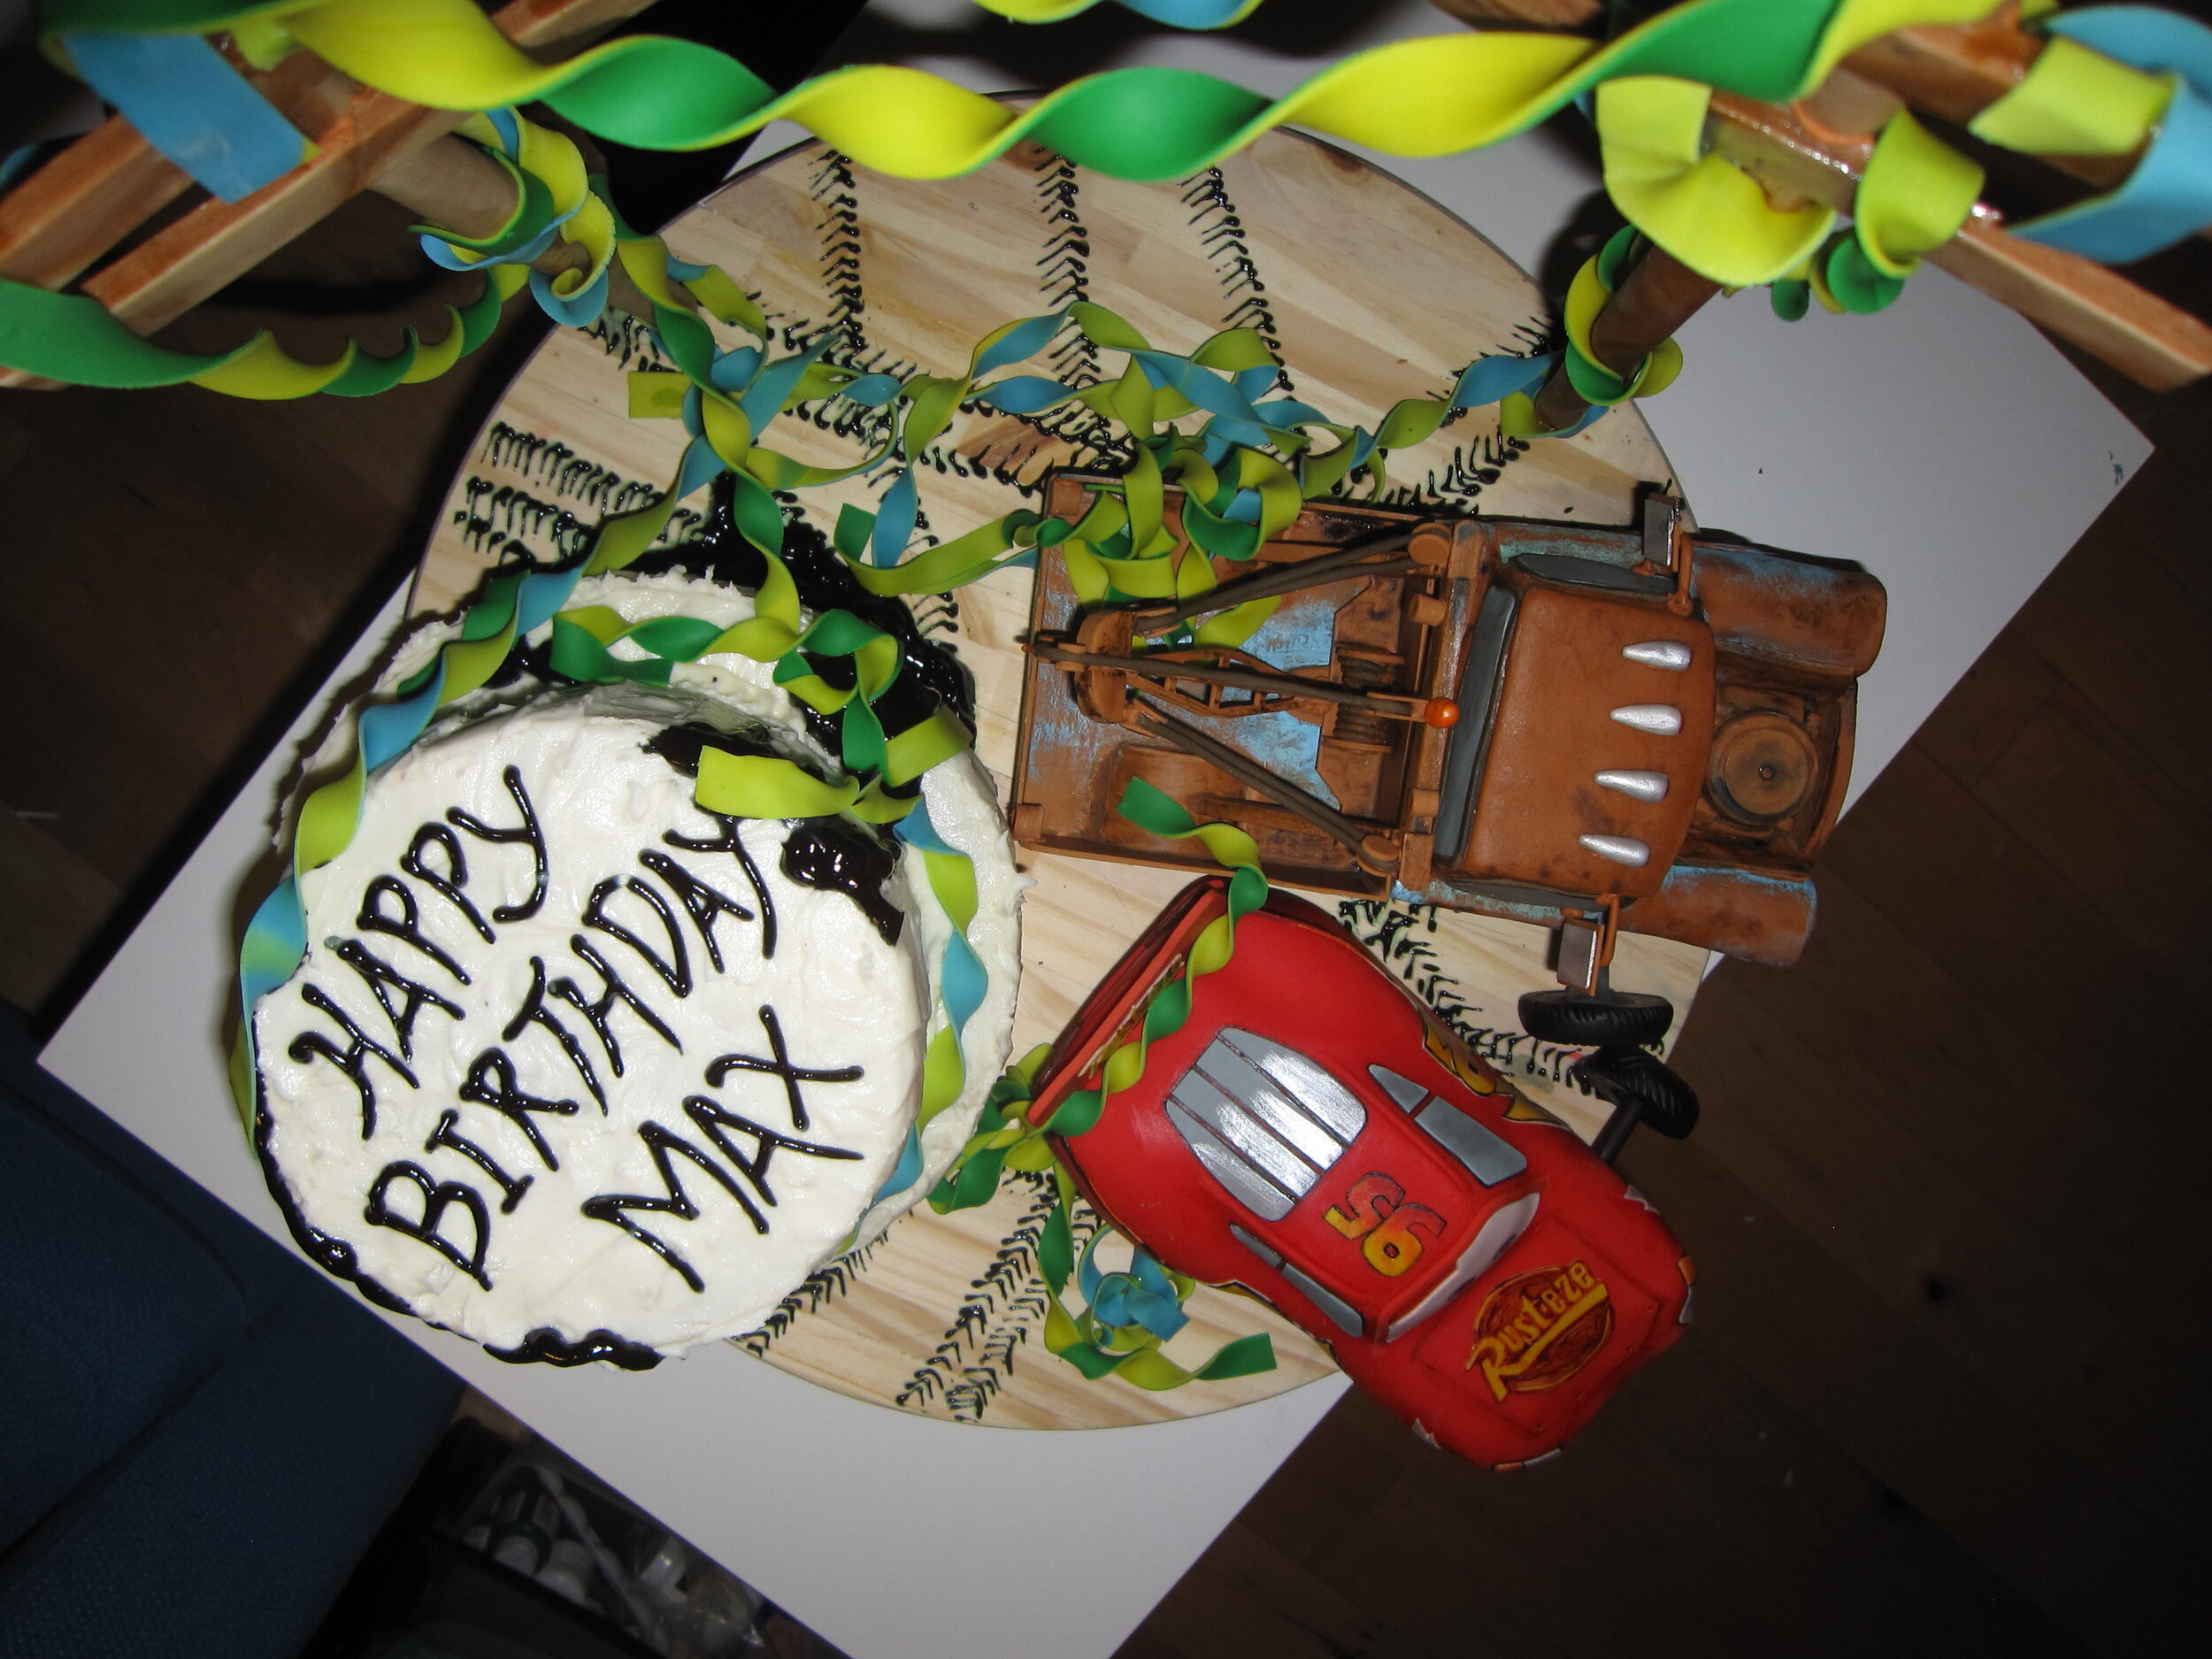
The very last touch was the addition of the streamers. To give them the look of two colors of streamer wound together, I rolled out two very thin pieces of gum paste and them stuck them one on top of the other and rolled them once to stick them together before cutting them to width.

I am sad that I didn’t manage to get Lightning to hang from the telephone poles, because I think that would have been super cool. But Max (and everyone else at the party) seemed to really like the cake. Like all children (at least in my experience), Max for some reason especially enjoyed the fondant tires.

Sneetch Cake
I have been looking forward to seeing my niece and nephew perform in school plays since before they were born. Finally, my dream has come true. At her pre-K graduation, my niece Alex appeared in their stage adaptation of Dr. Suess’s The Sneetches. To celebrate her accomplishment, I decided to make her a Sneetch cake.
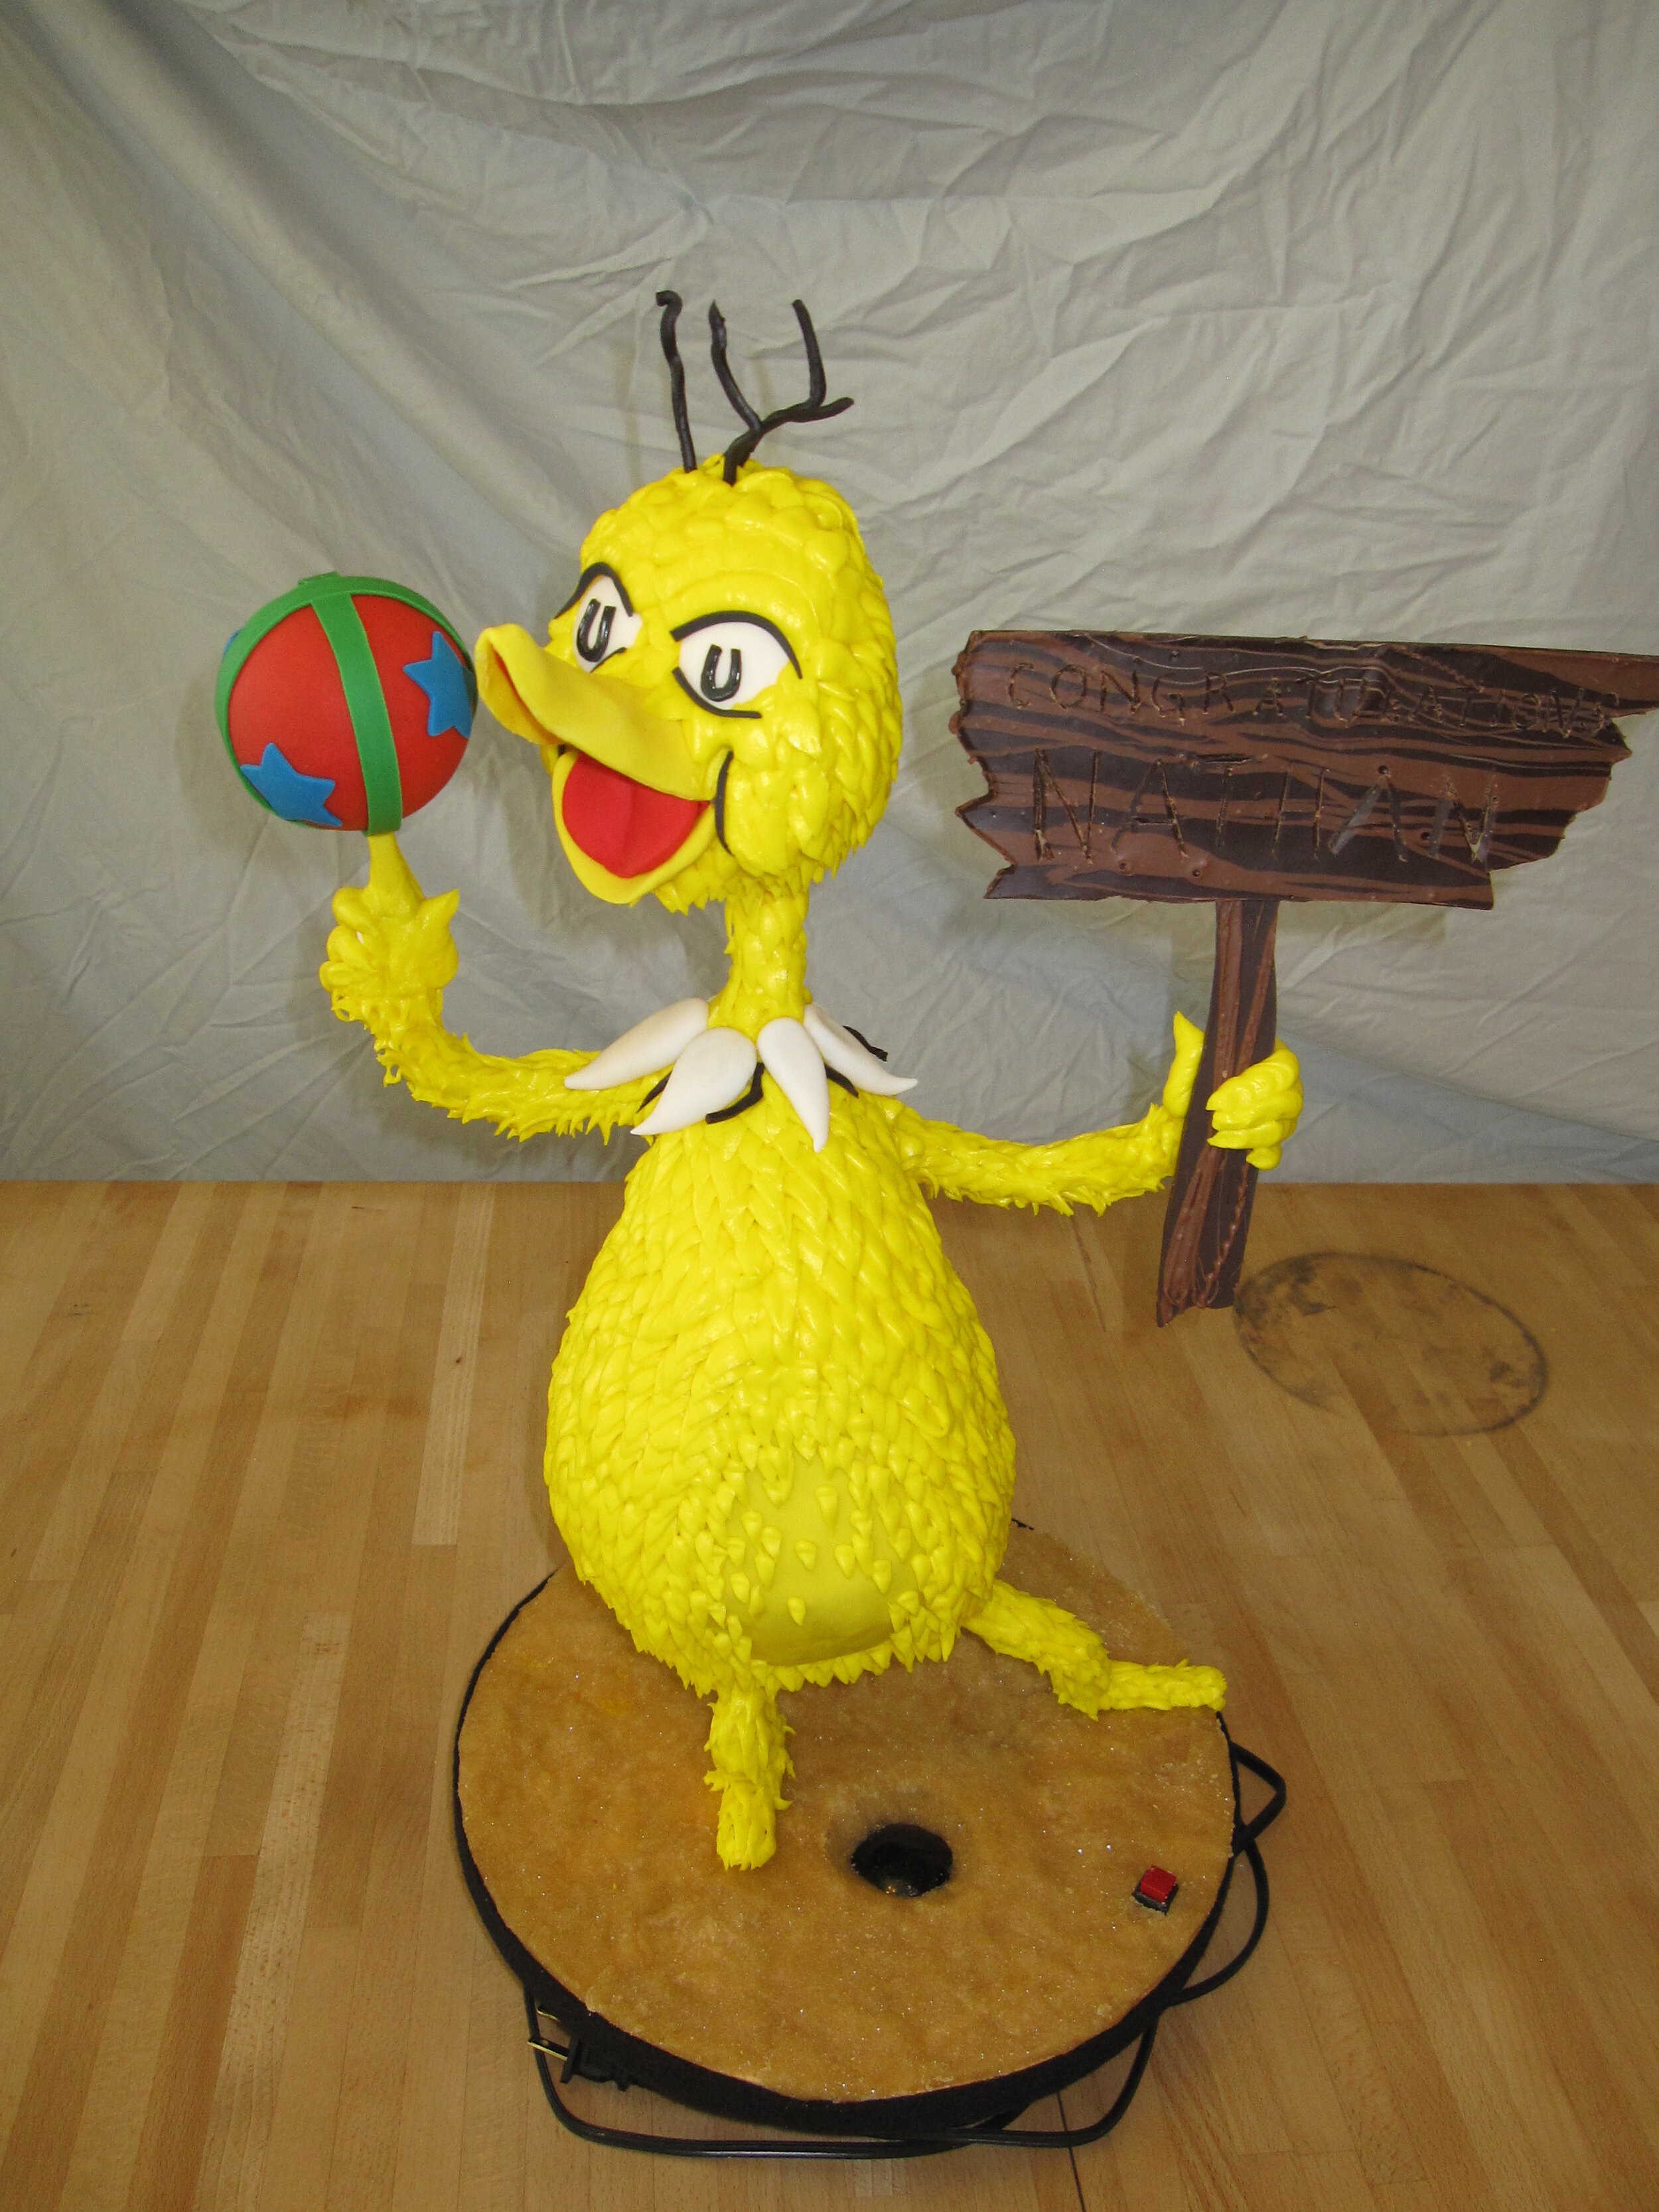
I have been looking forward to seeing my niece and nephew perform in school plays since before they were born. Finally, my dream has come true. At her pre-K graduation, my niece Alex appeared in their stage adaptation of Dr. Suess’s The Sneetches. My completely and totally unbiased expert opinion is that Alex was clearly the best Sneetch in the bunch. To celebrate her accomplishment, I decided to make her a Sneetch cake.
It would have been fairly easy to make a Sneetch sitting down, so of course I didn’t go that route. I wanted to make a standing up Sneetch because it would give me the opportunity to try one of the copper tubing armatures that I always see on Food Network Challenge and Ace of Cakes. I chose to attempt the pose of a proud newly-starred Sneetch thrusting out its belly. Ultimately, I'm not convinced that I fully achieved the balance and expression that I was looking for in the pose, so next time I'll have to take a little more care with the shape of the armature.
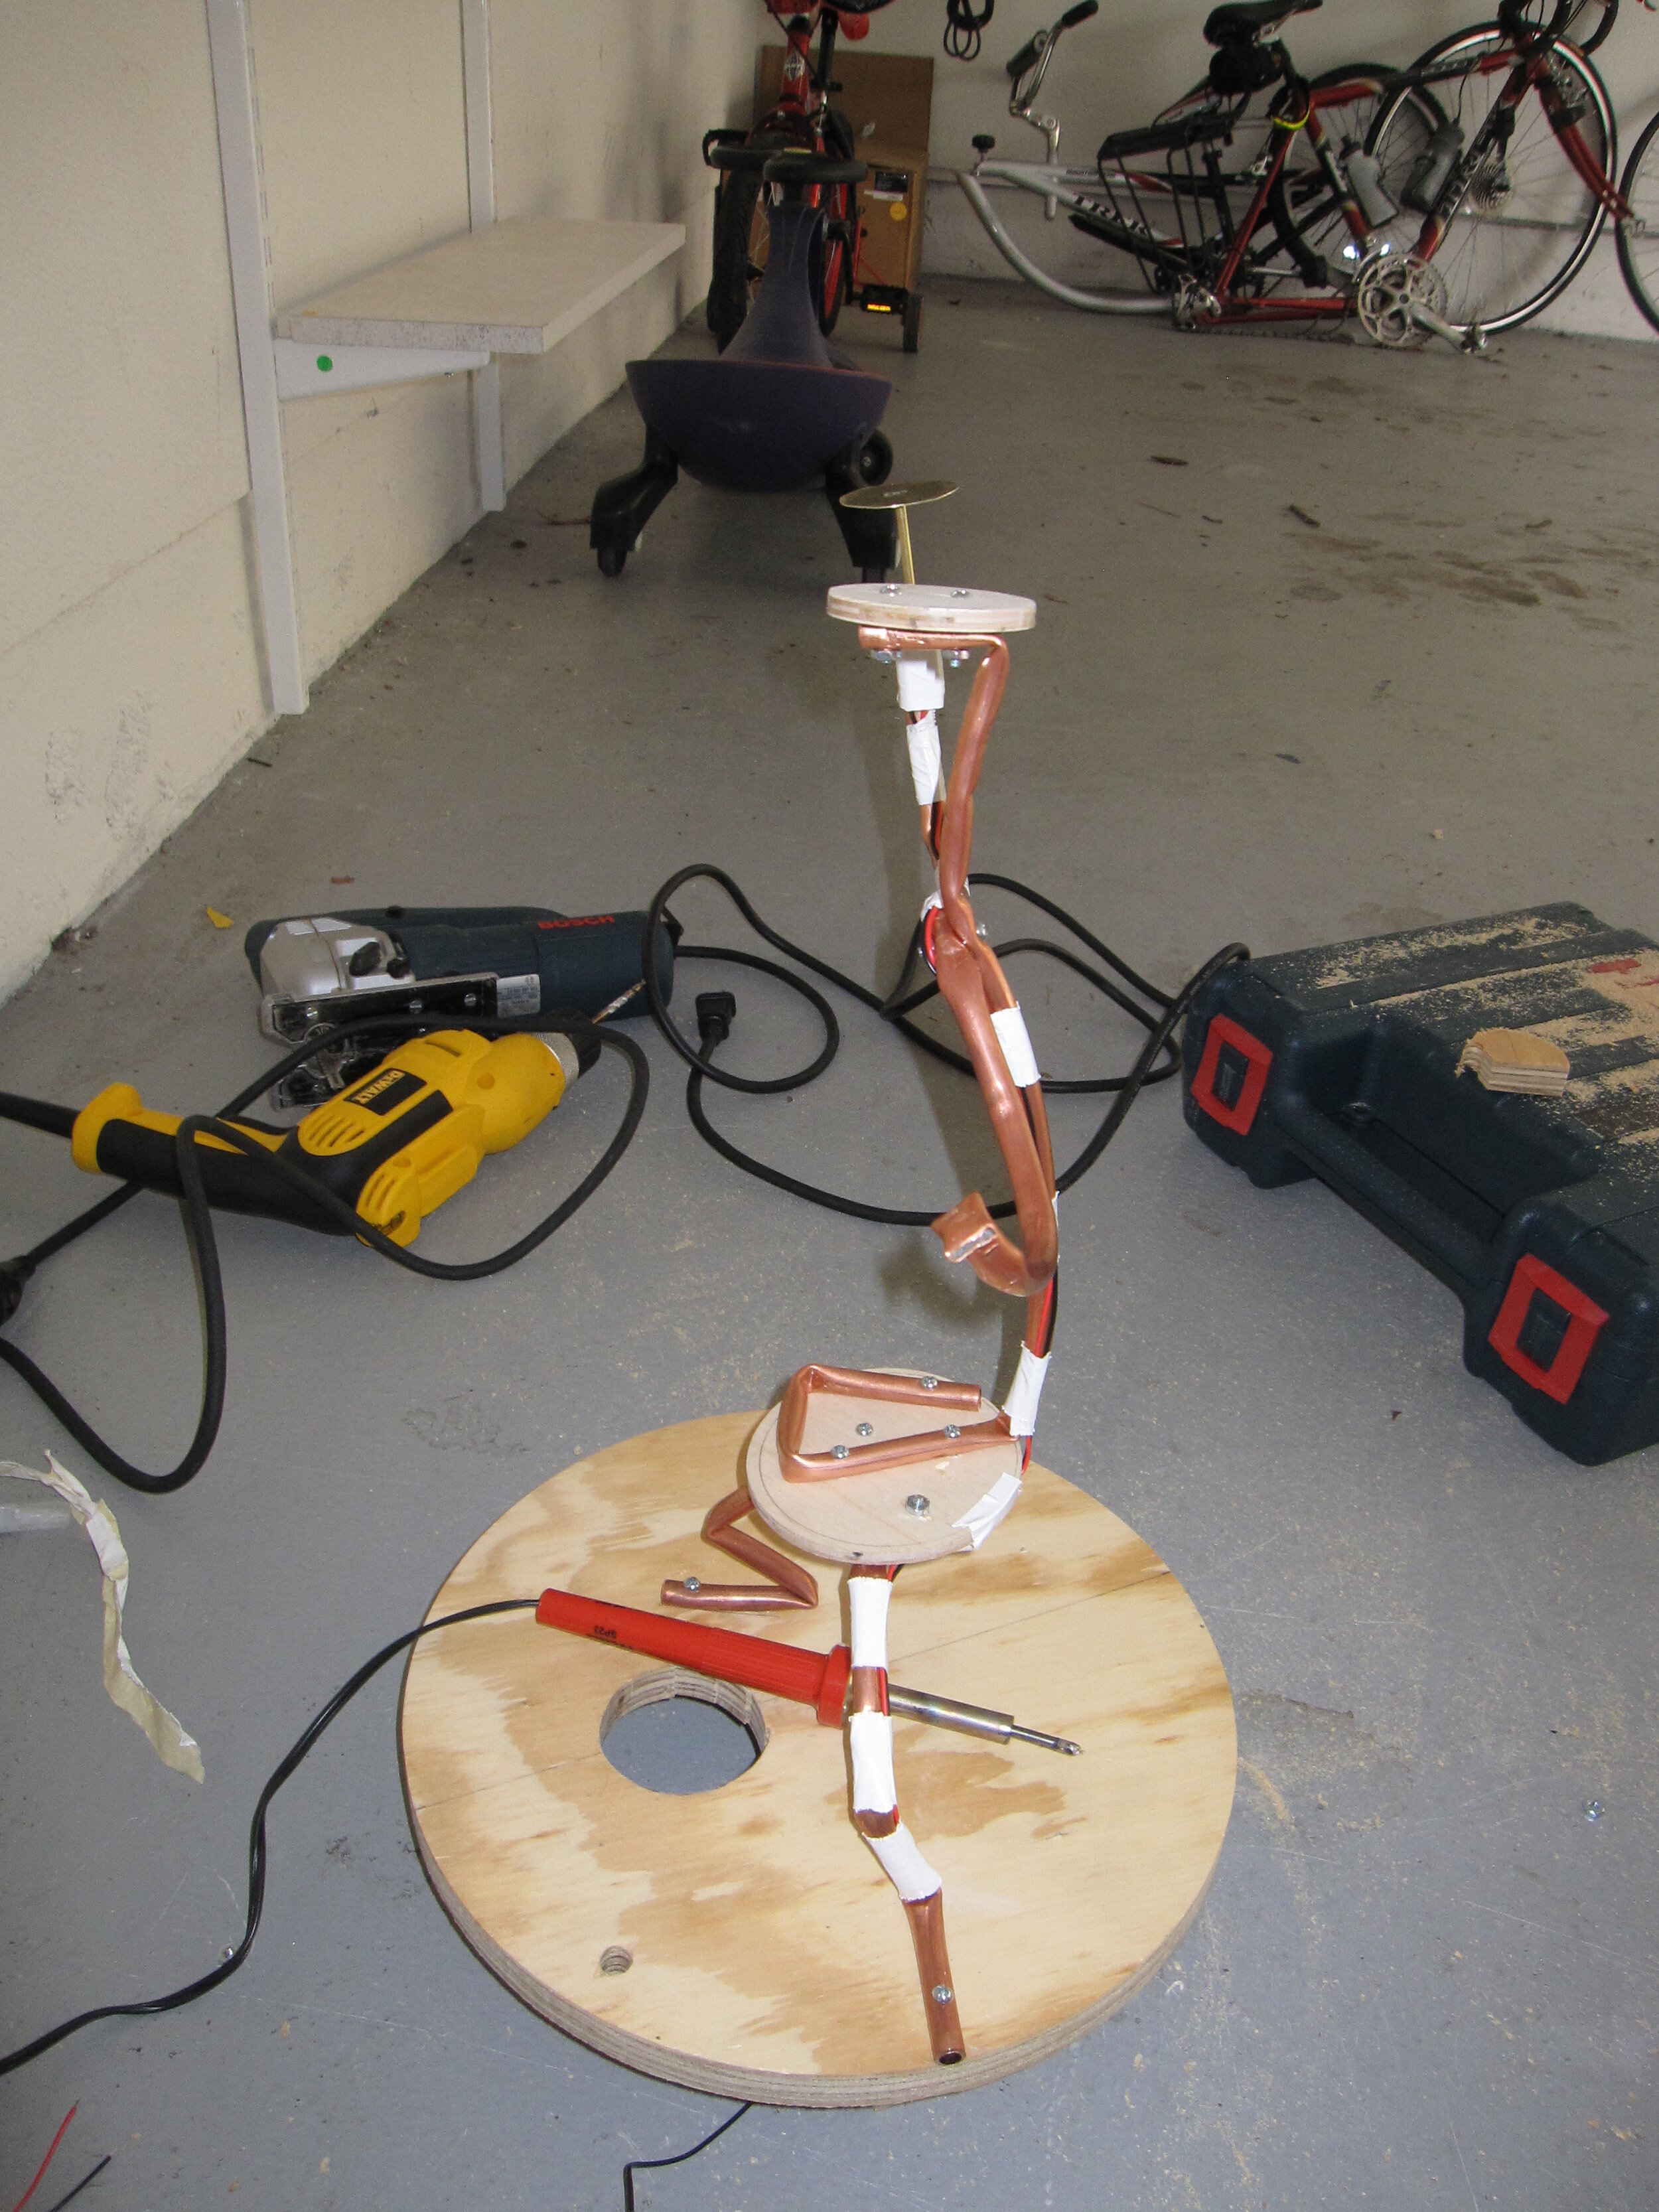
I’m not really sure if I made my armature according to industry best practices, but it seemed to work. I used 3/8” copper tubing, which was relatively easy to bend. I don’t think it would have supported a much larger cake, especially as the tight bends tend to get rather weak. I used ¼” plywood to make the circles to support the butt and the head and then I bolted the whole thing to a ¾” plywood circle for the base.
At this point, prior to the actual performance of The Sneetches, I knew nothing about the play except that Teacher Christine was playing the role of Sylvester McMonkey McBean and that it involved playing with a ball. So I decided to have my Sneetch twirling a ball on his finger. Alex and I have also been playing with a motor recently as part of a kit of science experiments related to light. The idea is that if you stick a circle of paper colored, for instance, half blue and half green onto the axle of the motor, when it spins the colors will blend together and you’ll see cyan. My thought was that if I made the ball red, blue, and green and got it to spin fast enough, then the colors would blend in the eye and look white – or at least yellowish grey.
To make this happen, I wired up a little hobby motor and soldered a circular brass platform to the top of it to hold up the cake ball. Because the cake ball was going to be pretty small, I just duct taped the motor to the top of the copper tubing arm.
The only gum paste pieces that I made in advance were the nose / beak (I’m not sure of the exact anatomy of a Sneetch), the eyes, and the ball, which I formed around a 3” diameter rubber ball.
The crux of anything Sneetch-related is, of course, the belly star, or lack thereof. My plan was to attempt to use a technique that I saw Mary Maher use on Last Cake Standing – glow-in-the-dark piping gel. By painting the star with club soda, which contains quinine, which fluoresces under blacklight, and implanting a blacklight in the base of the cake, I hoped to be able to make the belly star appear and disappear like in the story.
The first step in bringing this idea to life as to test the club soda. I tried a couple different ways of incorporating the club soda into piping gel, as well as just painting with the pure club soda. The most effective glow turned out to come from the star painted solely with the pure club soda, but overall it wasn’t really as impressive as I hoped that it would be. But I went ahead with it anyway, by cutting a hole in the cake’s plywood base and sticking my blacklight bulb in underneath. I frankly wasn’t confident that the effect would be anything to write home about, but it was the best I could do for a first try. I covered the base with brown pressed sugar to simulate the Sneetches’ beaches.
Because I was trying to keep the cake small, I started with just six 6” round cakes – 4 for body and two for the head with enough scrap left over for the ball. I torted and filled them using a white chocolate ganache because I wanted to make sure that the cake had the stability that you get from such a firm frosting.
After I carved the cake into the basic shape, I tried out another a new technique that I saw someone do on Food Network Challenge. I don’t remember who I saw doing this, but I think they called it “spackle.” Basically, you take the cut-off scraps of cake and stir it into some icing so that it makes a pretty thick paste. Then you can use the spackle to really smooth out the surface of the cake and fill in any gaps. I found that it worked perfectly to round out the curves of the head and the butt underneath the plywood bases and to fill in the seam where the body cake was notched out around the copper backbone.
For the fur / feathers (again, I’m not sure what kind of animals Sneetches actually are), I decided to used piped buttercream. I don’t generally use a lot of buttercream. I think I may be using a substandard recipe because I often have trouble with my buttercream breaking down. This time was no exception. My buttercream started out at the right consistency, but with the heat of my hand it rapidly got too liquidly in the piping bag. So I didn’t get the definition I was looking for in some of the Sneetch’s coat.
On the belly area, I used a gum paste panel instead of the buttercream so I would be able to paint on the club soda star. This gave me a little trouble in blending the belly into the rest of the body. I’m still not 100% happy with the result, because real Sneetches’ bellies aren’t discernibly different in texture from the rest of their bodies, but I think I did a tolerable job of keeping it from being too jarring.
The ball went together quite easily. I made the ball itself in two halves of red gum paste and then hid the seam with a green gum paste stripe. For the blue to complete my attempt at RGB color mixing I added blue stars. I fully expected Alex to criticize my color choice because in my carelessness I had reversed the colors of the ball as seen in the book. In the book, it’s a blue ball with red stars. Alex is normally a stickler for this kind of detail, but she must have really liked the cake because she actually didn’t even mention the ball colors. I also fully expected that my color mixing wouldn’t be fully successful because I didn’t have the food colors that I really needed. I didn’t have royal blue, so I had to use sky blue and I didn’t have emerald green, so I had to use kelly green.
At this point I also realized that I had constructed the spinning mechanism in such a way that not only would the ball spin, but also the finger that it was sitting on. Oops. Obviously this was unacceptable, so I had to whip up a little gun paste sleeve to conceal the spinning tube underneath the ball.
For the final details, I used a combination of gum paste and dark chocolate tinted with black food coloring. The only thing I really wasn’t happy with was the shape of the eyes. Real Sneetches have eyes that are slightly taller than they are wide. Mine wound up wider than they were tall, which made my Sneetch look slightly untrustworthy.
We served the cake at a very small graduation party. Alex was delighted, though she was also deeply concerned with the effects.
When we plugged in the blacklight it got very hot, which began to melt the pressed sugar above it. So Alex spent the entire few minutes that the blacklight was on begging us to turn it off, apparently under the impression that it might melt the entire cake. The star did show up a little bit in the blacklight, but it certainly wasn’t an attention-grabbing effect.
The ball spun well, though not fast enough to fully blend the colors the way that I had hoped. Again, Alex was deeply concerned, this time because the ball’s rotation shook the entire cake on its thin little legs.
Alex’s little brother Sam was especially delighted with the cake ball. For days after he ate it, he kept asking us, “Where’s-a cake ball?” and we had to keep reminding him that it was in his tummy.
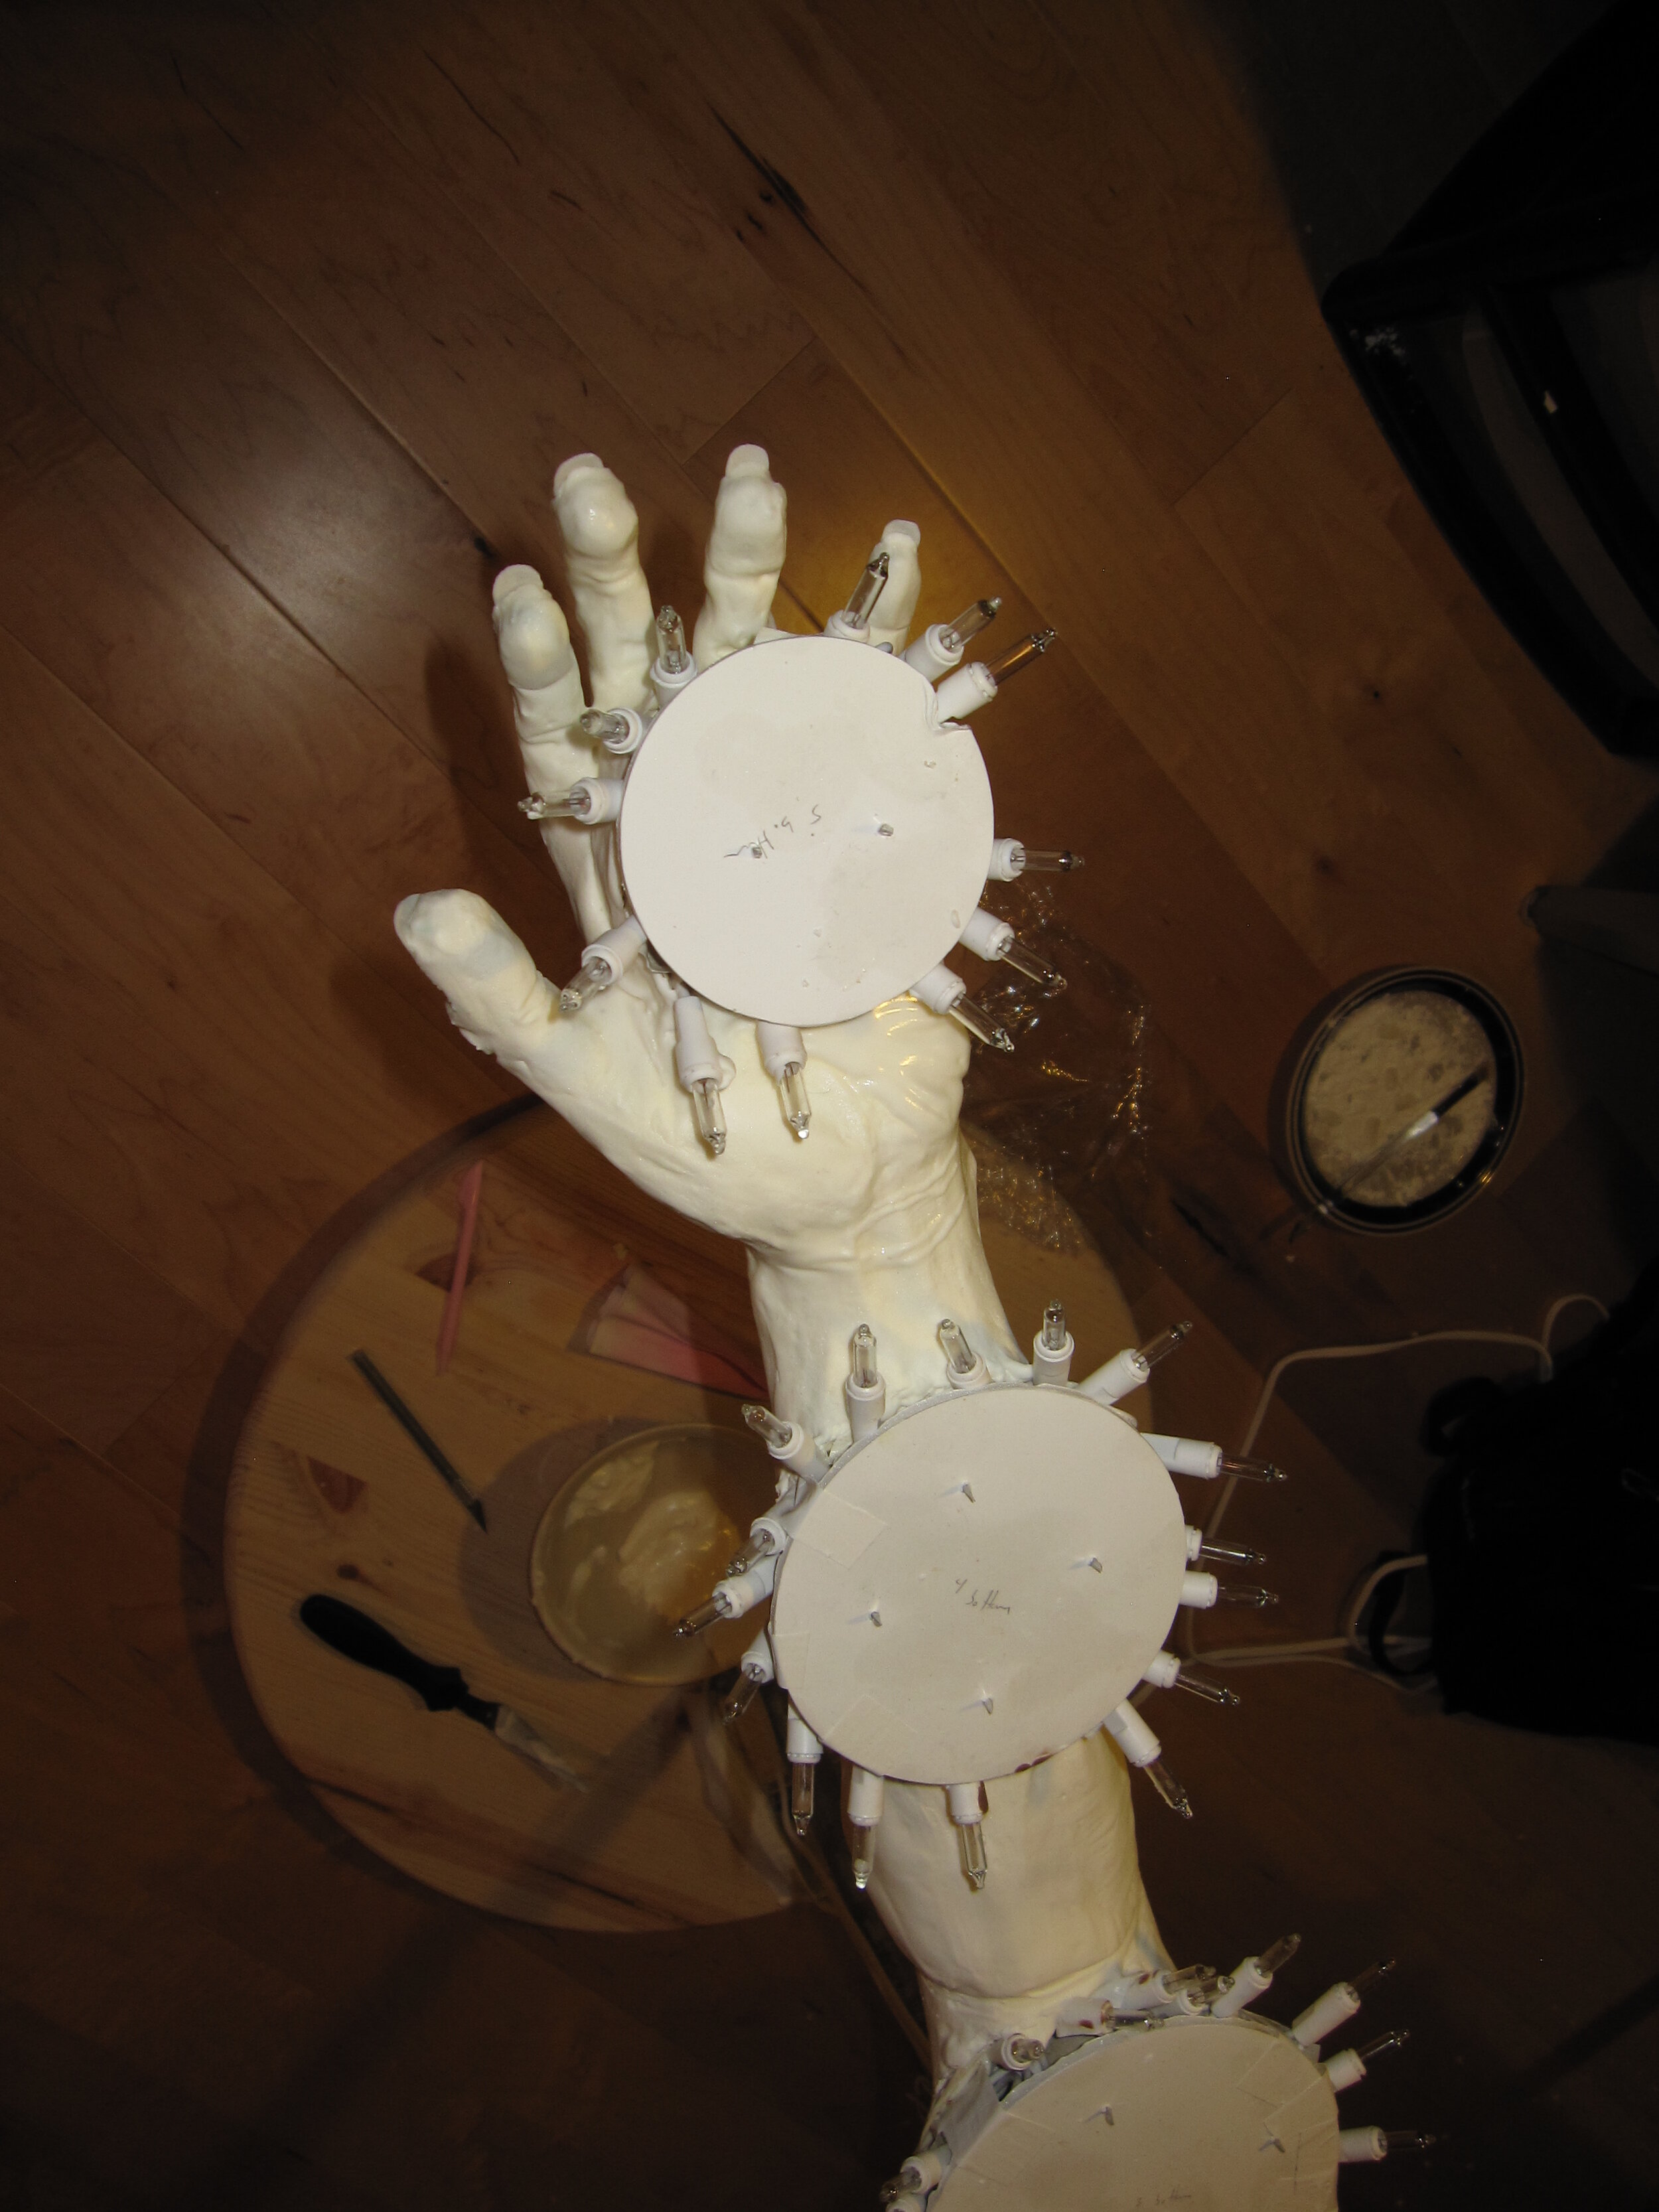
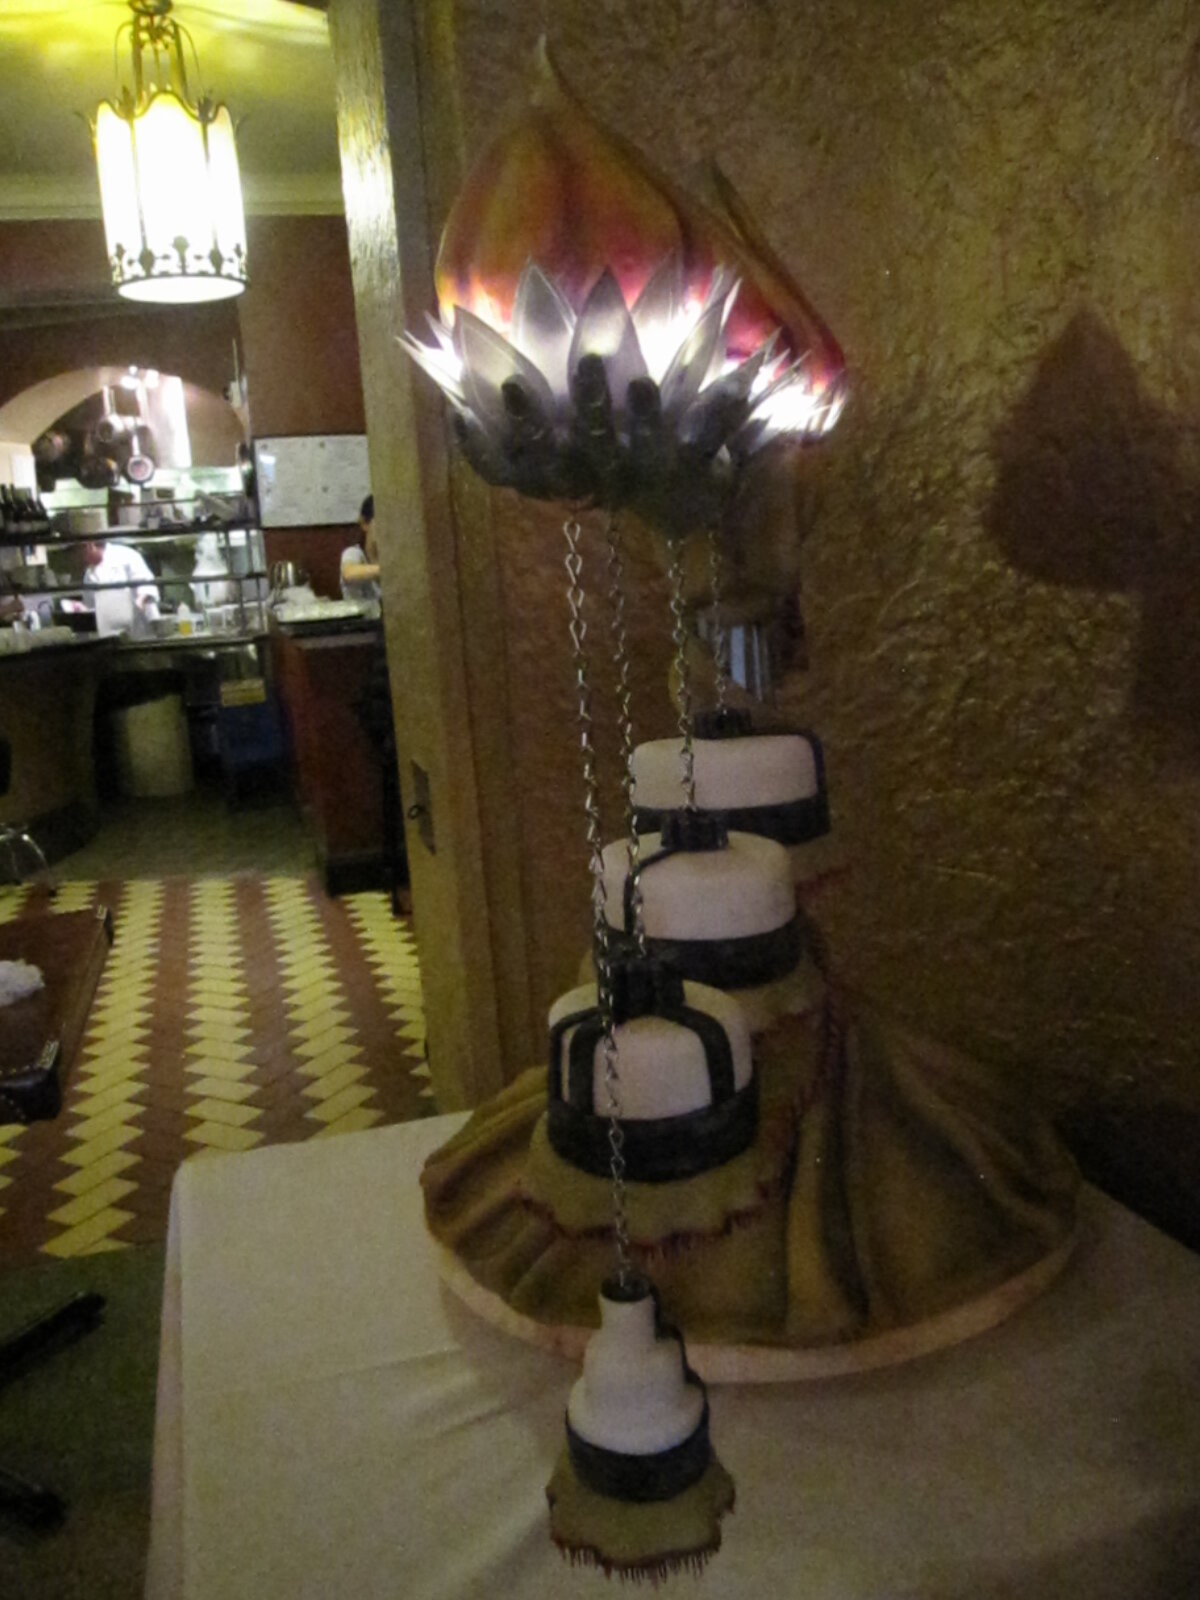
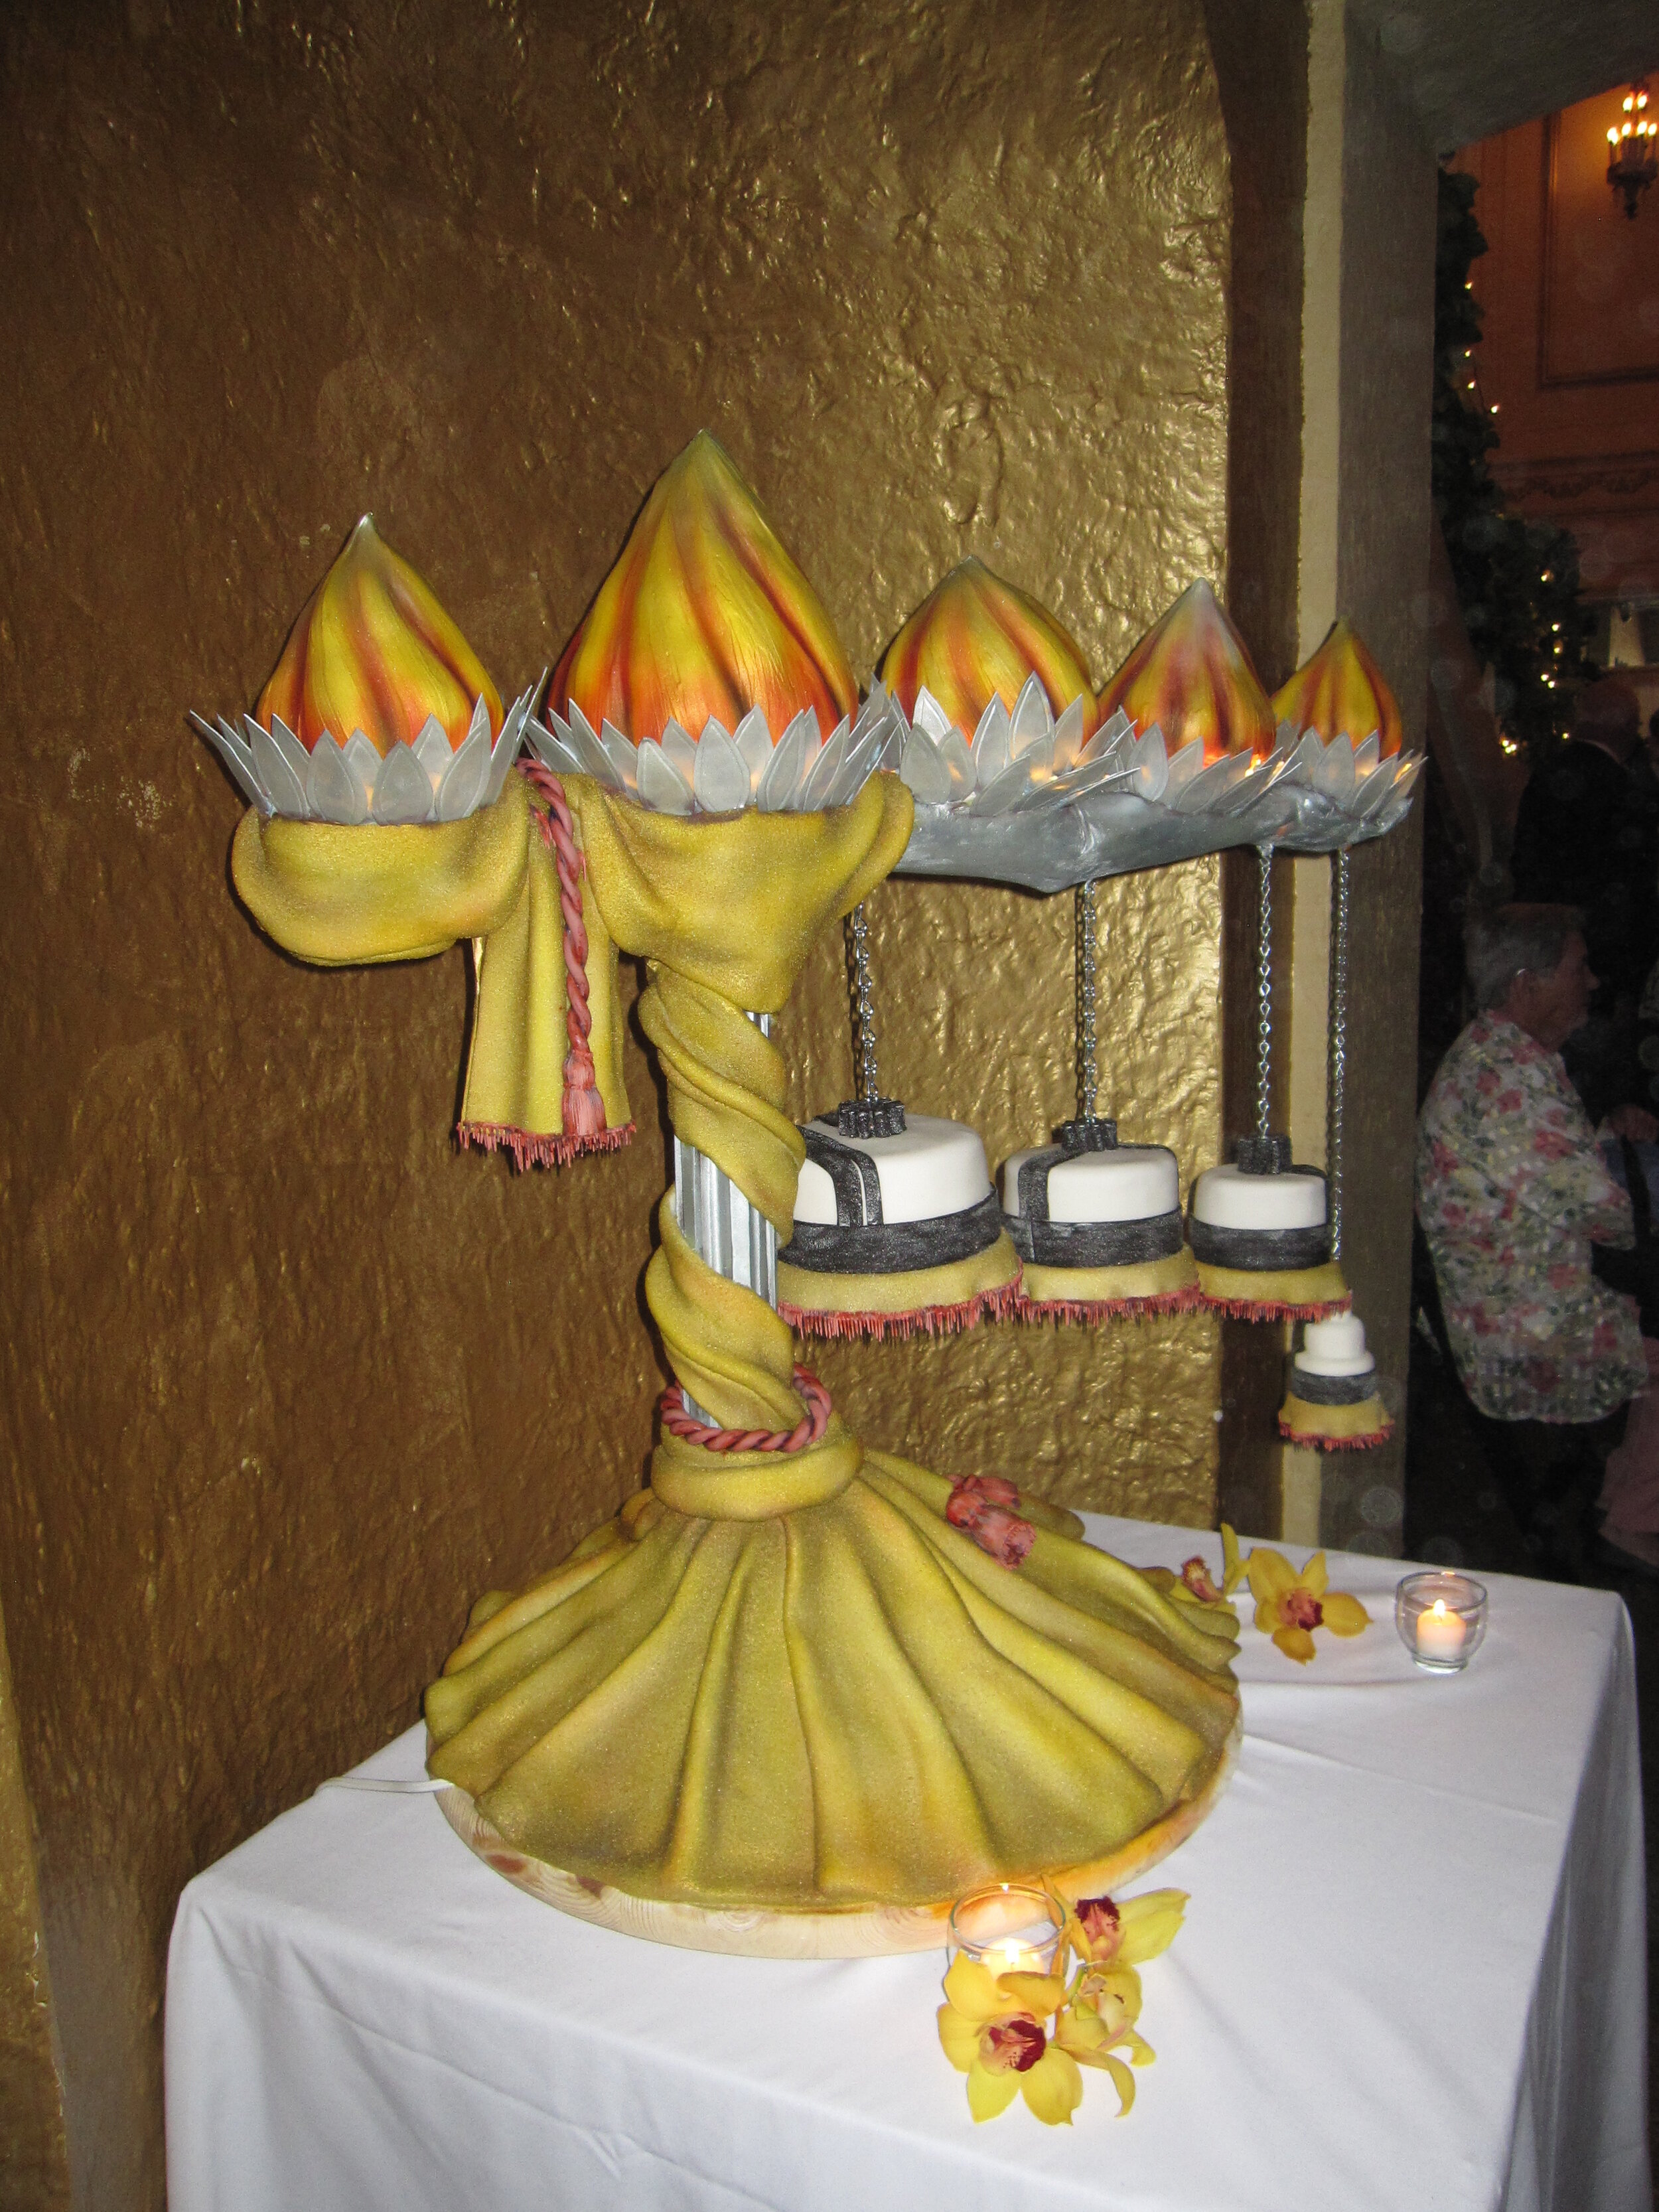
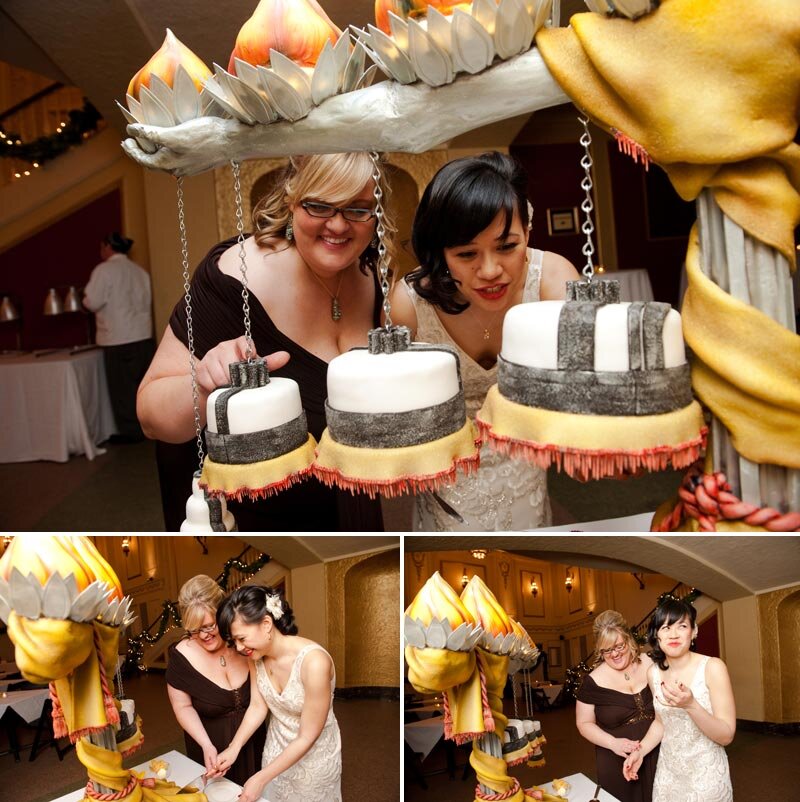
Torchiere Wedding Cake
My friends were getting married at the Orpheum, which is a beautiful old movie theater from the 20s, so I was thinking art deco; I was thinking stage lighting; I was thinking theater curtains; I was thinking dusty elegance and timeless romance.


So far, two couples have had the courage and/or the lunacy to trust me to design and make their wedding cakes. The first was the Seasons of Love Cake, which my sister and I made back in 2004. This is my second wedding cake.
My friends were getting married at the Orpheum, which is a beautiful old movie theater from the 20s, so I was thinking art deco; I was thinking stage lighting; I was thinking theater curtains; I was thinking dusty elegance and timeless romance.
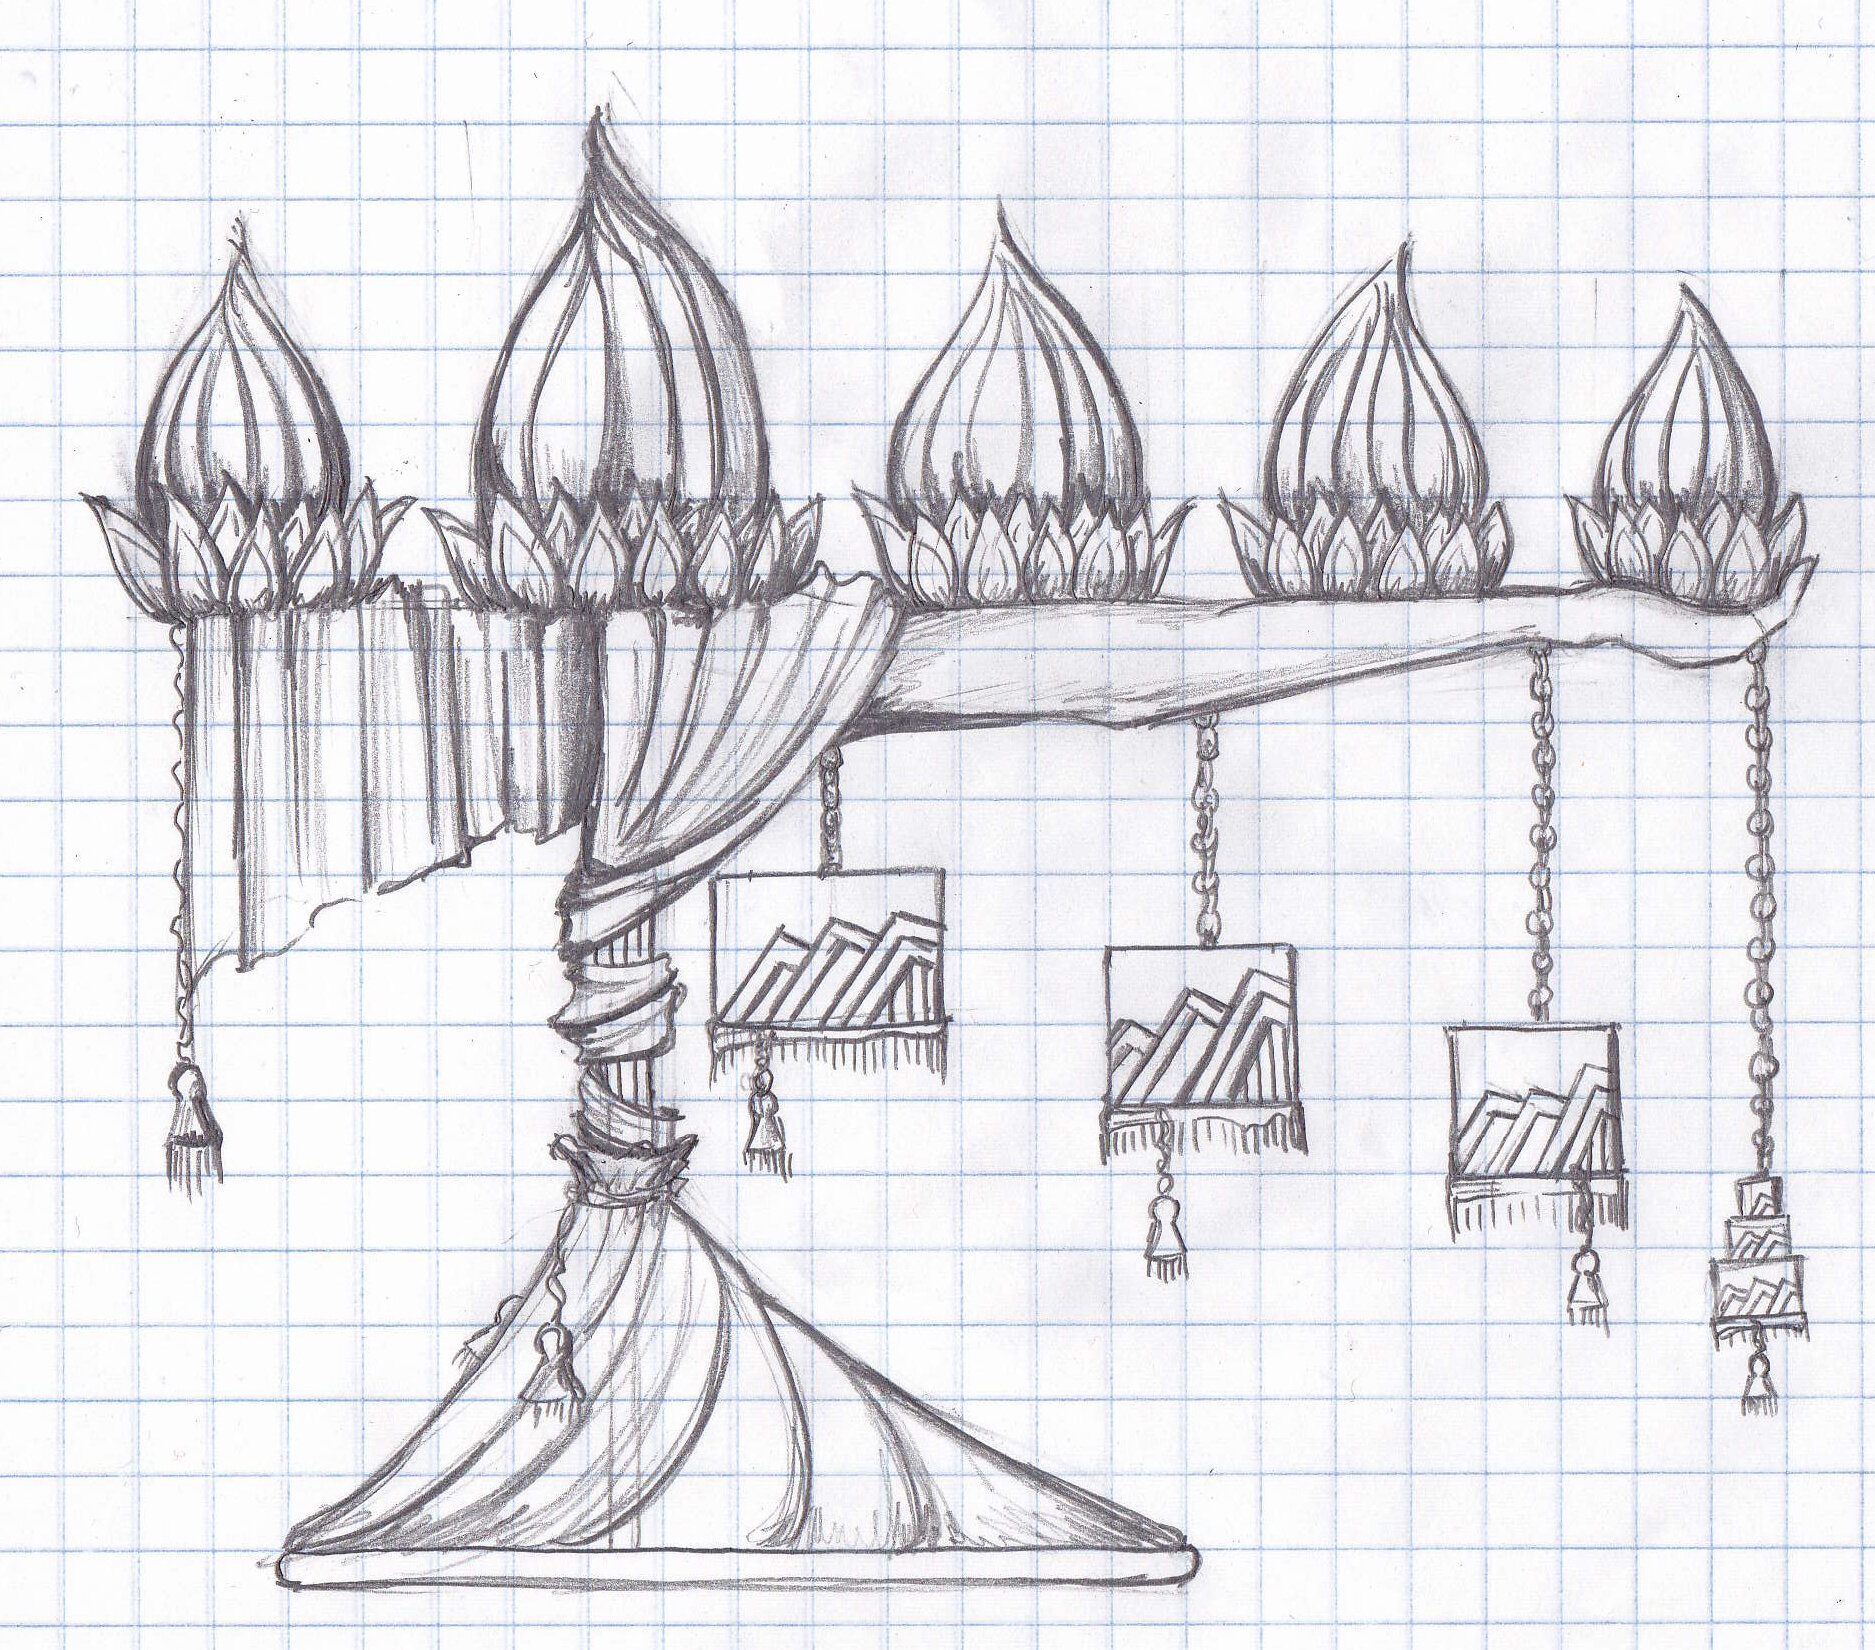
What I came up with was this bizarre art deco torchiere cake. Both this and the Seasons of Love Cake had aspects of balance and defying gravity about them. I didn’t really do this on purpose, but maybe it tells you something about how I see marriage – delicate? precarious? buoyant? at risk of collapse? I’m not sure. I’m also not sure why it’s in the shape of a human arm, except that it let me hang the little tiny wedding cake from the wedding ring finger. Apparently I just like making cakes in human form, whether appropriate to the occasion or not.
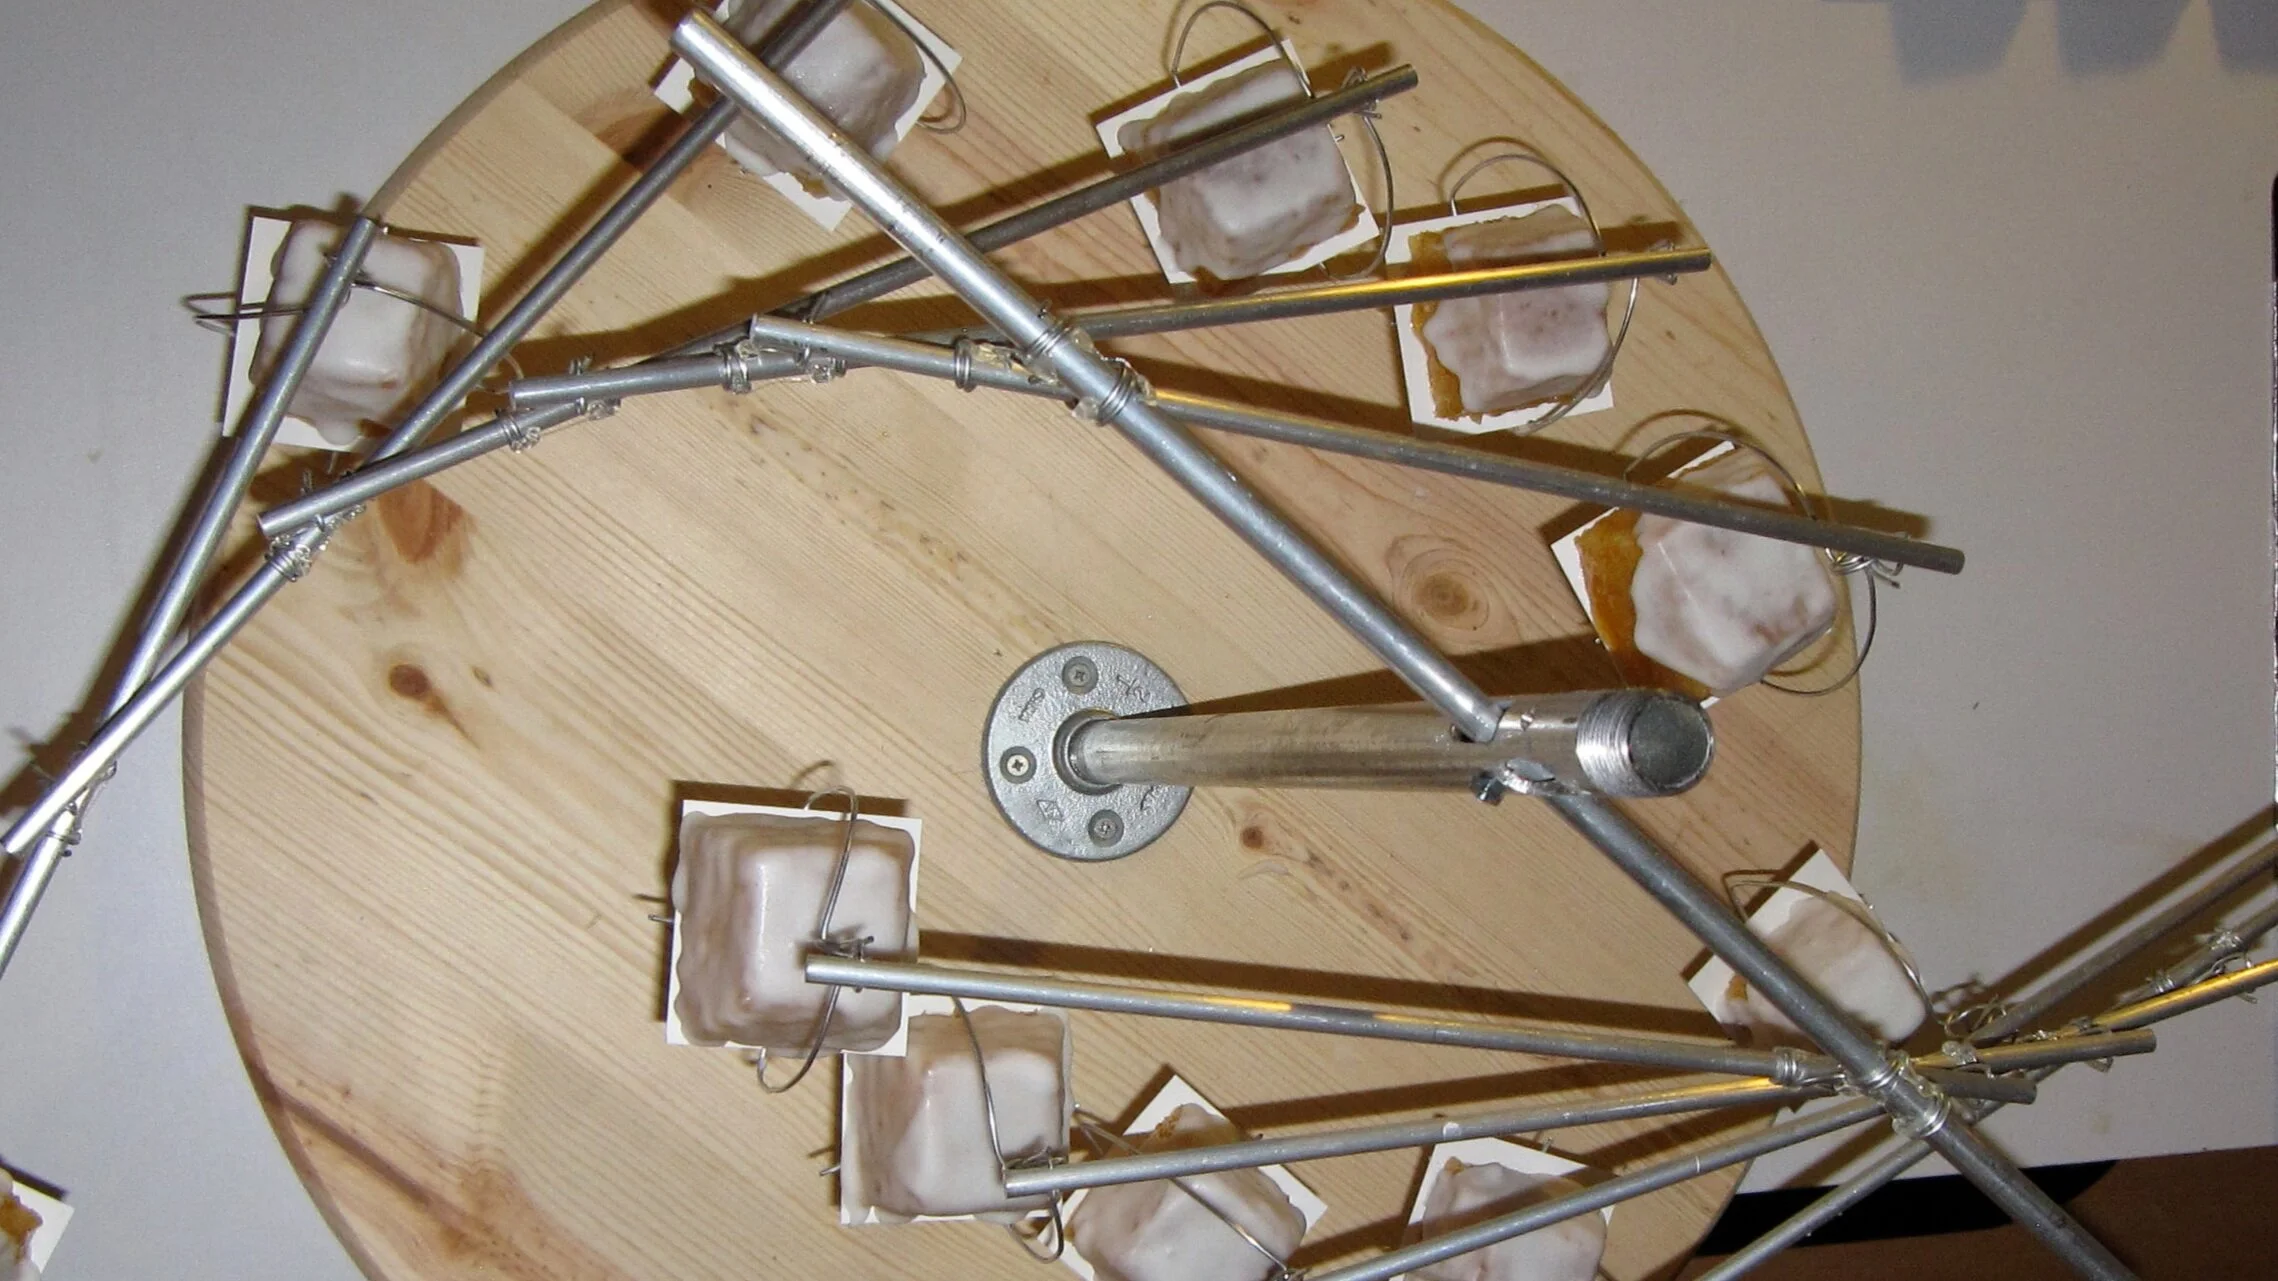
To make the arm strong enough to hold the cake, I started with ¾” steel pipes bolted to a 24” diameter solid wood base. I bolted little wood and foam core bases to the steel pipe to support the flame cakes and installed eyebolts to support the hanging cakes. To make the torchiere light up, I ran a strand of Christmas lights around all the little bases. In retrospect, it would have been better if I had used smaller lights, as I did have some difficulty later on masking the lights with the gum paste leaves.
I thought about making the arm out of white modeling chocolate, because I thought that would be the easiest to sculpt, but I was afraid that the silver airbrush color wouldn’t show up as well on that as it would on some other materials. Then I thought about making it out of fondant, but I thought that would be too heavy to stay up on the pipe. So I decided to form the shape of the arm out of rice cereal treats and then cover it and put in the details with royal icing.
Rice cereal treats always wind up being more difficult to work with than I expect them to be. I had a lot of trouble getting them to stay in place, to the point where I briefly feared that I might have to resort to a non-edible material instead. Eventually, though, I figured out how to hold them in place with aluminum foil until they firmed up. Then I carved them down to shape and slapped on a coat of royal icing. In retrospect, I would have been better served by a more carefully applied coat of royal icing.
Once that coat of royal icing dried, I sanded the rough edges, a process that would have been much easier if I had given more attention to the first coat. Then I applied a second coat, this time carefully smoothing it with a damp paintbrush. I found that I needed to install some small aluminum tubing to get the fingers to hold their shapes. I also sanded this coat of royal icing with a fine grit sand paper after it dried. I then went in one more time to create the details of the bone structure and skin folds. I made the fingernails out of gum paste, a technique that worked well for me on the Killer Rats Cake. This time I had a little trouble because the royal icing had dried too much to let me really sink the nails into the nail beds, so I had to add some more icing over the top of the nails to marry them to the fingers. As a result, the fingertips wound up perhaps a bit bulkier than ideal. Apparently the arm was wearing acrylic nails.
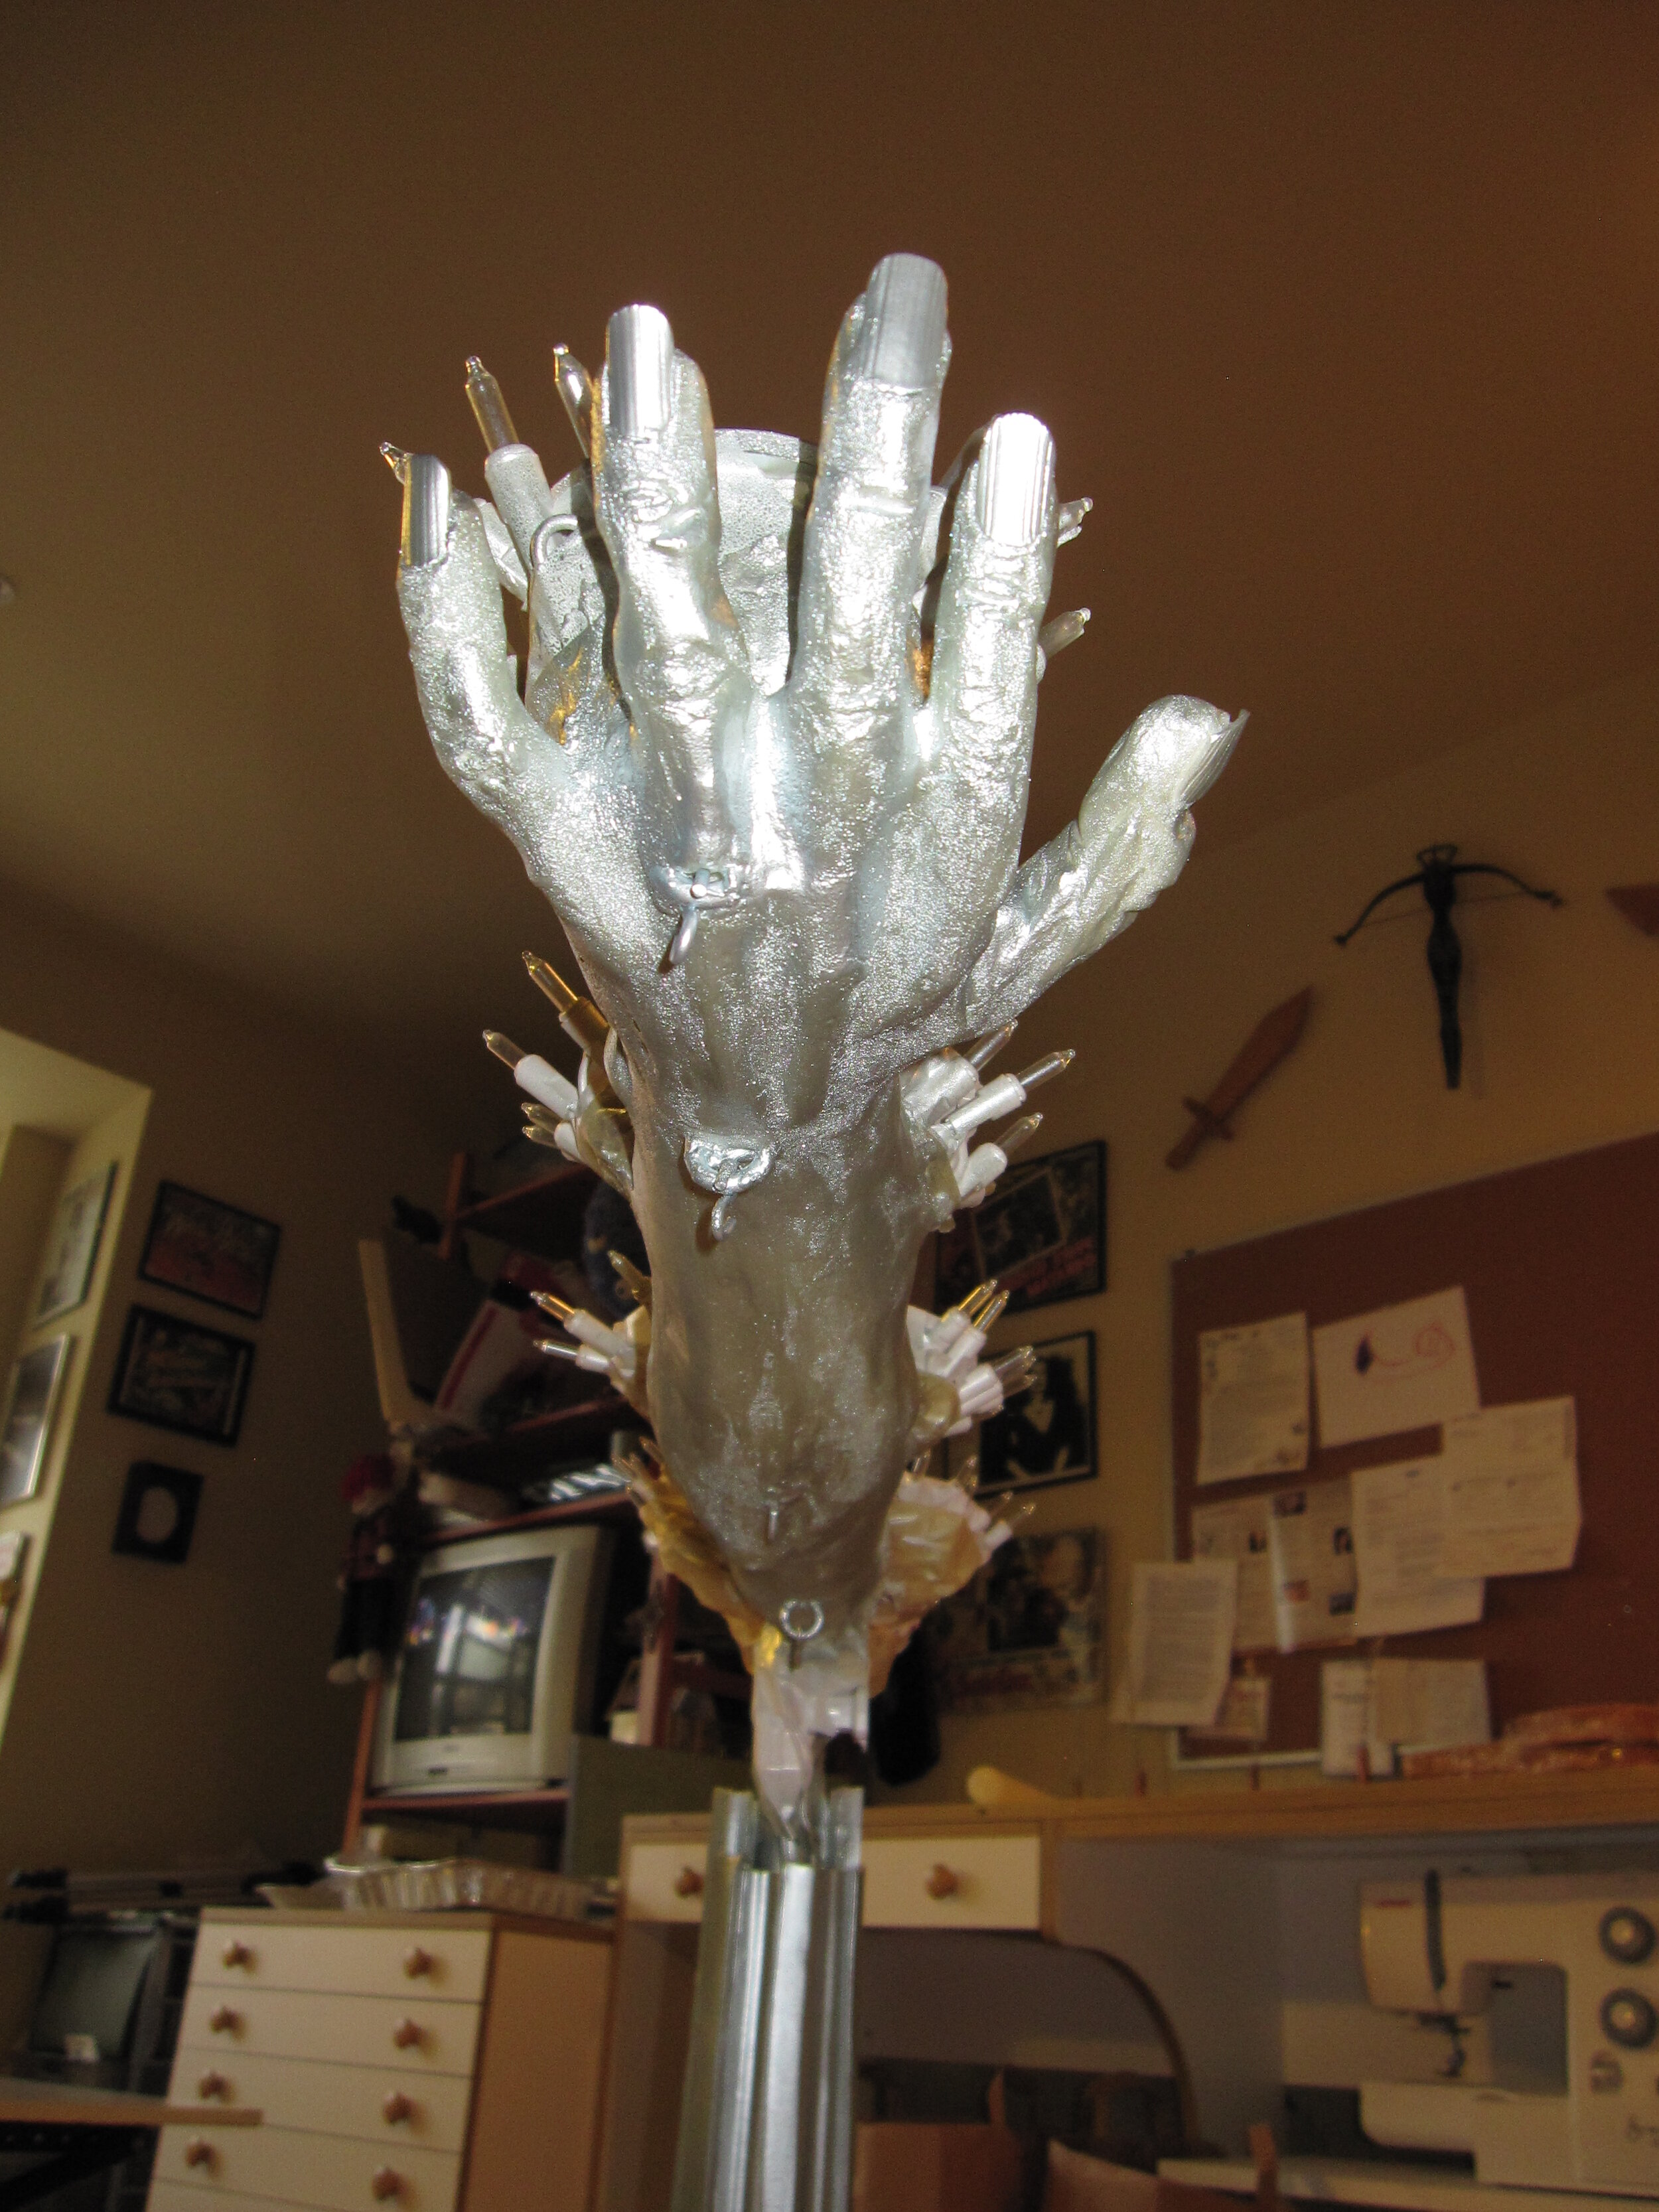
To mask the central support pipe, I used some pieces of foam core covered with fondant to create a fluted hexagonal column. I also made some stylized art deco leaves out of gum paste to cover the lights at the bases of the flame cakes. Then I got busy with the airbrush spraying the arm, the column, and the leaves silver. I also added a little gum paste wedding ring to the ring finger that would support the hanging mini wedding cake.

The next step was to make the fondant curtains. I had expected this to be a challenge, and I was right. Unsupported fondant drapery is difficult under any circumstances because it’s hard to drape the heavy fondant realistically without the weight of it ripping itself apart. This fondant drapery was especially tricky because I wanted it to have the worn velour texture of old theater curtains. To accomplish this, after I rolled out the fondant, I moistened the surface and then coated it with an even layer of granulated sugar. So not only was I worried about getting a natural drape, I also had to be careful not to damage the sugar texture. Because I was applying the drapery to the arm and the column that had already been airbrushed, there was also the risk that I would mar the paint job if I moved the fondant drapery around too much. In the end, it worked out pretty well, though, and I was able to wrap some tin foil around to hold the fondant in place until it set in place. I also draped some fondant over the foam core bases that I had made for the four hanging cakes.
Another problem with my sugar fabric texture technique is that it has a tendency to get sugar everywhere. So from this point forward, my apartment was covered with a fine layer of stickiness. My good friend Angie came to stay with me for a few days for the wedding and she made a valiant effort to keep the mess under control, but I still had to loan my slippers to my other friend Jenn when she came over to visit so that her stockings wouldn’t get covered with sugar.

With the torchiere structure in place, it was time to bake the cake. It needed to serve about 150 people, so this was the biggest cake I have made thus far. I actually rather dramatically overbought on ingredients because I thought that the cake recipe I was using made only six cups of batter when, in fact, it made ten cups of batter, so I didn’t have to make nearly as many batches I thought I would have to make. I believe that in the end I made 11 batches instead of the 16 I had initially anticipated. It’s perhaps just as well that I underestimated the yield of the recipe, as I also underestimated the number of eggs that it takes to make up a cup of egg whites. I bought eggs thinking that it would take 6 eggs per cup, when it actually took 8 eggs per cup, so in this case my miscalculations almost cancelled each other out and I had about the right number of eggs.
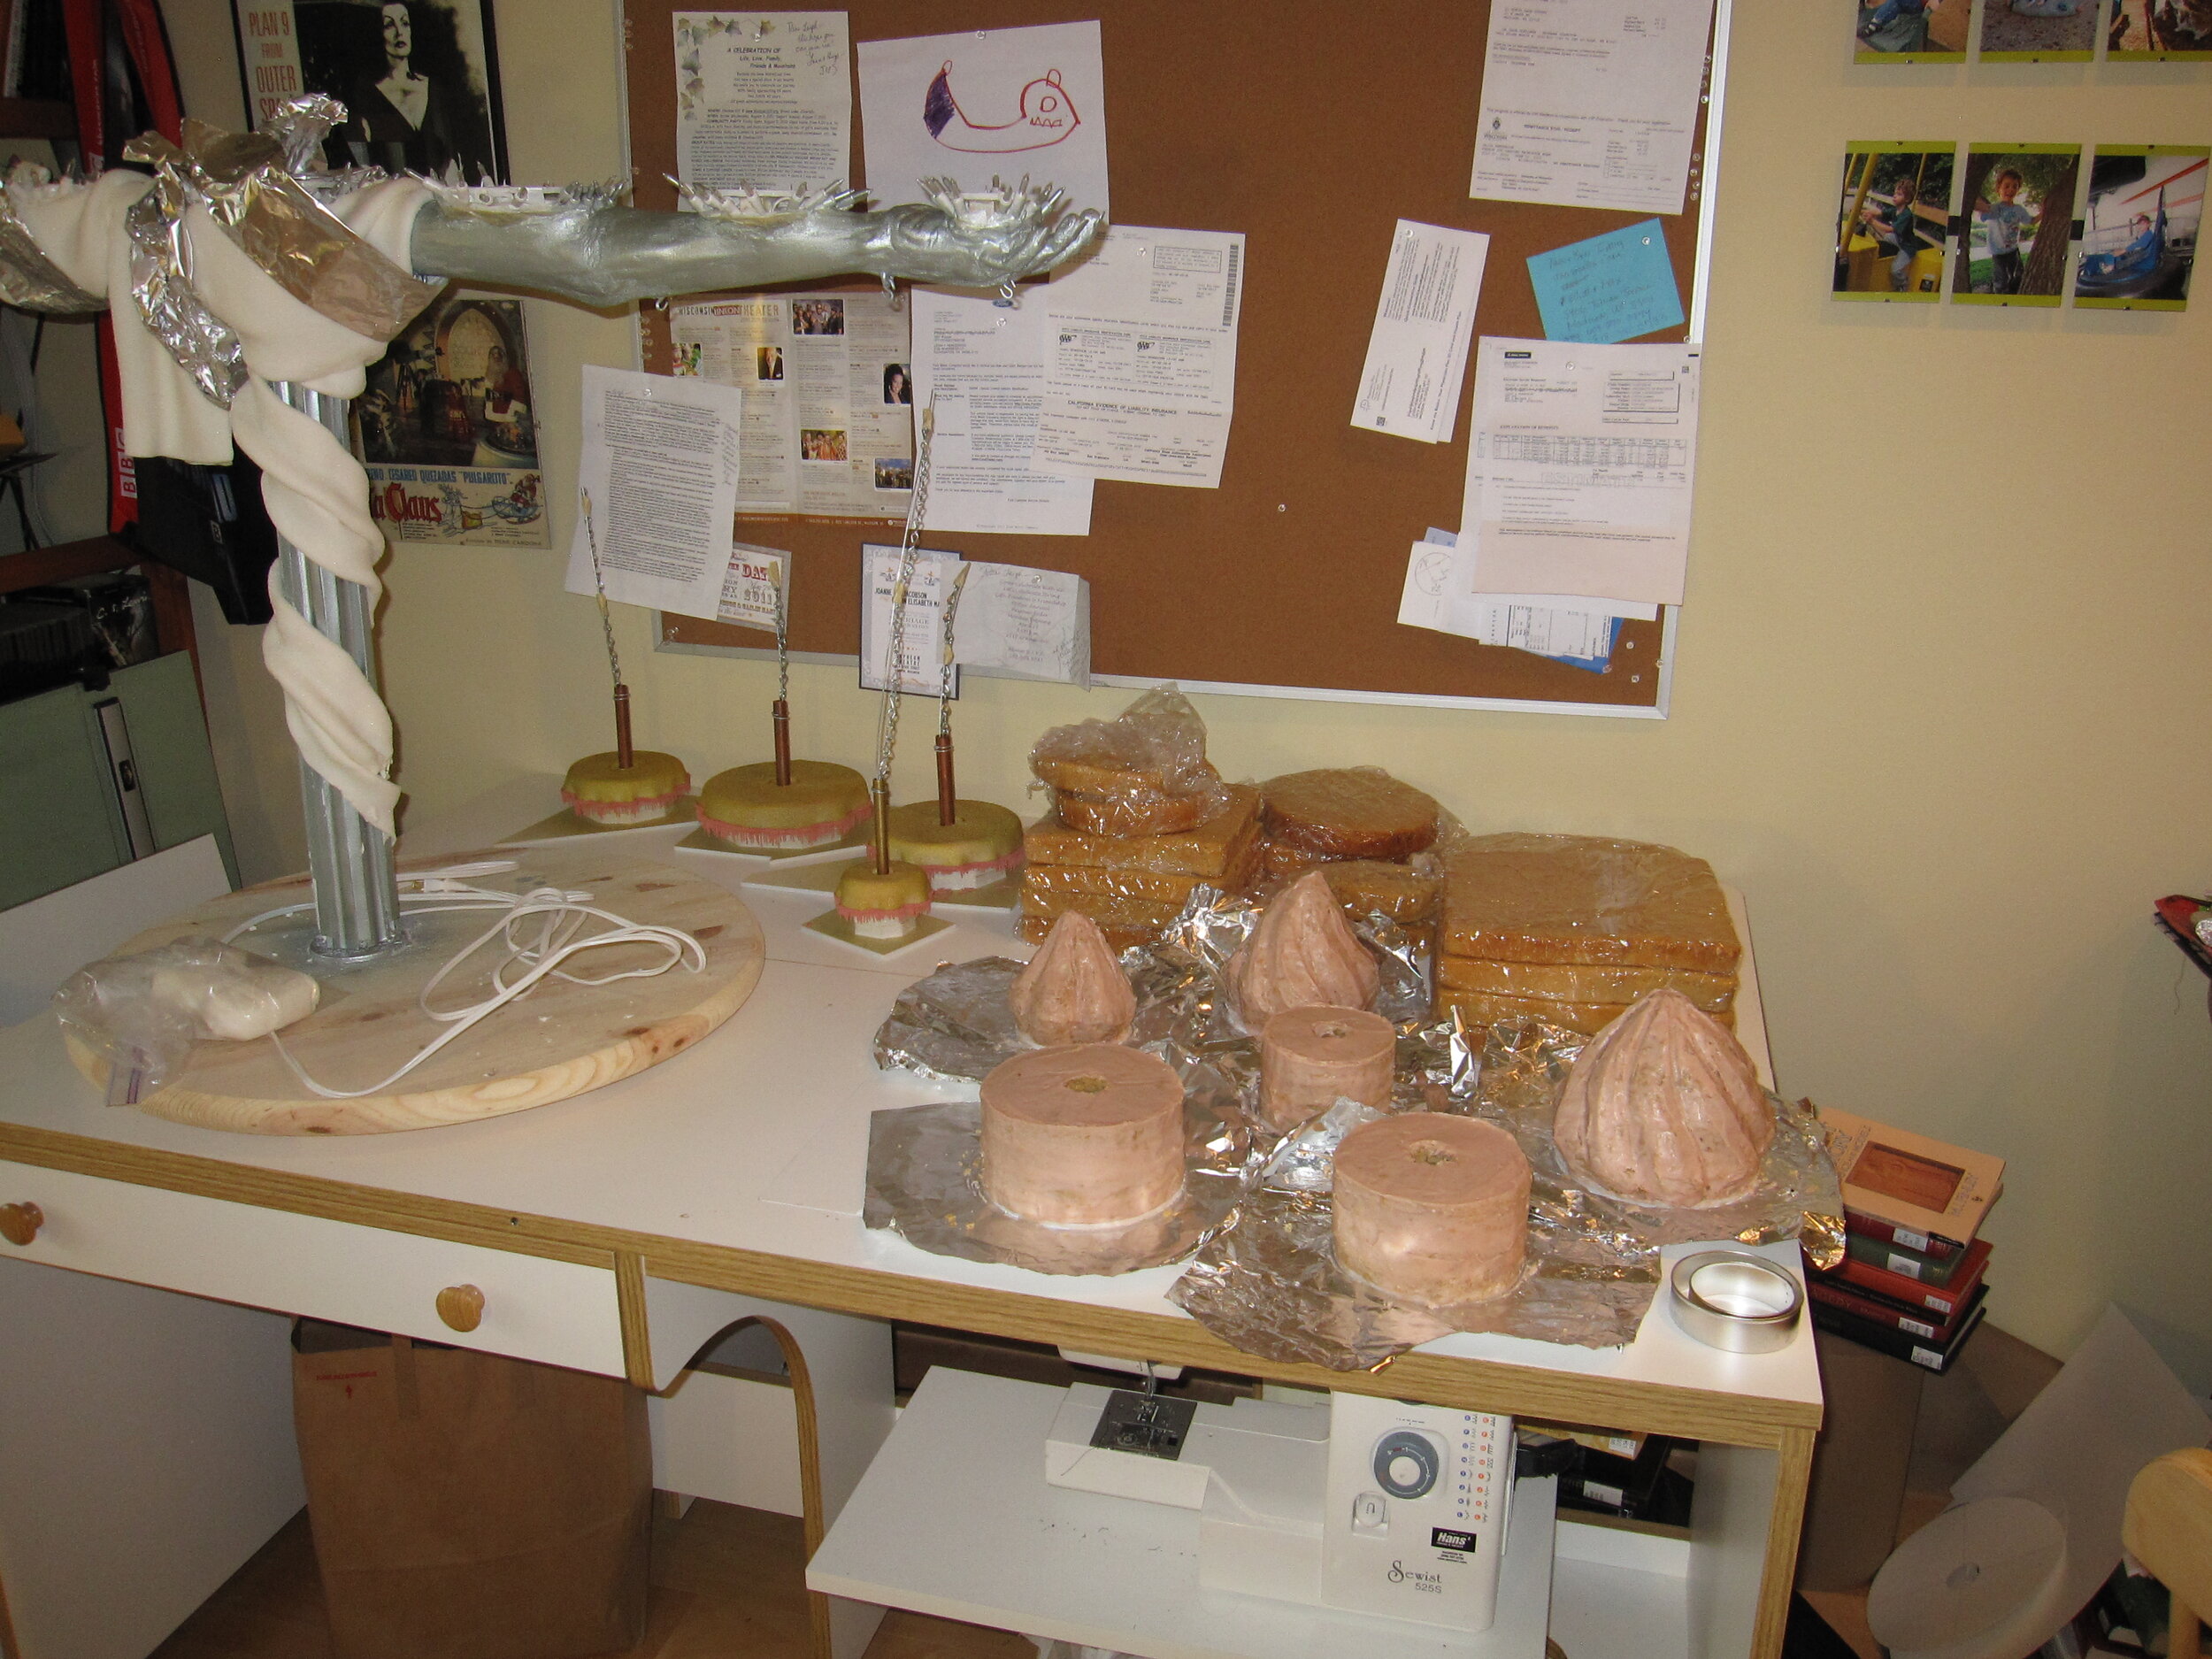
With a truly massive pile of cake baked, I was ready to begin assembly. First I put together the nine smaller cakes – 5 for the flames, and 4 for the hanging cakes. Three of the hanging cakes were pretty easy because they were round. The fourth was a little tiny three-tiered cake. The only request that the brides had made of me was that there be a mini wedding cake, because one of them loves miniature things. This cake was so small that there actually was only cake in the lower two tiers. The top was just fondant wrapped around the central tube that all the hanging cakes needed in order to attached the chain to the base. The flame cakes took a little longer to assemble and carve because they were tall enough to require internal supports and their shape was a bit complicated. Once all the cakes were carved, I covered them with fondant. Not to brag, but I was pretty pleased with how well I did covering such small cakes.
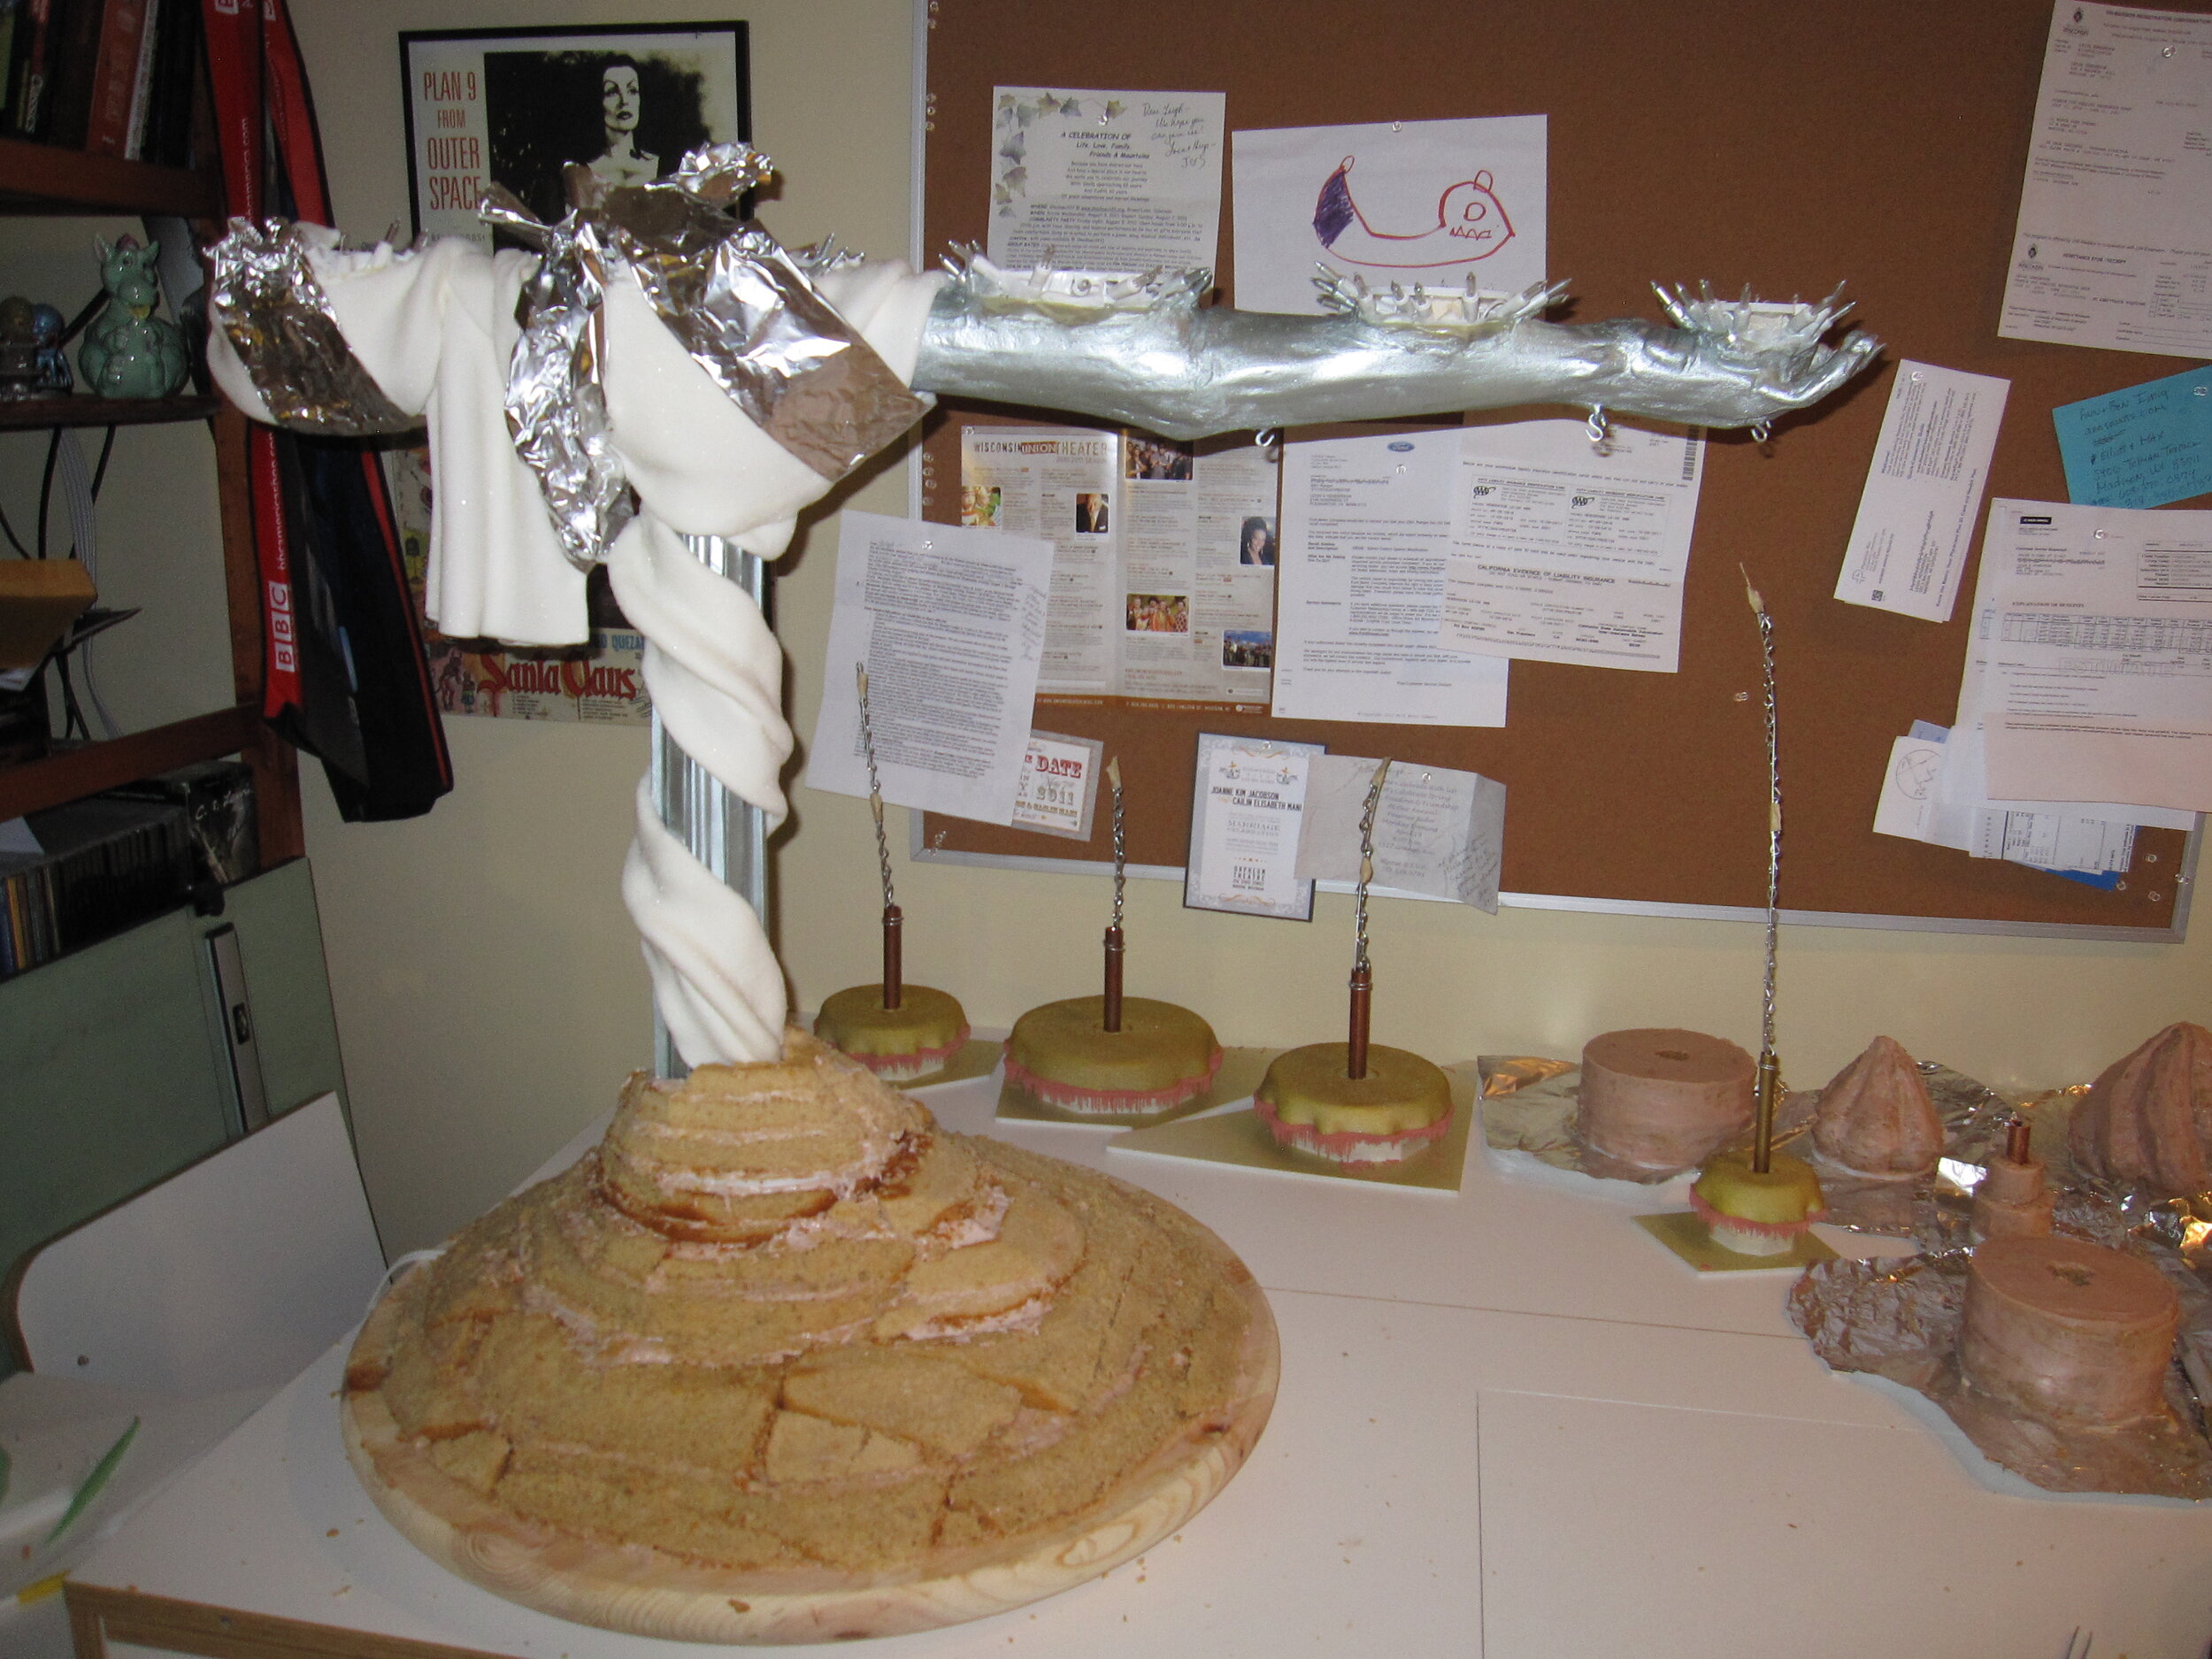
The majority of the cake went directly onto the base around the central column. Basically, I just made a big pile of cake and carved it into an organic pyramid shape. To cover it, I used the same sugared fondant technique that I had used for the rest of the drapery. Rather than trying to cover such a big cake with one enormous piece of fondant, I did it with a number of smaller trapezoidal pieces, which worked out quite well.
At this point I wasn’t happy with the way that the flame cakes looked. For one thing, a few of them did have imperfections in their fondant, but more importantly, they didn’t have the sense of movement and life that I had been hoping for. After a bit of experimentation I found that I could kill both birds with one stone by adding a layer of royal icing, striated and textured with a damp paintbrush, which gave them more flow.
Then it was time to paint. The colors for the wedding, to the extent that there were any, were grey and a sort of muted yellow. So I tried to tie in with this by making the structure silver and the curtains a dusty yellow-gold. After masking off the arm, column, and base with tin foil, I sprayed a layer of yellow, then just a smidge of red, some gold for shine, and finally some bronze to add a sense of age.
The flames took quite a few layers of color. I’m still not sure that I didn’t overdo it a bit. I think I did yellow first, then orange, then red, then blue, then bronze, then gold, then finally silver.
Instead of painting the hanging cakes, I just adorned them / concealed their imperfections with some black fondant details. To tie them in with the rest of the cake, I textured the black fondant with the same granulated sugar technique, and then highlighted the texture by brushing on a bit of silver luster dust.
I put just a little more color into the cake by adding dusty rose royal icing fringe to the hanging cake bases and to the drapery, as well as some fondant ropes and tassels. Once these dried, I painted a little bright red and a touch of blue onto them.
I wasn’t planning to actually install the flames and the hanging cakes until the cake was at the venue, but I did attach some of the gum paste leaves around the Christmas lights that would be under the flames. I could only attach about half of them, because I needed one side to be open in order to place the flames. This made me rather nervous because I had some trouble getting them to stick and had to create elaborate tin foil supports to hold them in place until the royal icing dried. I also had trouble with the royal icing sticking because I had made it a little too thick. So I was scared that, if I had that much trouble at the venue, I wouldn’t be able to get it all together in time.
Even though the venue was less than two miles from my apartment, transport was hair-raising. At first I had for some inexplicable reason imagined that I could transport the cake in the front seat of my pickup. Since the cake was two feet wide, three feet long, and about two and half feet tall, apparently I was temporarily insane when I was picturing sticking this thing in my passenger seat. My friend Alejandro very kindly volunteered to come pick up the cake in his SUV, though I don’t think he really knew what he was getting into.
The cake literally came within inches of not fitting in the back of his SUV along all three dimensions. On the top, there was not even a quarter of an inch of clearance. All I can do is thank my lucky stars that it made it in. The only reason that I didn’t make the cake six inches longer is because that was the size that the steel pipe came in.
I actually didn’t ride in the car with the cake on the way to the venue, because I wanted to have my truck there as well, but fortunately Angie was able to go with Alejandro, so he didn’t have to face the nerve-wracking ride alone. I can now admit that I was terrified that something would go wrong on the way over, though of course I didn’t say this to Alejandro until the cake was safely at the venue. All sorts of horrific scenarios were running through my head. The royal icing arm might crack. The fondant curtains could rip. All the leaves might break off. The entire cantilevered arm might collapse somehow. I packed two huge bags full of repair equipment and supplies to cope with any eventuality.
Of course, none of these dire events happened, or even had any real likelihood of happening. The cake got to the Orpheum with no problem whatsoever. A passing stranger even helped out by holding the door as Alejandro and I carried it into the venue.
This is the first time that I’ve ever completed a cake in the midst of professionals setting up a wedding venue. I was feeling very insecure about having that many people around while I was working, but Angie kindly hung around and kept me company and distracted me with stories about her love life. The assembly actually went quite smoothly and fairly quickly. Really it was just a matter of dropping the flames onto their bases, sticking on a few more leaves, and aging the silver leaves with just a touch of black powdered food coloring.
Because I wasn’t sure how long it would take to finish the assembly at the venue, we had tried to come up with some sort of complicated plan of vehicle switching that would allow me to stay at the venue if necessary while Angie went back to my apartment to change. I was so distracted that I never understood the plan in the first place, so it’s a good thing that we didn’t actually attempt to put it into action. In the end, we had plenty of time to drive home and change and then take a bus back to the venue in time for a pre-ceremony cocktail. While we were gone, they even accessorized the cake table with votive candles and flowers that matched the colors of the cake flawlessly.
The wedding was absolutely beautiful. I was so nervous about the cake that I hadn’t eaten all day and there was an open bar, so I may have had a few more glasses of wine than was really good for me. The wedding coordinator for the venue told me that the cake was a challenge to cut, which I don’t doubt is true. Apparently he put a note to that effect in the file. Not that there’s any real likelihood that I’ll ever serve a cake there again.
I have absolutely no idea whether there was any leftover cake or what happened to the cake base, since by the end of the night I was too drunk and exhausted to do anything but let Angie roll me into a cab home I like to picture a severed, silver, sugar arm sticking out of a dumpster being devoured by ants.
As promised, I’d like to give Executive Producer credit on this cake to Angie for cleaning my apartment, to Jenn for running to the store for emergency powdered sugar, and to Alejandro for driving the cake to the venue. Thanks guys!
Calder Cake
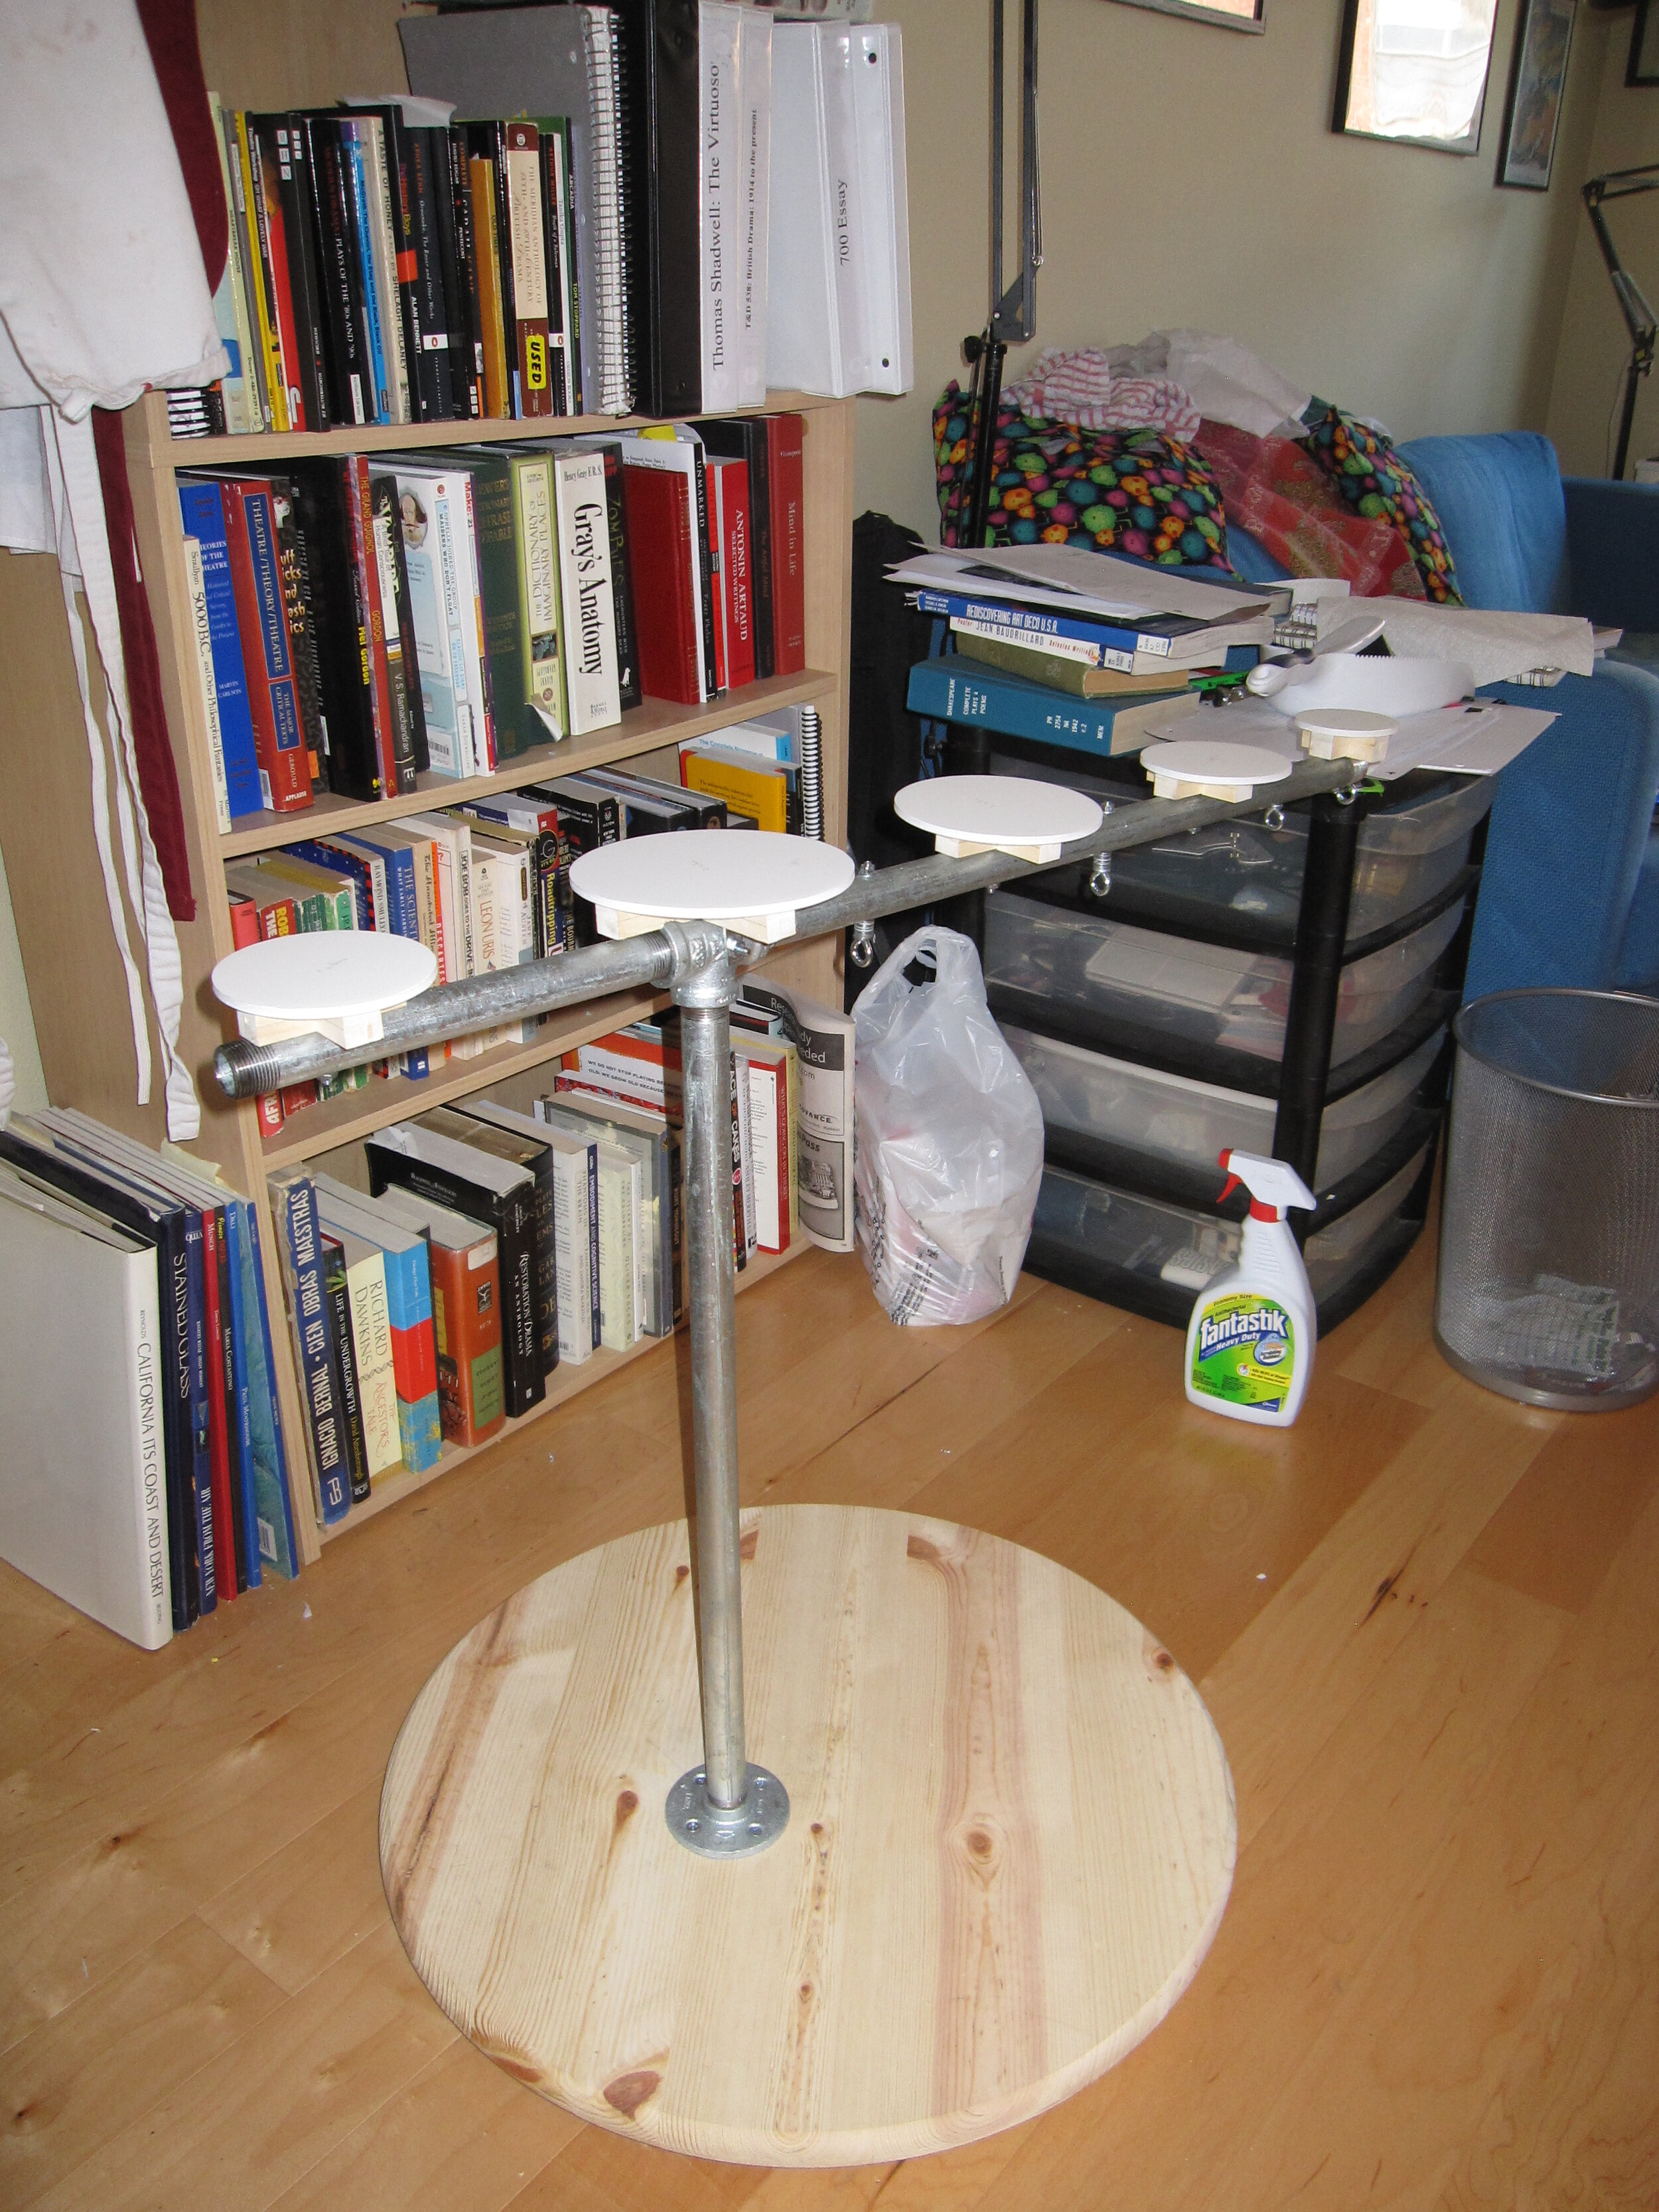
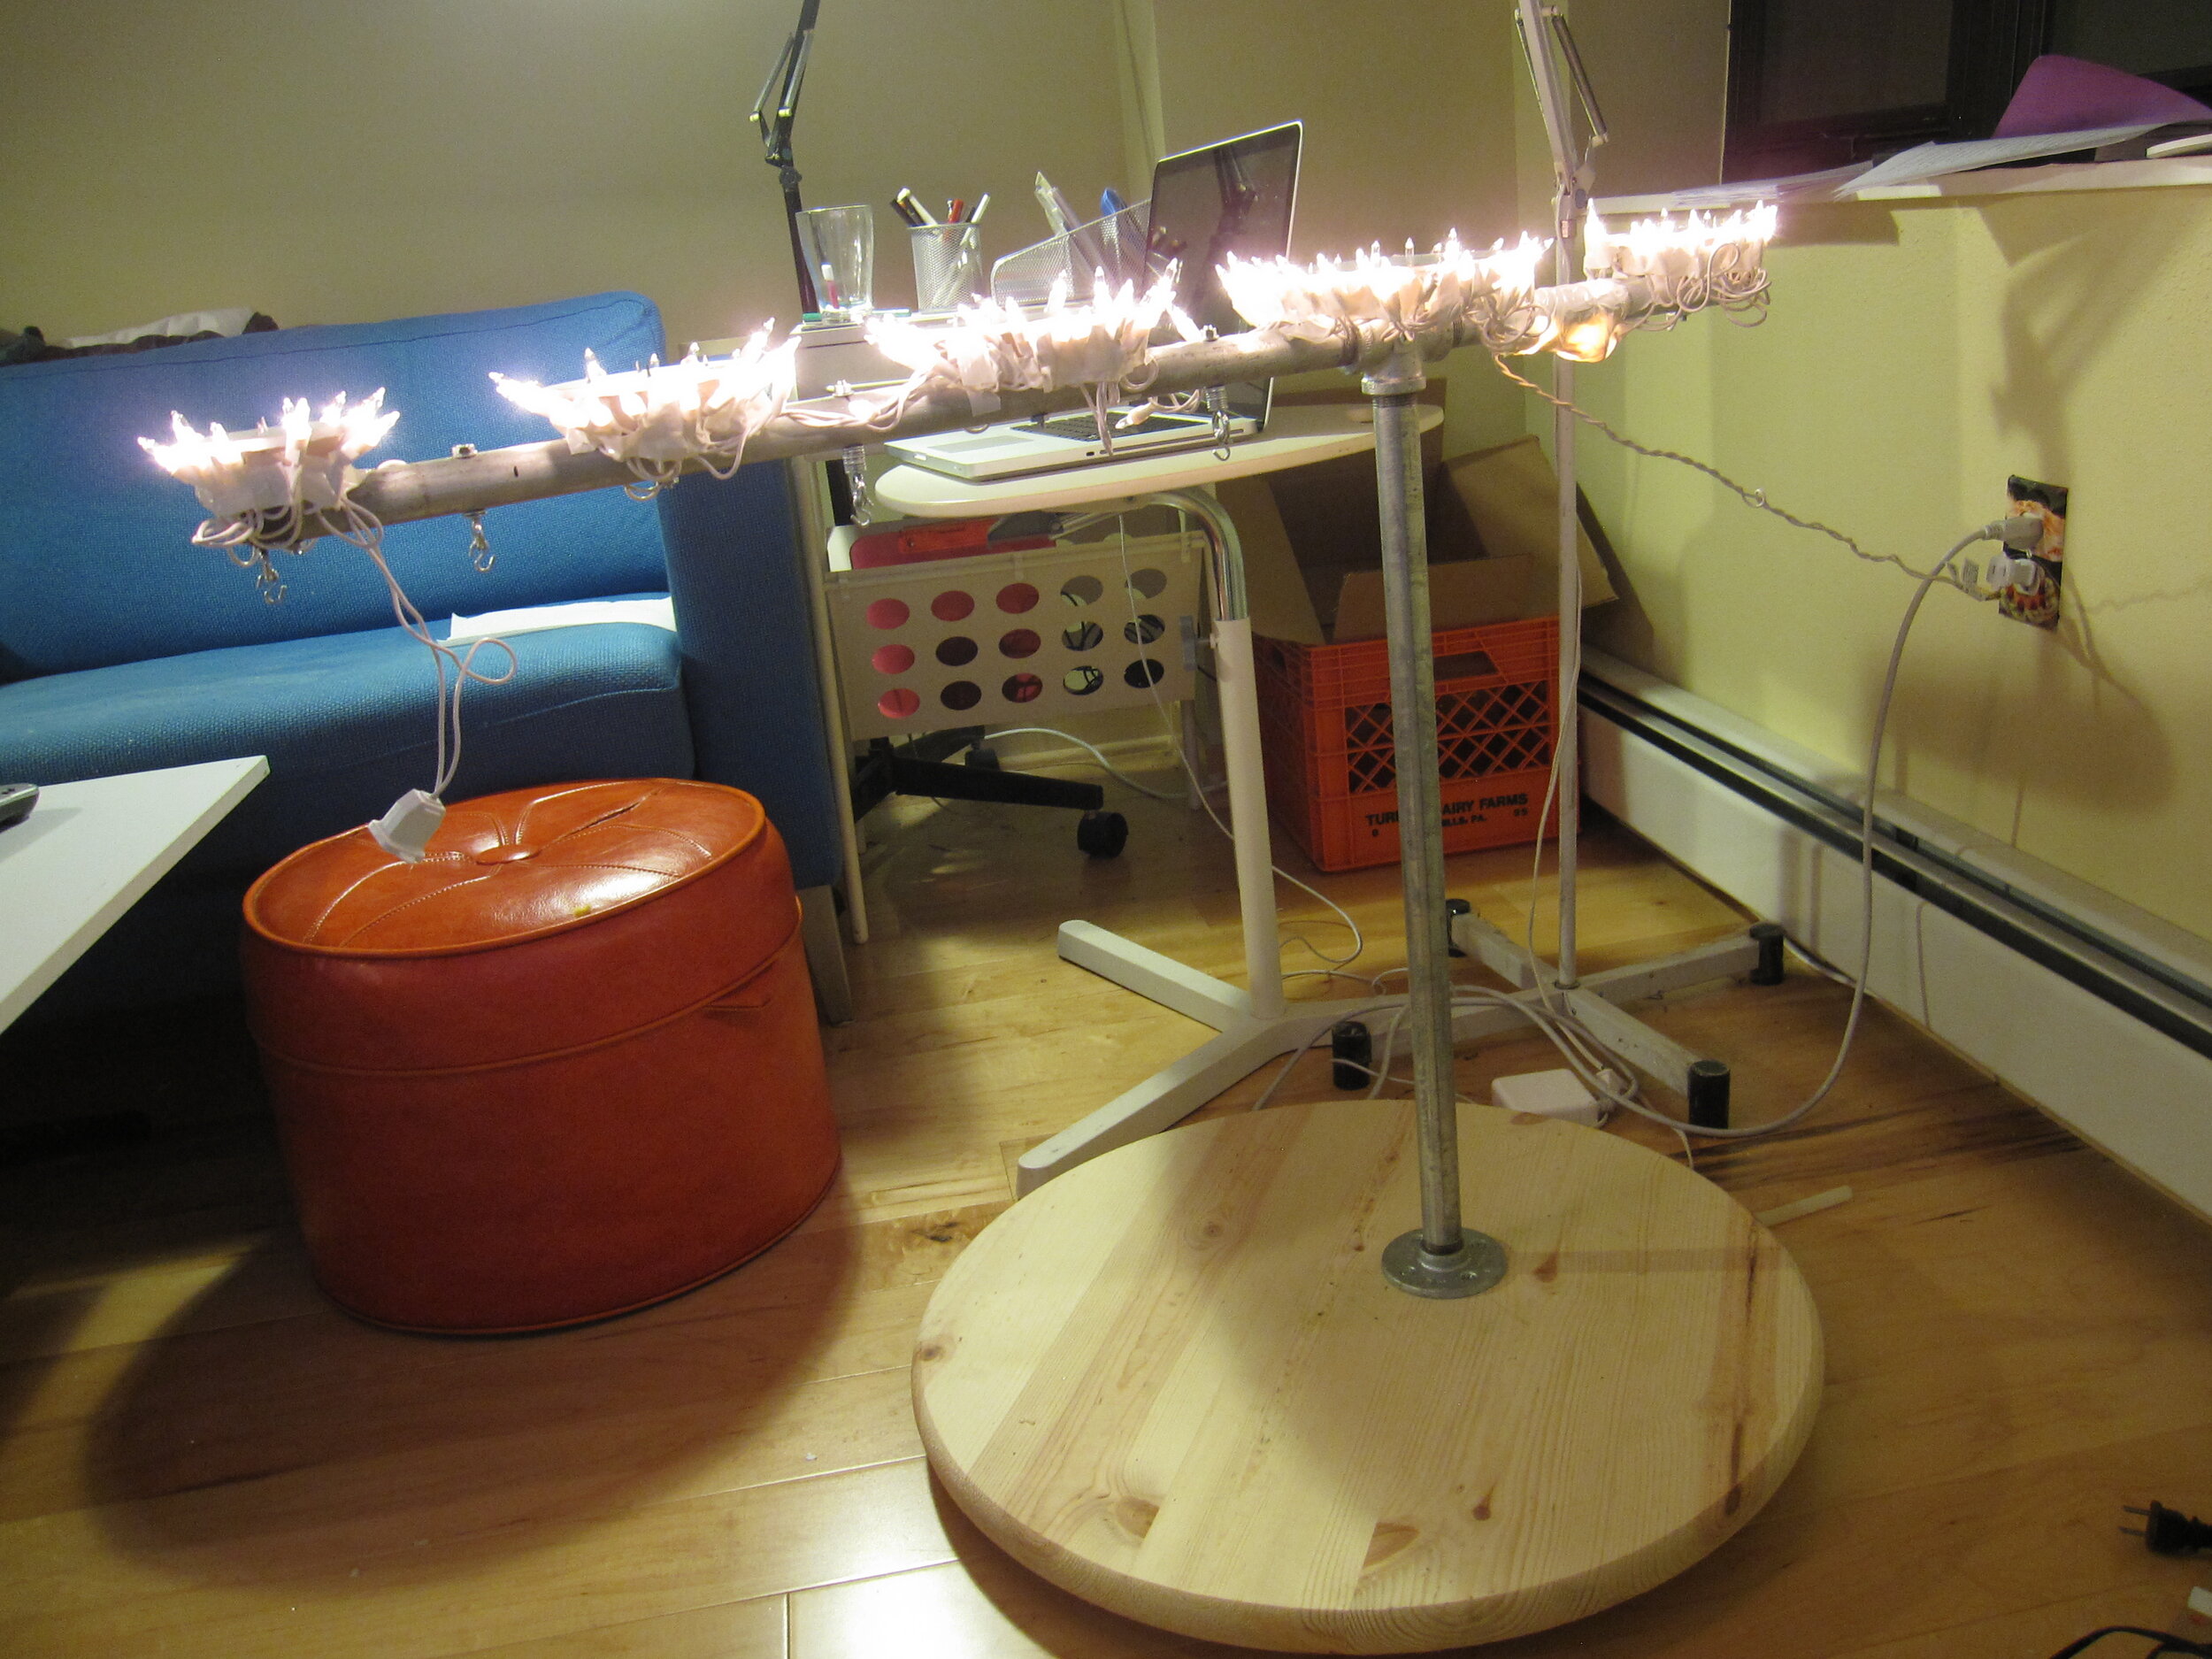
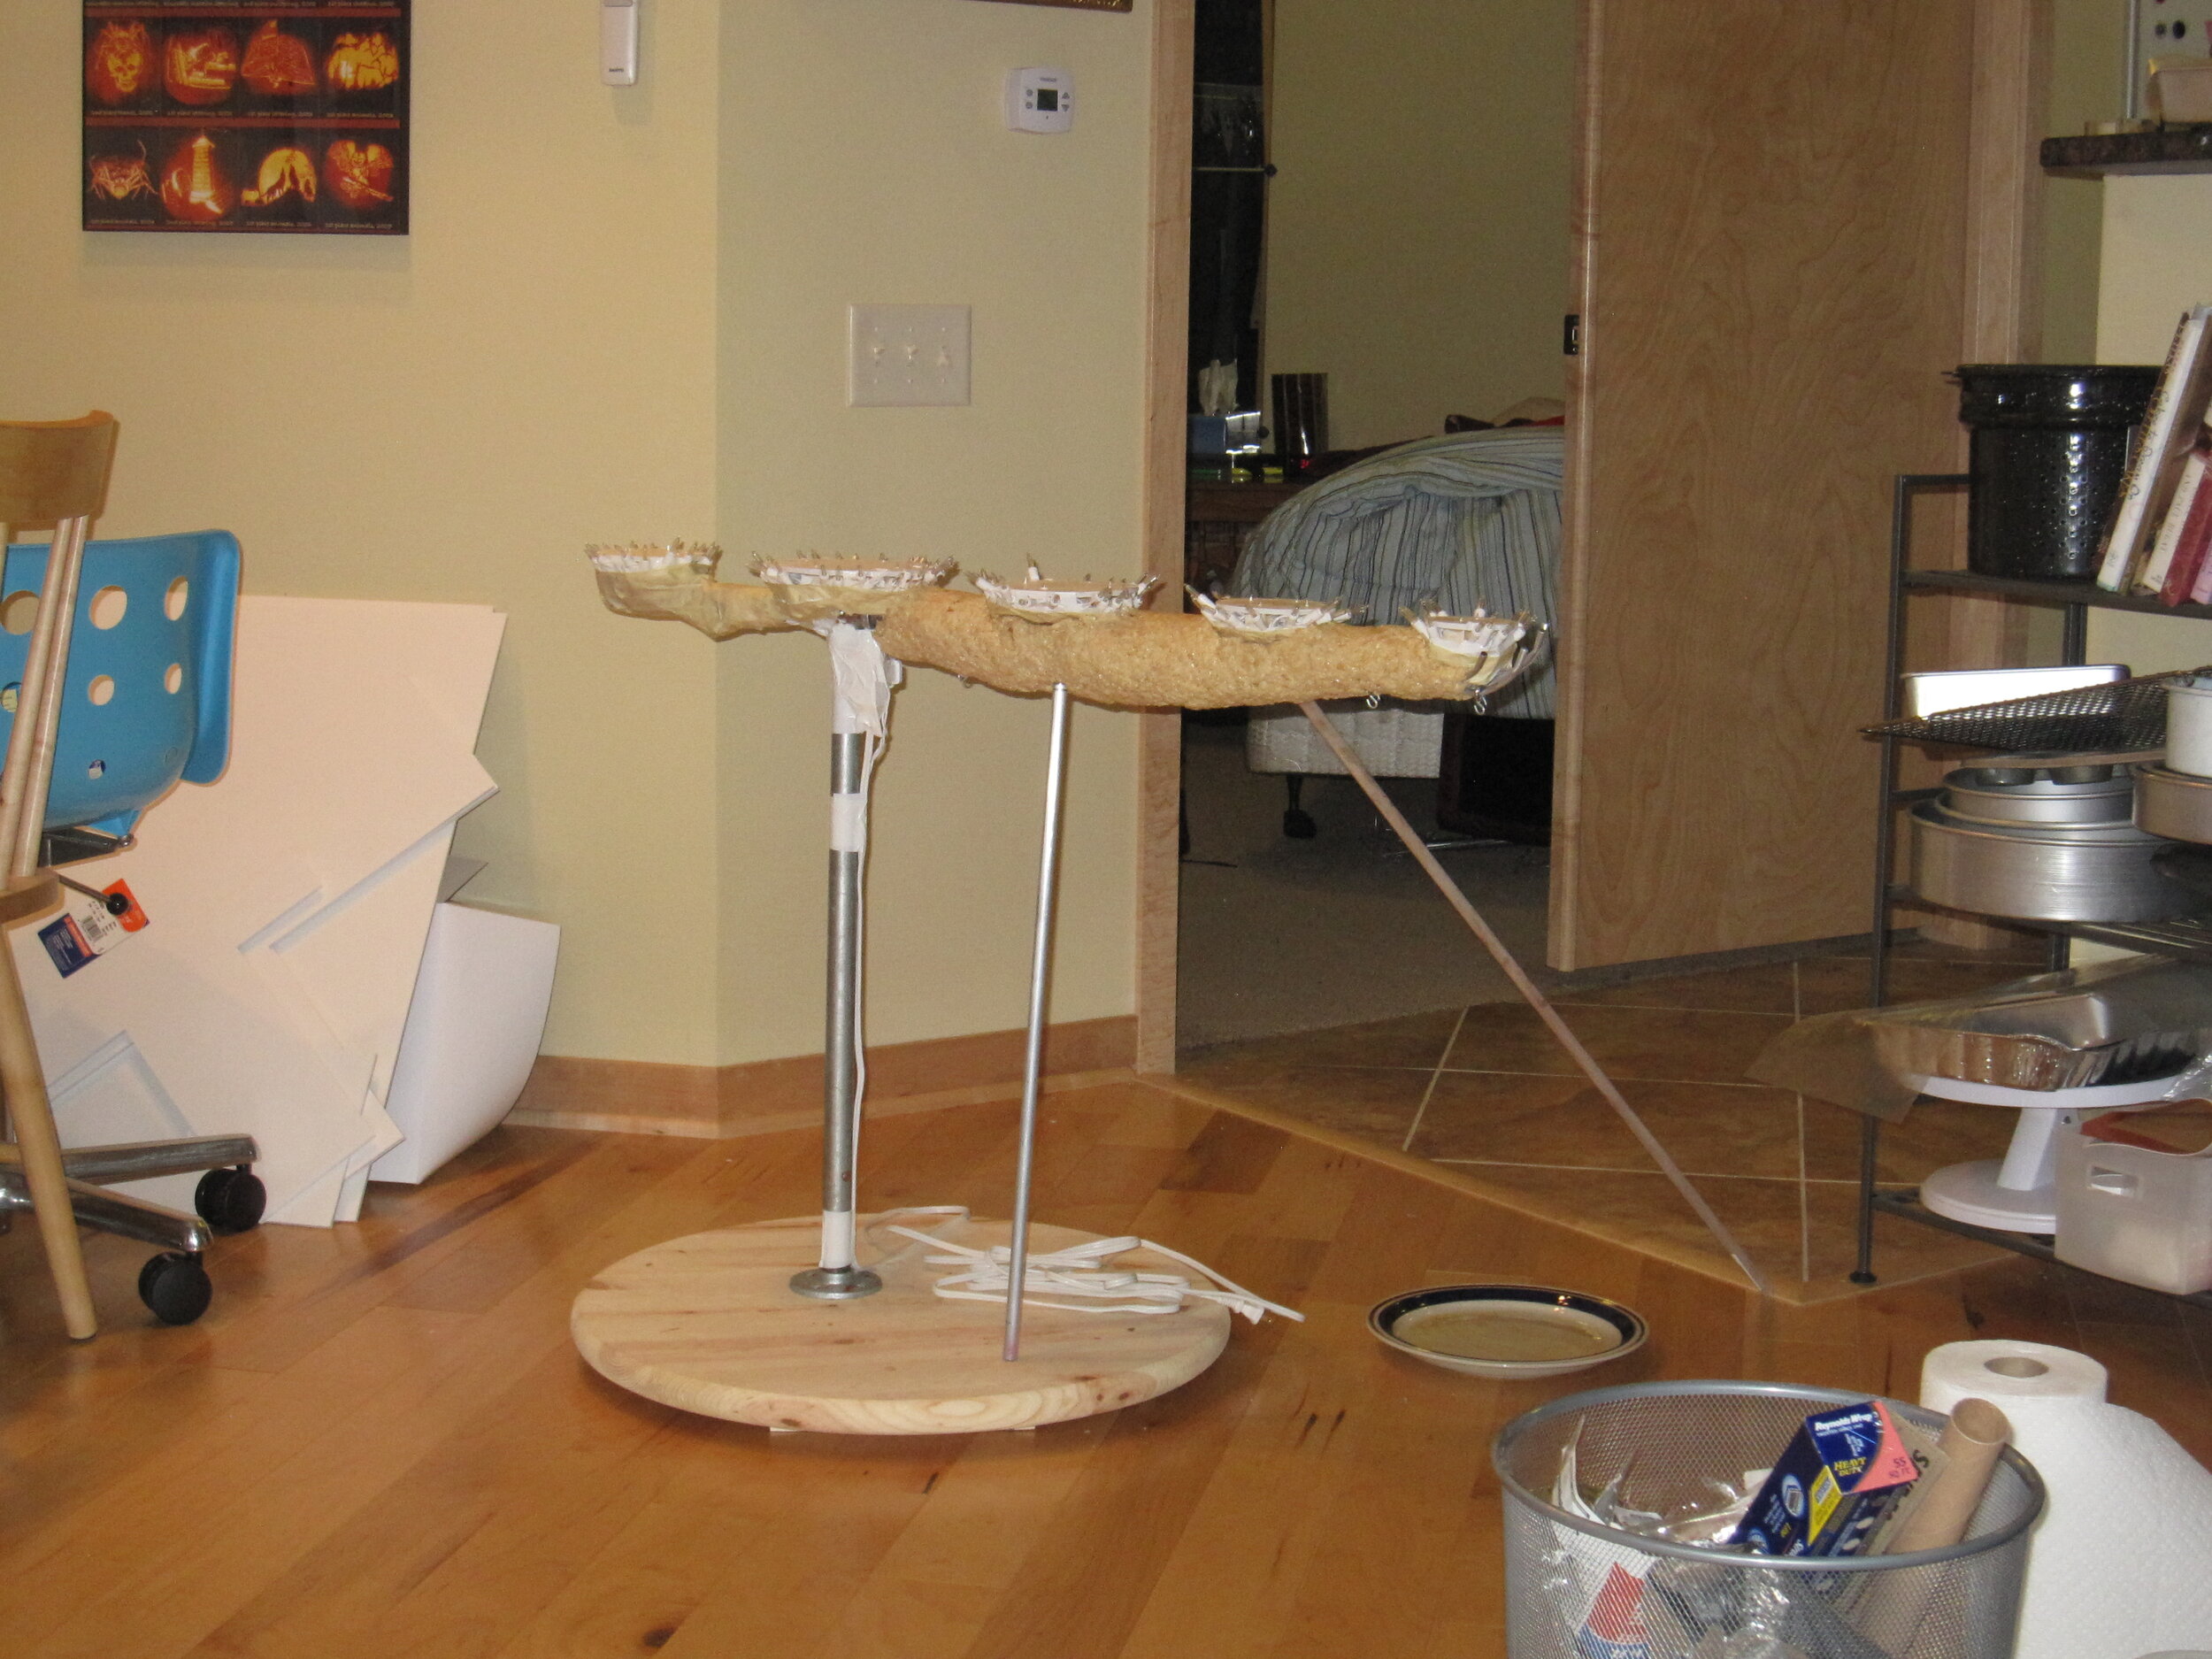
A few years ago I took a kinetic art class and we made little wire versions of Calder-style hanging mobiles. I decided to try to make one using cake to serve at a graduate student conference being put on by my department.

A few years ago I took a kinetic art class and we made little wire versions of Calder-style hanging mobiles. I decided to try to make one using cake to serve at a graduate student conference being put on by my department. It was partially an experiment to see whether I wanted to attempt a similar cake for my friends’ wedding that was coming up a couple months later. Although I think this cake turned out all right, I decided not to try one on a larger scale at an important event like a wedding.
For this project, the cake was the easy part. I tried out a new lemon cake recipe, since my friends wanted a lemon cake for their wedding. It was really good, but I didn’t wind up using it for the wedding because it called for the juice of one lemon and the zest of four lemons, so I wound up with a lot of naked lemons left over. It’s just not a very practical recipe.

I cut the cake into various sized truncated pyramids. Then I spritzed them with rum and coated them with an apricot jam glaze.
The trickier part of this project was the structure.

I started with a ½” steel pipe secured to a 24” diameter wooden base. I had planned to have two 18” aluminum tubes running through the top of this at right angles to one another to support a total of 32 little cakes. I clearly hadn’t envisioned the spatial relations carefully enough because there was just nowhere near enough room for that many cakes in that amount of space. I wound up with only 12 little cakes hanging from just one aluminum tube.

I made some little wire saddles to hold the cakes, and bought some ¼” aluminum rod to connect them.

To assemble this kind of sculpture, you start from the bottom and work your way up, balancing the components by shifting the pivot point. Once I had all the little cakes in place, I fine-tuned the weight by adding a white sugar glaze to each little cake.

I finished off the piece with a larger truncated pyramid cake on top of the central pole.

I had thought that the way that eating the cake disrupted the balance of the sculpture would make for an interesting interactive dining experience. I’m afraid, though, it may have just been off-putting and irksome.

I think the conference attendees enjoyed the cake overall, though it was by no means one of my most impressive efforts. It’s probably a good technique to have in my arsenal. I can picture some more interesting cakes based around a similar structure.


Banshee Cake
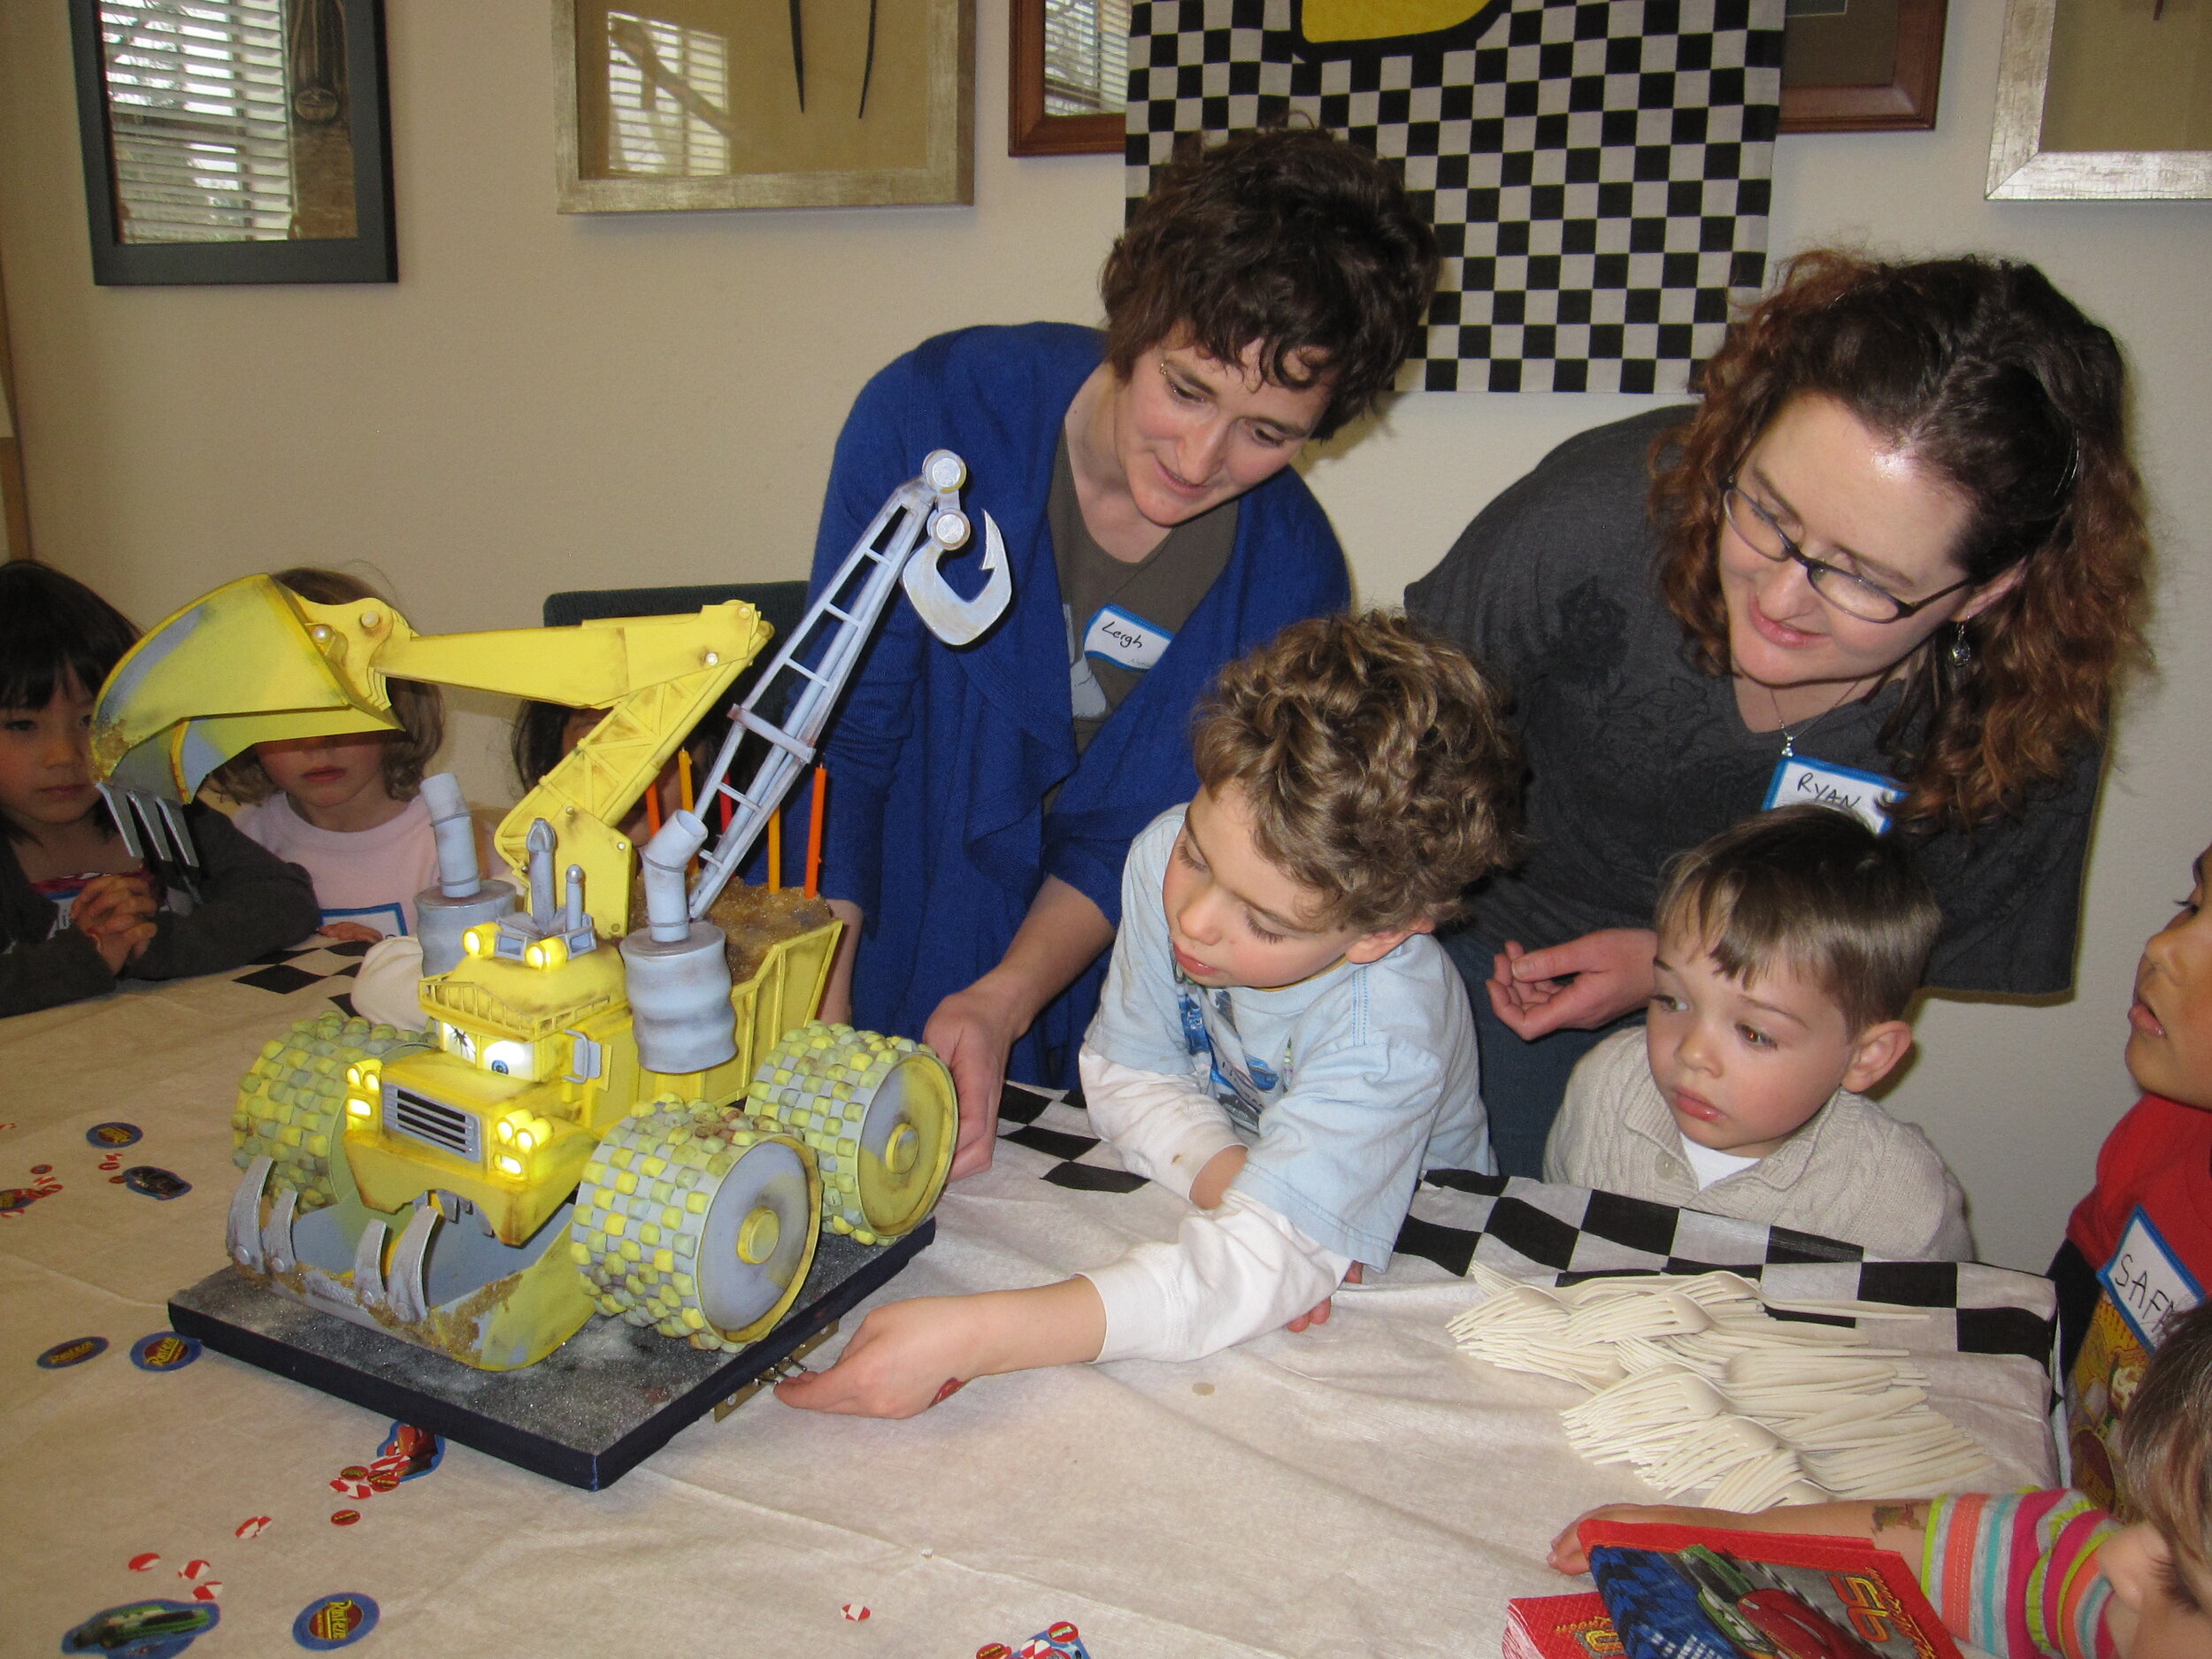
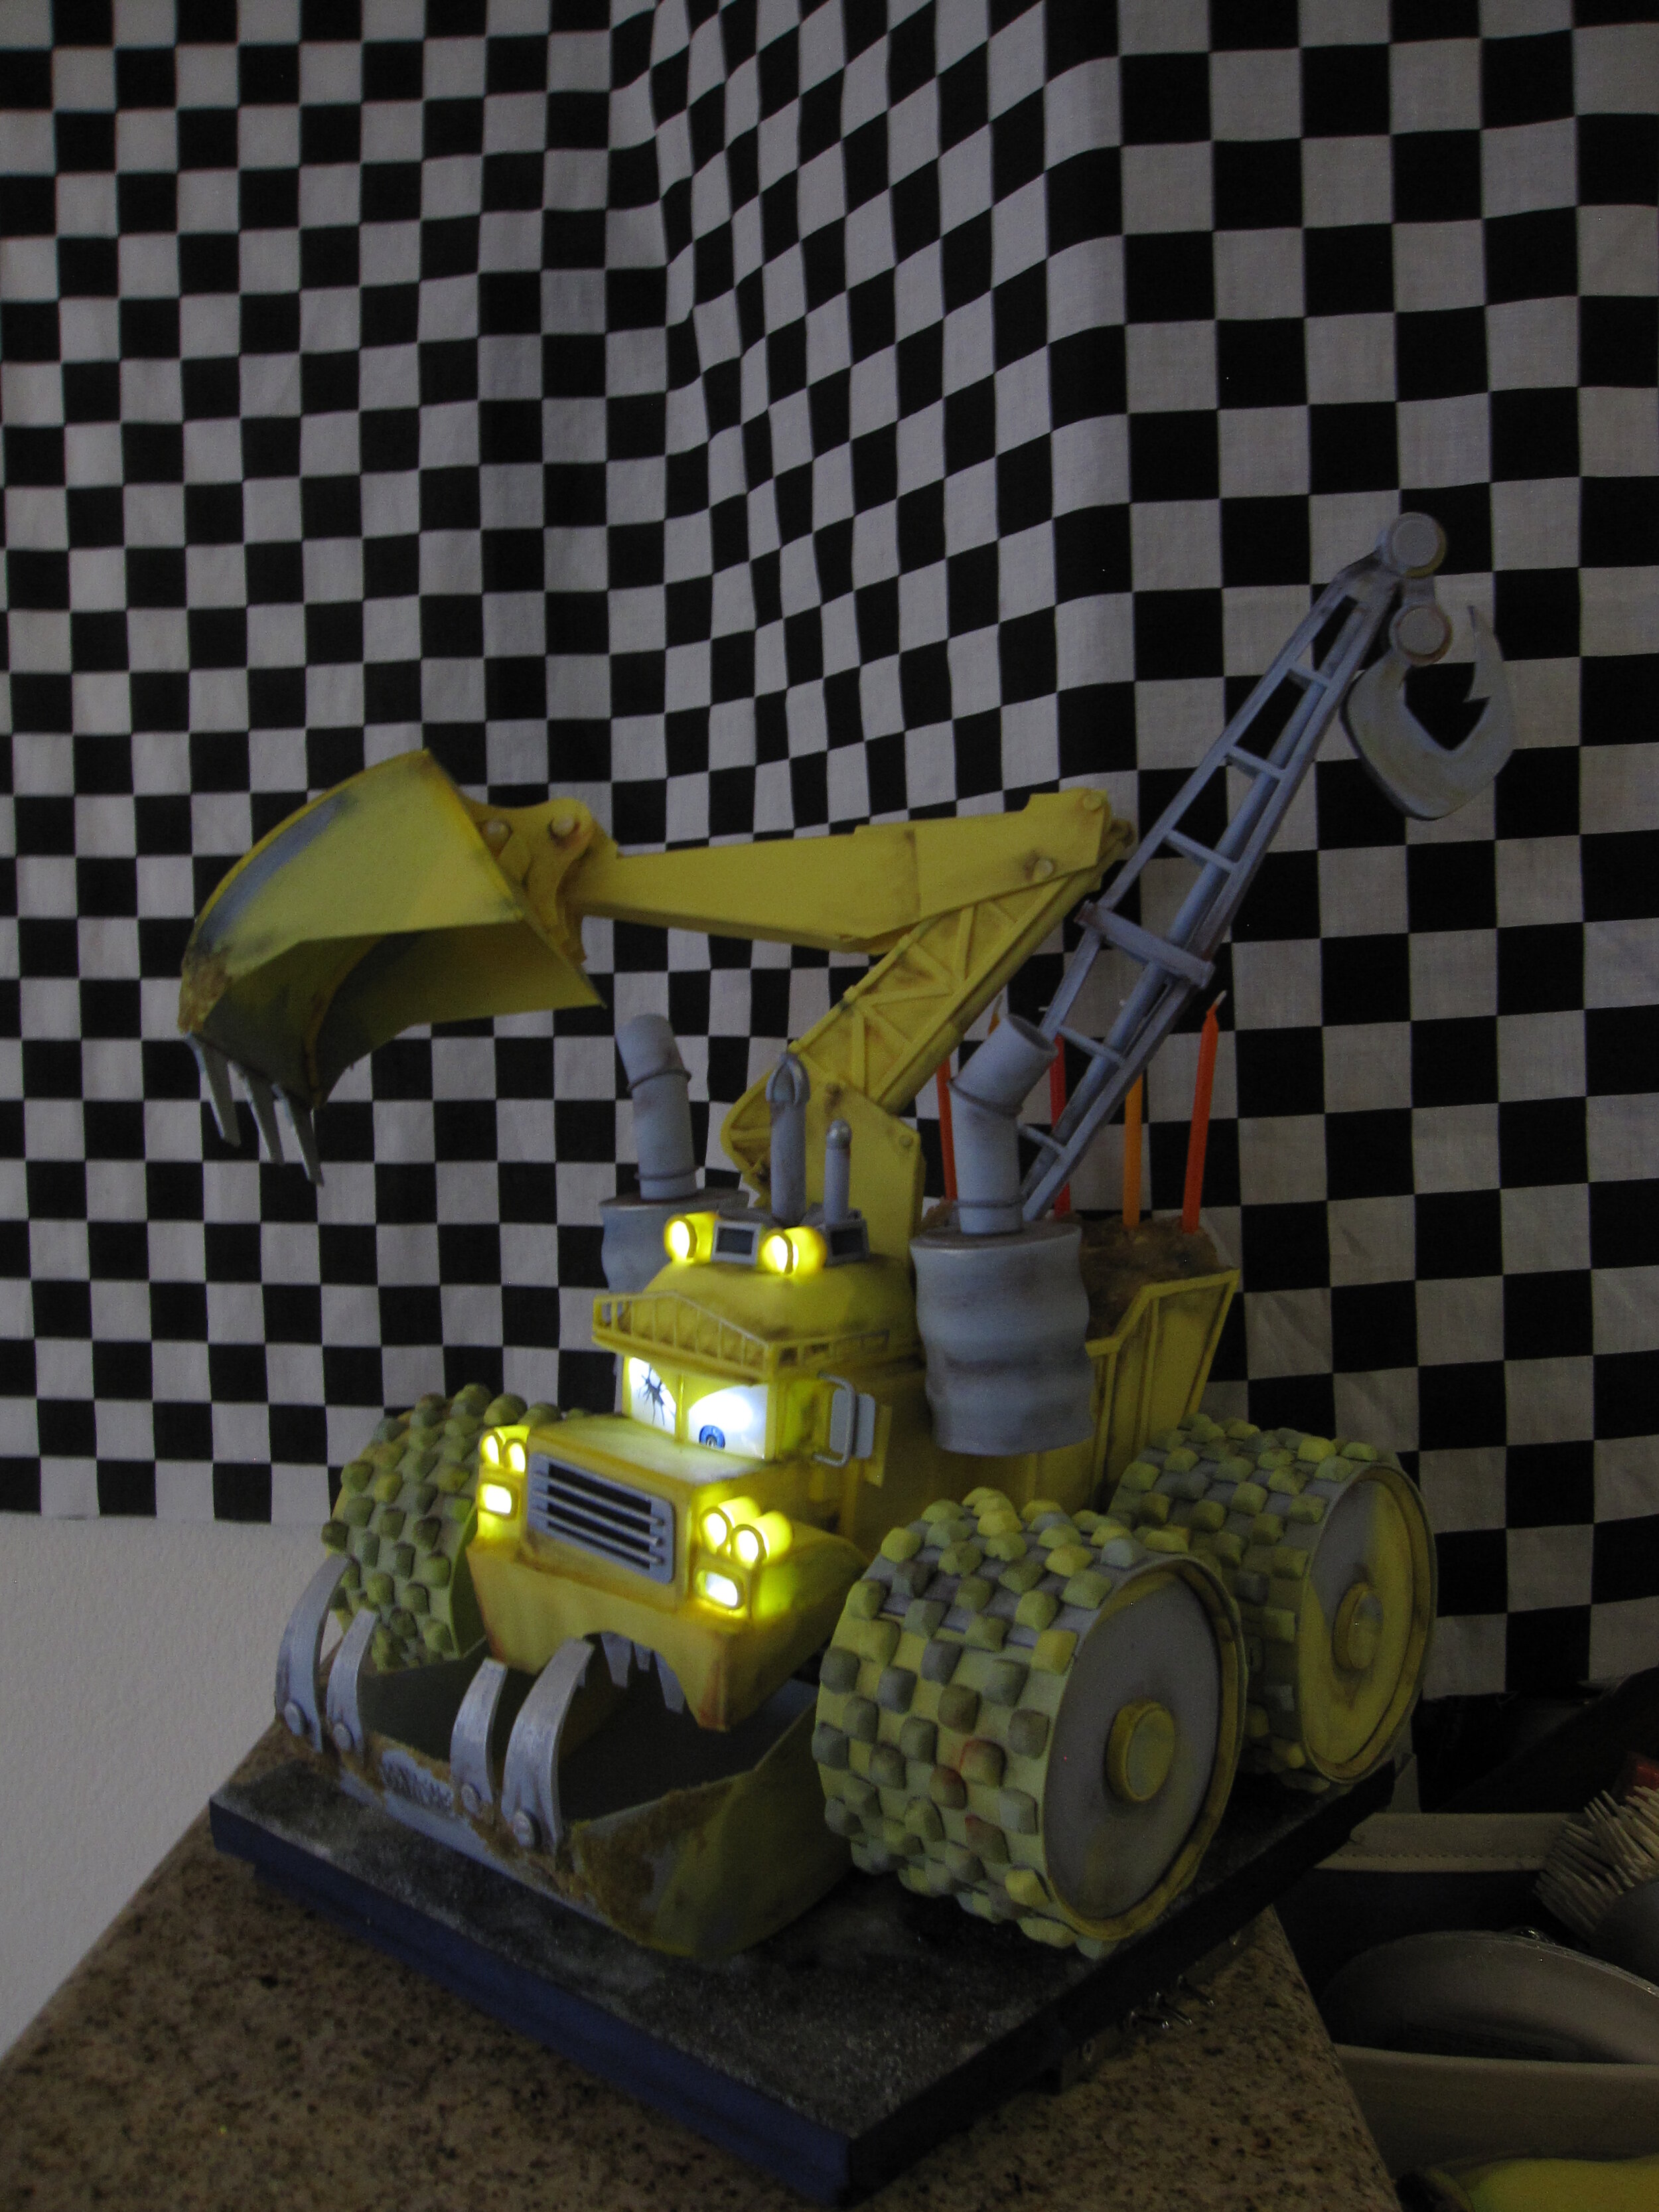
My niece Alex’s specifications for her fifth birthday cake: “I want a Banshee cake. And one switch will make the lights turn on and one switch will make the wheels turn and one switch will make the mouth open and close.”
My niece Alex’s specifications for her fifth birthday cake:
“I want a Banshee cake. And one switch will make the lights turn on and one switch will make the wheels turn and one switch will make the mouth open and close.”
Given her previous four birthday cakes, this is a reasonable request, though as you’ll read later in this account, I only managed to deliver on one of the switch operations. Of course, when I made her other birthday cakes, I was living in the same house with Alex. But now, while Alex still lives in California, I am in grad school in Madison, Wisconsin. Fortunately, my spring break aligns fairly well with Alex’s birthday, so I was able to be there for her party, but this meant that I had to make the cake in Wisconsin and then bring it with me to California on the airplane. One thing this forced me to do was to scale the cake such that it would fit in the overhead bin of an airplane, so Banshee was the smallest cake I’ve made in quite a while.

Banshee, of course, is a big work machine that appears at the end of Mater and the Ghostlight, which is an extra short on the DVD for the movie Cars. In fact, Banshee is not even in the short itself; he pops onto the screen only after the closing credits. He appears for all of twenty seconds and you only see him from one angle, which means that I had no idea, from watching the short, what the back half of Banshee looks like. Fortunately there is also a toy version of Banshee, so I bought one, planning to use it as a model for the cake and then give it to Alex for her birthday. However, since I failed to inform my sister and her husband that I had this toy for Alex, they bought her one as well. I gave mine to my little friend Isaac (age 4), who is also a huge Cars fan, so it actually worked out well for everyone.
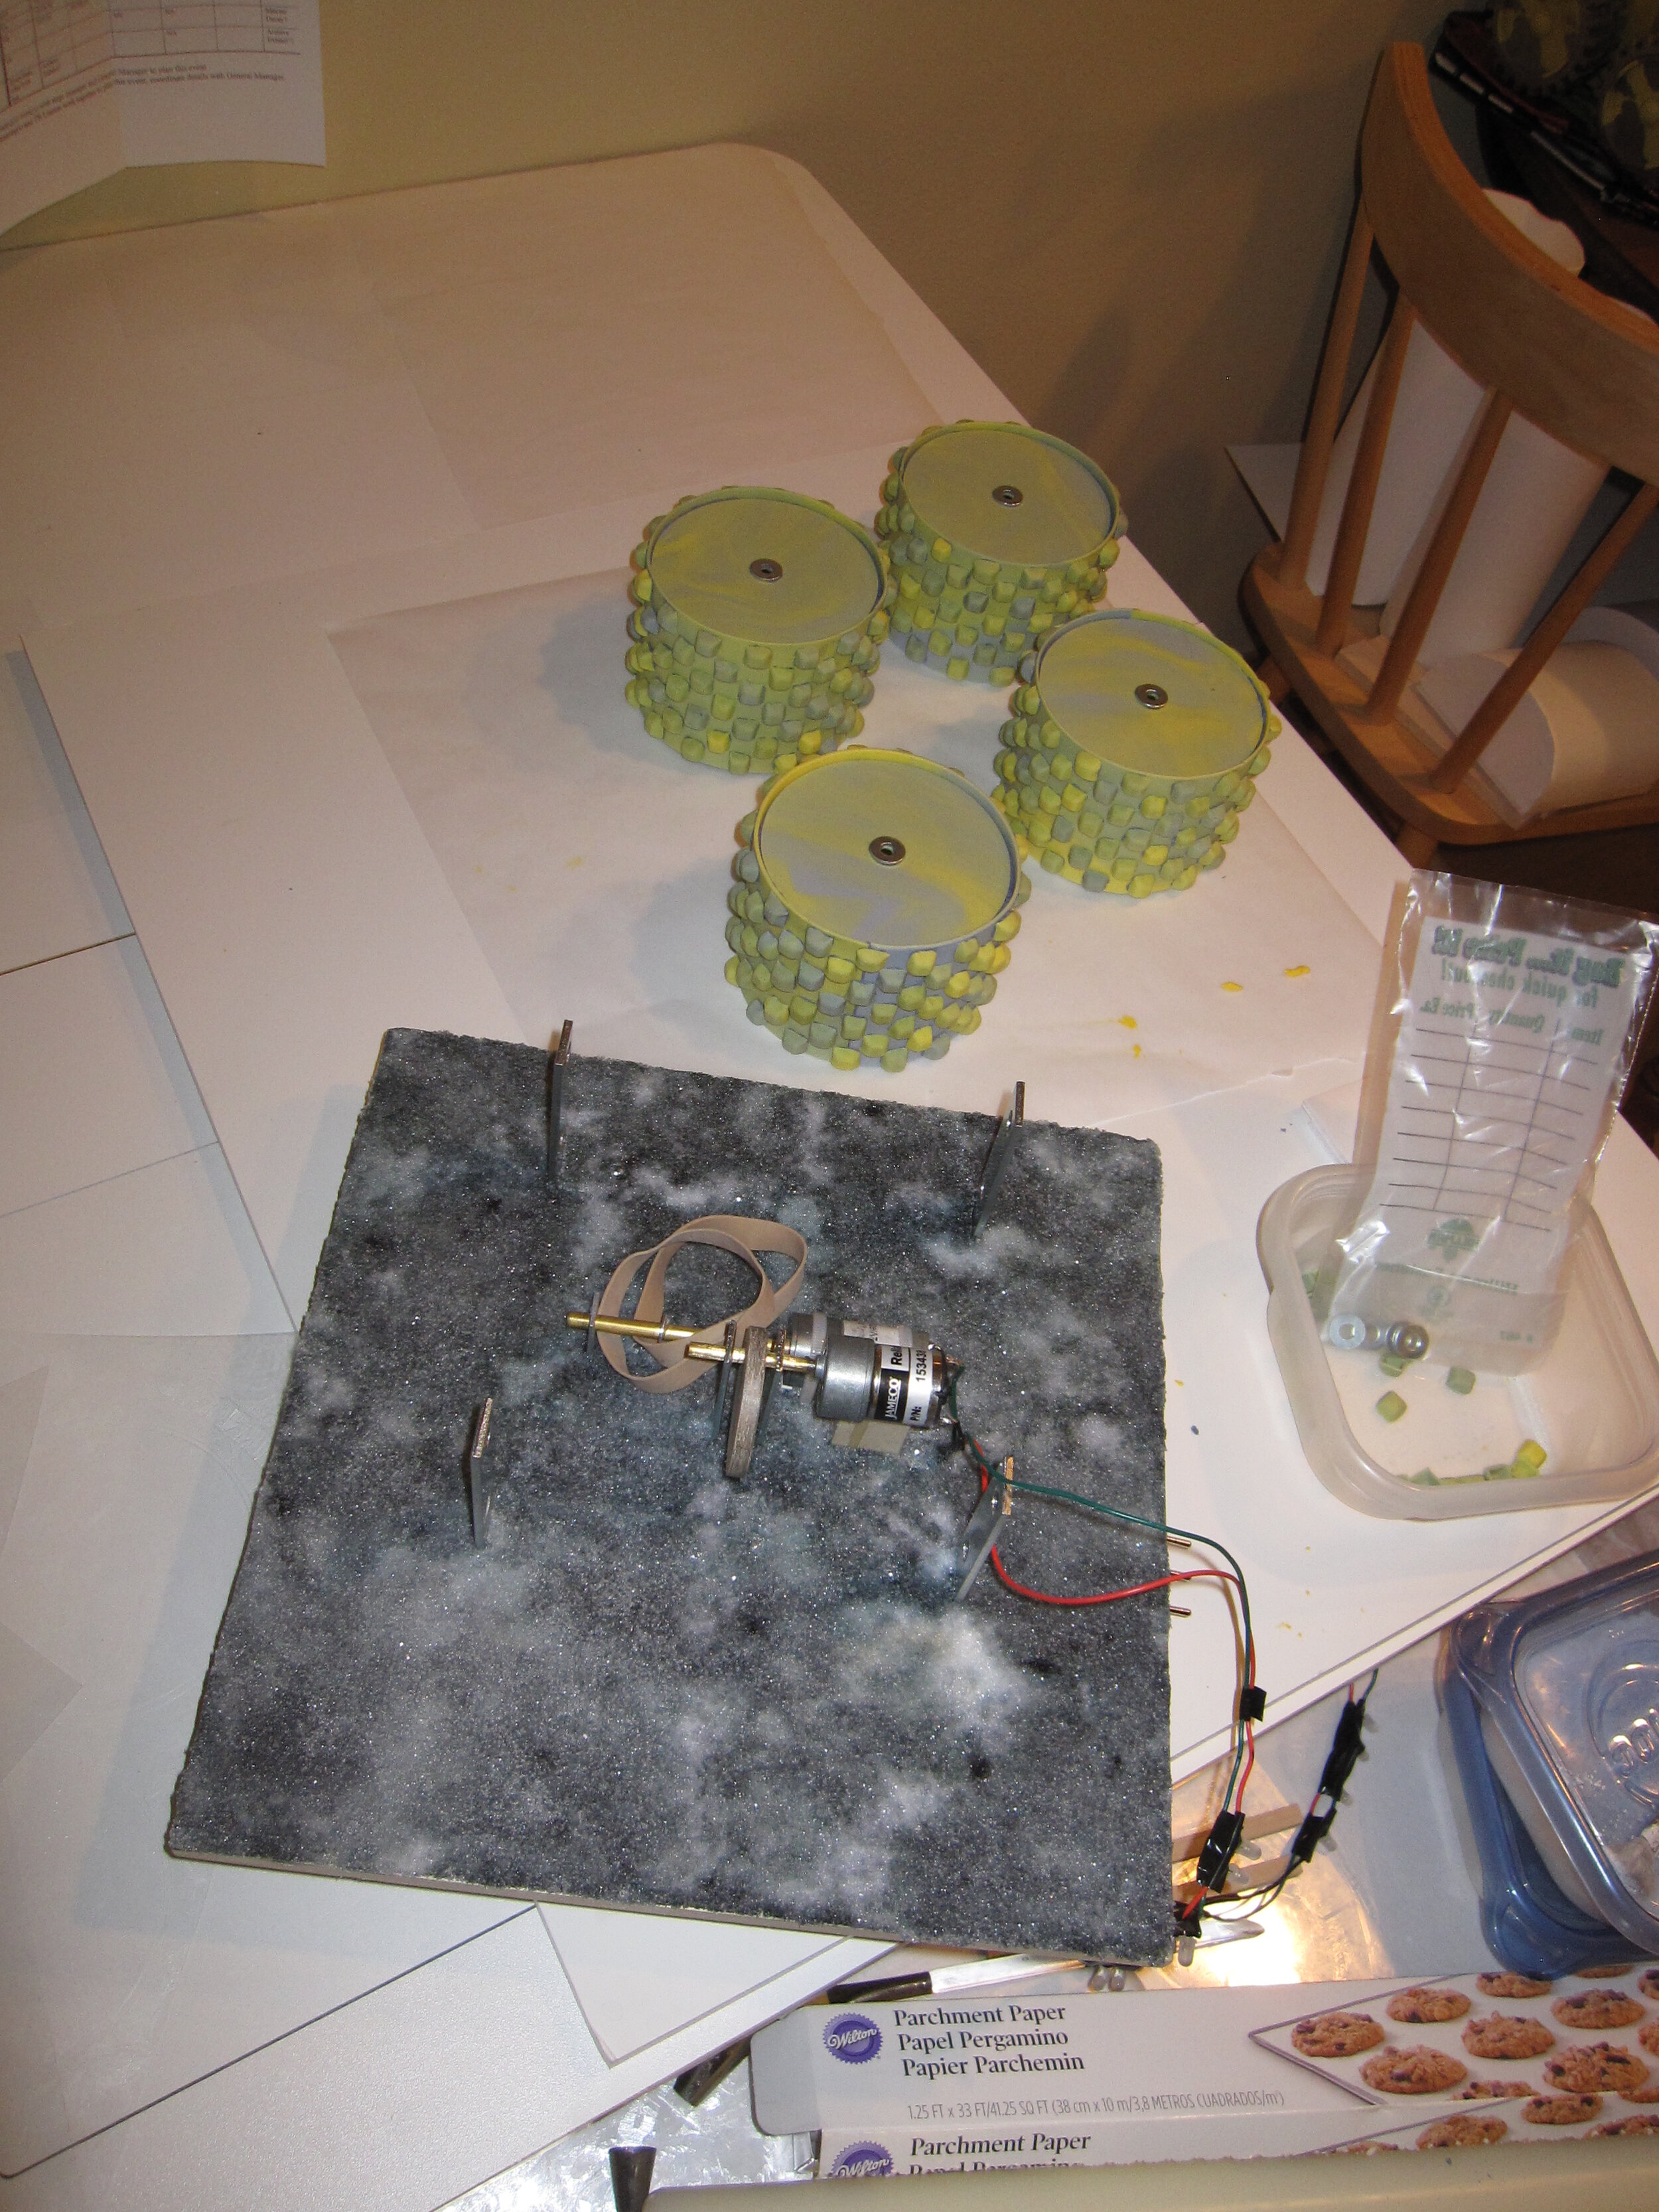
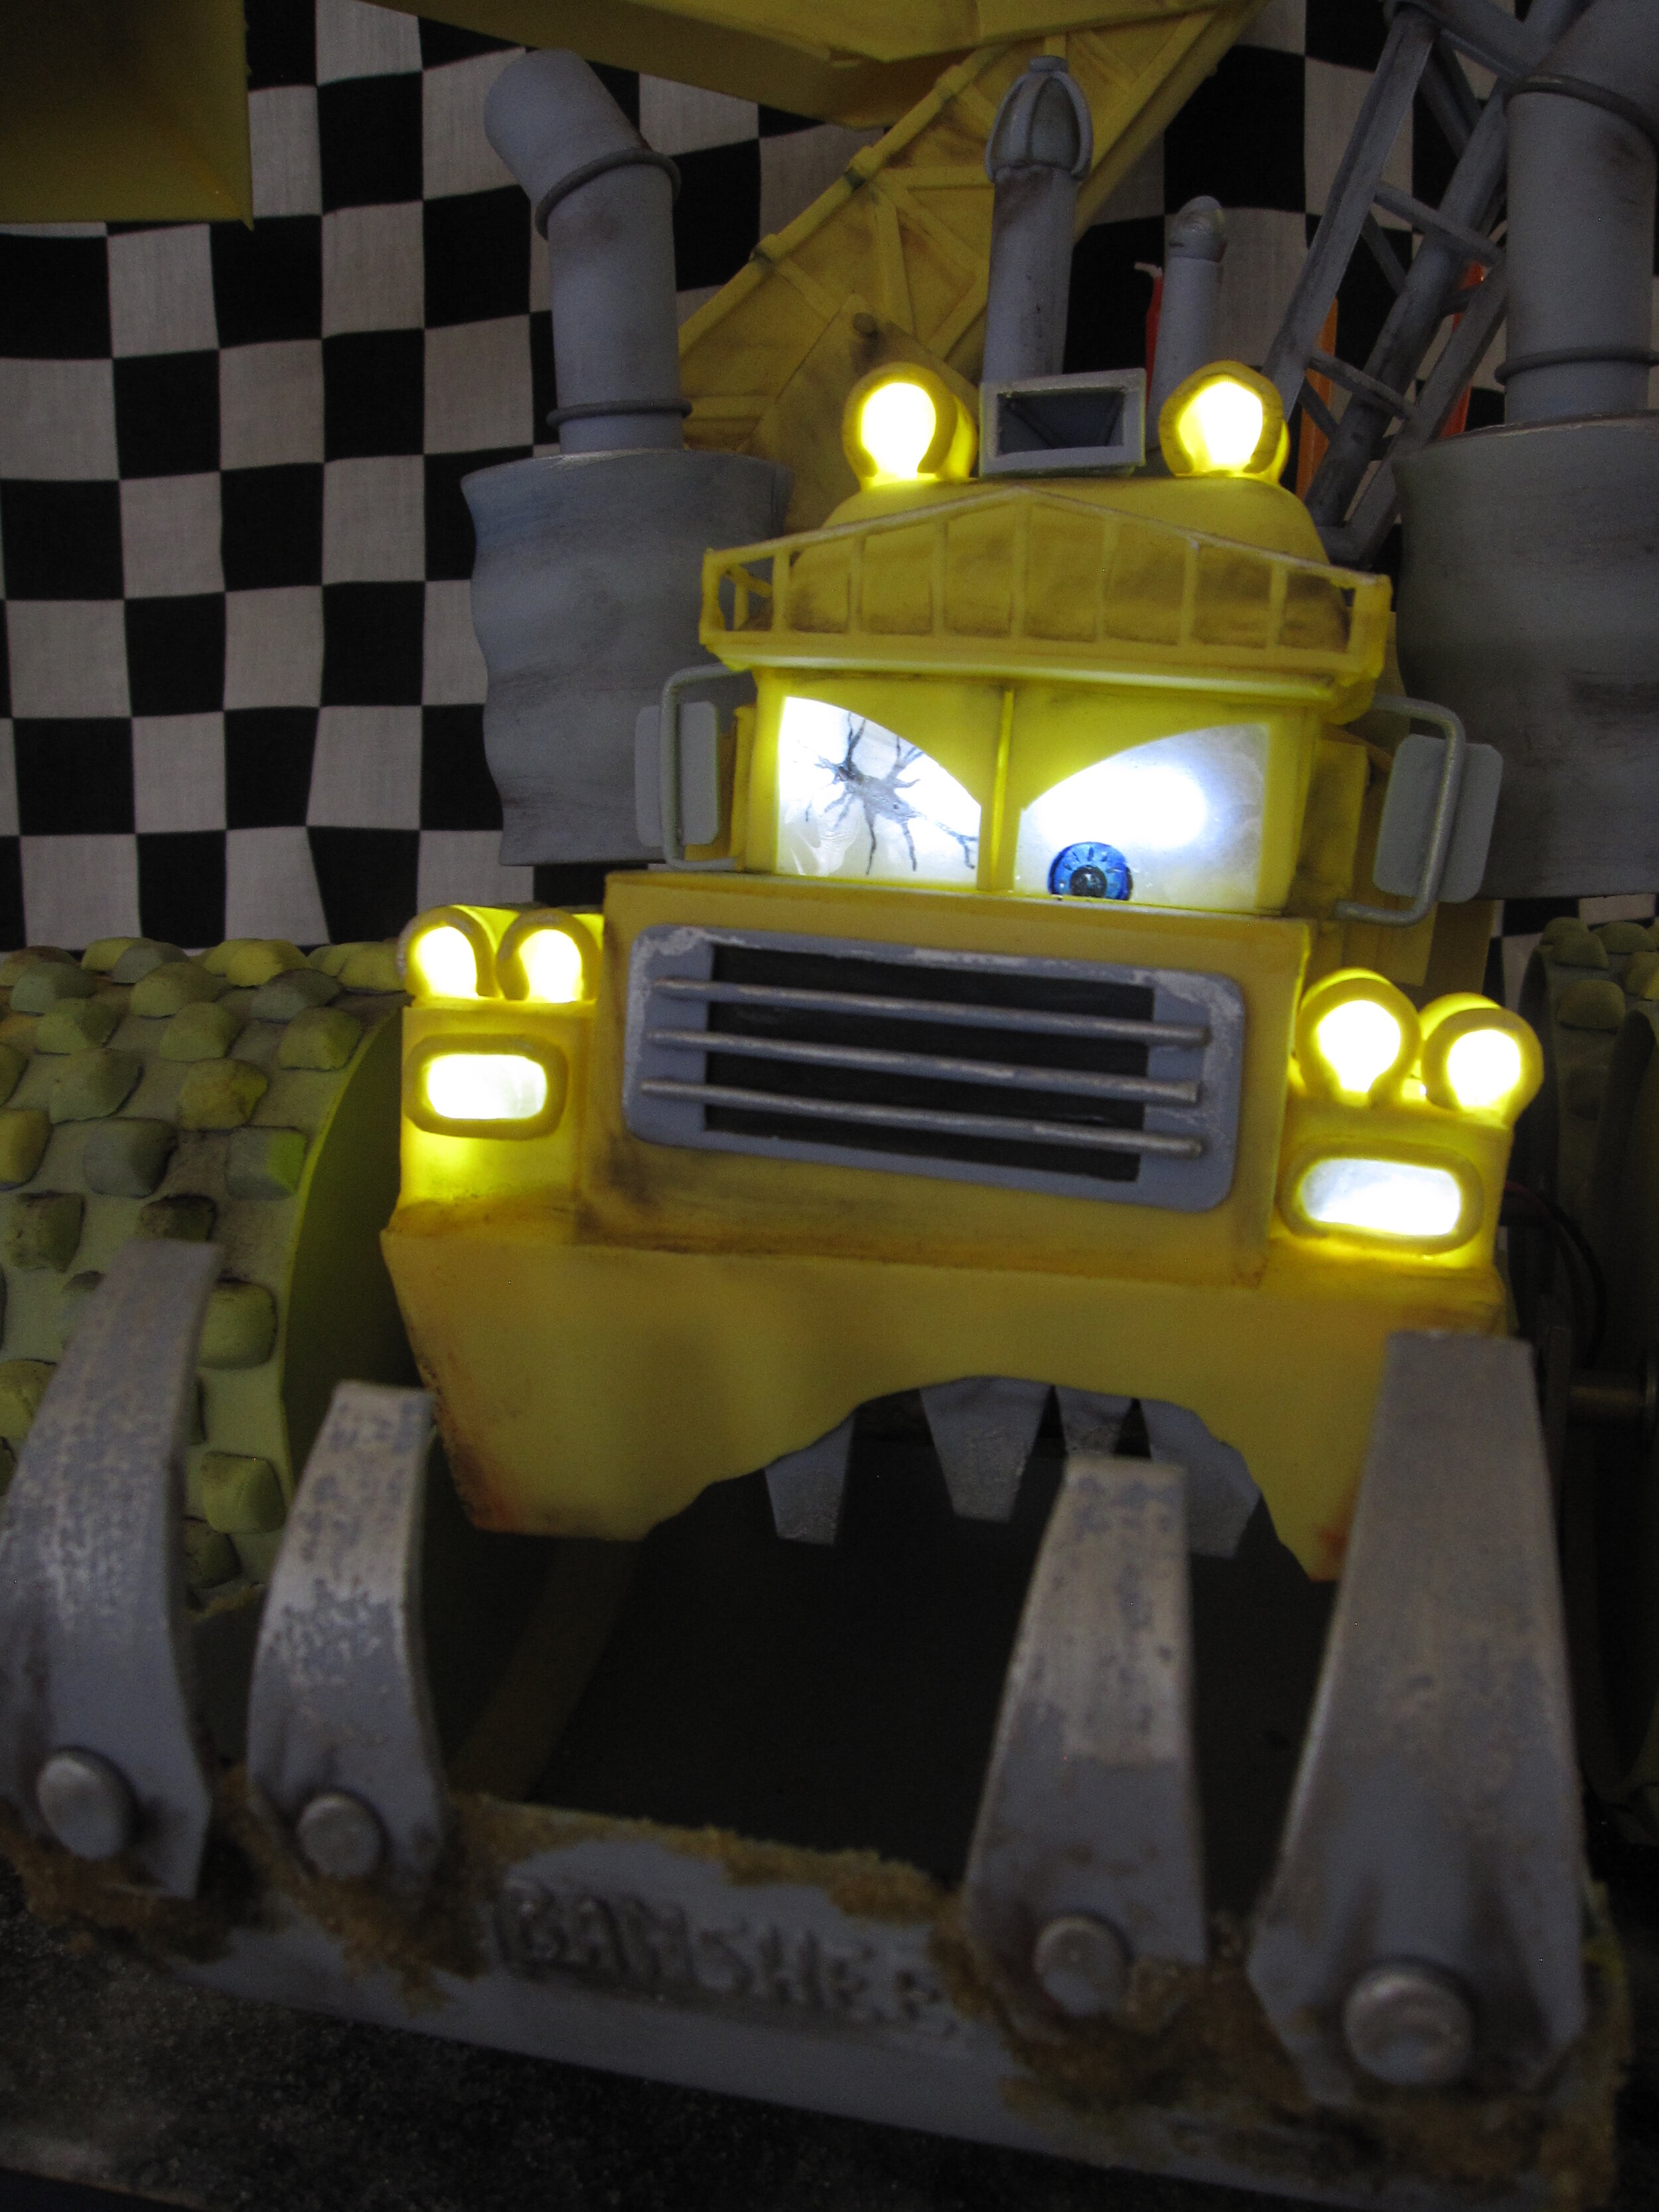
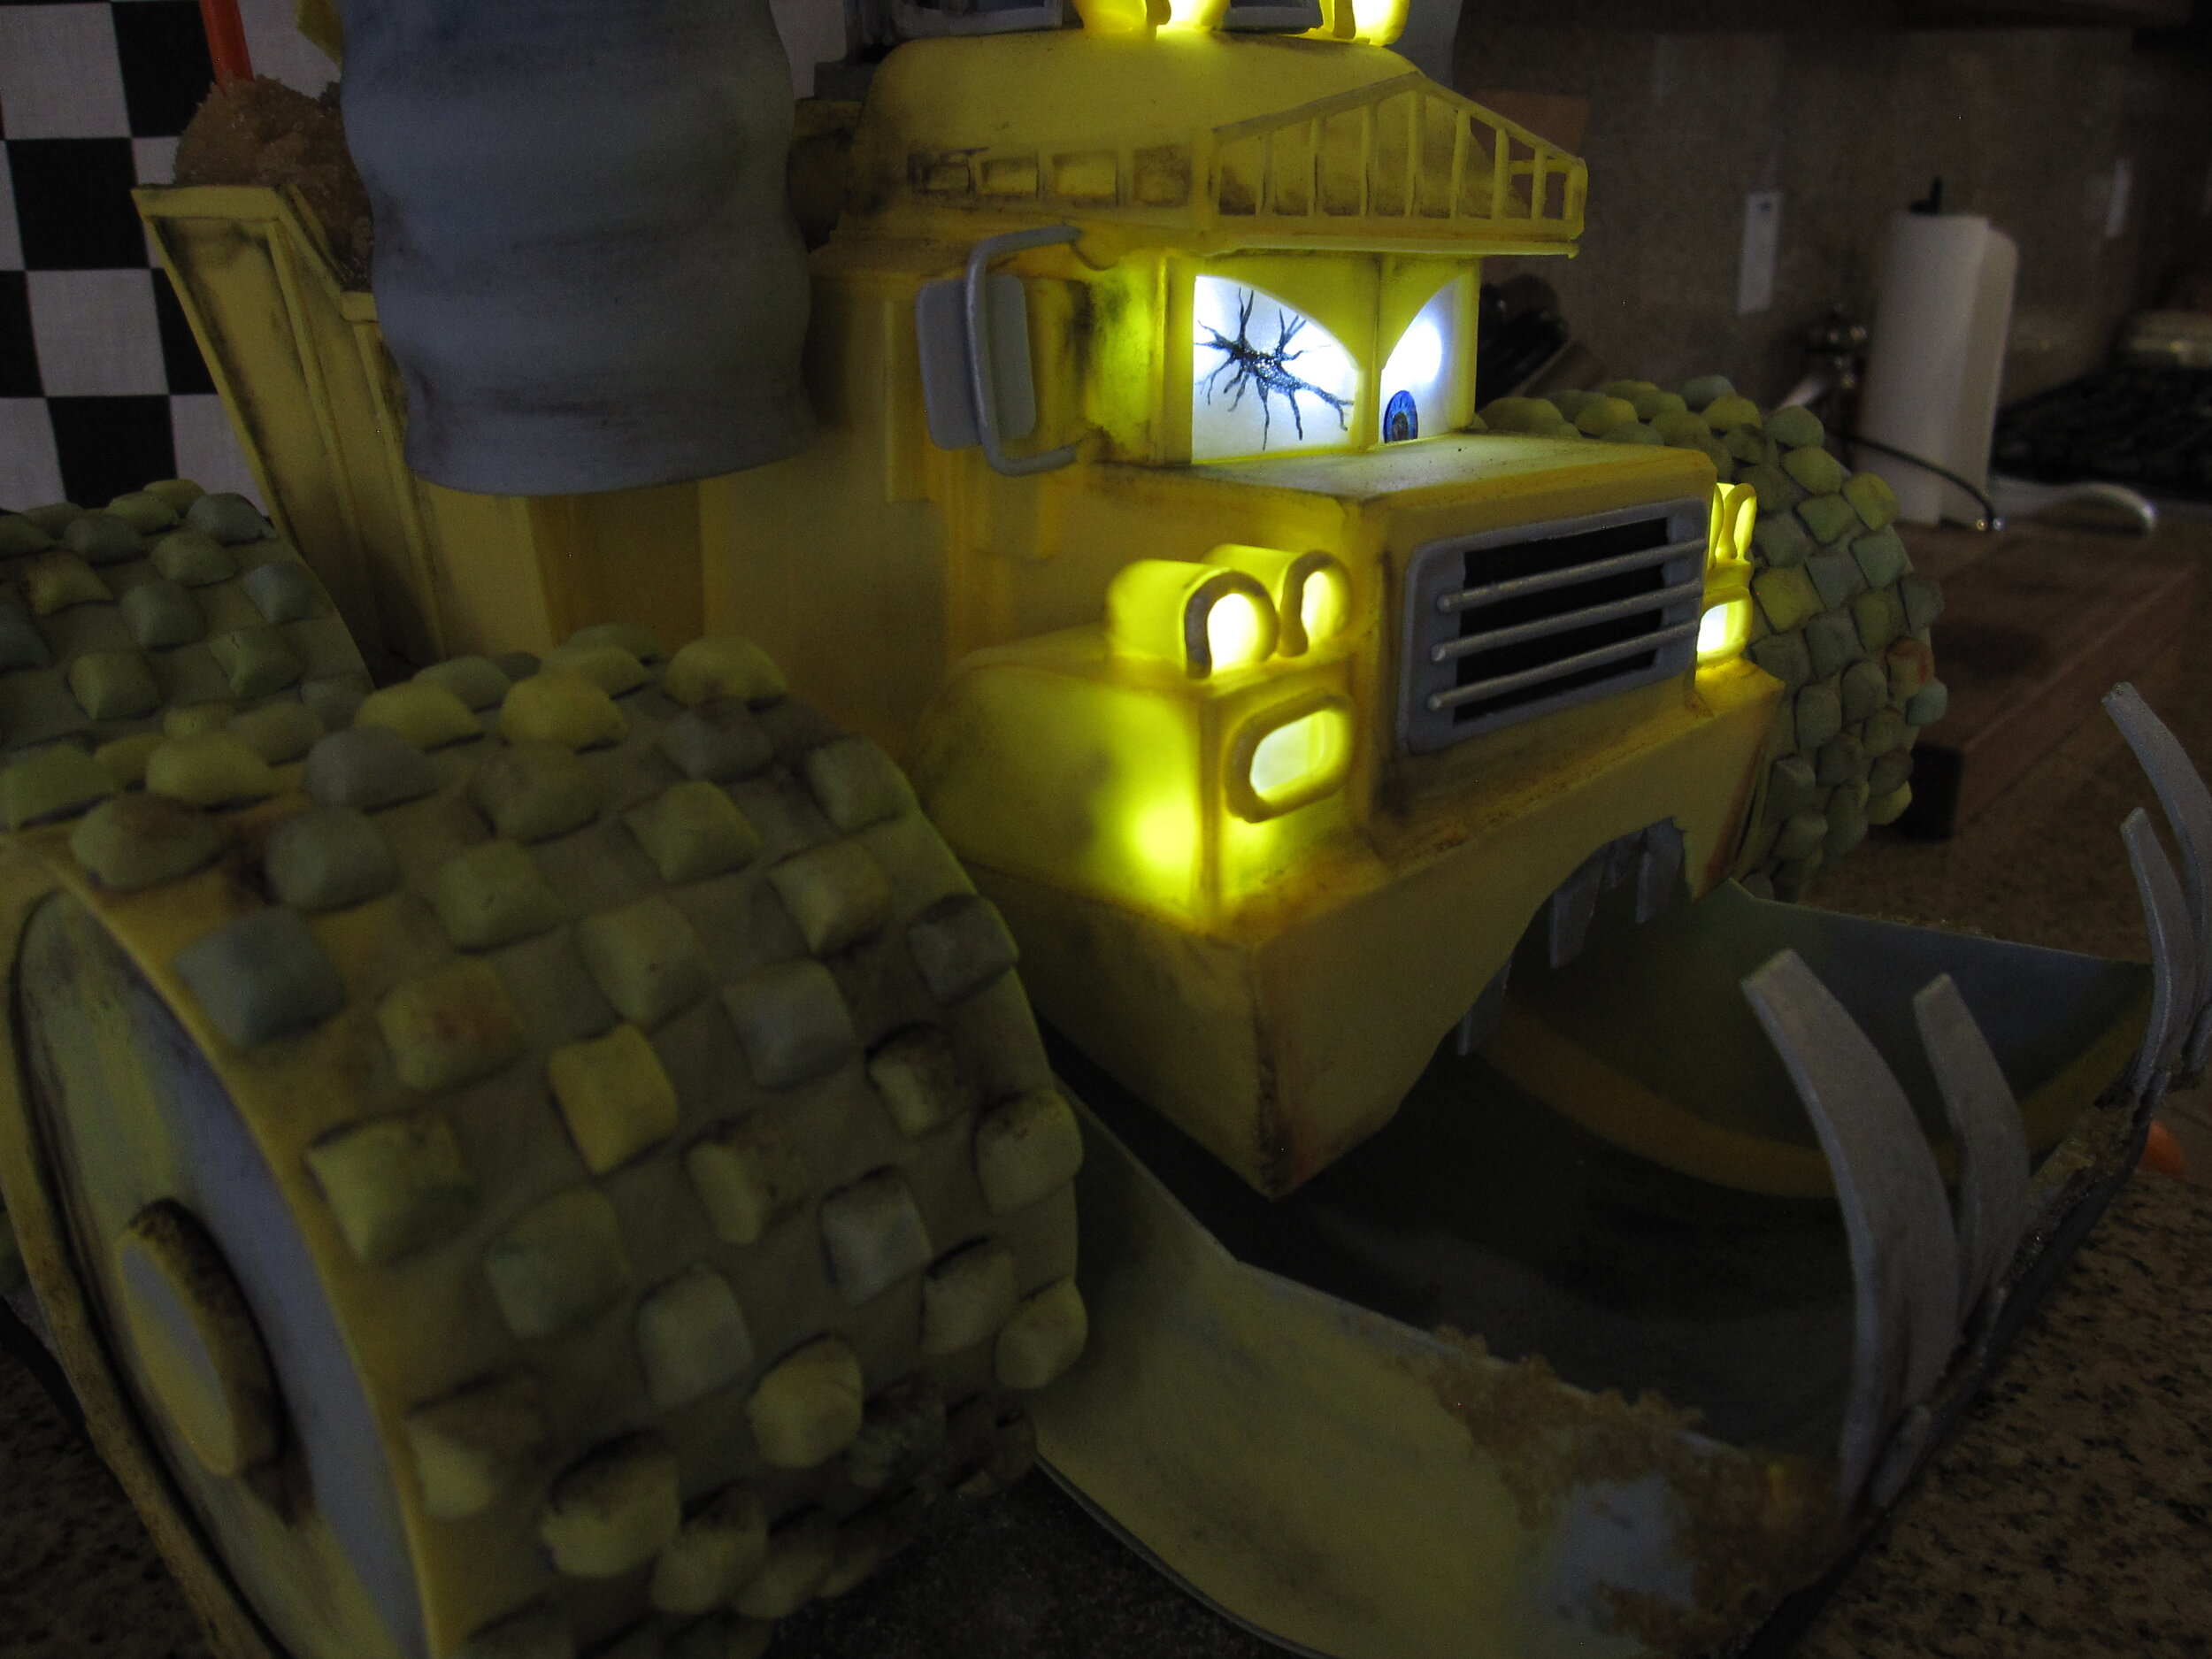
My first step was to create the electronics. By this point, I’m pretty adept at putting LEDs in my cakes, so the lights were easy. I reused the LEDs that I originally bought for the Tardis Cake. To make the wheels spin, I used a motor that I last used to power Big Rig on Alex’s fourth birthday cake, transferring power to the axles via rubber band drives. I still think it would have worked if my rubber bands had been slightly shorter. Rather than just make the mouth open and close I decided that the whole cake should rise and fall as well, so that Banshee looked like he was breathing, as he does in the movie. So I made an eccentric cam, hooked up to a motor that I had from powering Melvin the cement mixer’s drum, also on Alex’s fourth birthday cake. So as the cam rotated, it was meant to raise and lower the front end of Banshee’s body, which was anchored at the axle for his rear wheels, while simultaneously pushing his jaw up and down. If my motor had been strong enough to actually do this with the weight of the cake on it, it would have been really cool.
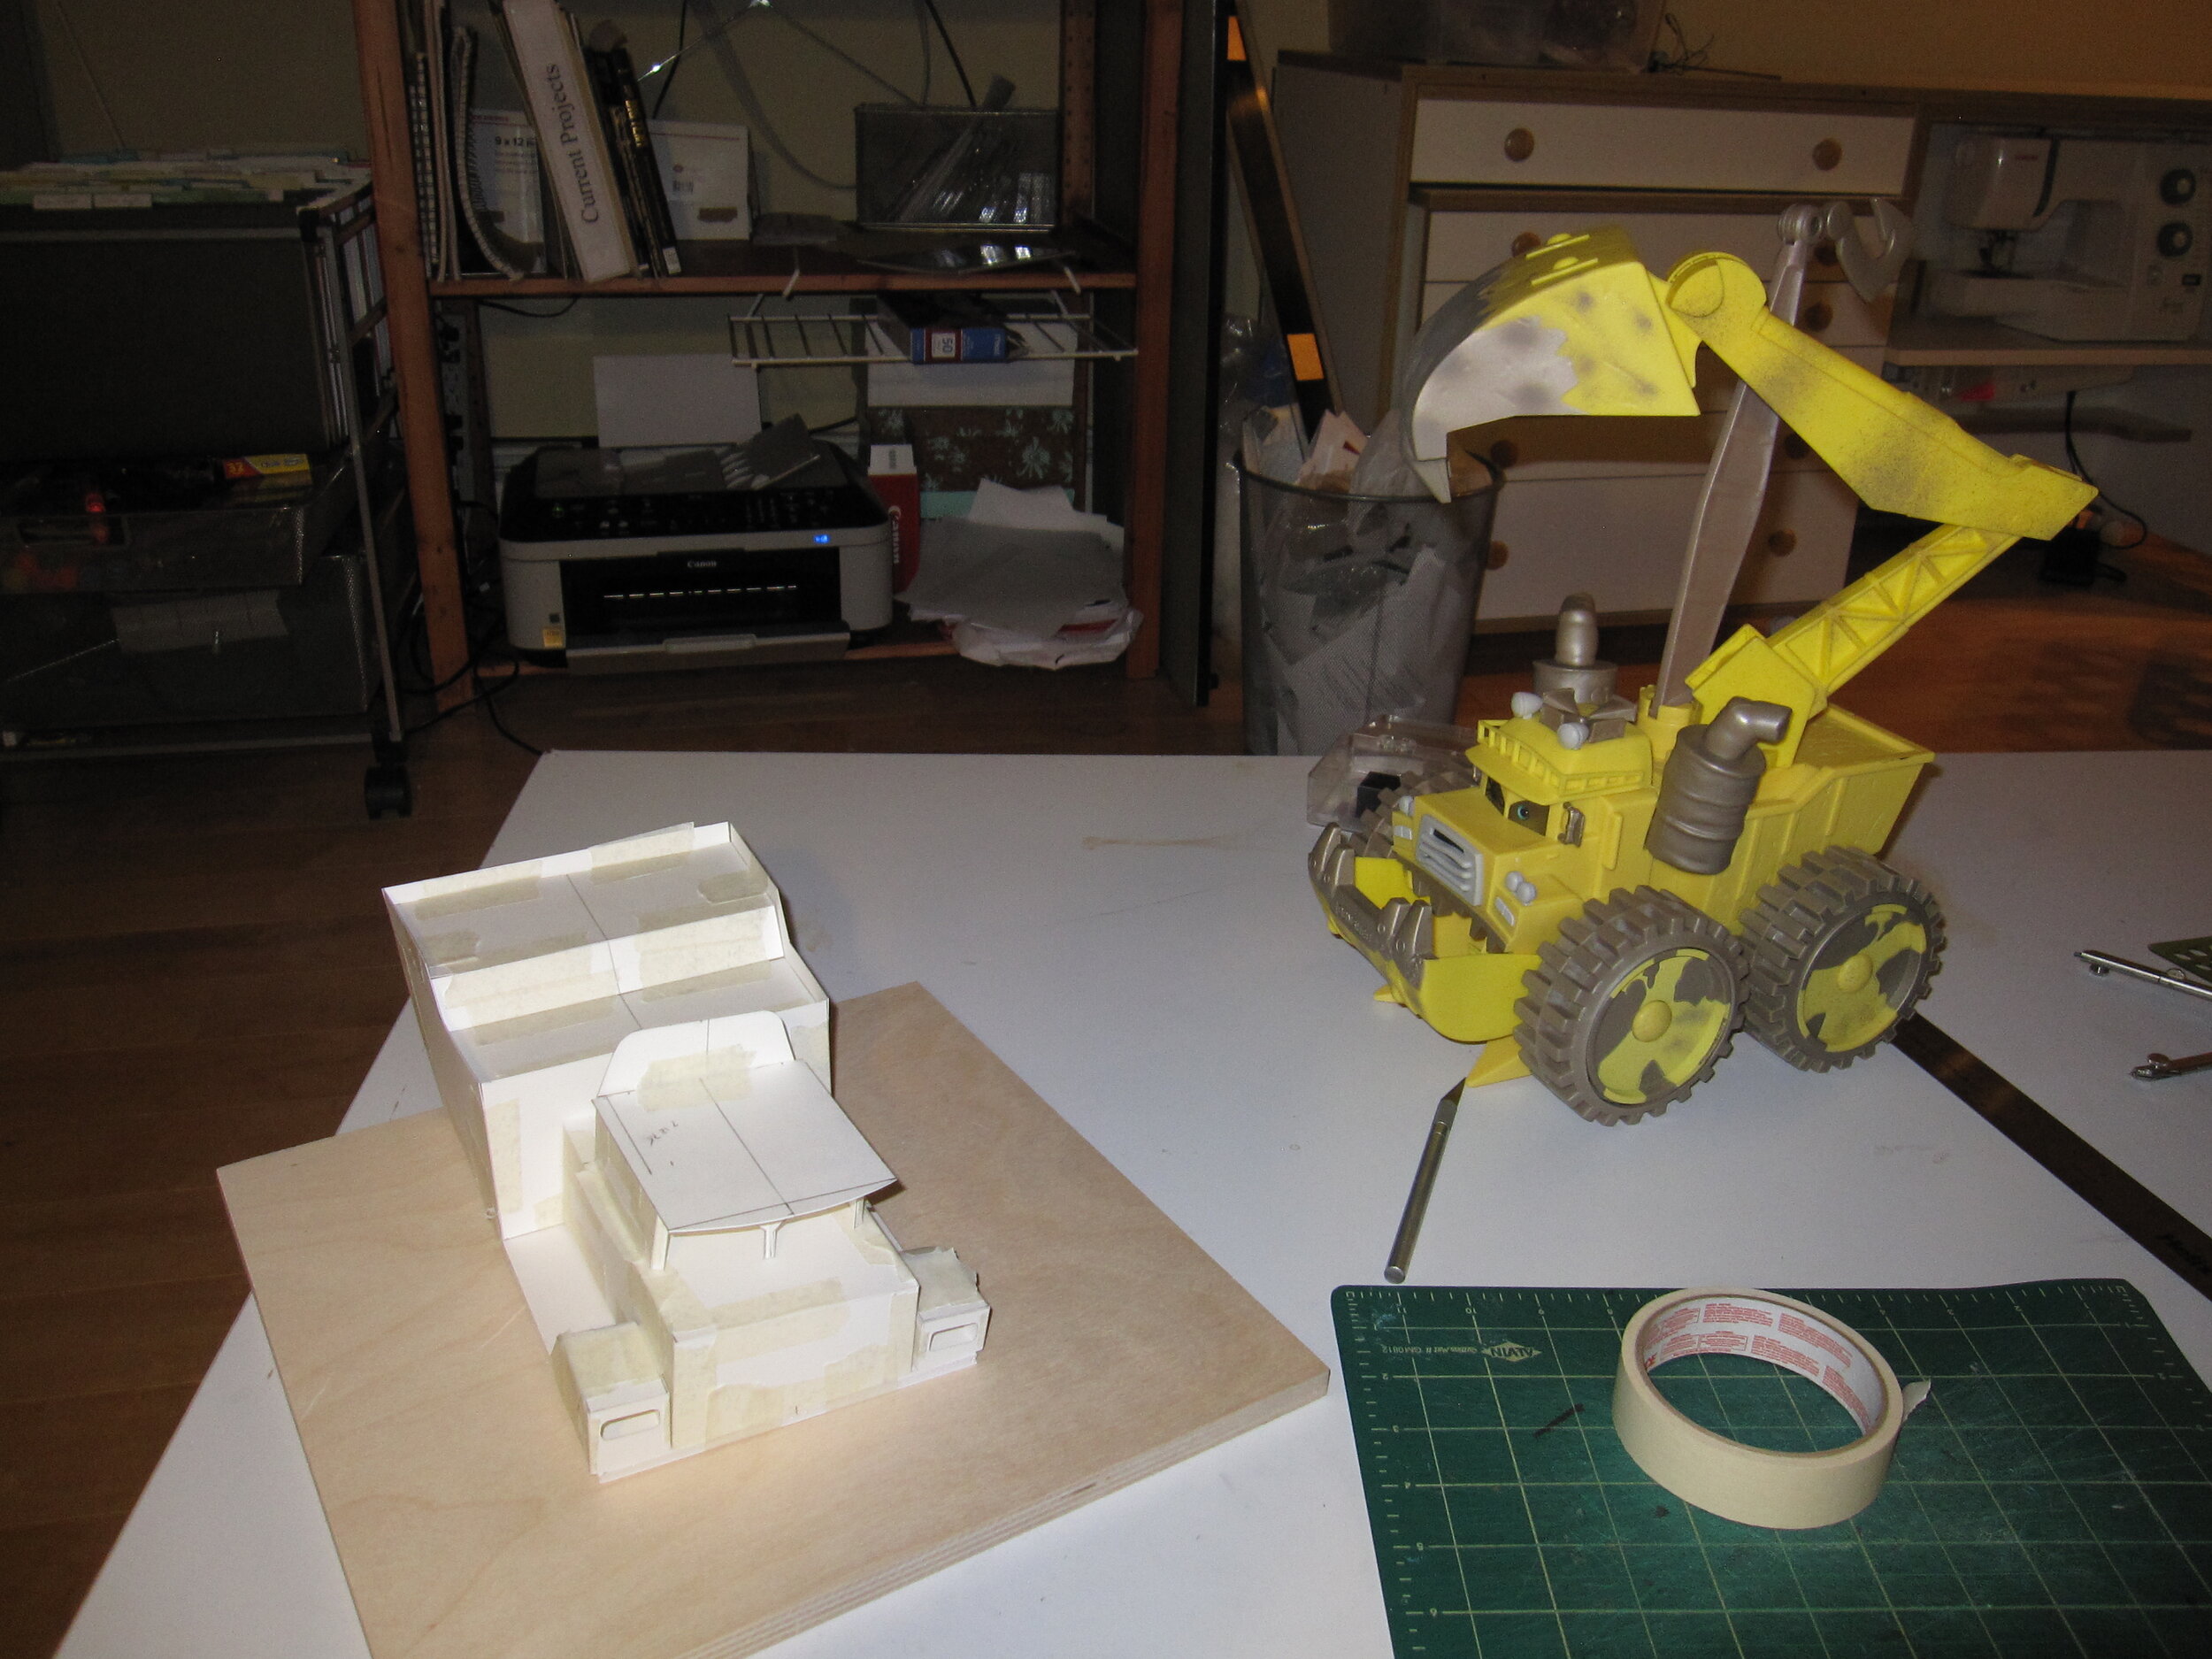
Before I made anything in edible materials, I made a full scale mockup of the entire cake in Bristol board. Then I cut it apart to use as a pattern to make the entire exterior of the cake out of gum paste. One nice thing about Banshee is that he only requires two colors of gum paste – construction vehicle yellow and old, dirty metal grey. This helped the gum paste cutting stage to go by fairly quickly. The most tedious part was making the approximately four hundred and twenty little truncated pyramids for the treads of the tires.

Once all the gum paste was dry, I assembled substructures as much as possible with royal icing. Because I was going to be transporting this cake across the country, I used more non-edible supports than I might have normally.
The tow hook and the scoop, for instance, were assembled around brass rods. Incidentally, although I’m breezing over all this in a paragraph, in reality I spent about a month on this stage of the project.

Two days before my flight to California I baked the actual cake. Because I wanted to be sure of a very stable cake for transport I used a chocolate ganache filling, rather than a buttercream. I made three separate little cakes – one for the bottom of the cab, one for the top of the cab, and one for the dumper bed in back. I covered them in fondant because you don’t want gum paste directly in contact with the cake because icing softens the gum paste.
Cake assembly went well. Only a few gum paste pieces were inexplicably the wrong size, but I was able to shave them down to size with a minimum of trouble.
Much more problematic than assembling the cake was packing the cake for travel. This was the first time I had ever tried to move a cake except by car so I was nervous. I had to use basically every inch of my two carry on allotment. For my main carry on I made a foam core box that was about 9”x14”x15” to carry the cake. I also needed to use my extra briefcase carry on allotment to bring Banshee’s scoop arm and tow hook, as well as all the components that made him more than 8 ½” tall. Terrified that my pieces would break en route and I wouldn’t have a cake to give to Alex, I spent at least six hours making boxes, carefully packing components, padding, etc. It was time well spent.

The trip was probably the most stressful flight I have ever endured, with the possible exception of the first solo plane trip I ever took when I was sixteen and flew from Michigan to California to visit my sister in her first year at Stanford. Initially, I had imagined that I would relax once I successfully got the boxed cake through security. This turned out not to be the case.
Security screening went pretty well, although I was so nervous that my hands were shaking. If I hadn’t been allowed to take the cake on the plane, it would have been game over. Fortunately, I was flying out of the Madison, Wisconsin airport, which is by far the most laid back airport I’ve even been to. The only other airport I’ve been to that even comes close is in Paro, Bhutan, an airport so remote and exclusive that only two airplanes are allowed to land there. I got to the airport about three hours early to be sure to have plenty of time to get through security. Obviously, they needed me to open the boxes, but the security personnel were very respectful of the cake’s fragility and complimentary of its appearance. After they swabbed my hands, the cake boxes, and the switches I was cleared through security and safely on my way.
At this point I realized that I couldn’t relax because I was traveling by myself and didn’t want to take my cake into the bathroom with me to pee. Fortunately, I ran into a friend in the airport bar whose flight to Albuquerque had been delayed, so she was able to watch my cake while I ran to the ladies’ room.
Getting onto the plane was also terrifying because the first leg of my itinerary was Madison to Chicago, which is a short commuter flight on a very small plane. When the gate attendant in charge of gate checking carry ons came around the gate area, he told me that I would probably not to able to fit both of my carry ons onto the plane, which to me would have been a complete disaster. However, after a half hour of sitting in the gate area in terror, I was able to stow the cake under the seat in front of me and my other item in the overhead bin. I cannot tell you how relieved I was that this worked out.
In Chicago, I had to carry the cake from one end of the airport to the other to get to my next gate, but at least it fit more easily onto this plane than the last one. A flight attendant even saw it in the overhead bin and offered to put an ice pack on the box to keep the cake cool.
I arrived in California late Friday night and the party was scheduled for Sunday afternoon. On Friday, all I could do was open the box to verify that the cake hadn’t completely collapsed before I fell asleep. I spent Saturday playing with the kids, so I didn’t get to unpack the cake completely until Saturday evening after the kids went to bed.
Amazingly, the cake came through the journey completely unscathed. Literally only one piece broke, and it was a piece that I had extras of, so it didn’t even matter. Even in my best case scenario, I had expected to have to effect at least minor repairs. I was completely flabbergasted by how well the cake traveled.
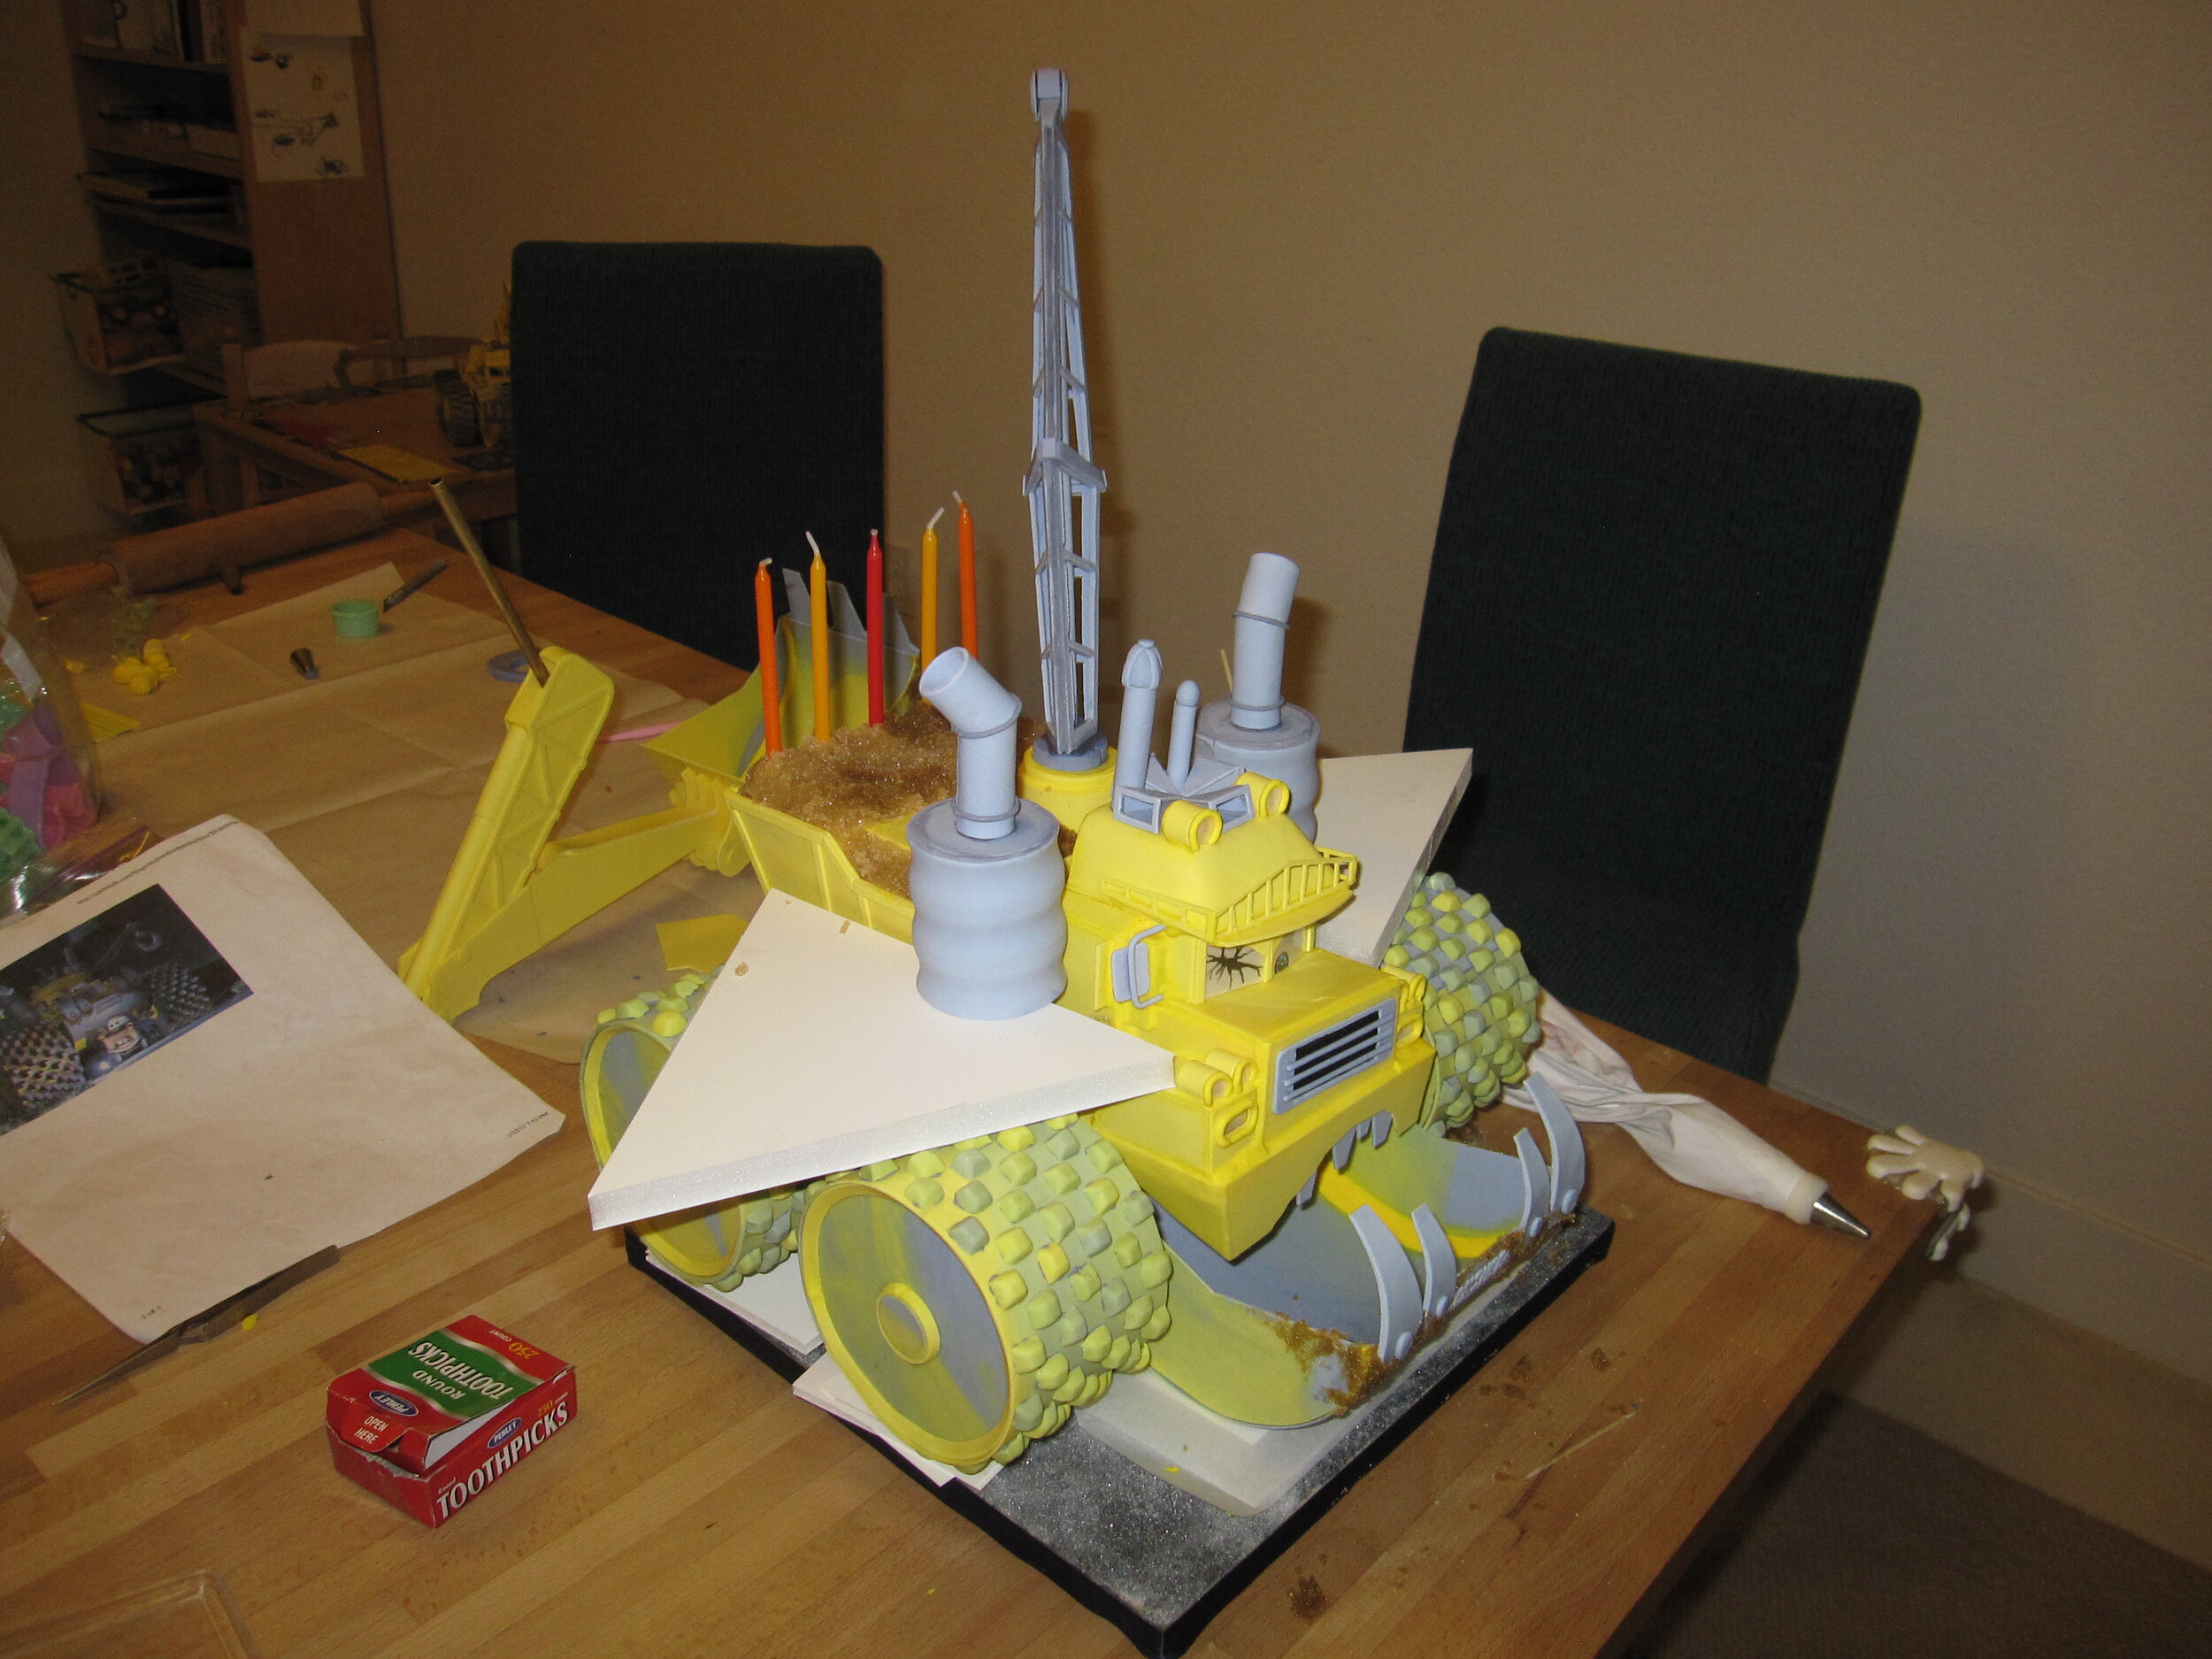
I spent Saturday night completing the assembly of the cake, installing the hook and the scoop, and adding finishing touches to the paint job. I also used some pressed sugar colored with brown food coloring for dirt on the teeth and in the dumper bed, where I also installed the five candles.

The party was fantastic. Our friend Sara brought awesome Cars decorations and balloons. My sister had invited Alex’s entire preschool class plus several other friends, so there were about 20 children. I’m not sure how they even all fit in the house.
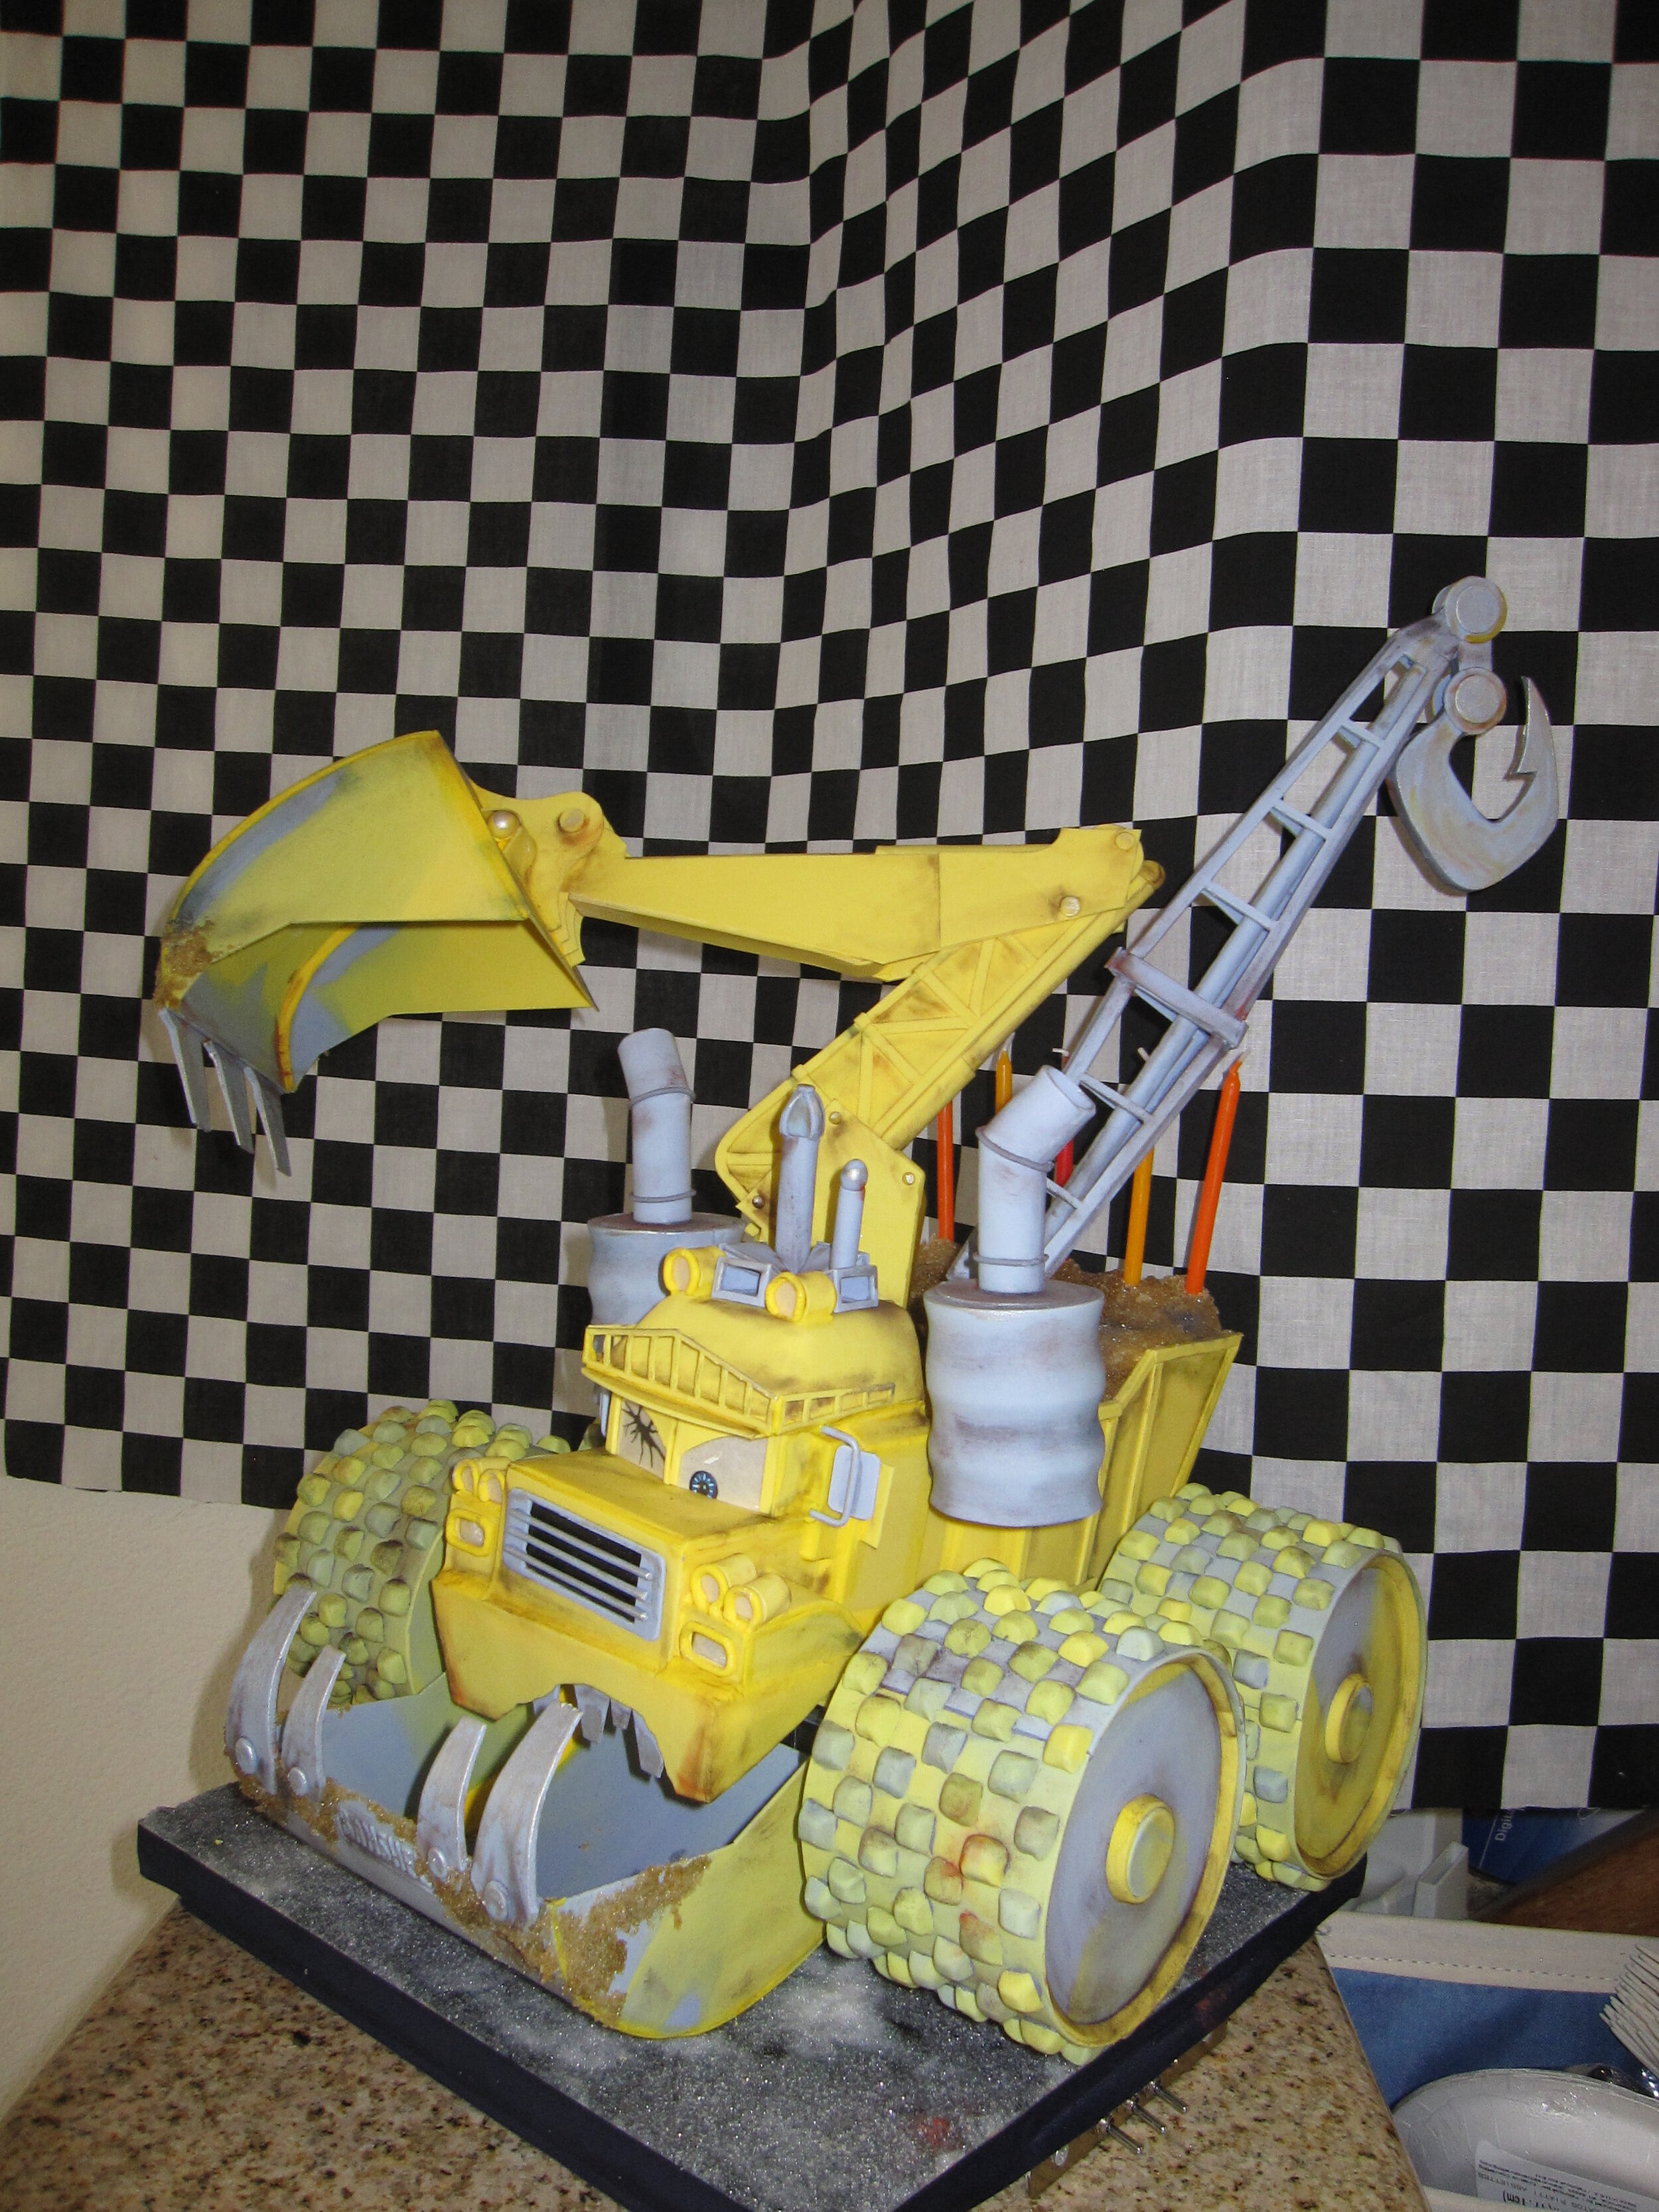
Sadly, Banshee’s wheels didn’t spin (I think the rubber bands weren’t tight enough) and he didn’t go up and down (I think the cake was too heavy for the motor), but otherwise he was very well received. The most important thing is that Alex was happy. Happy and full of sugar.