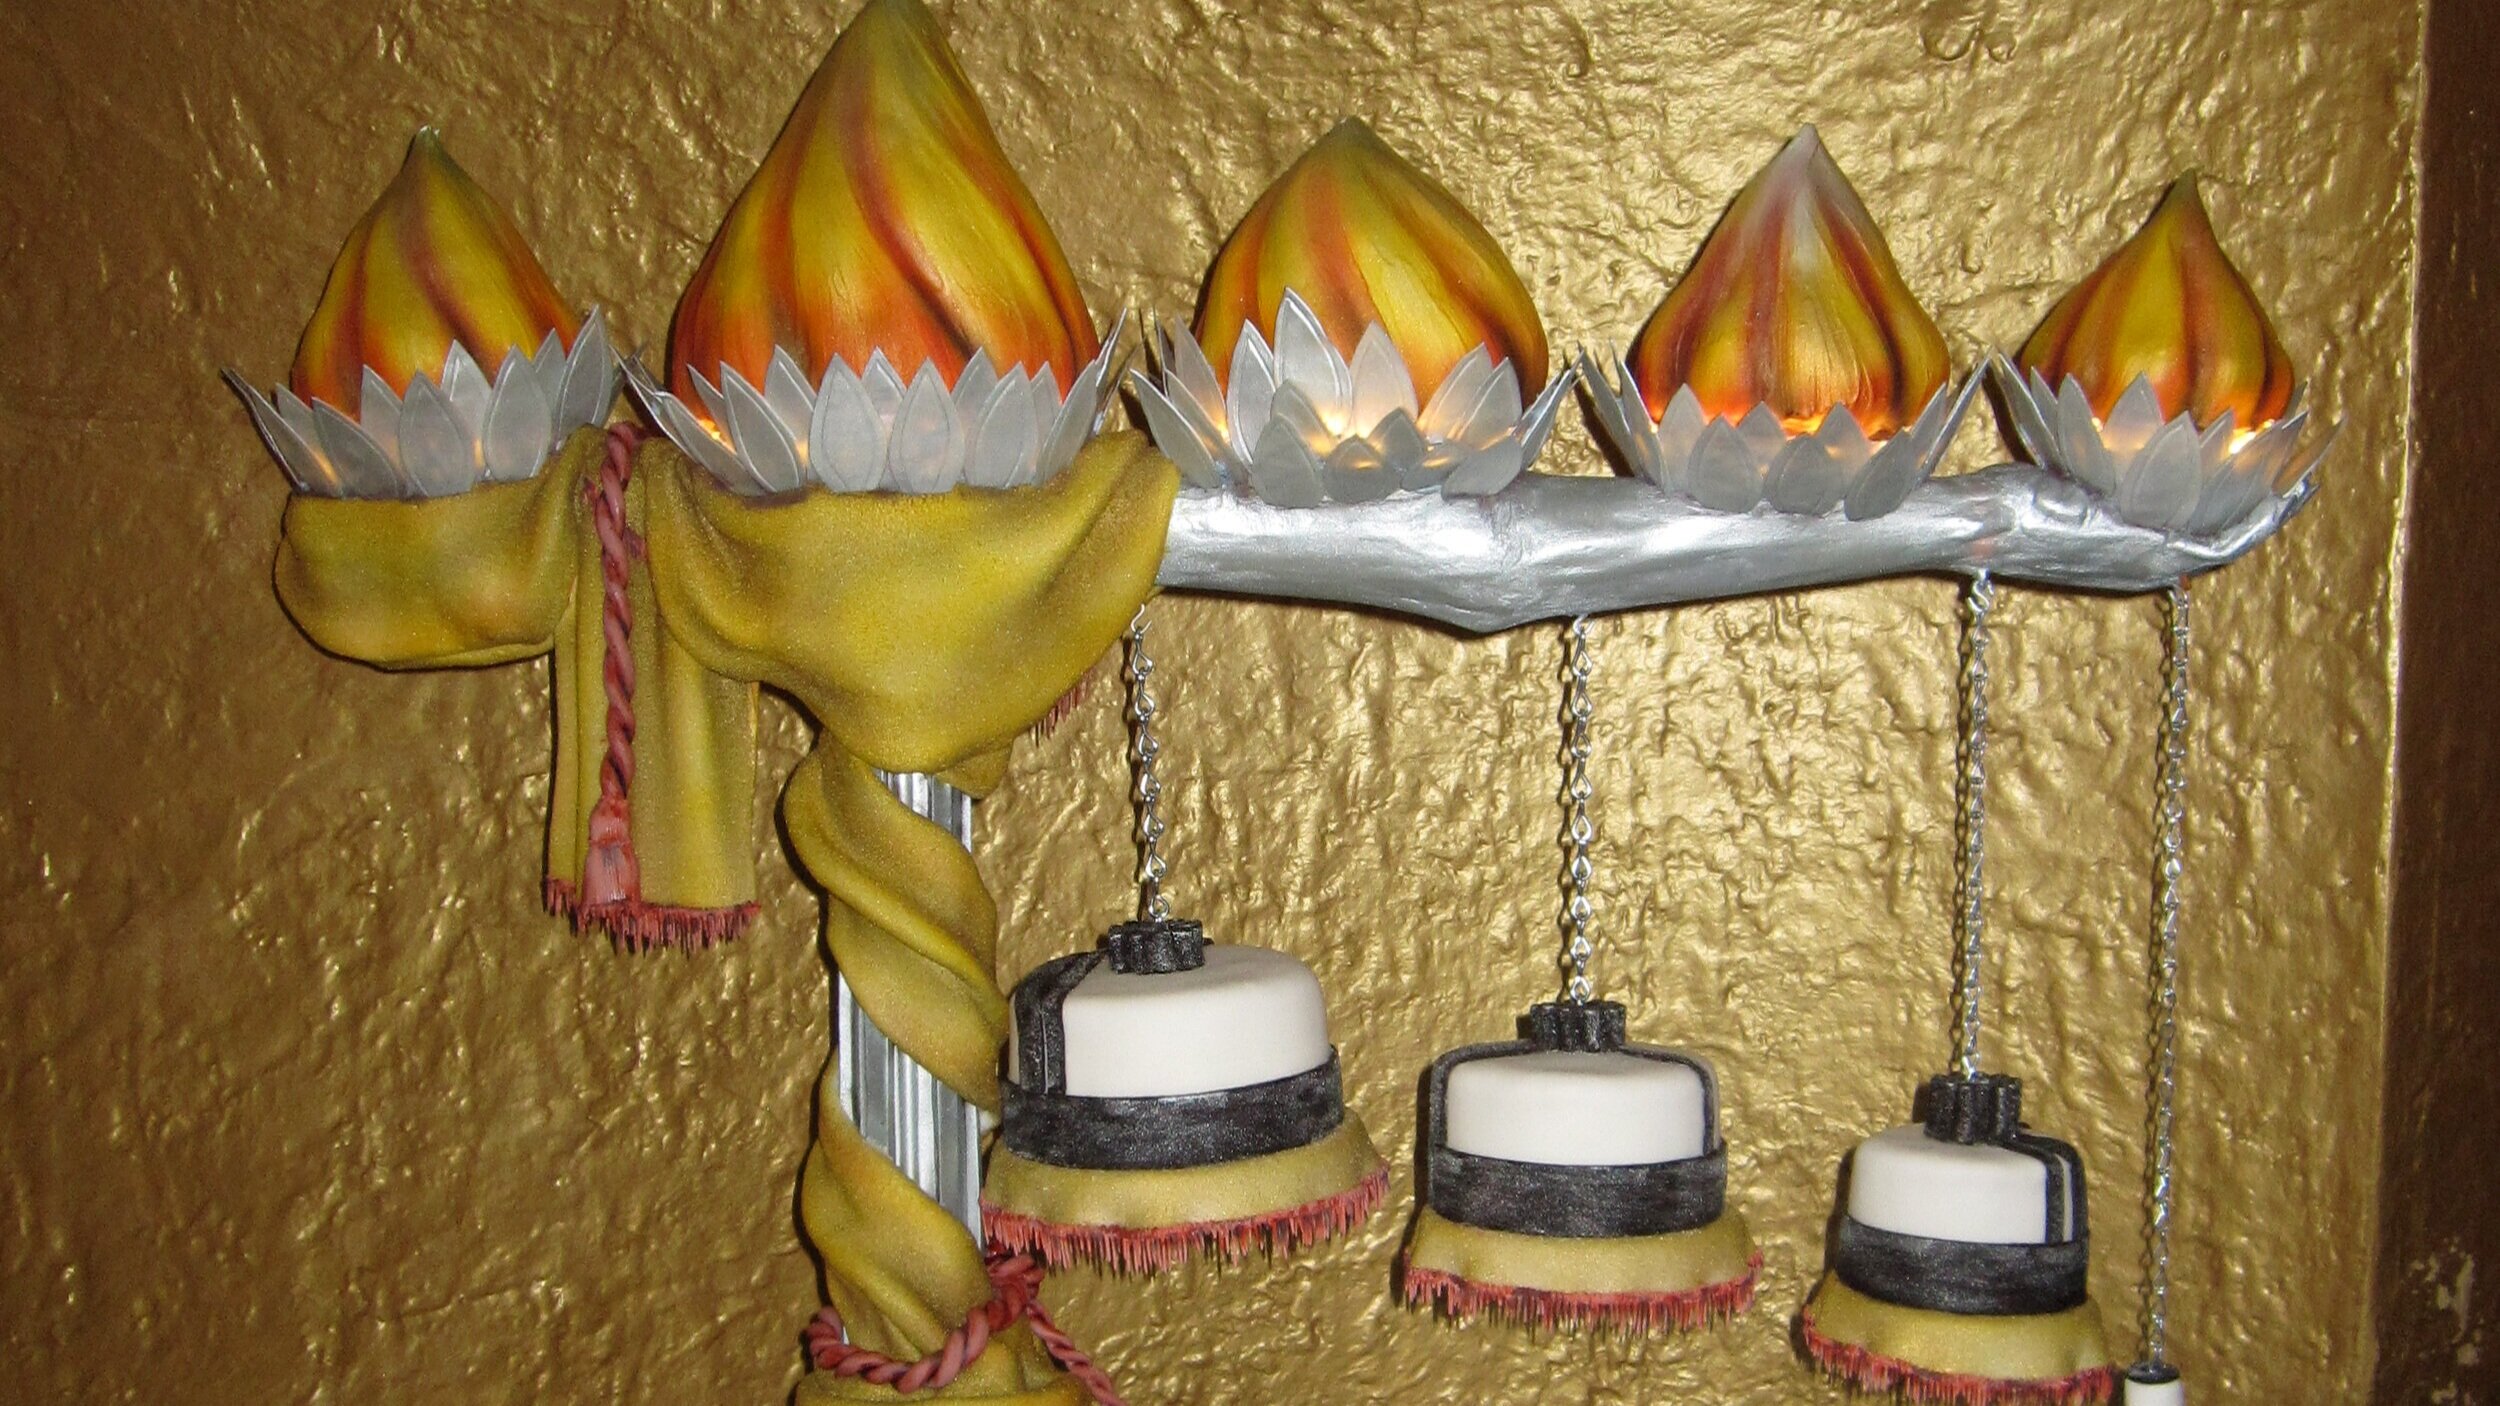
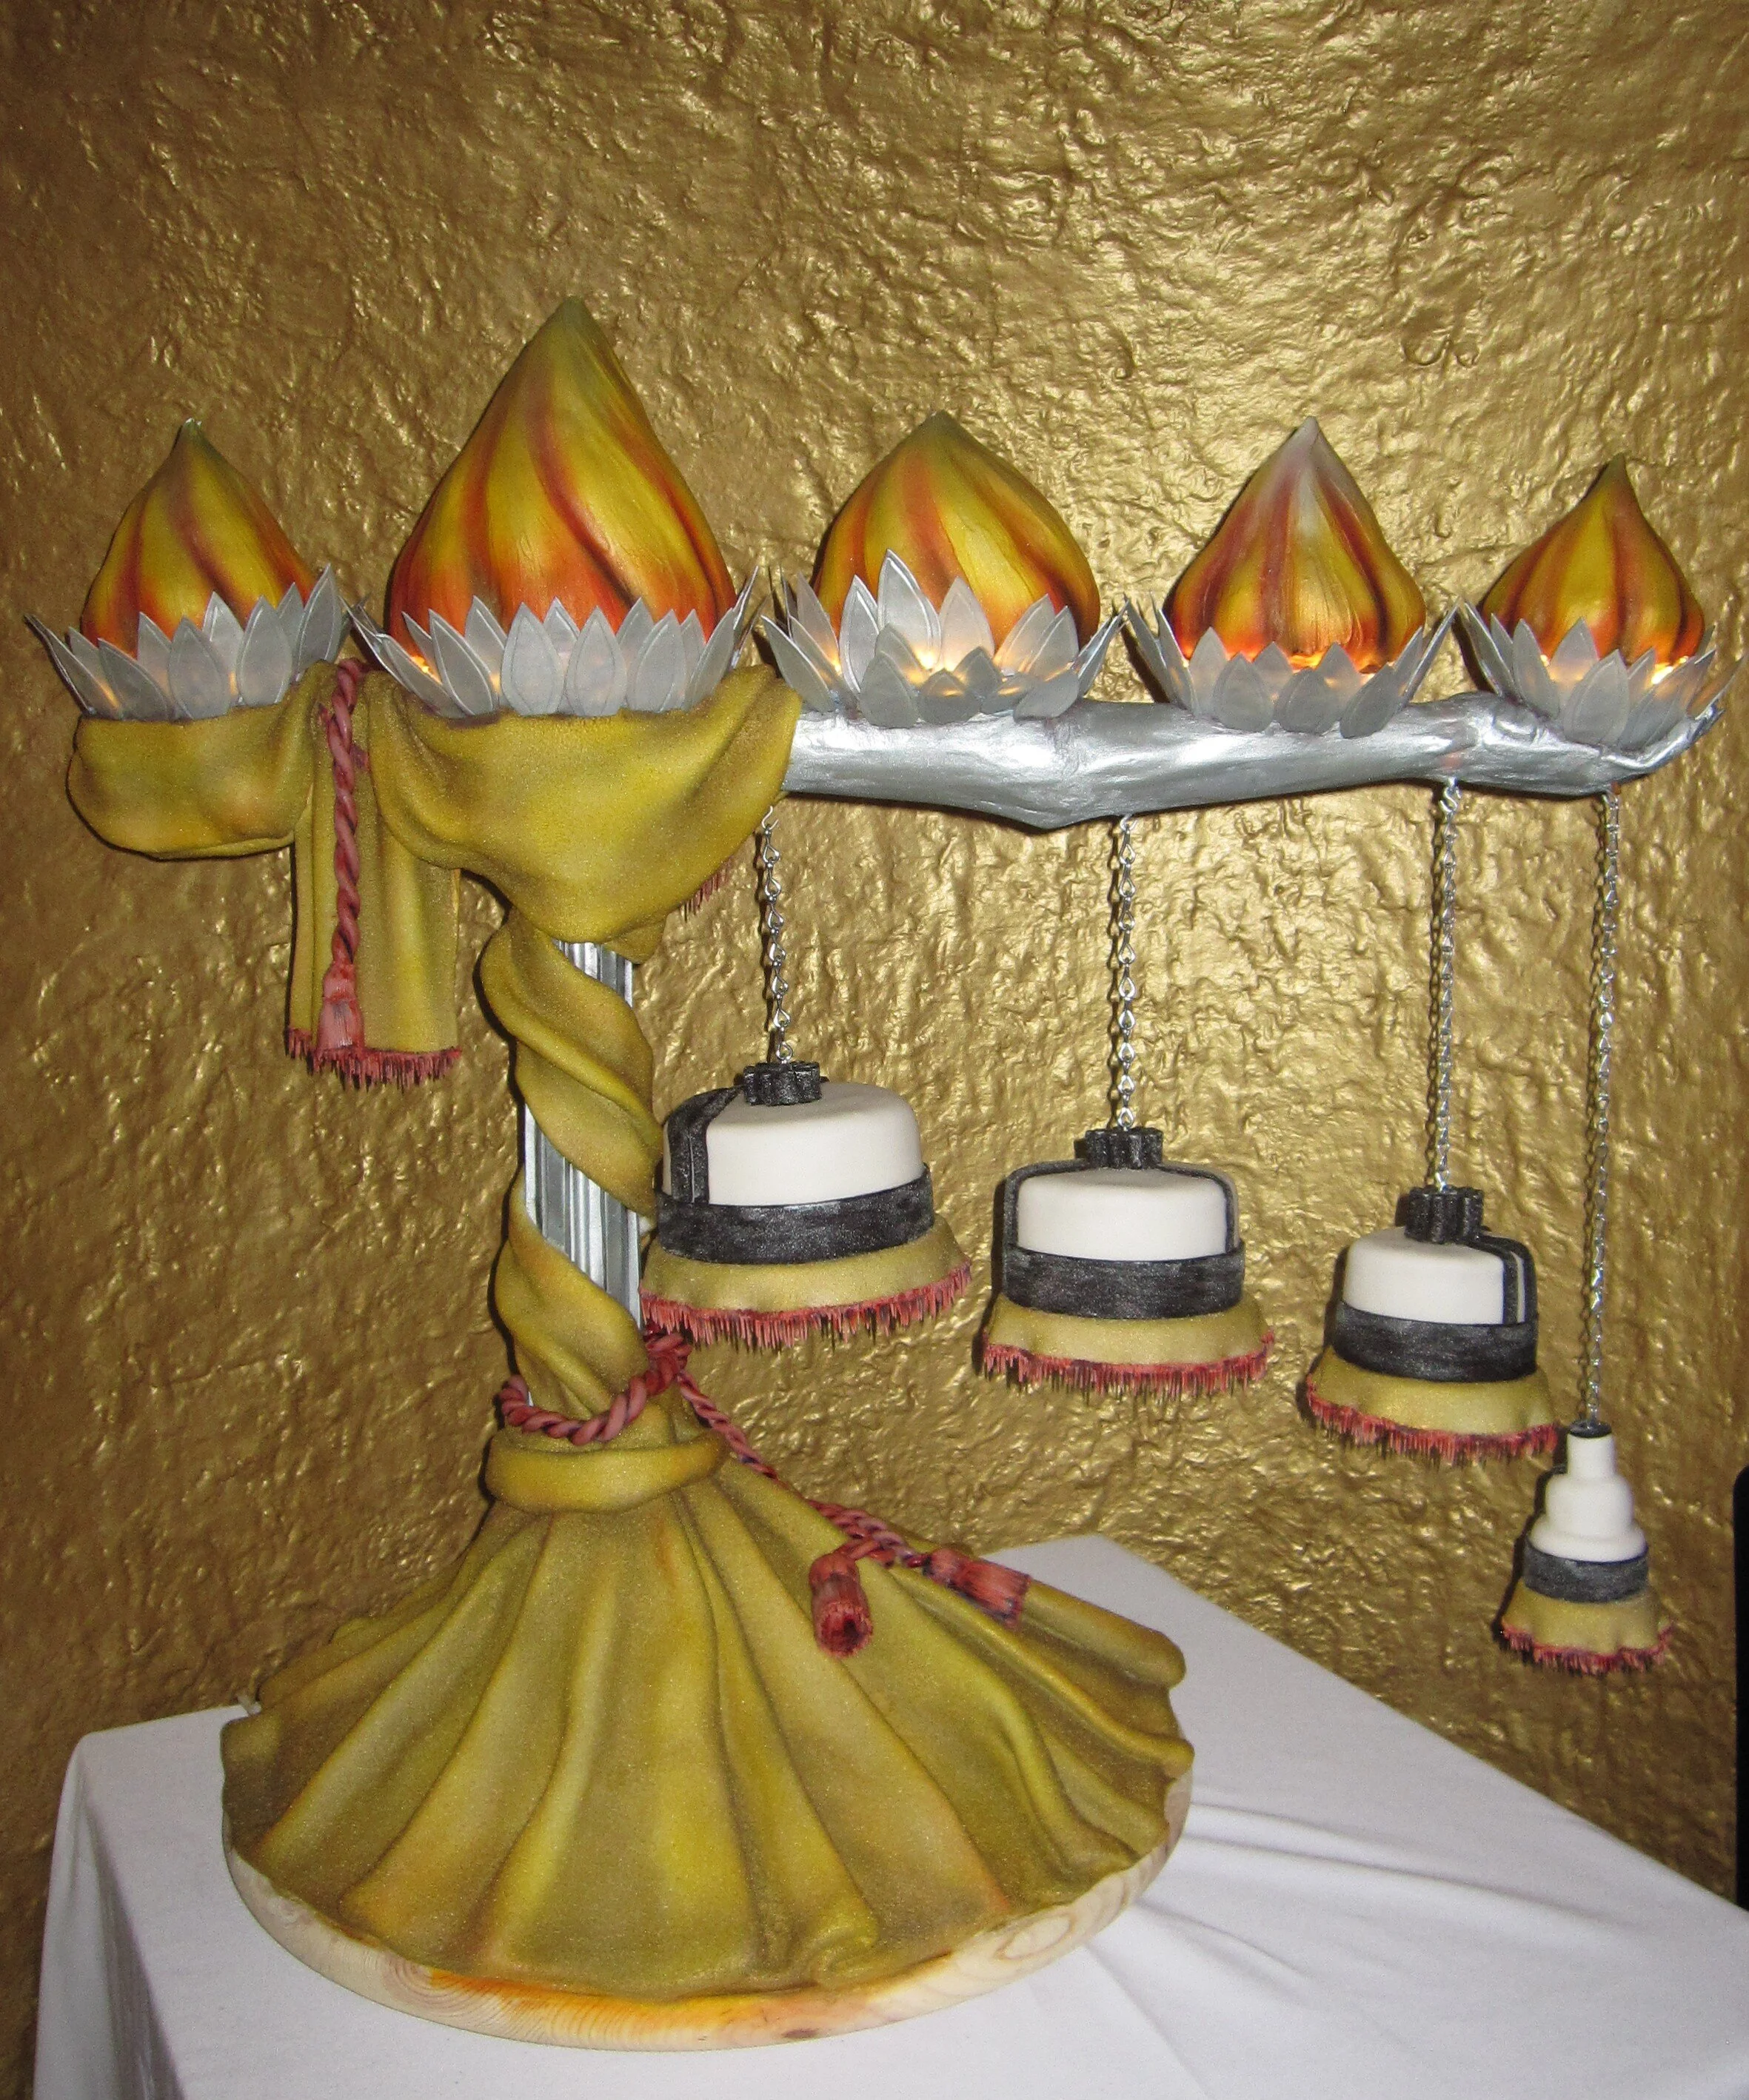
Torchiere Wedding Cake
My friends were getting married at the Orpheum, which is a beautiful old movie theater from the 20s, so I was thinking art deco; I was thinking stage lighting; I was thinking theater curtains; I was thinking dusty elegance and timeless romance.
So far, two couples have had the courage and/or the lunacy to trust me to design and make their wedding cakes. The first was the Seasons of Love Cake, which my sister and I made back in 2004. This is my second wedding cake.
My friends were getting married at the Orpheum, which is a beautiful old movie theater from the 20s, so I was thinking art deco; I was thinking stage lighting; I was thinking theater curtains; I was thinking dusty elegance and timeless romance.
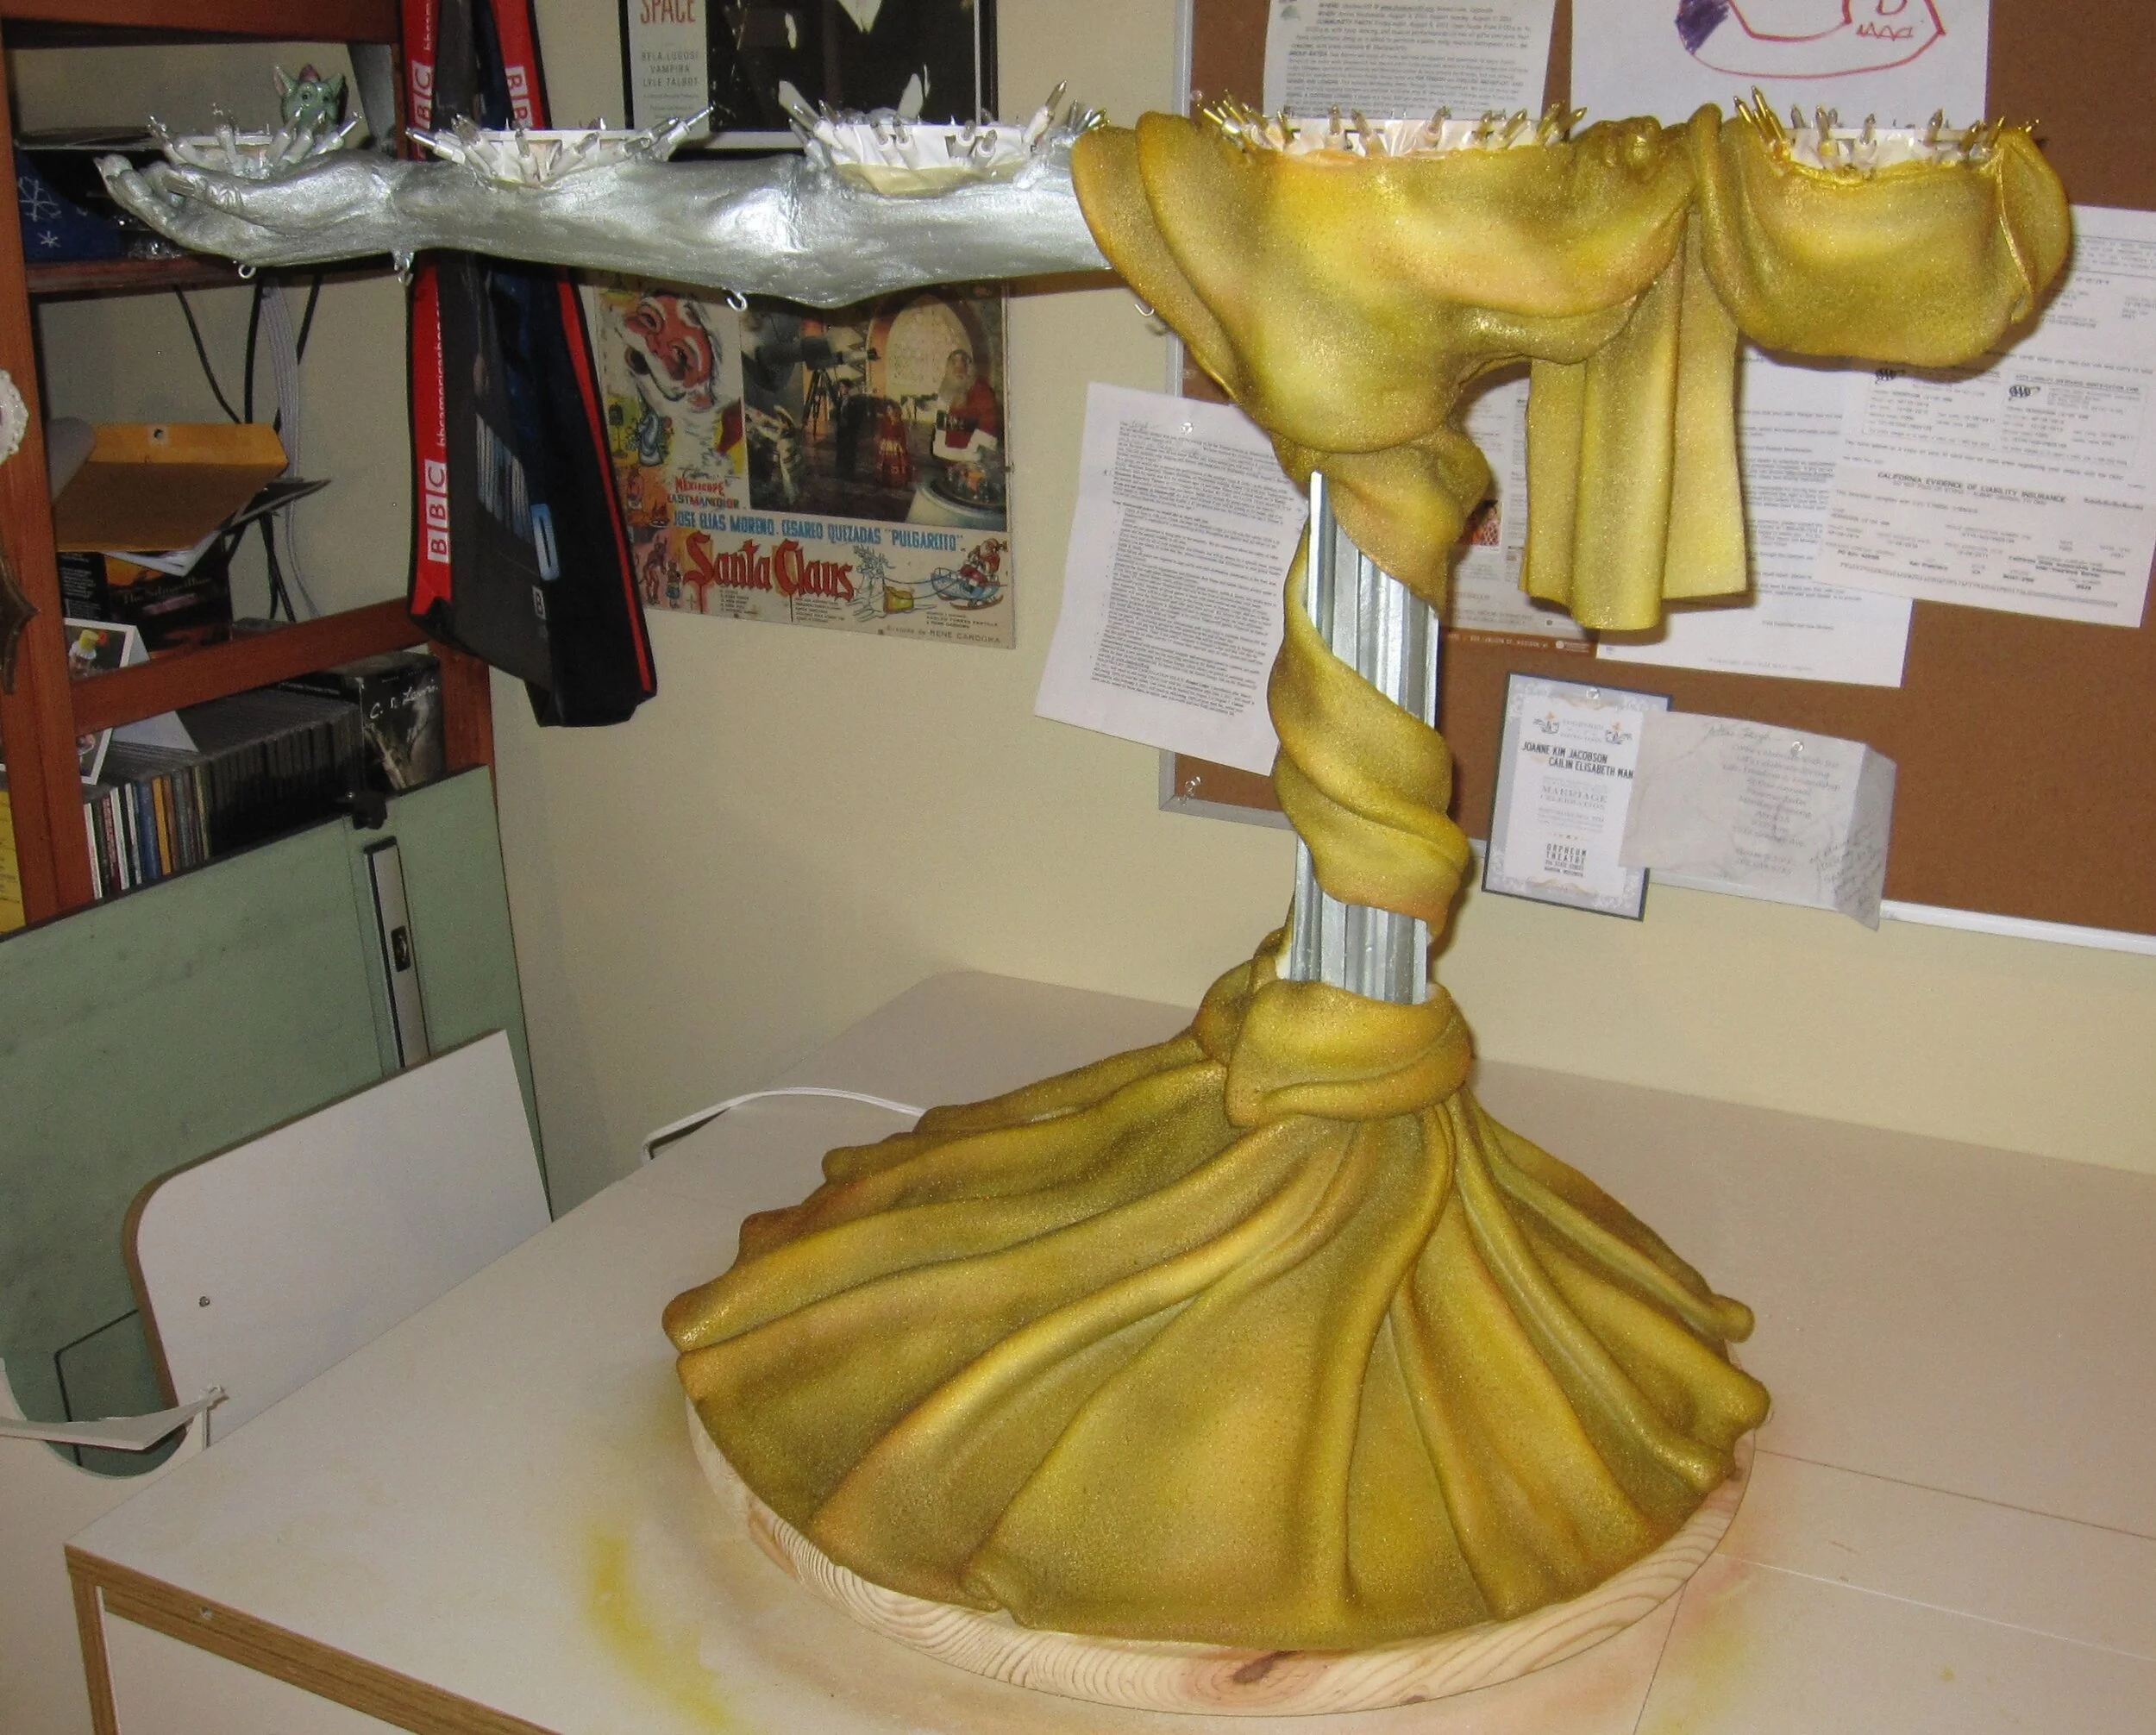
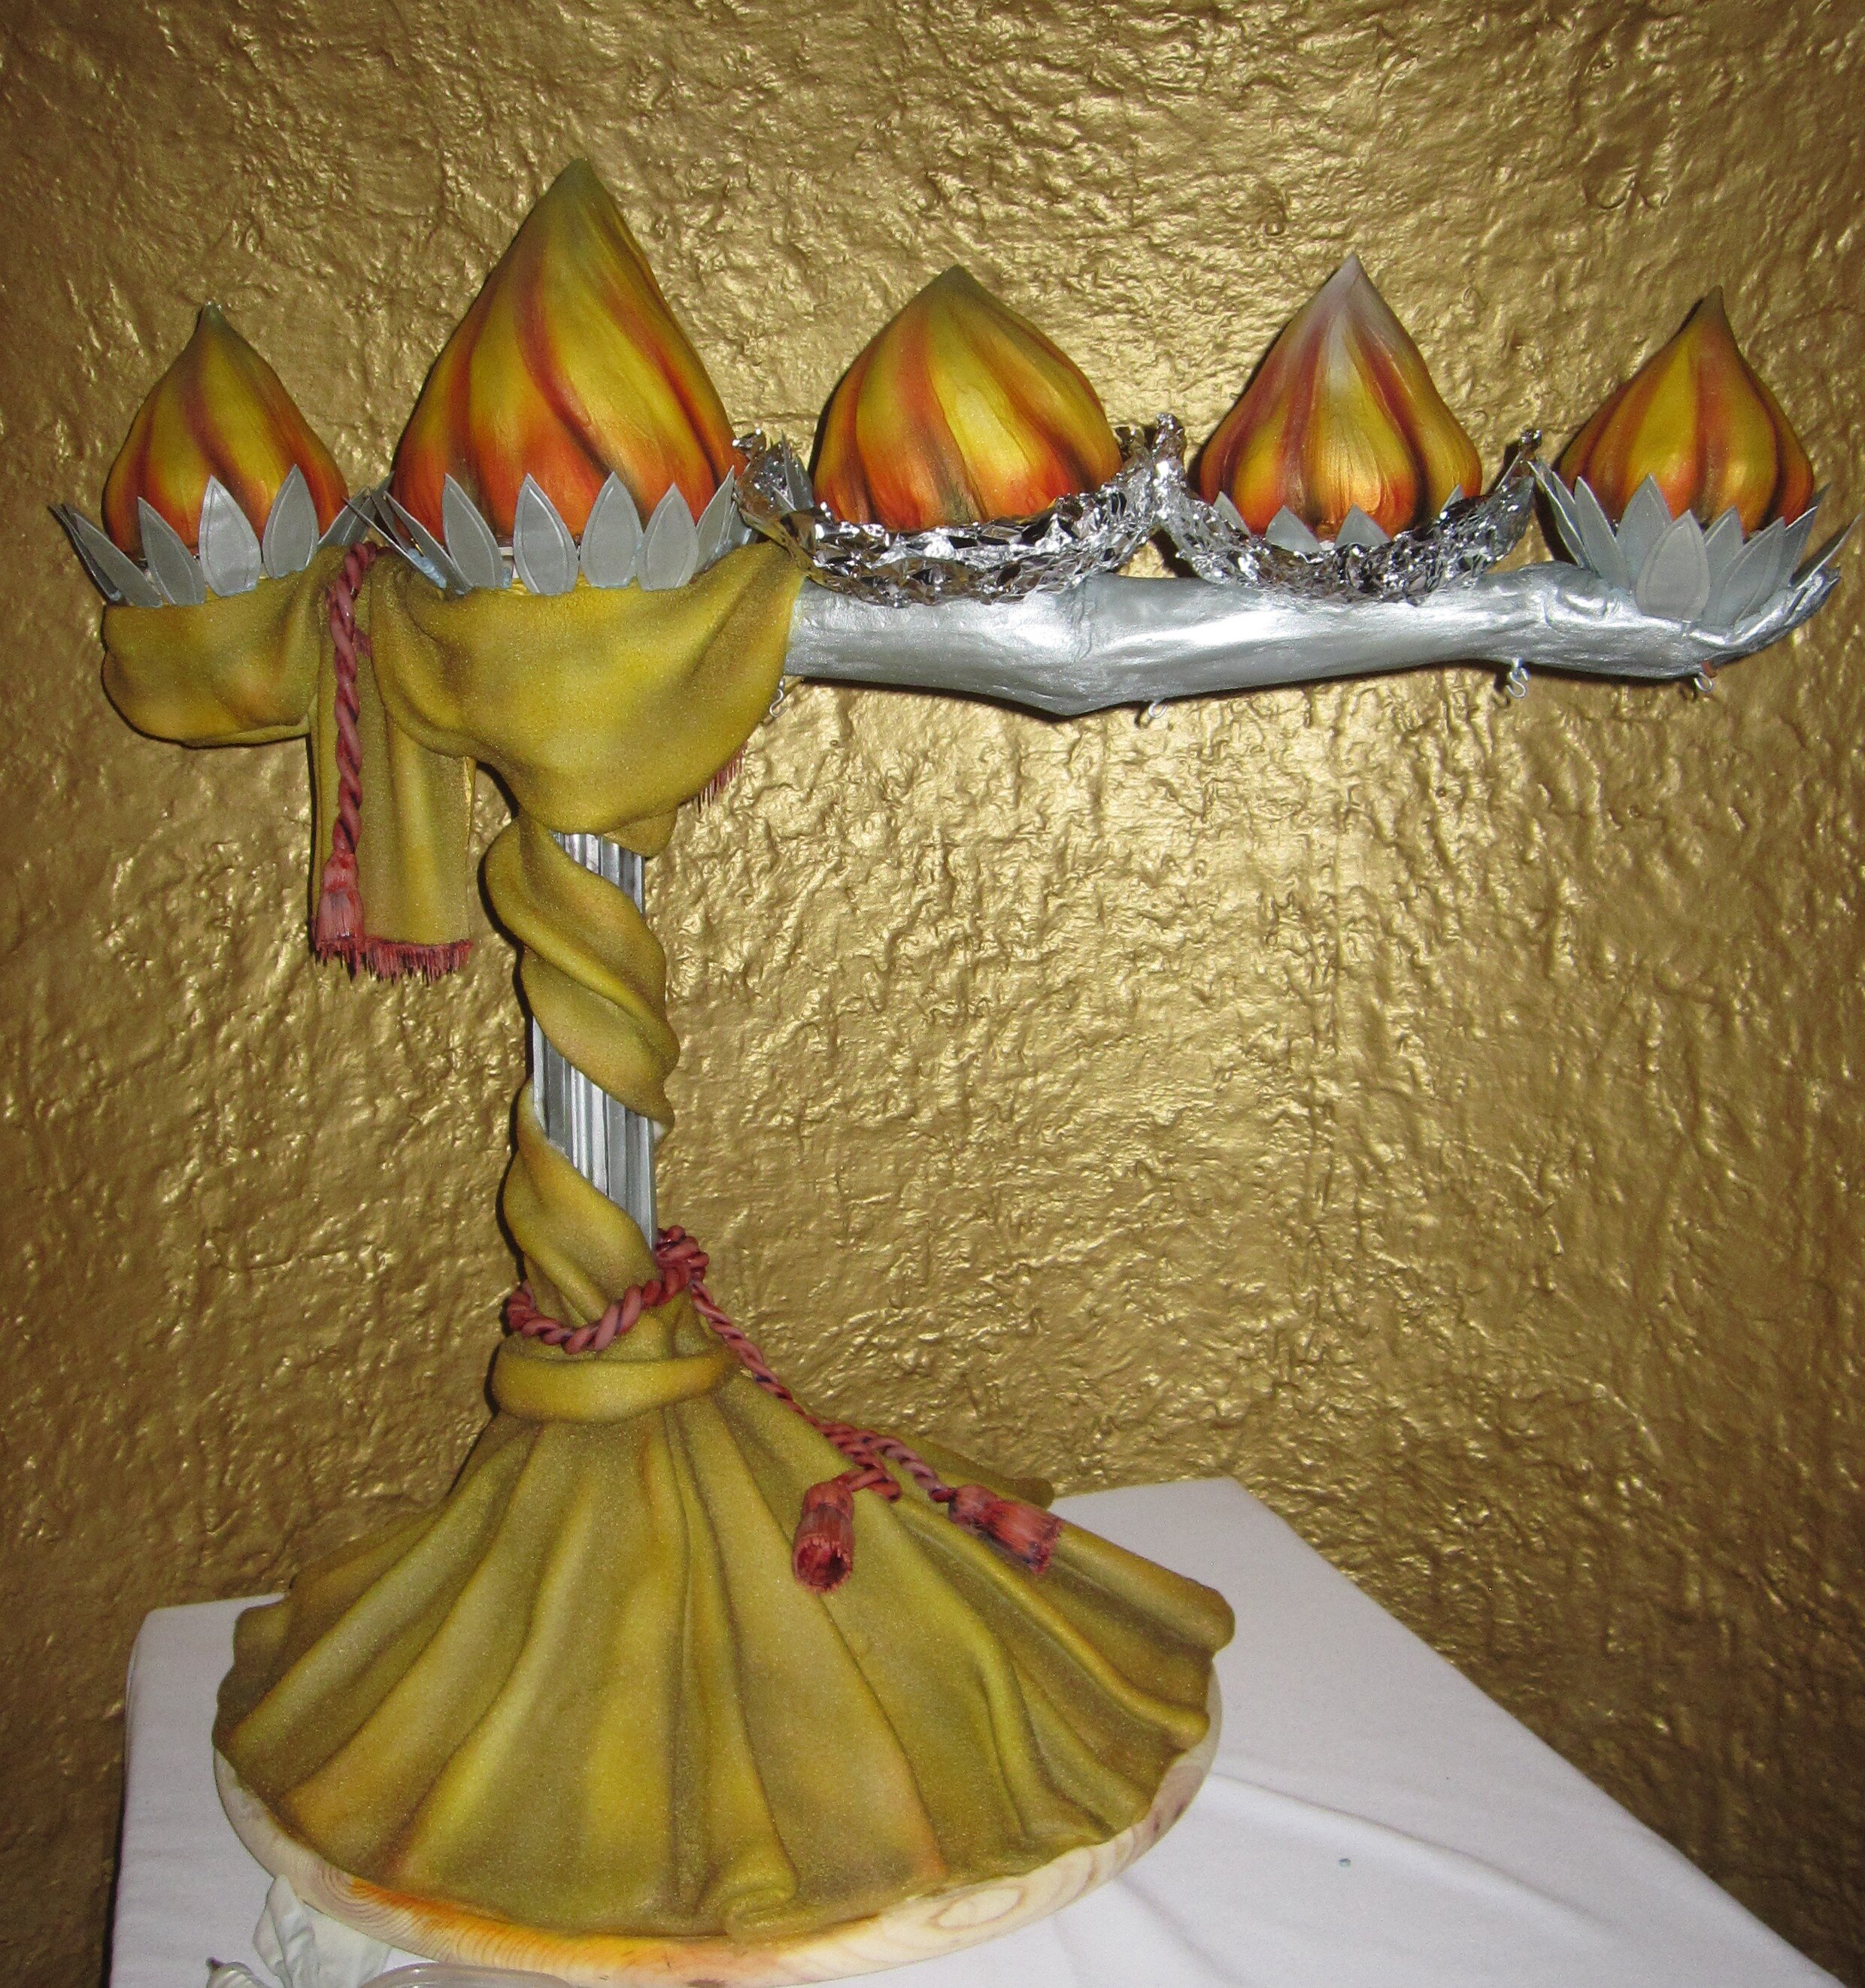
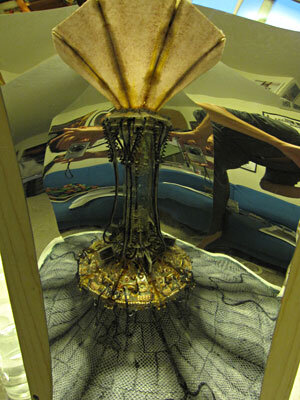
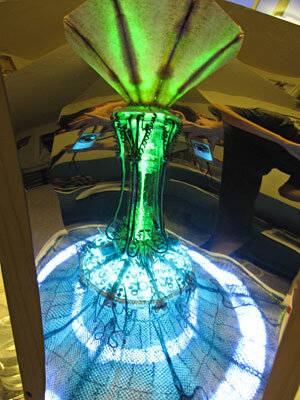
What I came up with was this bizarre art deco torchiere cake. Both this and the Seasons of Love Cake had aspects of balance and defying gravity about them. I didn’t really do this on purpose, but maybe it tells you something about how I see marriage – delicate? precarious? buoyant? at risk of collapse? I’m not sure. I’m also not sure why it’s in the shape of a human arm, except that it let me hang the little tiny wedding cake from the wedding ring finger. Apparently I just like making cakes in human form, whether appropriate to the occasion or not.
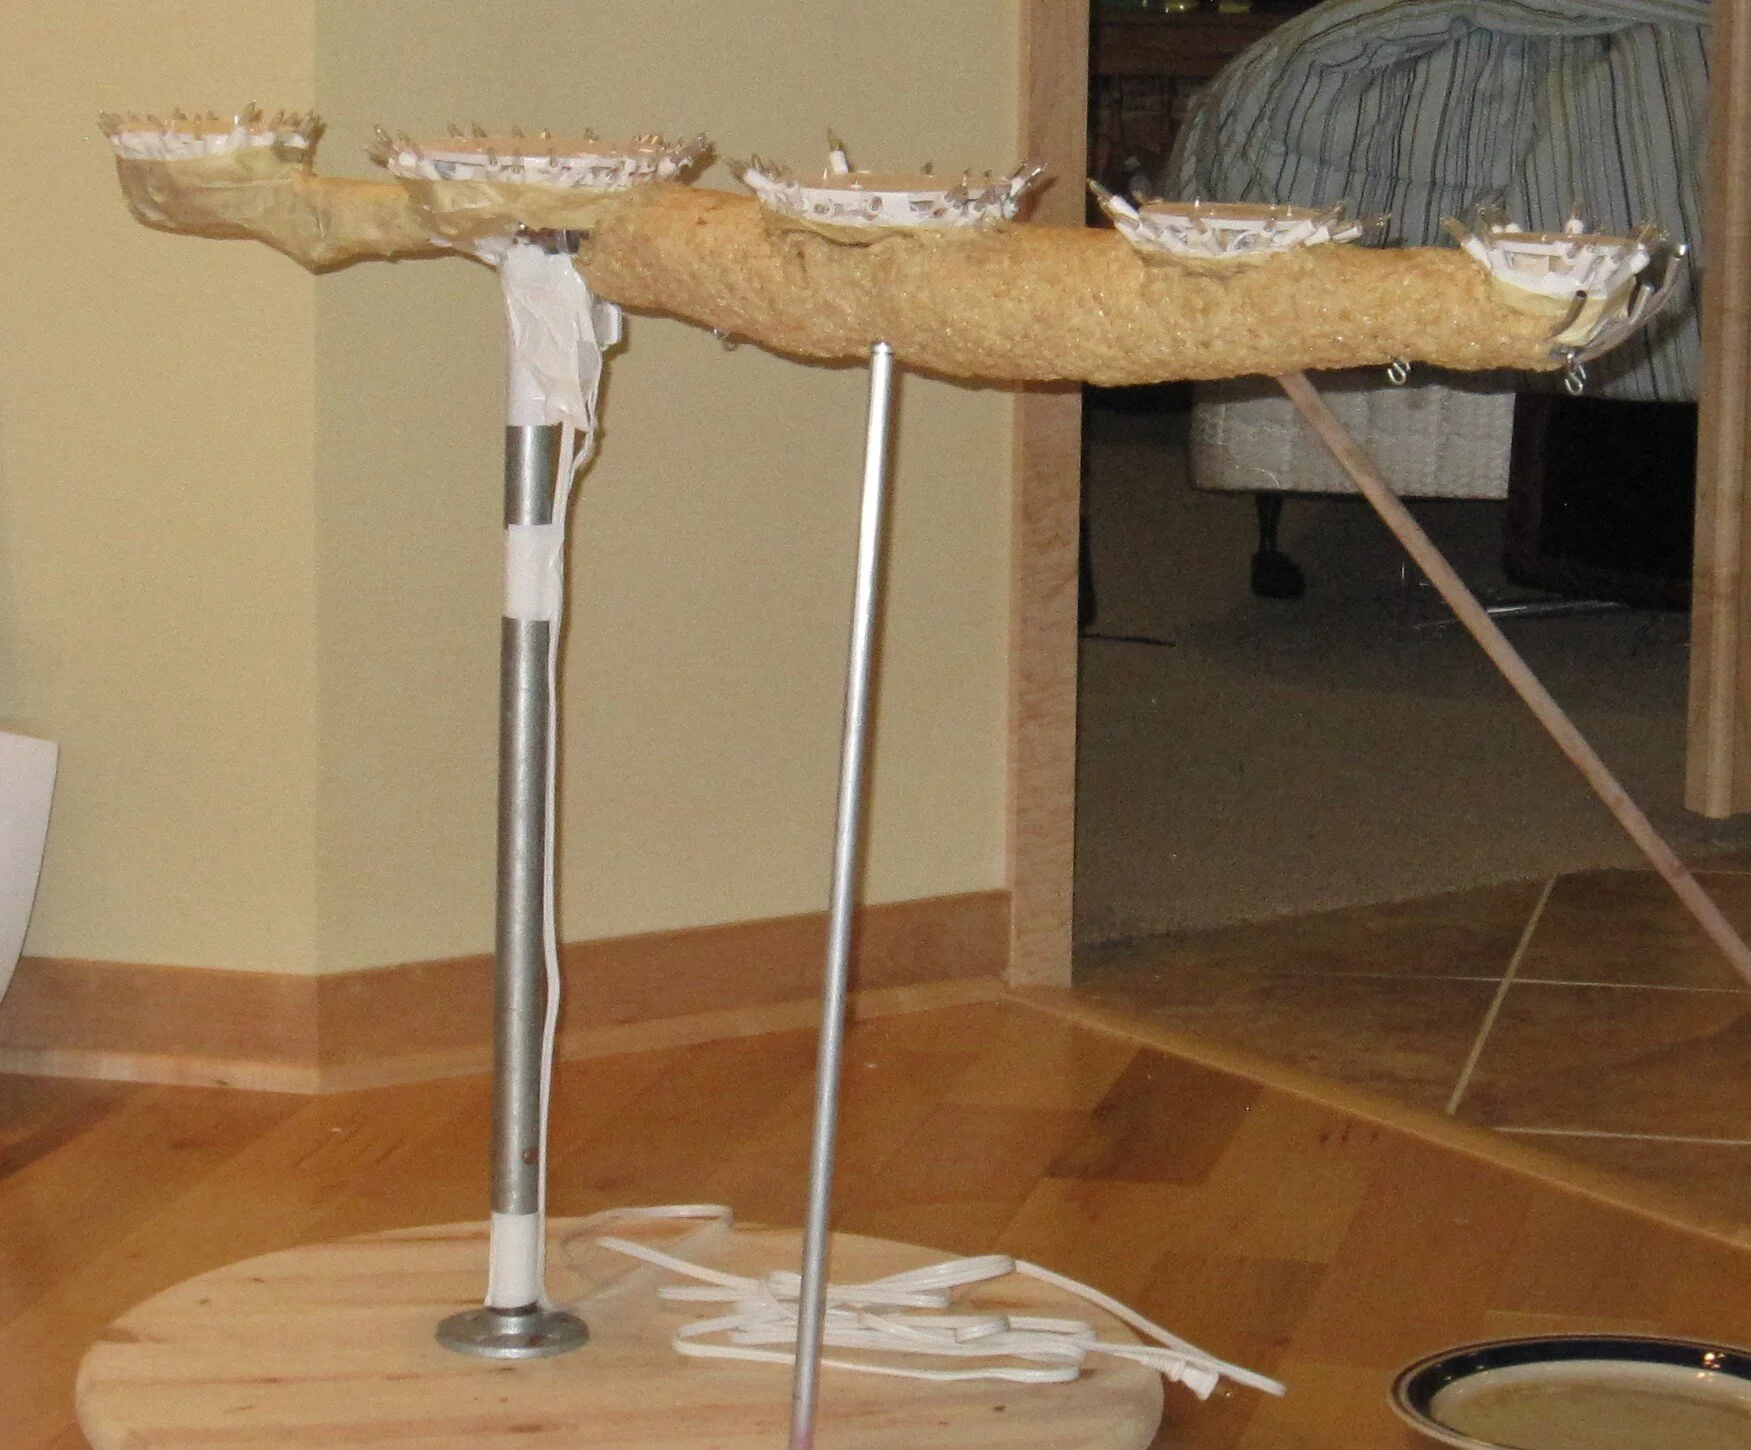
To make the arm strong enough to hold the cake, I started with ¾” steel pipes bolted to a 24” diameter solid wood base. I bolted little wood and foam core bases to the steel pipe to support the flame cakes and installed eyebolts to support the hanging cakes. To make the torchiere light up, I ran a strand of Christmas lights around all the little bases. In retrospect, it would have been better if I had used smaller lights, as I did have some difficulty later on masking the lights with the gum paste leaves.
I thought about making the arm out of white modeling chocolate, because I thought that would be the easiest to sculpt, but I was afraid that the silver airbrush color wouldn’t show up as well on that as it would on some other materials. Then I thought about making it out of fondant, but I thought that would be too heavy to stay up on the pipe. So I decided to form the shape of the arm out of rice cereal treats and then cover it and put in the details with royal icing.
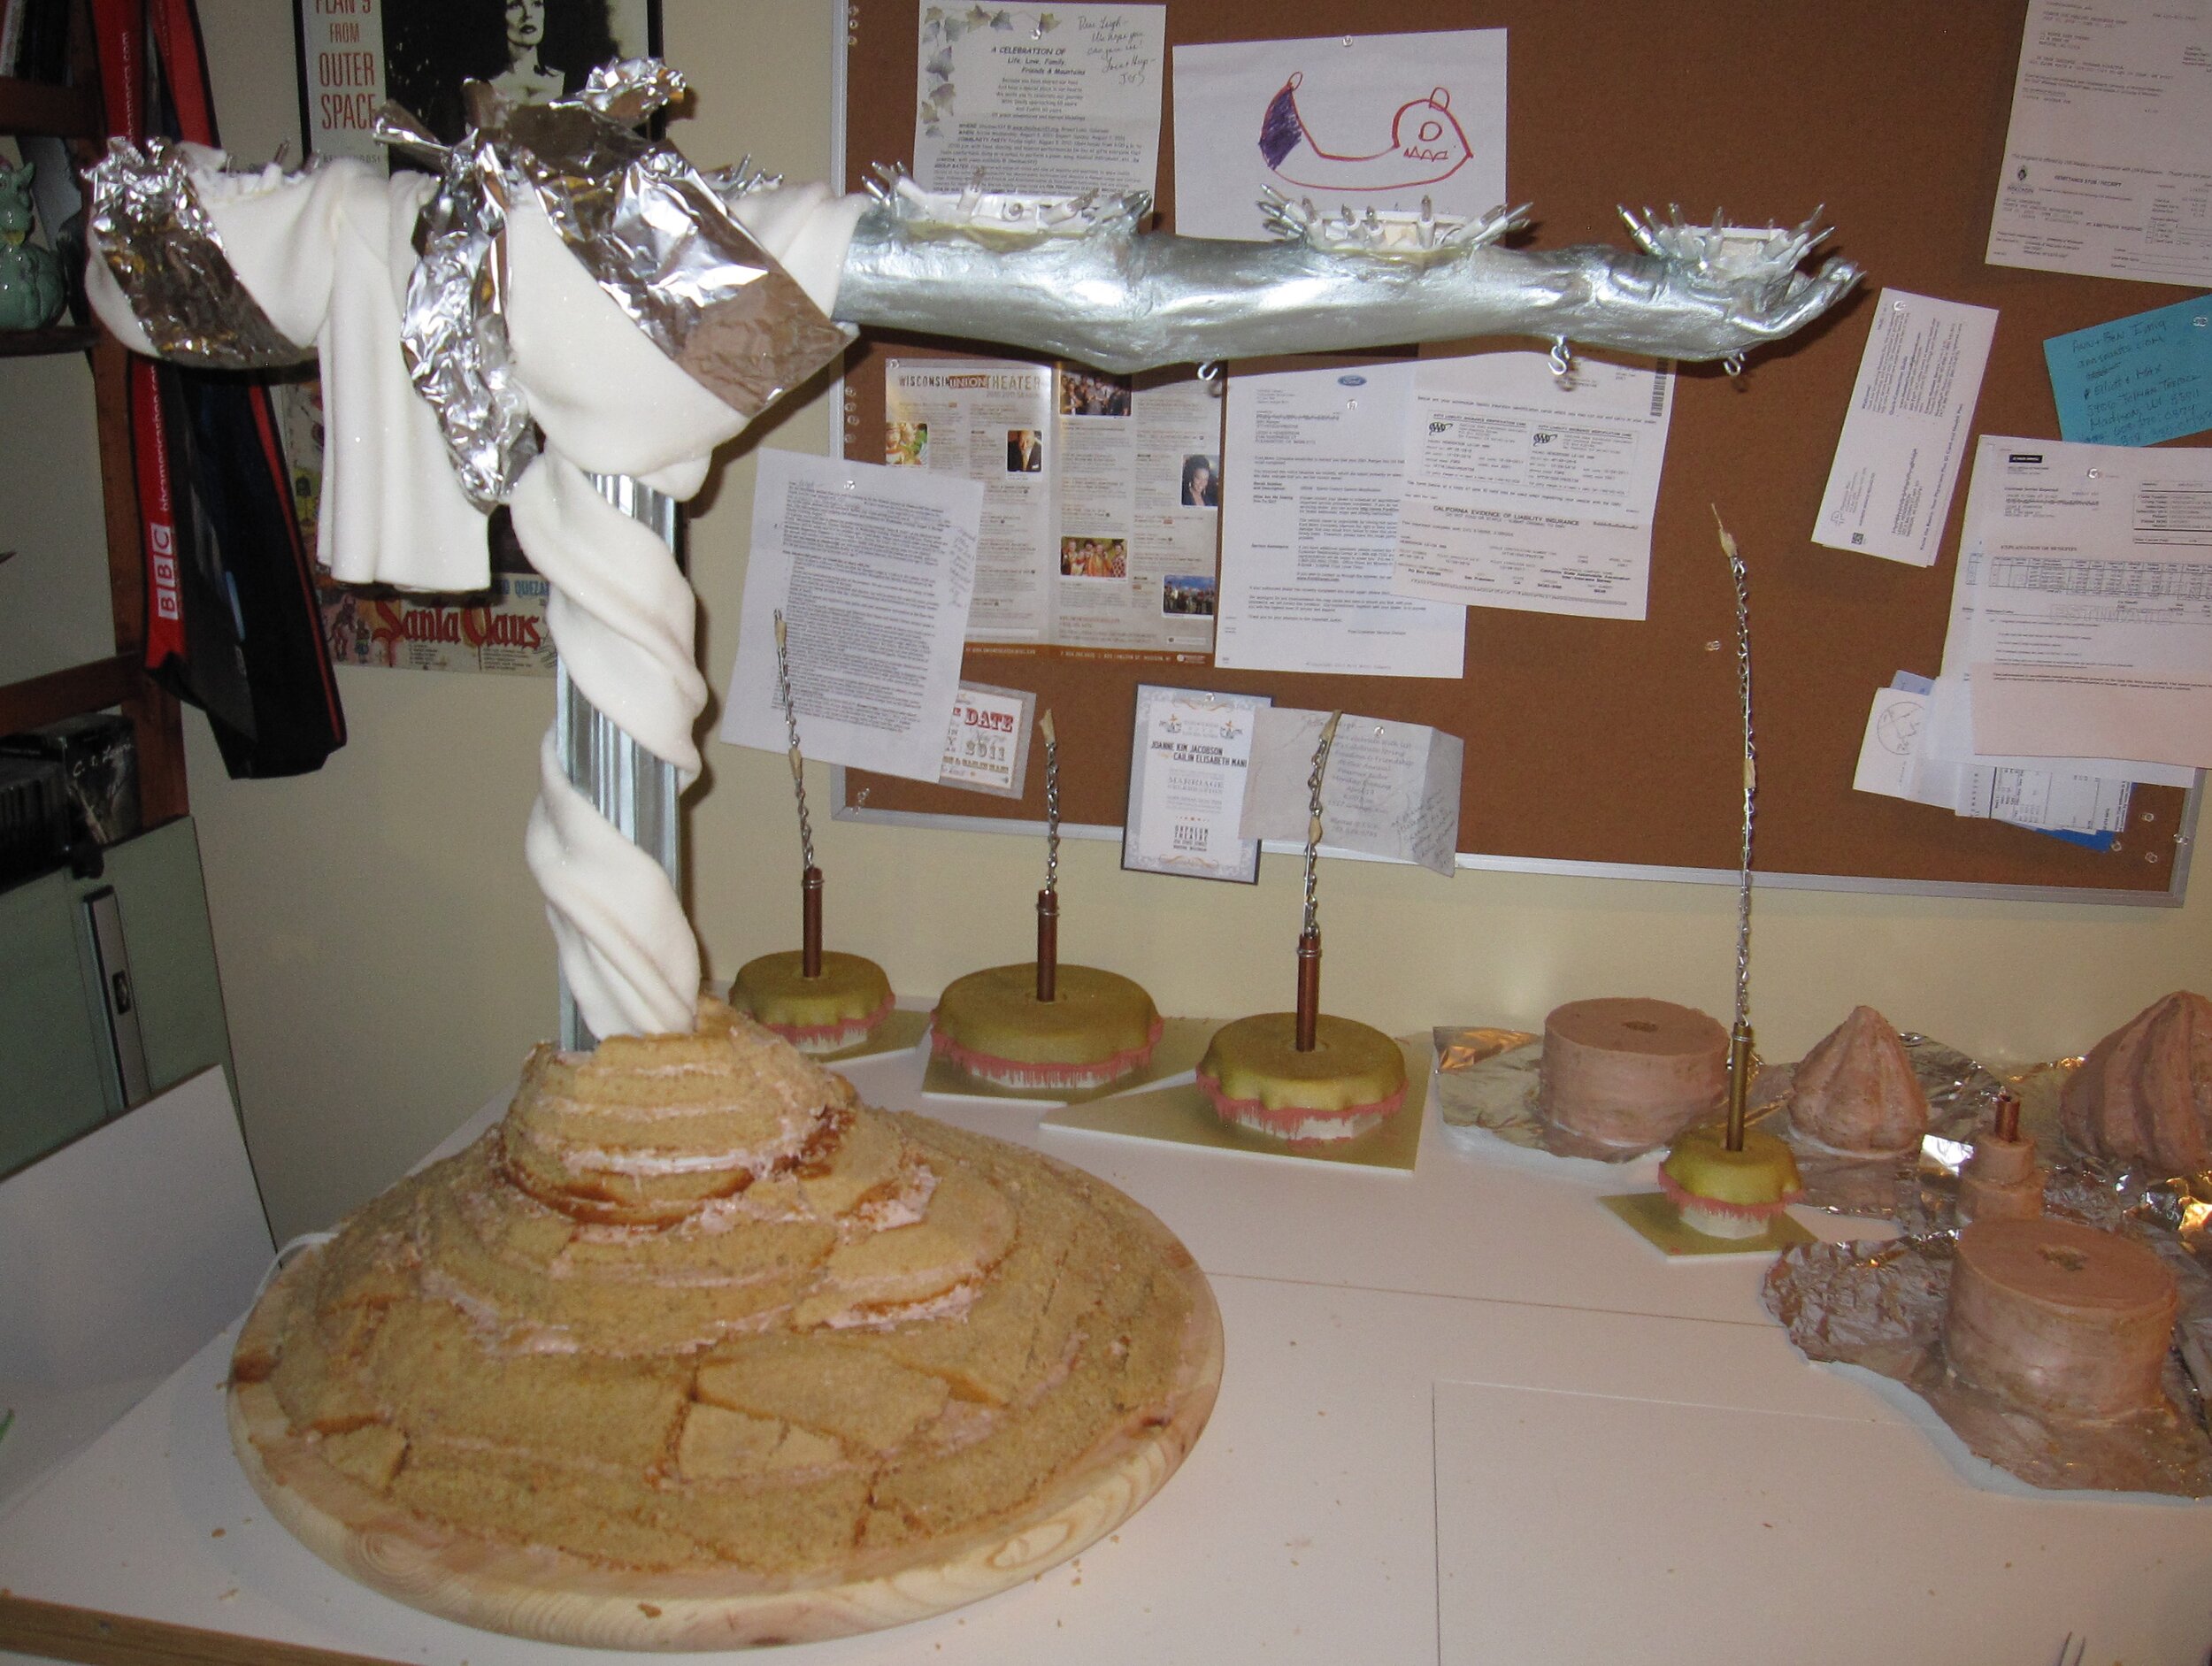
Rice cereal treats always wind up being more difficult to work with than I expect them to be. I had a lot of trouble getting them to stay in place, to the point where I briefly feared that I might have to resort to a non-edible material instead. Eventually, though, I figured out how to hold them in place with aluminum foil until they firmed up. Then I carved them down to shape and slapped on a coat of royal icing. In retrospect, I would have been better served by a more carefully applied coat of royal icing.
Once that coat of royal icing dried, I sanded the rough edges, a process that would have been much easier if I had given more attention to the first coat. Then I applied a second coat, this time carefully smoothing it with a damp paintbrush. I found that I needed to install some small aluminum tubing to get the fingers to hold their shapes. I also sanded this coat of royal icing with a fine grit sand paper after it dried. I then went in one more time to create the details of the bone structure and skin folds. I made the fingernails out of gum paste, a technique that worked well for me on the Killer Rats Cake. This time I had a little trouble because the royal icing had dried too much to let me really sink the nails into the nail beds, so I had to add some more icing over the top of the nails to marry them to the fingers. As a result, the fingertips wound up perhaps a bit bulkier than ideal. Apparently the arm was wearing acrylic nails.
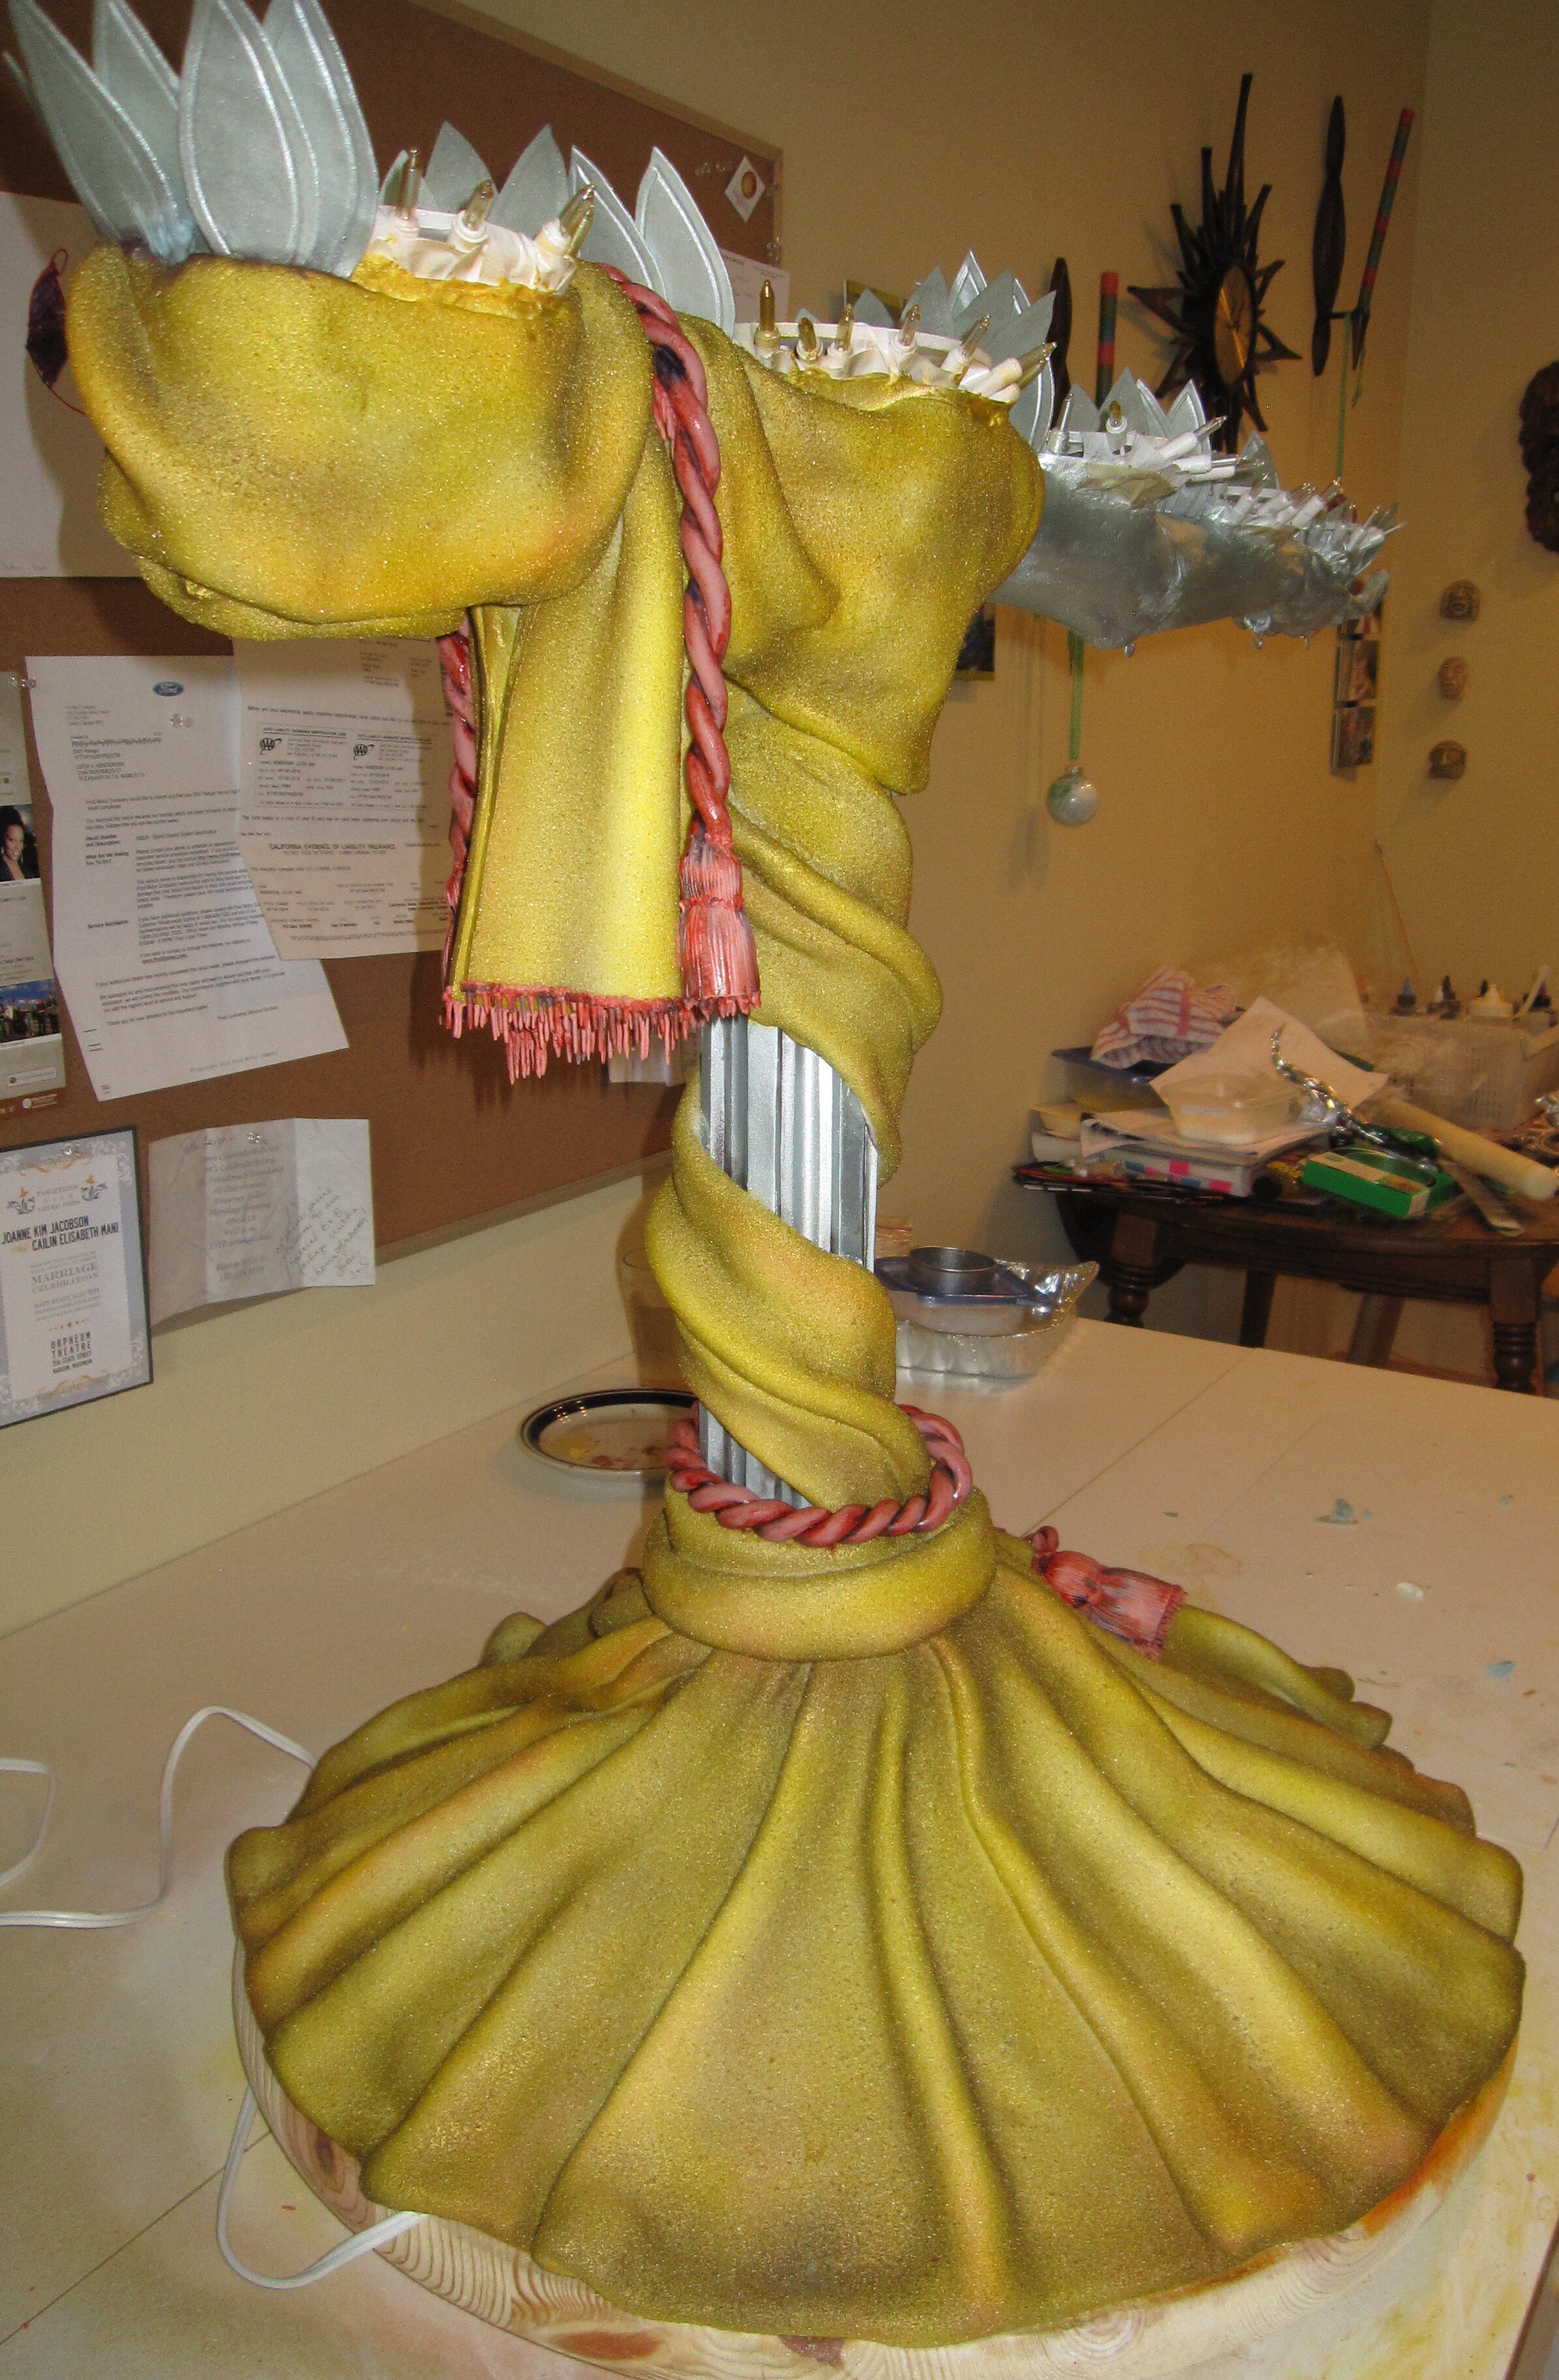
To mask the central support pipe, I used some pieces of foam core covered with fondant to create a fluted hexagonal column. I also made some stylized art deco leaves out of gum paste to cover the lights at the bases of the flame cakes. Then I got busy with the airbrush spraying the arm, the column, and the leaves silver. I also added a little gum paste wedding ring to the ring finger that would support the hanging mini wedding cake.
The next step was to make the fondant curtains. I had expected this to be a challenge, and I was right. Unsupported fondant drapery is difficult under any circumstances because it’s hard to drape the heavy fondant realistically without the weight of it ripping itself apart. This fondant drapery was especially tricky because I wanted it to have the worn velour texture of old theater curtains. To accomplish this, after I rolled out the fondant, I moistened the surface and then coated it with an even layer of granulated sugar. So not only was I worried about getting a natural drape, I also had to be careful not to damage the sugar texture. Because I was applying the drapery to the arm and the column that had already been airbrushed, there was also the risk that I would mar the paint job if I moved the fondant drapery around too much. In the end, it worked out pretty well, though, and I was able to wrap some tin foil around to hold the fondant in place until it set in place. I also draped some fondant over the foam core bases that I had made for the four hanging cakes.
Another problem with my sugar fabric texture technique is that it has a tendency to get sugar everywhere. So from this point forward, my apartment was covered with a fine layer of stickiness. My good friend Angie came to stay with me for a few days for the wedding and she made a valiant effort to keep the mess under control, but I still had to loan my slippers to my other friend Jenn when she came over to visit so that her stockings wouldn’t get covered with sugar.
With the torchiere structure in place, it was time to bake the cake. It needed to serve about 150 people, so this was the biggest cake I have made thus far. I actually rather dramatically overbought on ingredients because I thought that the cake recipe I was using made only six cups of batter when, in fact, it made ten cups of batter, so I didn’t have to make nearly as many batches I thought I would have to make. I believe that in the end I made 11 batches instead of the 16 I had initially anticipated. It’s perhaps just as well that I underestimated the yield of the recipe, as I also underestimated the number of eggs that it takes to make up a cup of egg whites. I bought eggs thinking that it would take 6 eggs per cup, when it actually took 8 eggs per cup, so in this case my miscalculations almost cancelled each other out and I had about the right number of eggs.
With a truly massive pile of cake baked, I was ready to begin assembly. First I put together the nine smaller cakes – 5 for the flames, and 4 for the hanging cakes. Three of the hanging cakes were pretty easy because they were round. The fourth was a little tiny three-tiered cake. The only request that the brides had made of me was that there be a mini wedding cake, because one of them loves miniature things. This cake was so small that there actually was only cake in the lower two tiers. The top was just fondant wrapped around the central tube that all the hanging cakes needed in order to attached the chain to the base. The flame cakes took a little longer to assemble and carve because they were tall enough to require internal supports and their shape was a bit complicated. Once all the cakes were carved, I covered them with fondant. Not to brag, but I was pretty pleased with how well I did covering such small cakes.
The majority of the cake went directly onto the base around the central column. Basically, I just made a big pile of cake and carved it into an organic pyramid shape. To cover it, I used the same sugared fondant technique that I had used for the rest of the drapery. Rather than trying to cover such a big cake with one enormous piece of fondant, I did it with a number of smaller trapezoidal pieces, which worked out quite well.
At this point I wasn’t happy with the way that the flame cakes looked. For one thing, a few of them did have imperfections in their fondant, but more importantly, they didn’t have the sense of movement and life that I had been hoping for. After a bit of experimentation I found that I could kill both birds with one stone by adding a layer of royal icing, striated and textured with a damp paintbrush, which gave them more flow.
Then it was time to paint. The colors for the wedding, to the extent that there were any, were grey and a sort of muted yellow. So I tried to tie in with this by making the structure silver and the curtains a dusty yellow-gold. After masking off the arm, column, and base with tin foil, I sprayed a layer of yellow, then just a smidge of red, some gold for shine, and finally some bronze to add a sense of age.
The flames took quite a few layers of color. I’m still not sure that I didn’t overdo it a bit. I think I did yellow first, then orange, then red, then blue, then bronze, then gold, then finally silver.
Instead of painting the hanging cakes, I just adorned them / concealed their imperfections with some black fondant details. To tie them in with the rest of the cake, I textured the black fondant with the same granulated sugar technique, and then highlighted the texture by brushing on a bit of silver luster dust.
I put just a little more color into the cake by adding dusty rose royal icing fringe to the hanging cake bases and to the drapery, as well as some fondant ropes and tassels. Once these dried, I painted a little bright red and a touch of blue onto them.
I wasn’t planning to actually install the flames and the hanging cakes until the cake was at the venue, but I did attach some of the gum paste leaves around the Christmas lights that would be under the flames. I could only attach about half of them, because I needed one side to be open in order to place the flames. This made me rather nervous because I had some trouble getting them to stick and had to create elaborate tin foil supports to hold them in place until the royal icing dried. I also had trouble with the royal icing sticking because I had made it a little too thick. So I was scared that, if I had that much trouble at the venue, I wouldn’t be able to get it all together in time.
Even though the venue was less than two miles from my apartment, transport was hair-raising. At first I had for some inexplicable reason imagined that I could transport the cake in the front seat of my pickup. Since the cake was two feet wide, three feet long, and about two and half feet tall, apparently I was temporarily insane when I was picturing sticking this thing in my passenger seat. My friend Alejandro very kindly volunteered to come pick up the cake in his SUV, though I don’t think he really knew what he was getting into.
The cake literally came within inches of not fitting in the back of his SUV along all three dimensions. On the top, there was not even a quarter of an inch of clearance. All I can do is thank my lucky stars that it made it in. The only reason that I didn’t make the cake six inches longer is because that was the size that the steel pipe came in.
I actually didn’t ride in the car with the cake on the way to the venue, because I wanted to have my truck there as well, but fortunately Angie was able to go with Alejandro, so he didn’t have to face the nerve-wracking ride alone. I can now admit that I was terrified that something would go wrong on the way over, though of course I didn’t say this to Alejandro until the cake was safely at the venue. All sorts of horrific scenarios were running through my head. The royal icing arm might crack. The fondant curtains could rip. All the leaves might break off. The entire cantilevered arm might collapse somehow. I packed two huge bags full of repair equipment and supplies to cope with any eventuality.
Of course, none of these dire events happened, or even had any real likelihood of happening. The cake got to the Orpheum with no problem whatsoever. A passing stranger even helped out by holding the door as Alejandro and I carried it into the venue.
This is the first time that I’ve ever completed a cake in the midst of professionals setting up a wedding venue. I was feeling very insecure about having that many people around while I was working, but Angie kindly hung around and kept me company and distracted me with stories about her love life. The assembly actually went quite smoothly and fairly quickly. Really it was just a matter of dropping the flames onto their bases, sticking on a few more leaves, and aging the silver leaves with just a touch of black powdered food coloring.
Because I wasn’t sure how long it would take to finish the assembly at the venue, we had tried to come up with some sort of complicated plan of vehicle switching that would allow me to stay at the venue if necessary while Angie went back to my apartment to change. I was so distracted that I never understood the plan in the first place, so it’s a good thing that we didn’t actually attempt to put it into action. In the end, we had plenty of time to drive home and change and then take a bus back to the venue in time for a pre-ceremony cocktail. While we were gone, they even accessorized the cake table with votive candles and flowers that matched the colors of the cake flawlessly.
The wedding was absolutely beautiful. I was so nervous about the cake that I hadn’t eaten all day and there was an open bar, so I may have had a few more glasses of wine than was really good for me. The wedding coordinator for the venue told me that the cake was a challenge to cut, which I don’t doubt is true. Apparently he put a note to that effect in the file. Not that there’s any real likelihood that I’ll ever serve a cake there again.
I have absolutely no idea whether there was any leftover cake or what happened to the cake base, since by the end of the night I was too drunk and exhausted to do anything but let Angie roll me into a cab home I like to picture a severed, silver, sugar arm sticking out of a dumpster being devoured by ants.
As promised, I’d like to give Executive Producer credit on this cake to Angie for cleaning my apartment, to Jenn for running to the store for emergency powdered sugar, and to Alejandro for driving the cake to the venue. Thanks guys!
Banshee Cake
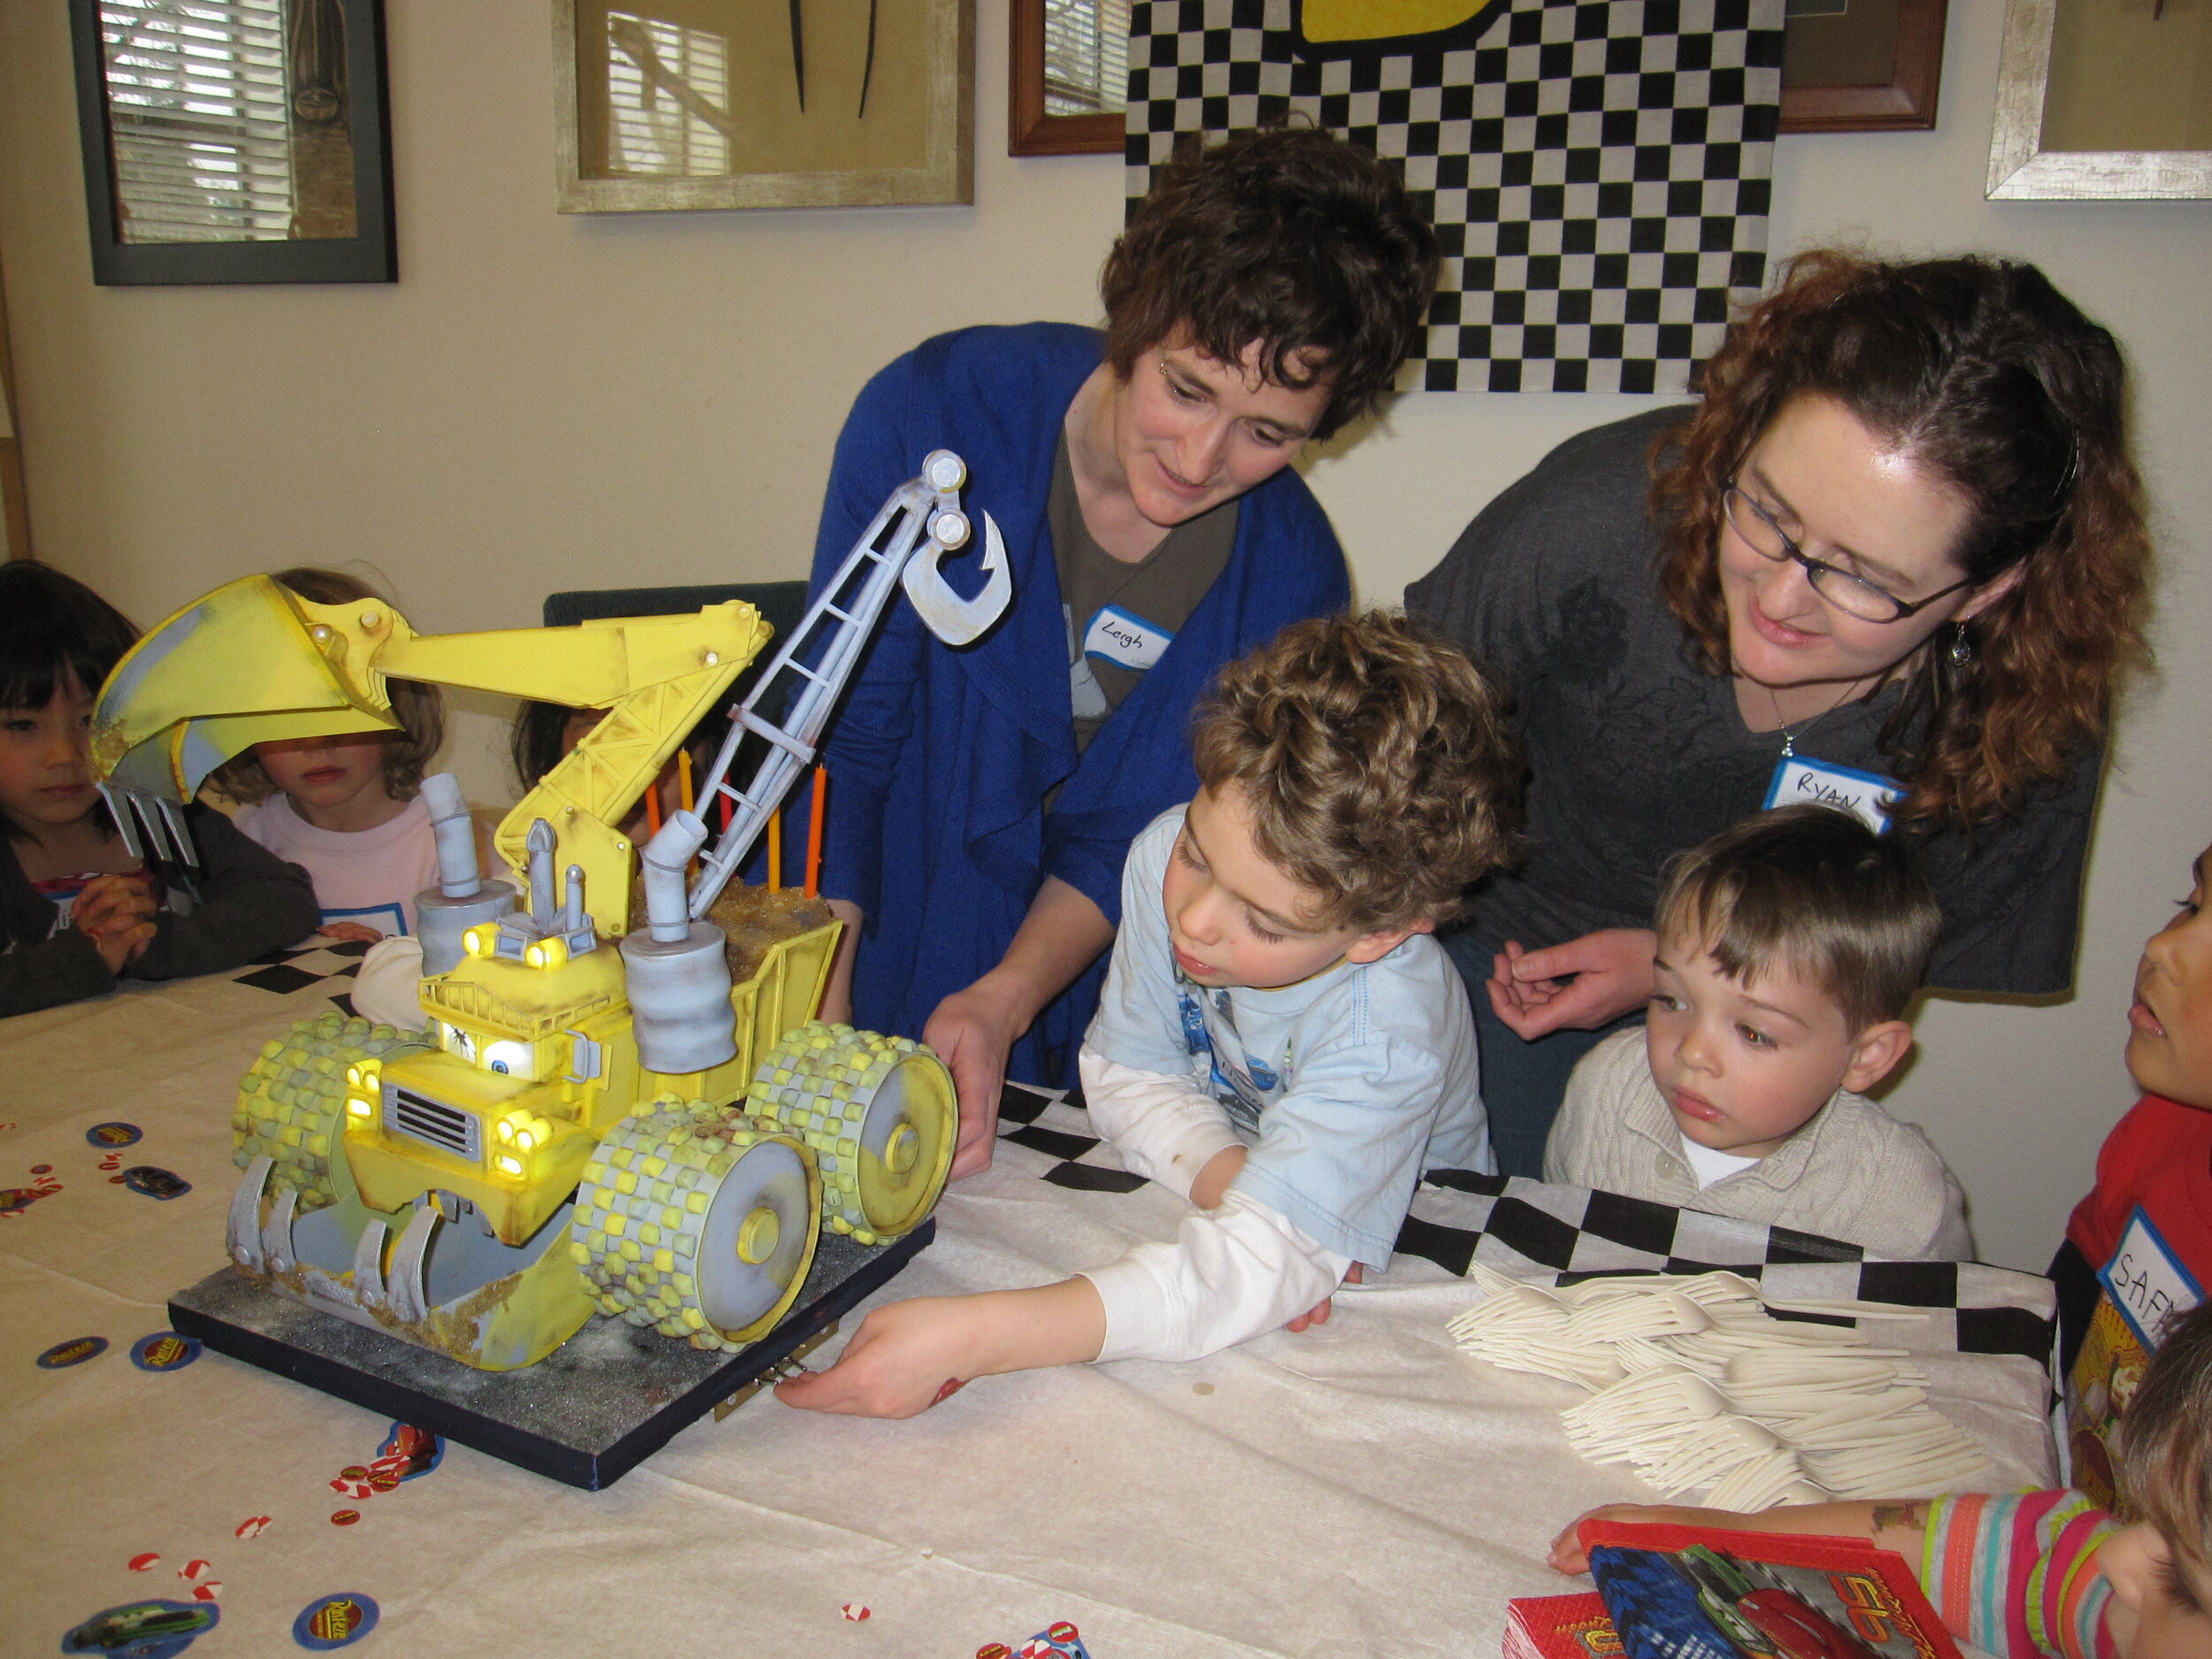
My niece Alex’s specifications for her fifth birthday cake: “I want a Banshee cake. And one switch will make the lights turn on and one switch will make the wheels turn and one switch will make the mouth open and close.”
My niece Alex’s specifications for her fifth birthday cake:
“I want a Banshee cake. And one switch will make the lights turn on and one switch will make the wheels turn and one switch will make the mouth open and close.”
Given her previous four birthday cakes, this is a reasonable request, though as you’ll read later in this account, I only managed to deliver on one of the switch operations. Of course, when I made her other birthday cakes, I was living in the same house with Alex. But now, while Alex still lives in California, I am in grad school in Madison, Wisconsin. Fortunately, my spring break aligns fairly well with Alex’s birthday, so I was able to be there for her party, but this meant that I had to make the cake in Wisconsin and then bring it with me to California on the airplane. One thing this forced me to do was to scale the cake such that it would fit in the overhead bin of an airplane, so Banshee was the smallest cake I’ve made in quite a while.
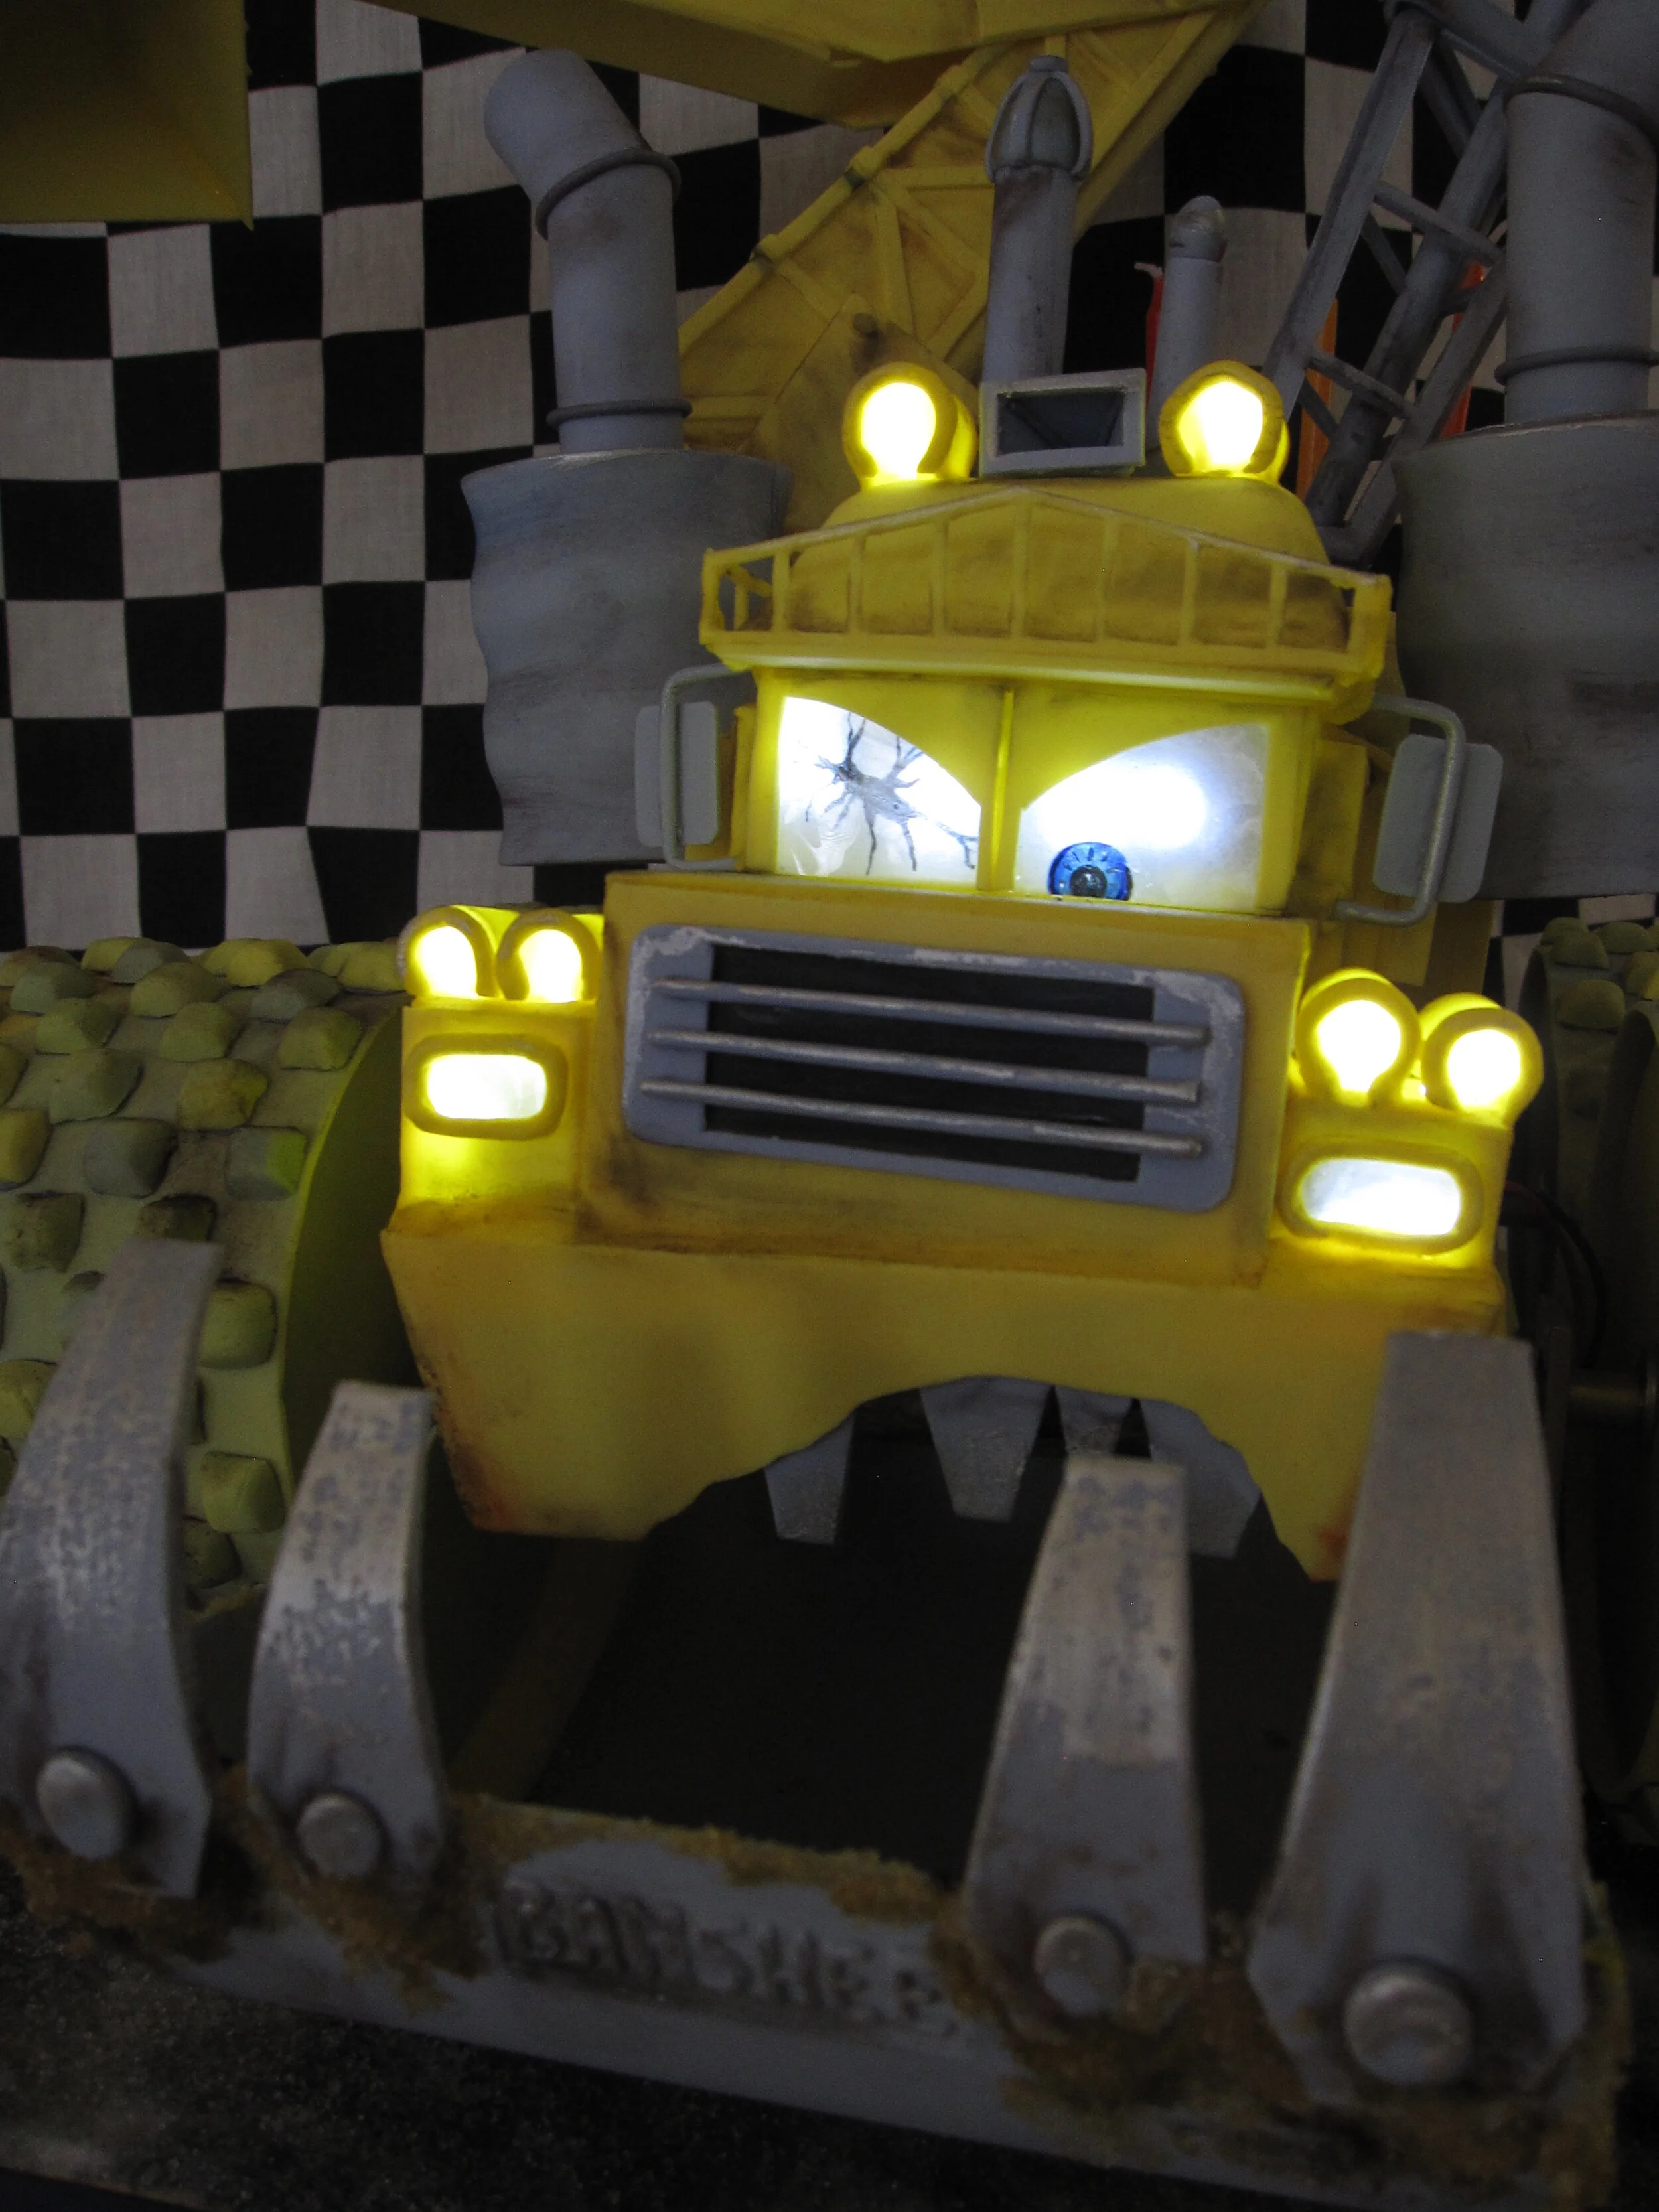
Banshee, of course, is a big work machine that appears at the end of Mater and the Ghostlight, which is an extra short on the DVD for the movie Cars. In fact, Banshee is not even in the short itself; he pops onto the screen only after the closing credits. He appears for all of twenty seconds and you only see him from one angle, which means that I had no idea, from watching the short, what the back half of Banshee looks like. Fortunately there is also a toy version of Banshee, so I bought one, planning to use it as a model for the cake and then give it to Alex for her birthday. However, since I failed to inform my sister and her husband that I had this toy for Alex, they bought her one as well. I gave mine to my little friend Isaac (age 4), who is also a huge Cars fan, so it actually worked out well for everyone.
My first step was to create the electronics. By this point, I’m pretty adept at putting LEDs in my cakes, so the lights were easy. I reused the LEDs that I originally bought for the Tardis Cake. To make the wheels spin, I used a motor that I last used to power Big Rig on Alex’s fourth birthday cake, transferring power to the axles via rubber band drives. I still think it would have worked if my rubber bands had been slightly shorter. Rather than just make the mouth open and close I decided that the whole cake should rise and fall as well, so that Banshee looked like he was breathing, as he does in the movie. So I made an eccentric cam, hooked up to a motor that I had from powering Melvin the cement mixer’s drum, also on Alex’s fourth birthday cake. So as the cam rotated, it was meant to raise and lower the front end of Banshee’s body, which was anchored at the axle for his rear wheels, while simultaneously pushing his jaw up and down. If my motor had been strong enough to actually do this with the weight of the cake on it, it would have been really cool.
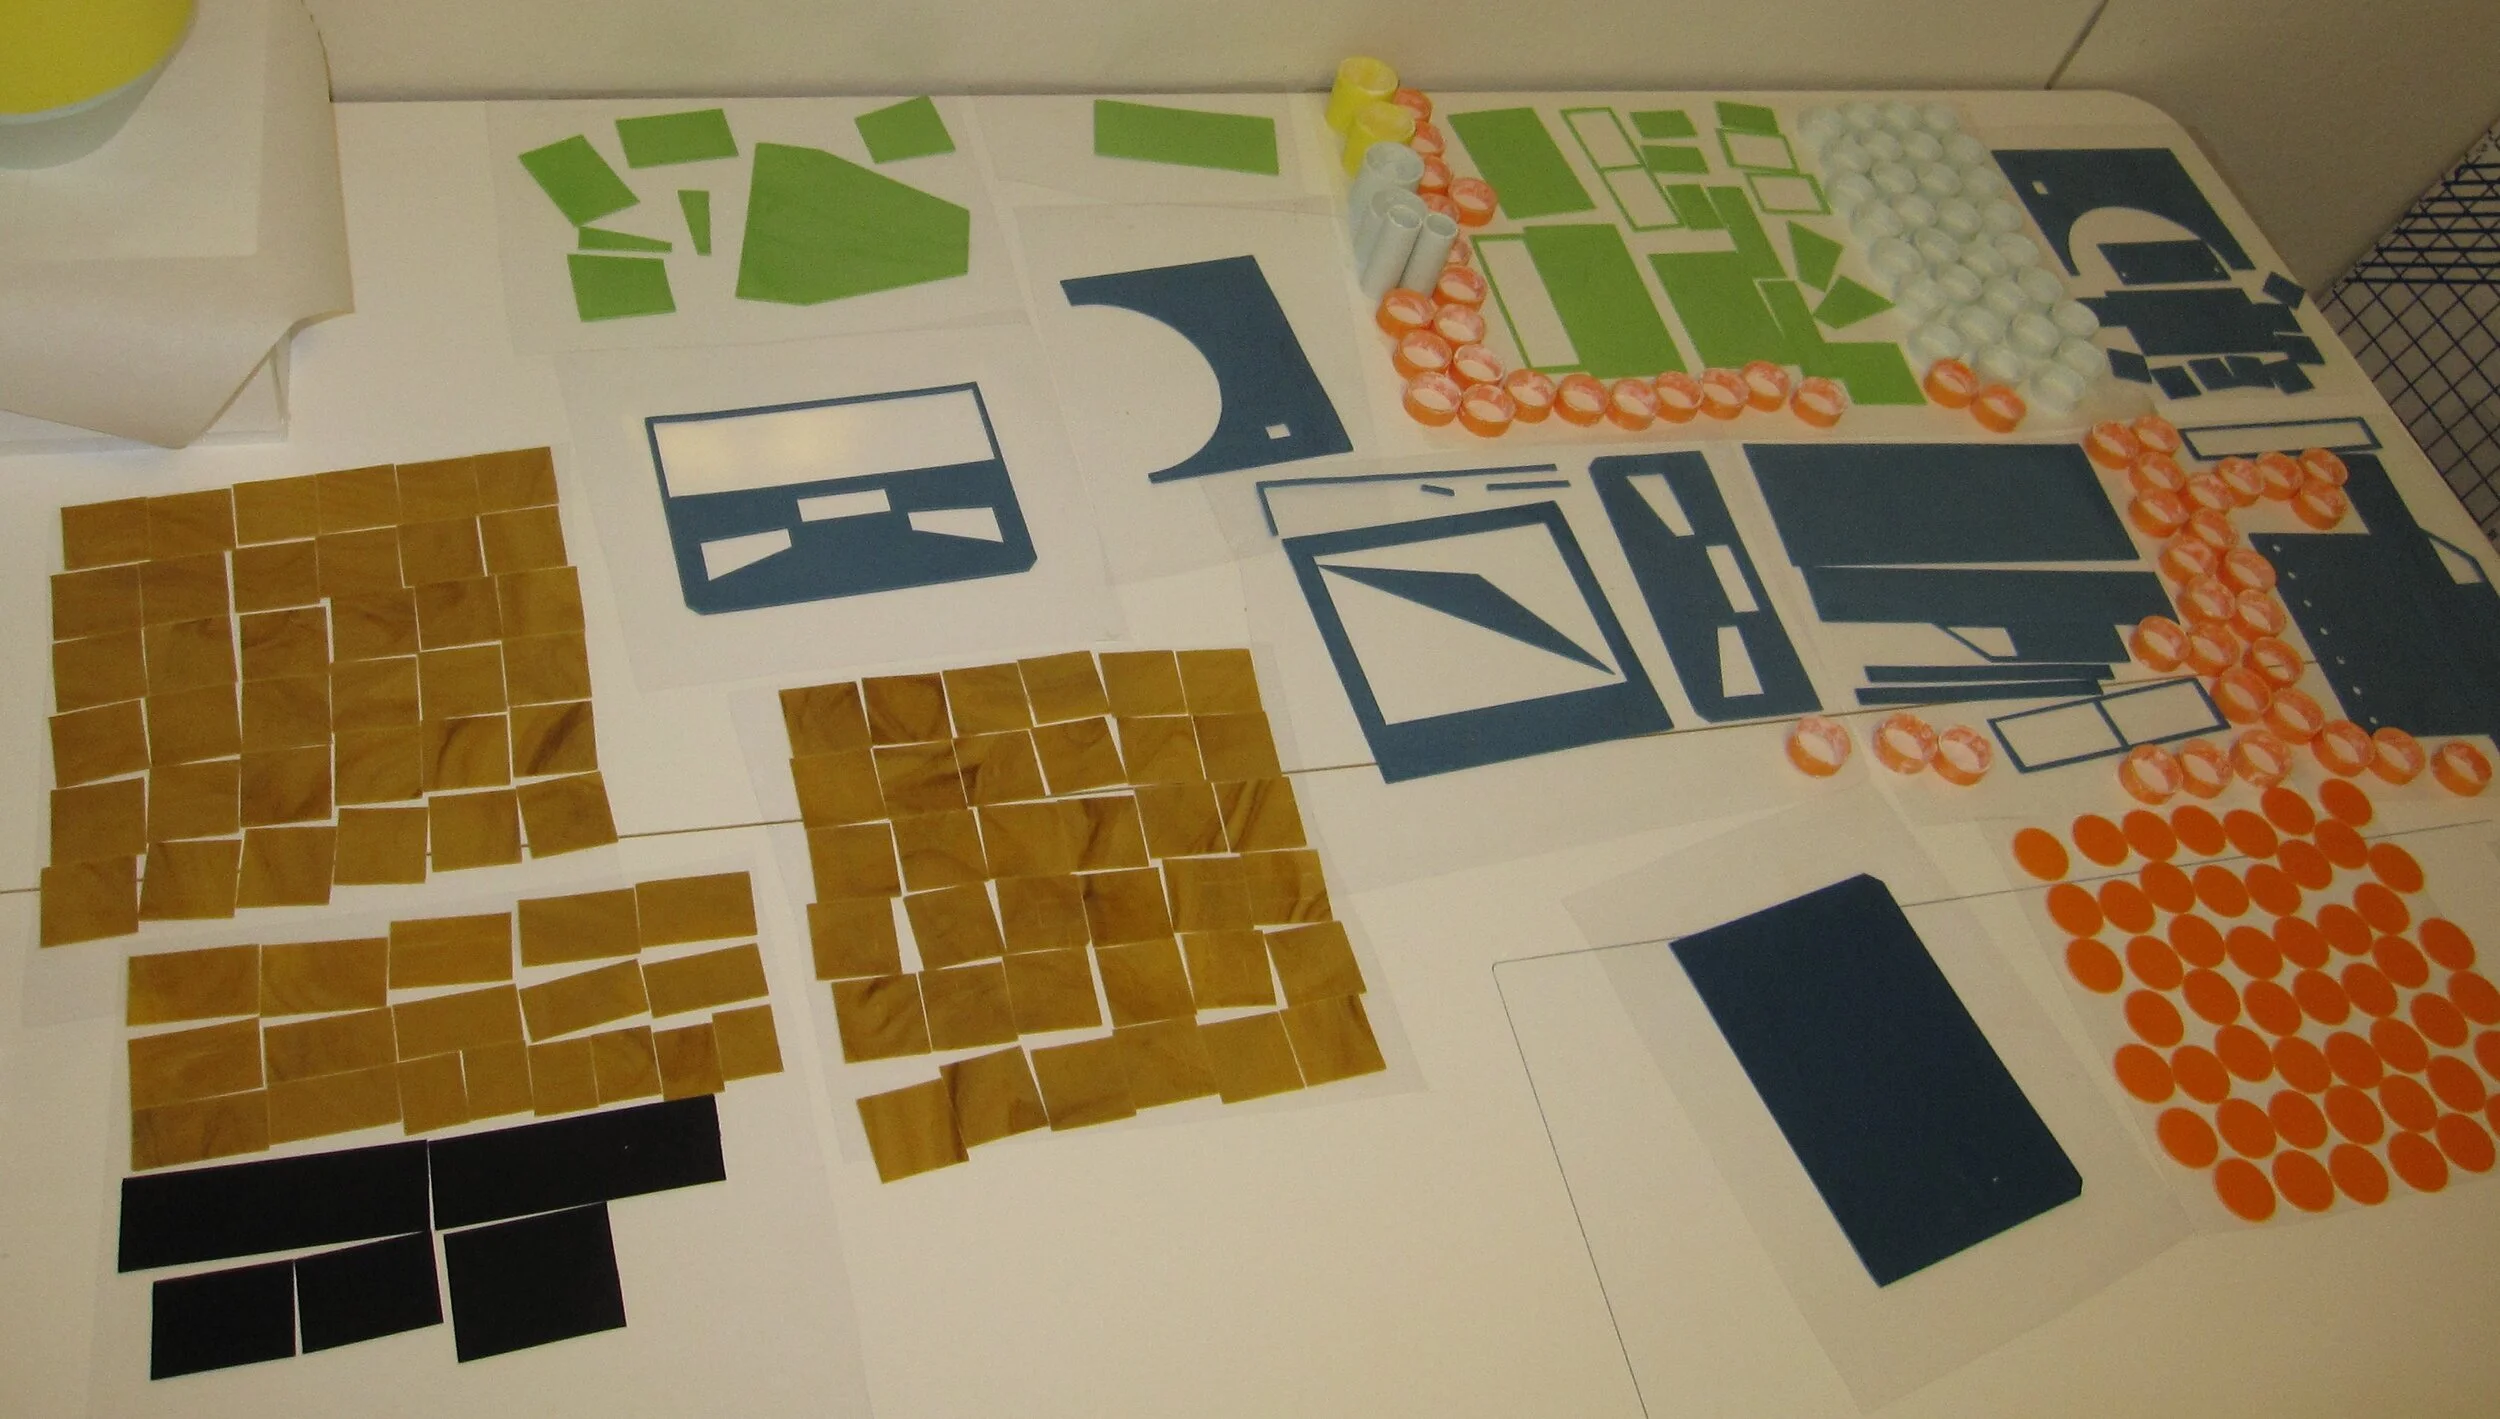
Before I made anything in edible materials, I made a full scale mockup of the entire cake in Bristol board. Then I cut it apart to use as a pattern to make the entire exterior of the cake out of gum paste. One nice thing about Banshee is that he only requires two colors of gum paste – construction vehicle yellow and old, dirty metal grey. This helped the gum paste cutting stage to go by fairly quickly. The most tedious part was making the approximately four hundred and twenty little truncated pyramids for the treads of the tires.
Once all the gum paste was dry, I assembled substructures as much as possible with royal icing. Because I was going to be transporting this cake across the country, I used more non-edible supports than I might have normally.
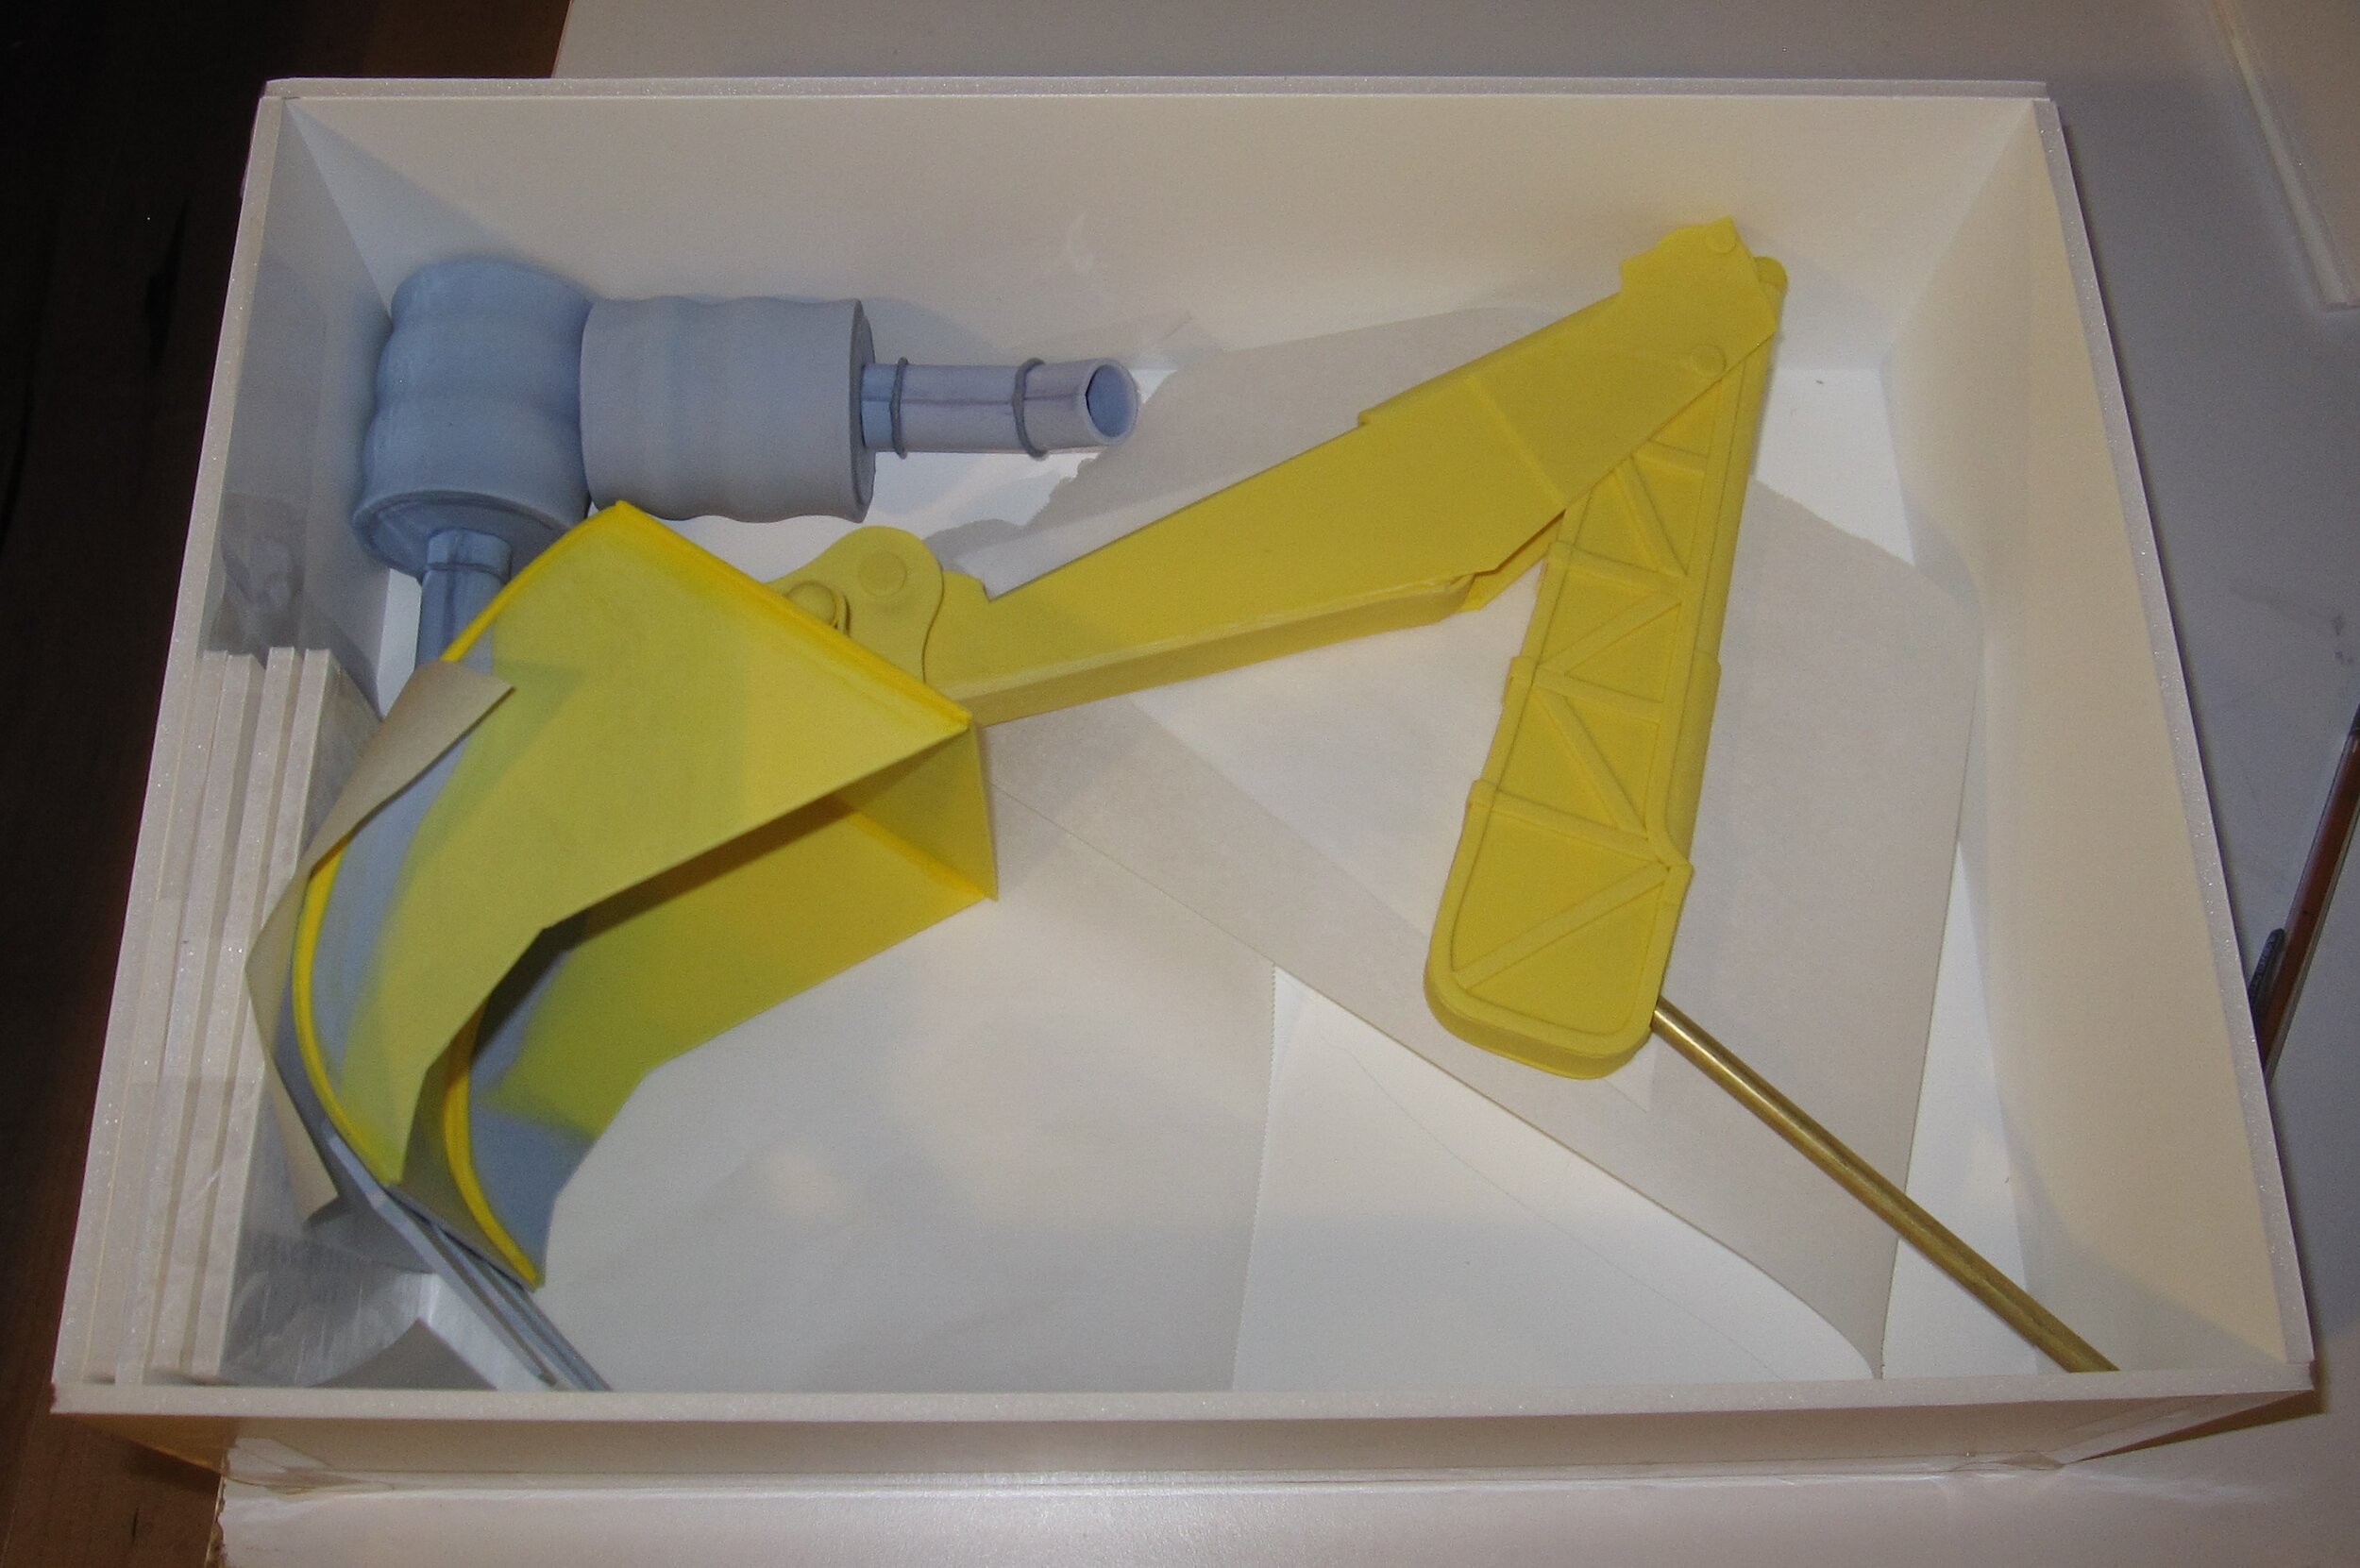
The tow hook and the scoop, for instance, were assembled around brass rods. Incidentally, although I’m breezing over all this in a paragraph, in reality I spent about a month on this stage of the project.
Two days before my flight to California I baked the actual cake. Because I wanted to be sure of a very stable cake for transport I used a chocolate ganache filling, rather than a buttercream. I made three separate little cakes – one for the bottom of the cab, one for the top of the cab, and one for the dumper bed in back. I covered them in fondant because you don’t want gum paste directly in contact with the cake because icing softens the gum paste.
Cake assembly went well. Only a few gum paste pieces were inexplicably the wrong size, but I was able to shave them down to size with a minimum of trouble.
Much more problematic than assembling the cake was packing the cake for travel. This was the first time I had ever tried to move a cake except by car so I was nervous. I had to use basically every inch of my two carry on allotment. For my main carry on I made a foam core box that was about 9”x14”x15” to carry the cake. I also needed to use my extra briefcase carry on allotment to bring Banshee’s scoop arm and tow hook, as well as all the components that made him more than 8 ½” tall. Terrified that my pieces would break en route and I wouldn’t have a cake to give to Alex, I spent at least six hours making boxes, carefully packing components, padding, etc. It was time well spent.
The trip was probably the most stressful flight I have ever endured, with the possible exception of the first solo plane trip I ever took when I was sixteen and flew from Michigan to California to visit my sister in her first year at Stanford. Initially, I had imagined that I would relax once I successfully got the boxed cake through security. This turned out not to be the case.
Security screening went pretty well, although I was so nervous that my hands were shaking. If I hadn’t been allowed to take the cake on the plane, it would have been game over. Fortunately, I was flying out of the Madison, Wisconsin airport, which is by far the most laid back airport I’ve even been to. The only other airport I’ve been to that even comes close is in Paro, Bhutan, an airport so remote and exclusive that only two airplanes are allowed to land there. I got to the airport about three hours early to be sure to have plenty of time to get through security. Obviously, they needed me to open the boxes, but the security personnel were very respectful of the cake’s fragility and complimentary of its appearance. After they swabbed my hands, the cake boxes, and the switches I was cleared through security and safely on my way.
At this point I realized that I couldn’t relax because I was traveling by myself and didn’t want to take my cake into the bathroom with me to pee. Fortunately, I ran into a friend in the airport bar whose flight to Albuquerque had been delayed, so she was able to watch my cake while I ran to the ladies’ room.
Getting onto the plane was also terrifying because the first leg of my itinerary was Madison to Chicago, which is a short commuter flight on a very small plane. When the gate attendant in charge of gate checking carry ons came around the gate area, he told me that I would probably not to able to fit both of my carry ons onto the plane, which to me would have been a complete disaster. However, after a half hour of sitting in the gate area in terror, I was able to stow the cake under the seat in front of me and my other item in the overhead bin. I cannot tell you how relieved I was that this worked out.
In Chicago, I had to carry the cake from one end of the airport to the other to get to my next gate, but at least it fit more easily onto this plane than the last one. A flight attendant even saw it in the overhead bin and offered to put an ice pack on the box to keep the cake cool.
I arrived in California late Friday night and the party was scheduled for Sunday afternoon. On Friday, all I could do was open the box to verify that the cake hadn’t completely collapsed before I fell asleep. I spent Saturday playing with the kids, so I didn’t get to unpack the cake completely until Saturday evening after the kids went to bed.
Amazingly, the cake came through the journey completely unscathed. Literally only one piece broke, and it was a piece that I had extras of, so it didn’t even matter. Even in my best case scenario, I had expected to have to effect at least minor repairs. I was completely flabbergasted by how well the cake traveled.
I spent Saturday night completing the assembly of the cake, installing the hook and the scoop, and adding finishing touches to the paint job. I also used some pressed sugar colored with brown food coloring for dirt on the teeth and in the dumper bed, where I also installed the five candles.
The party was fantastic. Our friend Sara brought awesome Cars decorations and balloons. My sister had invited Alex’s entire preschool class plus several other friends, so there were about 20 children. I’m not sure how they even all fit in the house.
Sadly, Banshee’s wheels didn’t spin (I think the rubber bands weren’t tight enough) and he didn’t go up and down (I think the cake was too heavy for the motor), but otherwise he was very well received. The most important thing is that Alex was happy. Happy and full of sugar.
Zoom! Boom! Bully Cake
For my niece’s fourth birthday, I made a cake based on Zoom! Boom! Bully from John Scieszka’s Trucktown.
Those of you who don’t happen to be immersed in the magical world of three- to five-year-old children are probably not familiar with John Scieszka’s Trucktown. So I recommend that you follow the link so you know what the heck I’m talking about.
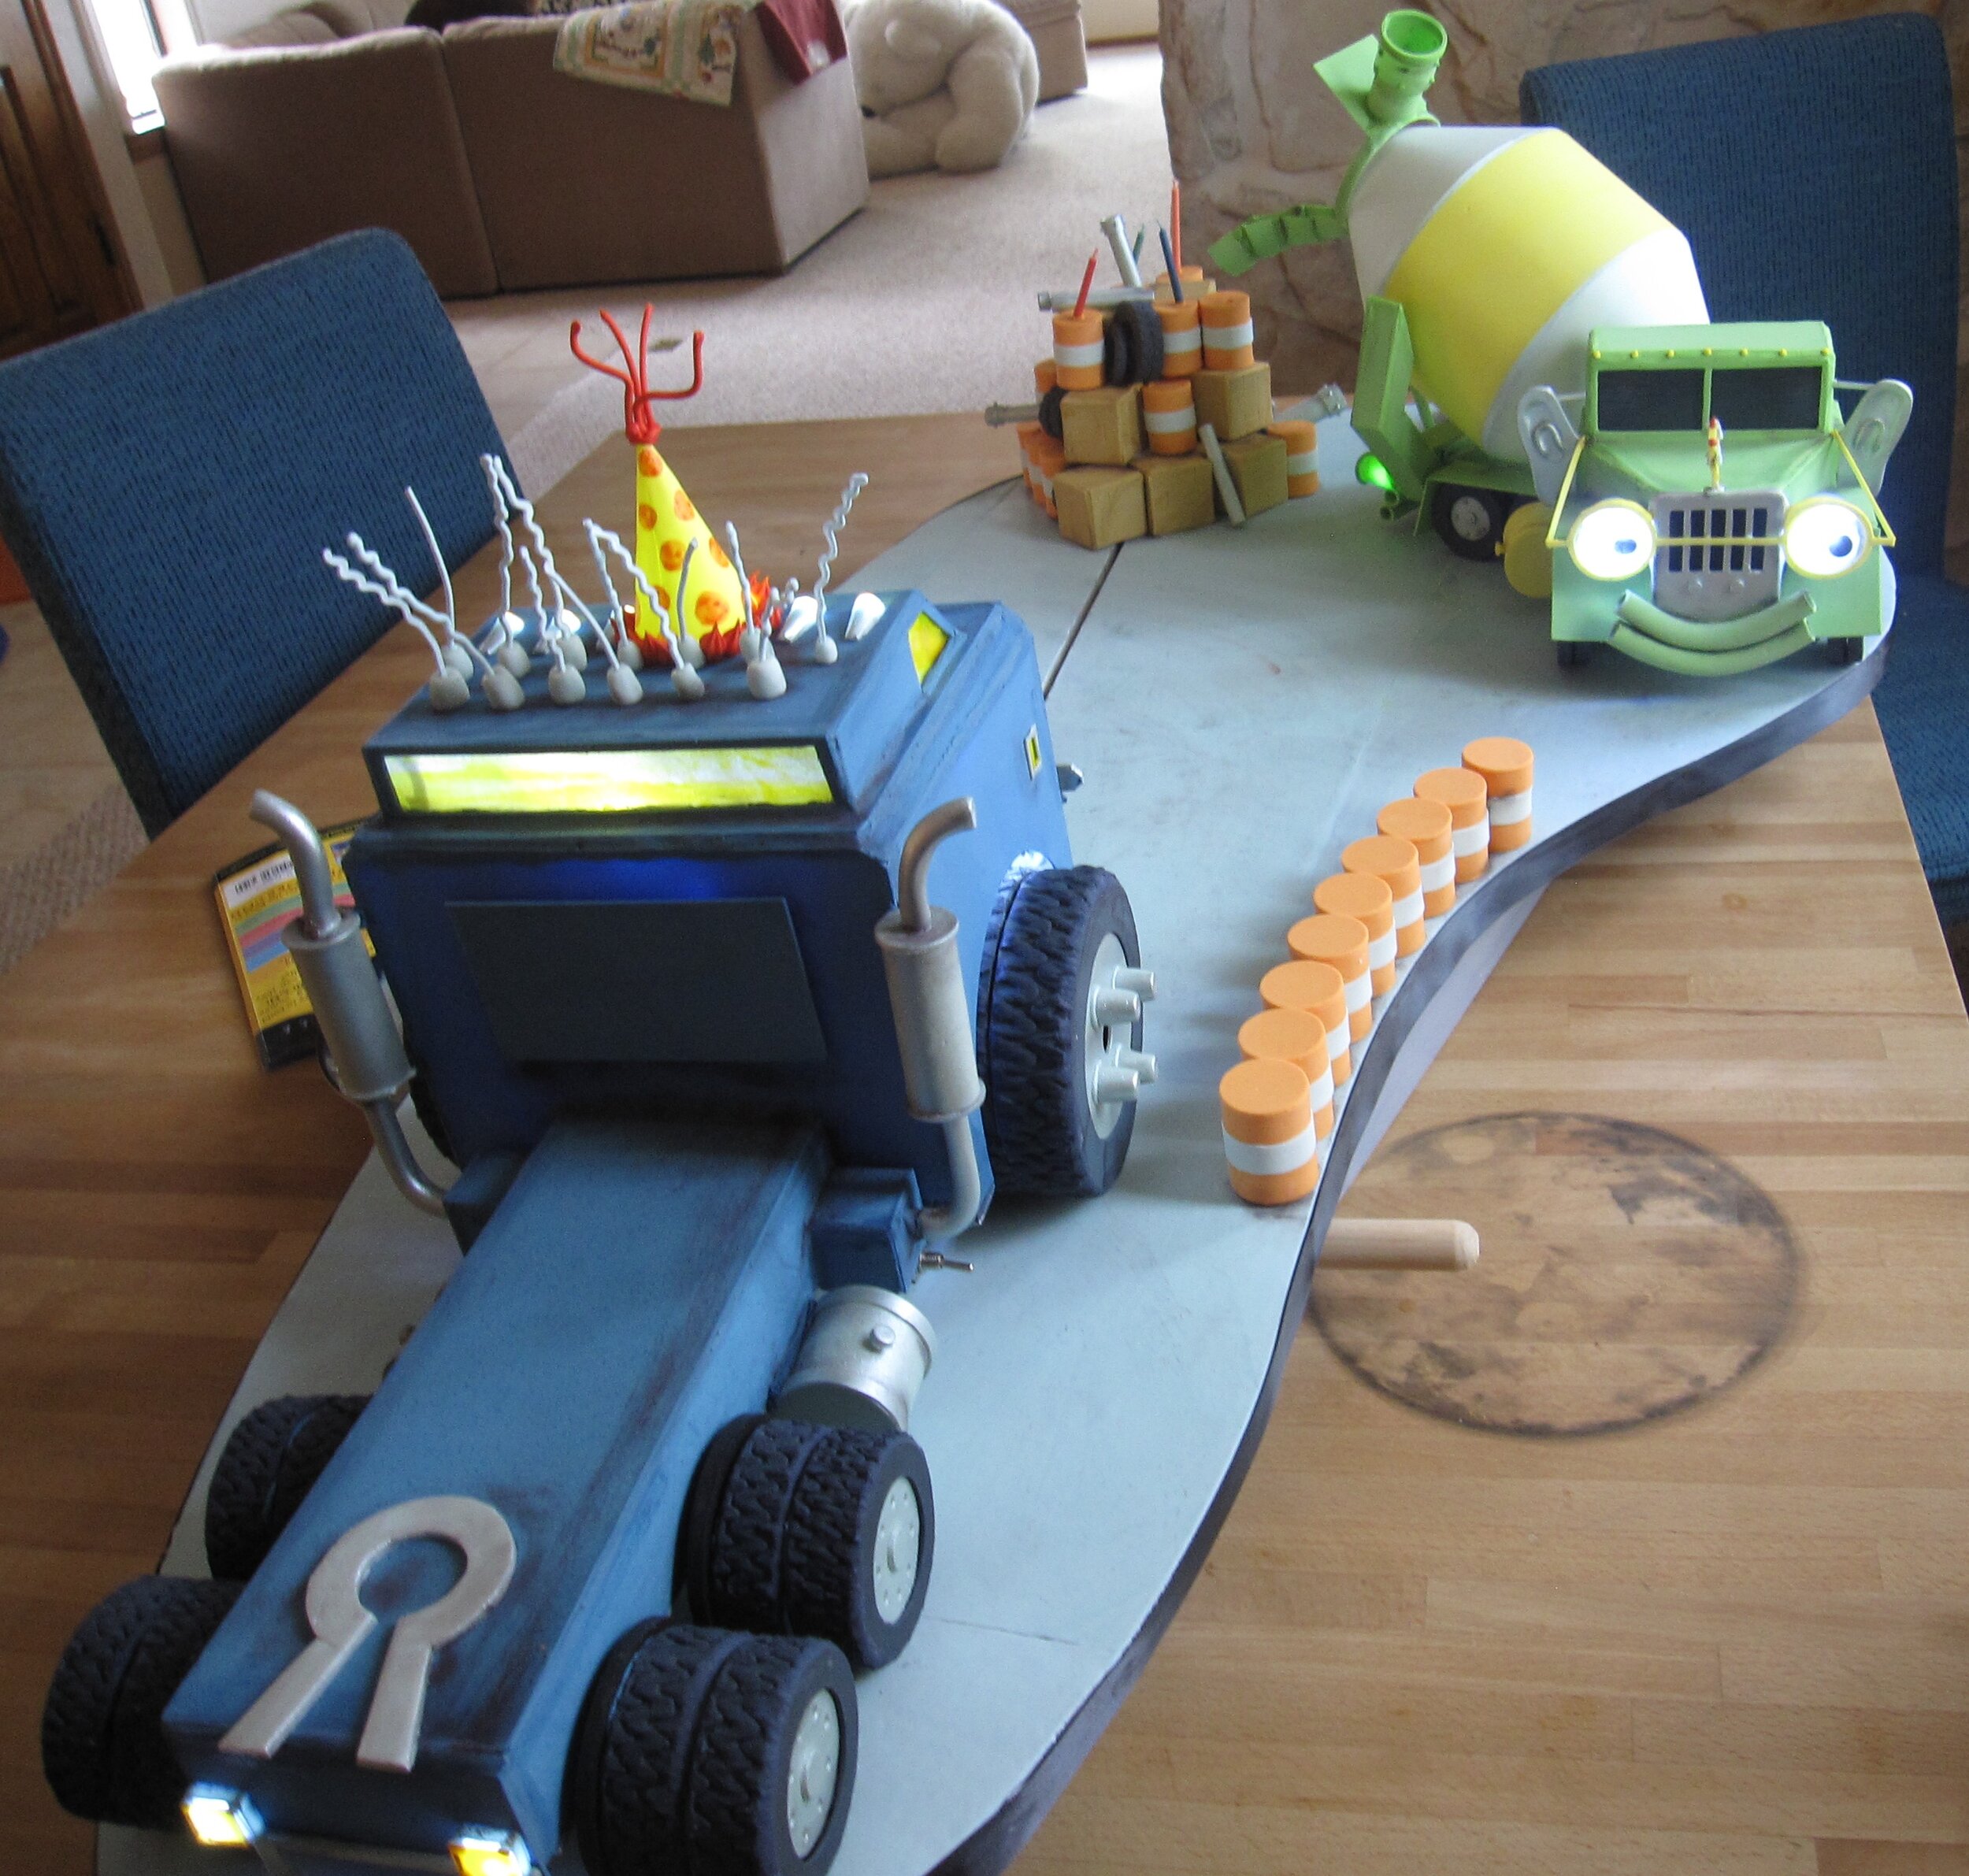
My personal favorite book in the Trucktown series is actually Smash! Crash!, but since the occasion for this cake was my niece Alex’s fourth birthday, Zoom! Boom! Bully was a more appropriate reference. The basic plot is that various denizens of Trucktown stack up crate, barrels, and tires in the middle of the street, but are periodically disrupted by the aptly named Big Rig smashing into them (Zoom! Boom!). The other trucks then exclaim about what a bully Big Rig is. The big surprise in the end is that it’s Big Rig’s birthday and the other trucks are making him a birthday cake out of the crates, barrels, and tires, which Melvin the cement mixer then pours cement “icing” on. Big Rig, very touched by the other trucks’ thoughtful gesture, picks up the “cake”, takes it back to his garage, and proceeds to gleefully smash it while wearing a festive yellow party hat.
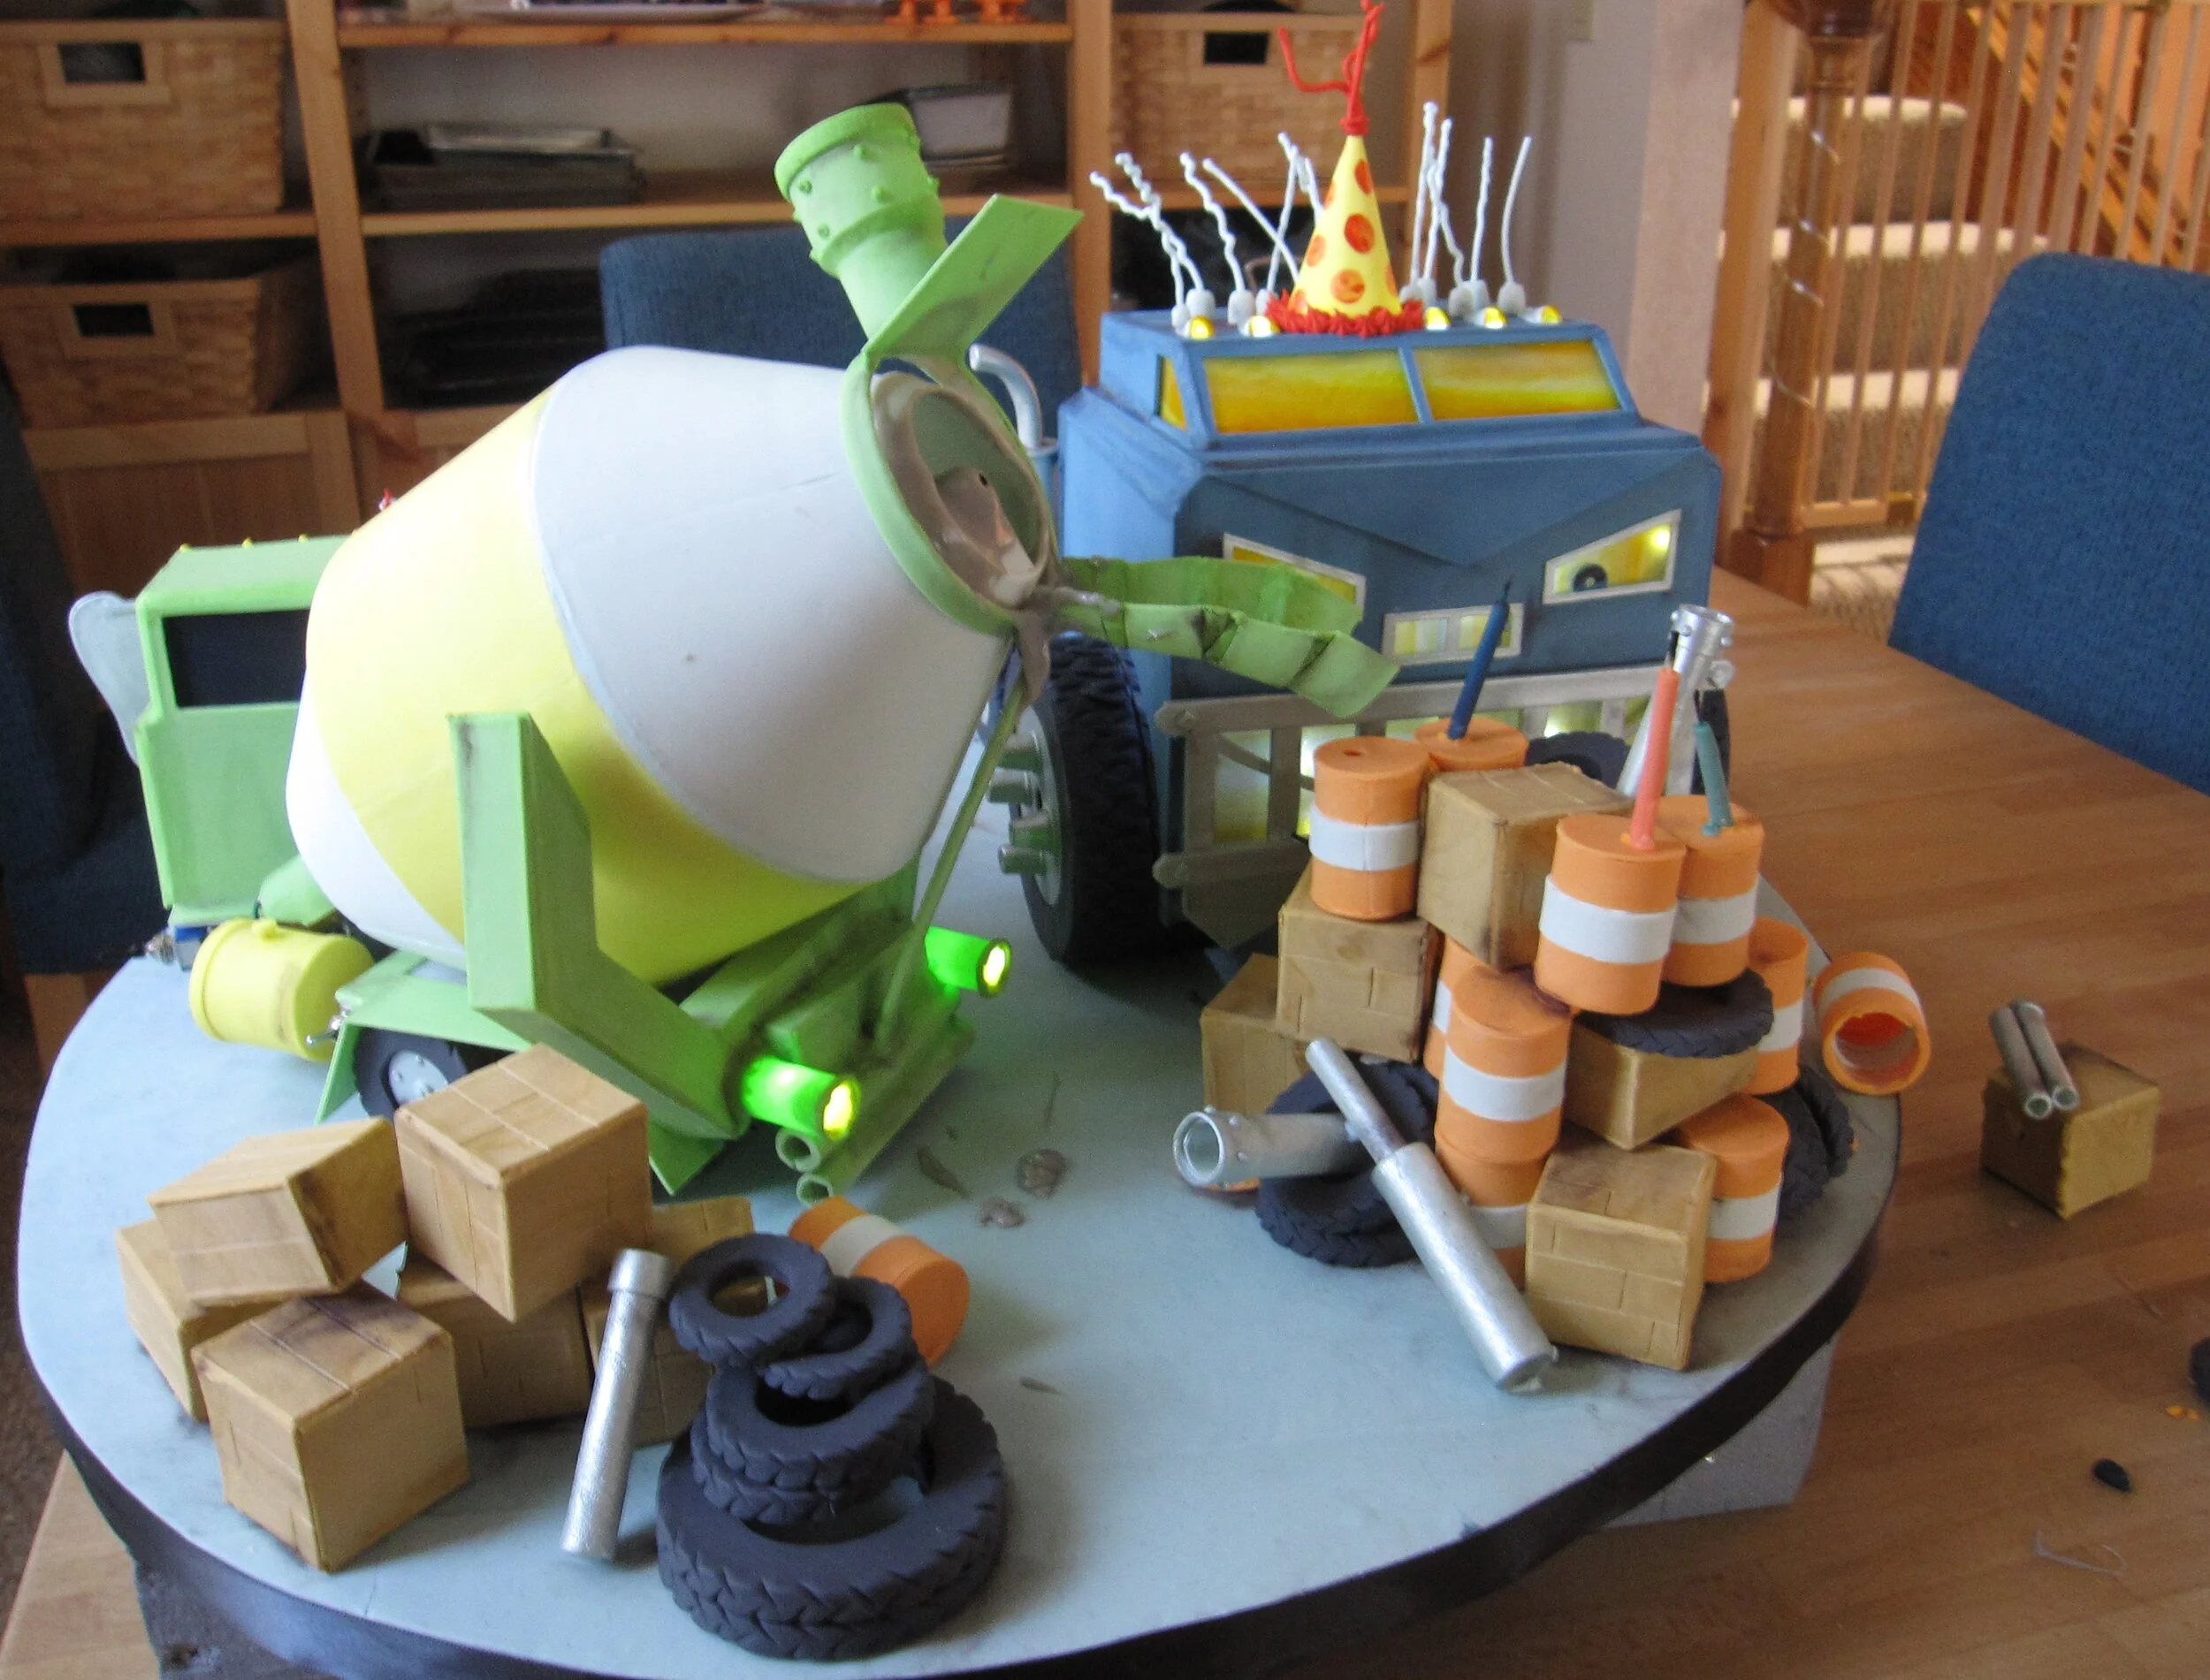
I decided to recreate the penultimate moment of the book in cake form, consisting of three components:
1) The “cake” made of tires, crate, and barrels.
2) Melvin the cement mixer, with a rotating drum in the process of dumping cement onto the “cake”.
3) Big Rig, who would smash face first into the “cake”.
When I explained this concept to Alex she was very enthusiastic, if a bit disappointed that Jack Truck and Dump Truck Dan wouldn’t be on the cake.
The first thing I had to do was figure out how the heck I was going to make any of this happen. The easiest way to describe the process is probably to take each piece separately, though of course these projects were running concurrently.
Melvin the Cement Mixer
I learned a lot about cement mixer drums. The first thing I learned was that it’s very difficult to find detailed schematics of them on the internet. Eventually I resorted to studying Alex’s toy cement mixer. As far as I’ve been able to determine from these authoritative sources, cement mixer drum interiors consist of a series of semicircles, angled and staggered such that when the drum turns one way the cement is propelled towards the bottom of the drum and when it turns the other way the cement is pushed up and out the chute.
I made a whole series of Bristol board mockups with various sizes and densities of semicircles, trying them out using little pieces of paper as a cement substitute. None of them even came close to working. So I branched out and tried some other variations on the internal structure. Finally I settled on a helical arrangement of triangular wedges spiraling up towards the top of the drum. This seemed to at least sort of work.
With the basic structure settled, it was time to remake the drum in gum paste. The exterior of the drum was made in three pieces around Bristol board forms. Once these and the myriad little triangular wedges were dry, I assembled them with royal icing around a brass tube for the center support. Assembly was a lengthy process, as I had to wait for the icing on each wedge to dry before attaching the next one.
With the drum assembled around the central tube, I superglued the tube to the shaft of a reversible gear head motor (once I had figured out how to wire up the motor to make it reversible.) Mounting the drum and motor assembly to the base was a real challenge. I had made a pretty simple base for Melvin out of a cut-up aluminum baking sheet, covered with gum paste, and elevated off the wooden base for the entire cake with L-brackets, so the body of the truck would ultimately appear to be resting on its tires. In Zoom! Boom! Bully, Melvin’s drum appears to be supported from beneath in the middle by two angled beams, but there doesn’t seem to be a support for the back of the drum. This, of course, also raises the question of what Melvin’s rear chute is attached to.
My plan was to build the side support beams out of gum paste around pieces of brass, bolted to the aluminum base. Because, unlike the people illustrating the book, I physically needed something on the back to support both the drum and the chute, I decided on a brass ring mounted on a strip of brass and wrapped in gum paste, also bolted to the aluminum base.
The first time that I put this all together with the motor and the gum paste drum, I set it up so that the lowest point on the drum was resting on the aluminum base, on which I had put some UHMW tape to keep friction to a minimum. I thought that this would help to support the weight of the drum and keep stress off the motor. This turned out to be a very bad plan, as I had failed to account for the fact that, in spite of my best efforts, I had failed to center the drum perfectly on the central brass tube. This meant that when I turned the motor on, as soon as the part of the drum that was slightly further from the axis of rotation got around to the bottom, it jammed against the base. I turned the motor off as soon as I realized what has happened, but not soon enough. As the central brass tube was still trying to rotate while the drum itself was jammed against the base, the royal icing connected the gum paste drum pieces to the brass tube cracked. D’oh!
A few tense hours and one major royal icing repair later, the drum was reattached to the tube. In order to prevent this from happening again, I made a new, slightly higher brass ring to support the back of the drum and raised the motor, and therefore the front of the drum, about a half an inch as well. That way, the drum never touched the actual aluminum base and was supported only by the motor on one end and the brass ring on the other end. It worked!
Once the drum turning mechanism was in place, finishing the back of the truck was relatively simple. I covered the motor in green gum paste and assembled the gum paste pieces of the side support beams. Having previously made tires out of black fondant and hubcaps out of gum paste, sprayed silver, it was easy to attach these, as well as the gum paste wheel wells.
I had also wired up some white LEDs to use for Melvin’s taillights and headlights, so I put the LEDs for the taillights in place and then ran the wires underneath the aluminum base so they’d be in place for the headlights once I got his head assembled. The taillights themselves I made out of gum paste cylinders, capped with rice paper (to diffuse the light) and yellow gelatin (to give the light the correct hue.) In the past, when I’ve needed sheet gelatin (see the Tardis Cake and the Flying Saucer Cake) I’ve used the pre-made kind, but since that has a strange diamond pattern on it, this time I tried making my own flat sheet gelatin, using these instructions that I found on the internet. After a few abortive efforts, it worked pretty well.
Assembling the chute took a little time, because it was made of six separate pieces, which had to be attached one at a time, with sufficient time for the connective royal icing to dry before attaching the next one.
With the back of Melvin thus complete, I had to make his head, the only part of Melvin that contained actual cake. This went very smoothly. Having made all the exterior gum paste pieces in advance, it was simply a matter of carving the cake into the appropriate shape, covering it with fondant, and then setting it in place on the aluminum base. Then I could assemble the gum paste exterior with royal icing, including more tires and wheel wells, the ears / side view mirrors, and eyeglasses / headlights (which were assembled around the rest of the strand of LEDs.) To fill gaps and hide seams, I used royal icing, smoothed with a damp paintbrush.
For cement, I made some white chocolate ganache, tinted grey with black powdered food coloring. Mind you, at this point I still didn’t know whether the drum was properly configured to actually push the cement out and down the tube, and I wouldn’t find out until the party.
Big Rig
My biggest challenge of this cake was figuring out how to make Big Rig roll. It was also pretty high pressure because, let’s face it, if Big Rig didn’t smash into the “cake” the whole project would pretty much be a blatant failure. With almost all of my cakes, I accept that there is a fairly high probability that it might not work as I intend. My philosophy is that if you always know that what you’re doing will work, you’re not trying hard enough. Which is fine when the only people who are going to be disappointed with a failure are me, or my adult friends, or the guests at my friends’ wedding. But I really didn’t want to disappoint Alex. So in this particular case, I really couldn’t let failure be an option.
Keeping Big Rig on the right trajectory was the easy part. I attached two L-brackets to the bottom of Big Rig’s aluminum base, a material which I had selected to keep his weight as low as possible. Then I cut a track in the plywood base for the entire cake, running from the far end where Big Rig would start, leading to the end of the base where the “cake” would sit. That way, the L-brackets, slotted into the plywood track, which I had lined with UHMW tape to reduce friction, would keep Big Rig on target to the “cake.” All I had to do was get him to move.
My first attempt at a drive mechanism was to connect a hobby motor directly to the shaft of one of the front wheels (made out of plywood, to be covered later with gum paste tires), so it would basically be a one-wheel drive car. This failed for at least two reasons. First, because the two front wheels weren’t connected to each other via a complete axle, both had a tendency to bind up in their bushings, so that moving even the light aluminum base without any cake on it took all the motor’s power. Second, because only one wheel was driving the truck, it had a tendency to try to pull the truck off course so that the L-bracket bound up in the track.
So I scrapped that and tried something else. This time, I connected the two front wheels with a brass and threaded rod axle. My plan was to transfer the power from the motor to the axle with a heavy-duty rubber band under tension. This plan failed even before I connected it to the wheels, as the minute that I started experimenting with putting tension on a rubber band around the shaft of any of the hobby motors I had in hand it became clear that none of my motors had nearly enough torque to get the job done.
I went online and located a promising-looking high-torque motor. While I was waiting for that to arrive, I started playing around with the possibility of a motor-less drive mechanism. My first thought was a tension spring. Unfortunately, a few major problems with this idea soon became clear. First, the length difference between the relaxed spring and the spring under tension wasn’t nearly enough. I couldn’t pull the truck all the way back to the end of the track, and even with the spring fully relaxed I was afraid that the truck wouldn’t even reach the “cake” to smash it. Second, I was very scared that, if I had to keep Big Rig under that kind of tension for any length of time there was a significant risk of premature smashing, which would be a real tragedy. Third, I really wanted Big Rig’s tires to spin on their own, so I could start the wheels spinning, and then release the truck for the final smash. There’s a great illustration in Zoom! Boom! Bully where Big Rig’s tires are spinning into a whirl of smoke just as Jack shouts, “Stop!” and the other trucks reveal that the “cake” is for Big Rig’s birthday. I really wanted to recreate this moment in cake before the smash, and that required motor power directly to Big Rig’s wheels.
I managed to solve the first of these problems by substituting a jumbo-sized rubber band for the spring. The rubber band had a much higher stretch-to-length ratio than the spring, and the flexibility of the rubber band meant that even after its tension was exhausted, it at least wouldn’t arrest the momentum of the truck. The rubber band also seemed to have sufficient power to move the truck fairly quickly, even with the projected added weight of the cake and gum paste. But the rubber band still left my other two concerns unaddressed. It still required the truck to be under tension for a longer period of time than I was comfortable with, unless I could come up with a release mechanism that I could set after the cake was completed and moved into place. And in order to achieve the effect I wanted with the tires spinning prior to release, I really needed tires that were legitimately motor-powered.
Fortunately, when my high-torque motor arrived, early signs were encouraging. Unlike the motors I was trying before, it was clearly powerful enough to withstand the tension on the rubber band. So I mounted the motor to the cake base and ran the rubber band to connect the motor shaft to the axle. Initially, I was delighted with the result. With no weight on the aluminum base, the truck drove great. However, as soon as I put some weight on it, to mimic the weight of the cake and gum paste I was planning to put onto Big Rig, it stopped working altogether, as the added weight was sufficient to counteract the tension on the rubber band and cause it just to slip uselessly around the axle. I tried to mitigate this problem by putting something sticky on the axle, but this just made the rubber band stick to itself and get wound up around the axle.
Next, I tried using gears to transfer the power from the motor to the axle, which required a complete redo of the front bushings to leave space between the axle and the aluminum base for the gear. Like the rubber band drive, this worked great until I put any weight on the base. Unlike with the rubber band, the truck did at least move with additional weight on it. It just moved very slowly. I did have hopes, though, that if I kept the cake as light as I possibly could, it might work.
To give it an extra boost of power, I decided to combine this partially successful motor solution with my partially successful rubber band solution. I designed a release mechanism consisting of a piece of U-shaped channel that ran across the track, underneath the base, attached to a dowel handle leading out the side of the base. That way, with the rubber band connected to one of the L-brackets under the truck base on one end and an eye bolt at the “cake” end of the track at the other end, I could finish decorating Big Rig with the rubber band relaxed, and then pull him back and set the L-bracket into the U-channel. This would hold him in place, and hold the front wheels a fraction of an inch off the base, so I could turn the motor on, let the wheels spin freely for a second, and then pull the dowel to release him. The rubber band would pull Big Rig forward while the wheel simultaneously pushed him forward. I could only hope that would provide enough force to make him powerfully smash into the “cake.”
And thus ends the saga of making Big Rig go, but I still had to actually make Big Rig. Because Big Rig has a kind of maniacally glowing face, as well as taillights and a menacing glow inside his wheel wells, he needed a lot of LEDs. Fortunately, by this point I’ve done so many LED-intensive cakes that I could basically just chop and splice segments together as needed, so the wiring went pretty quickly.
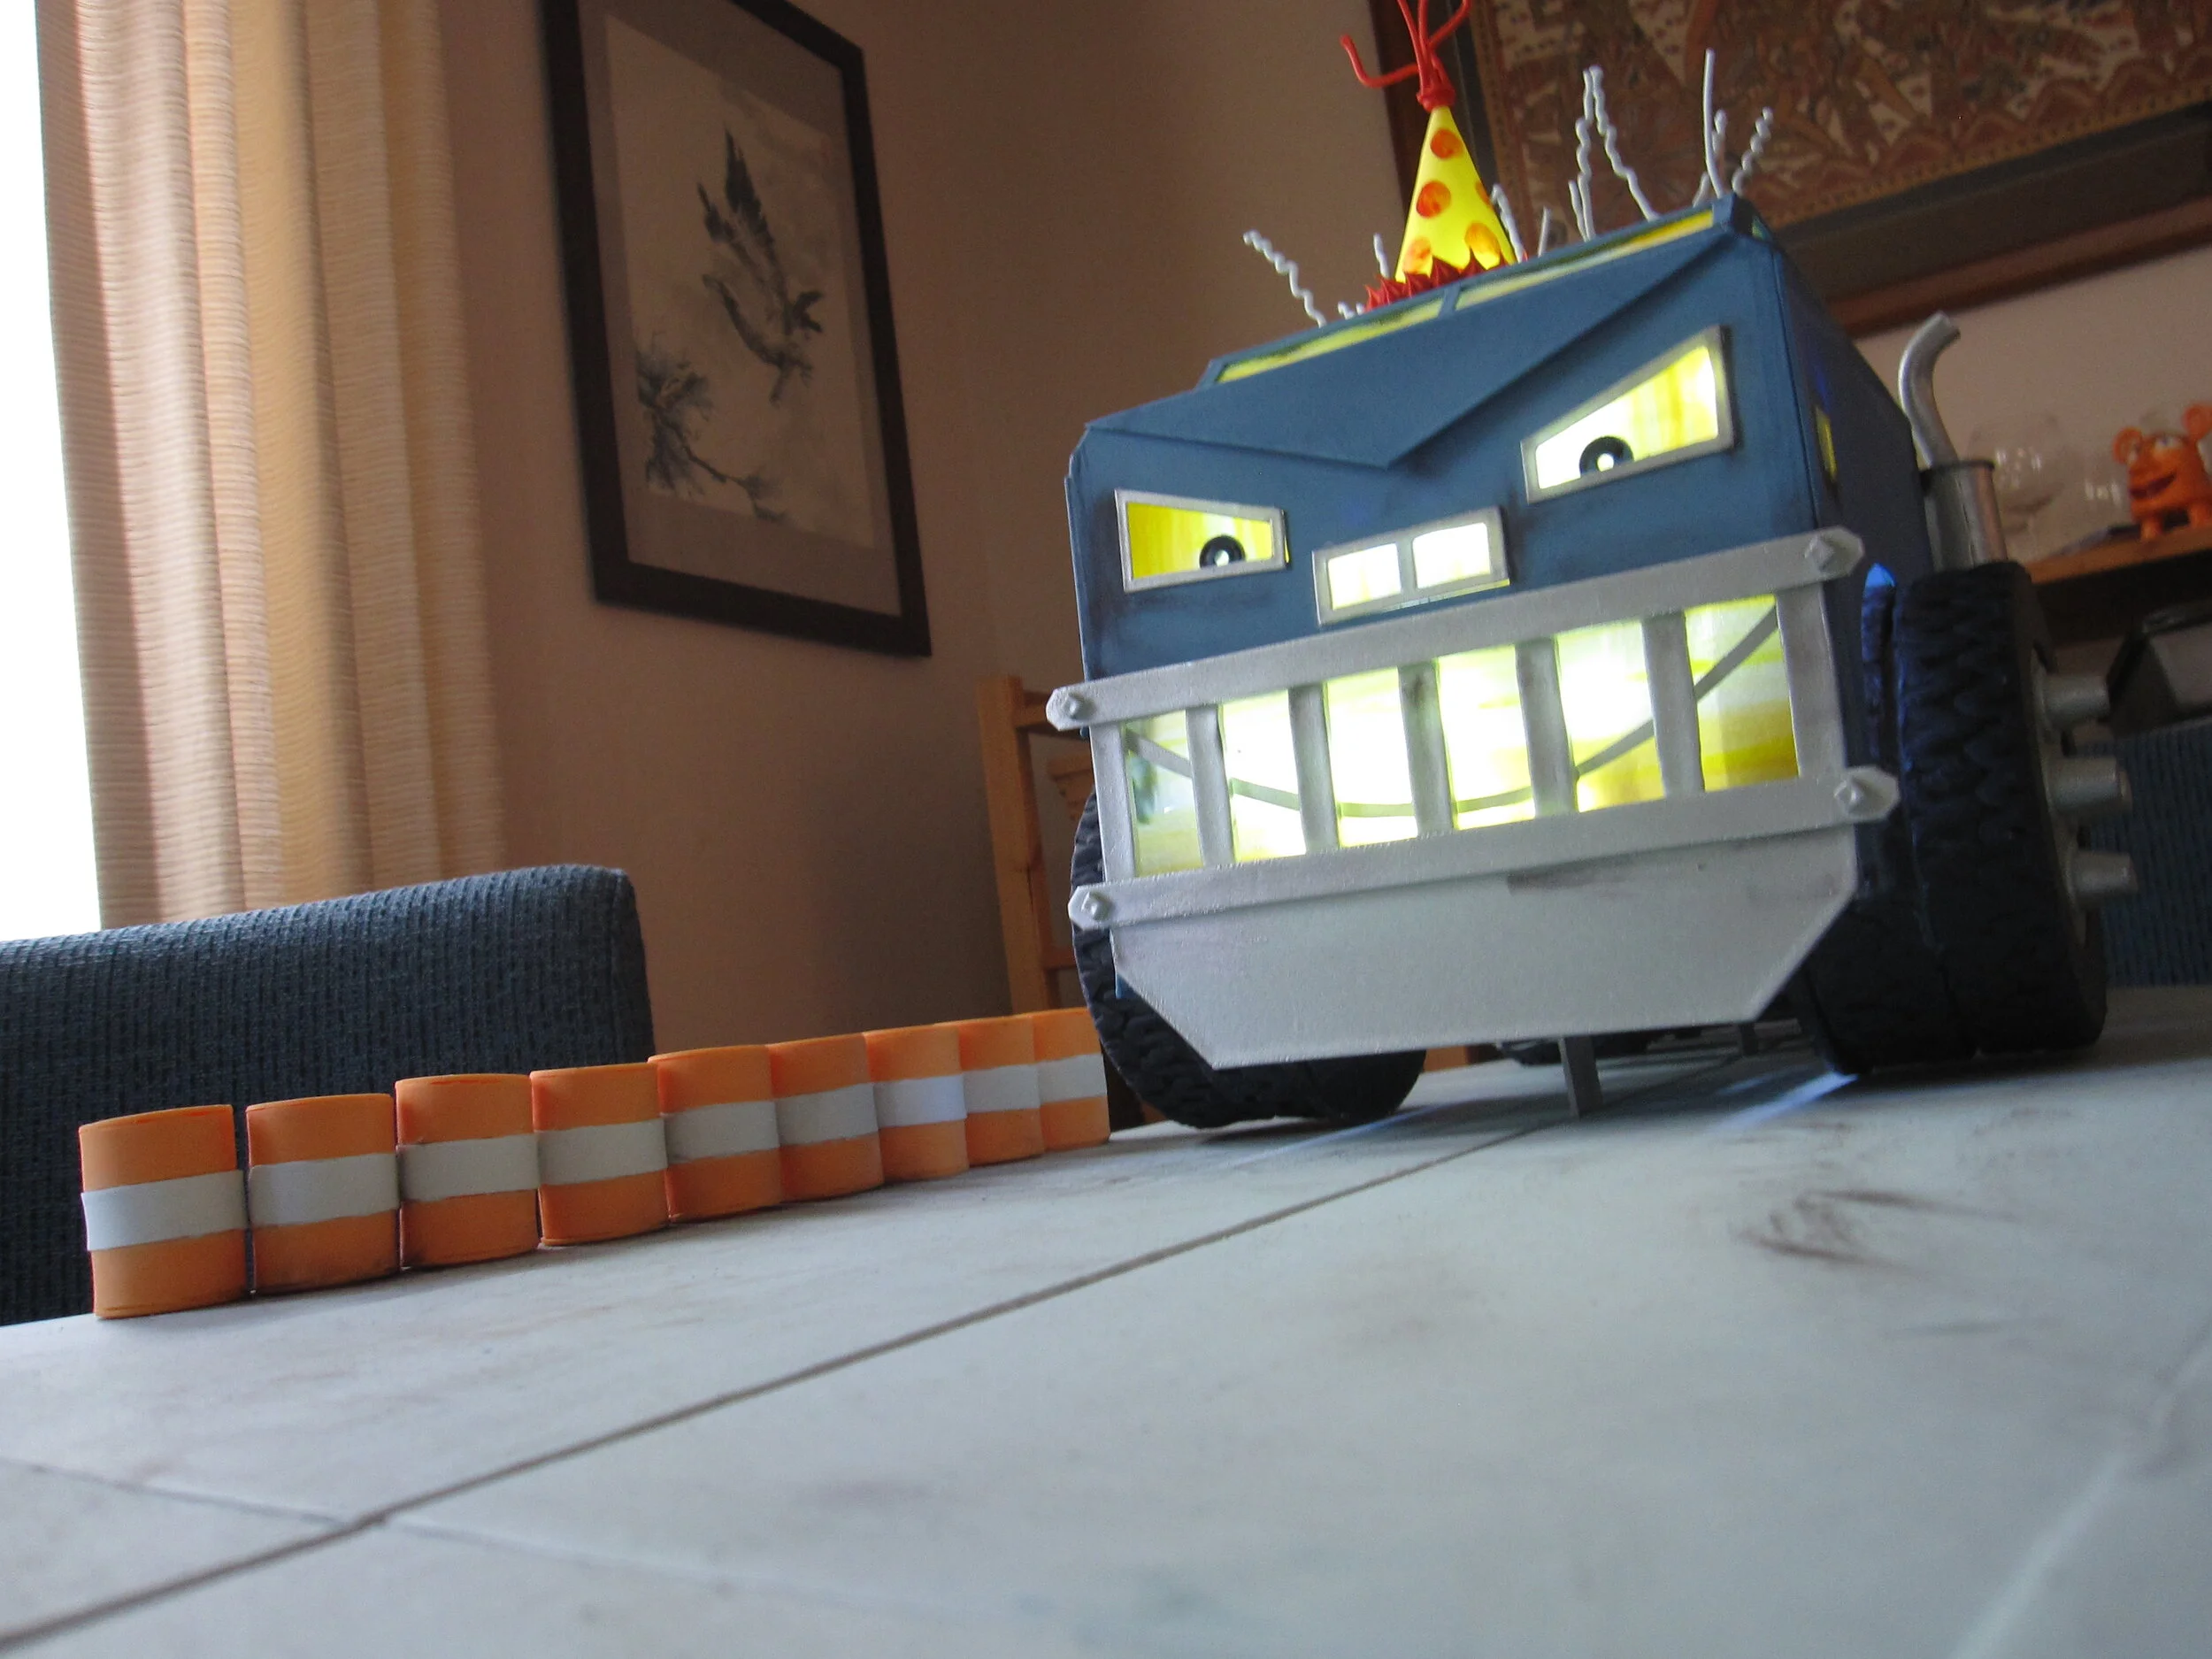
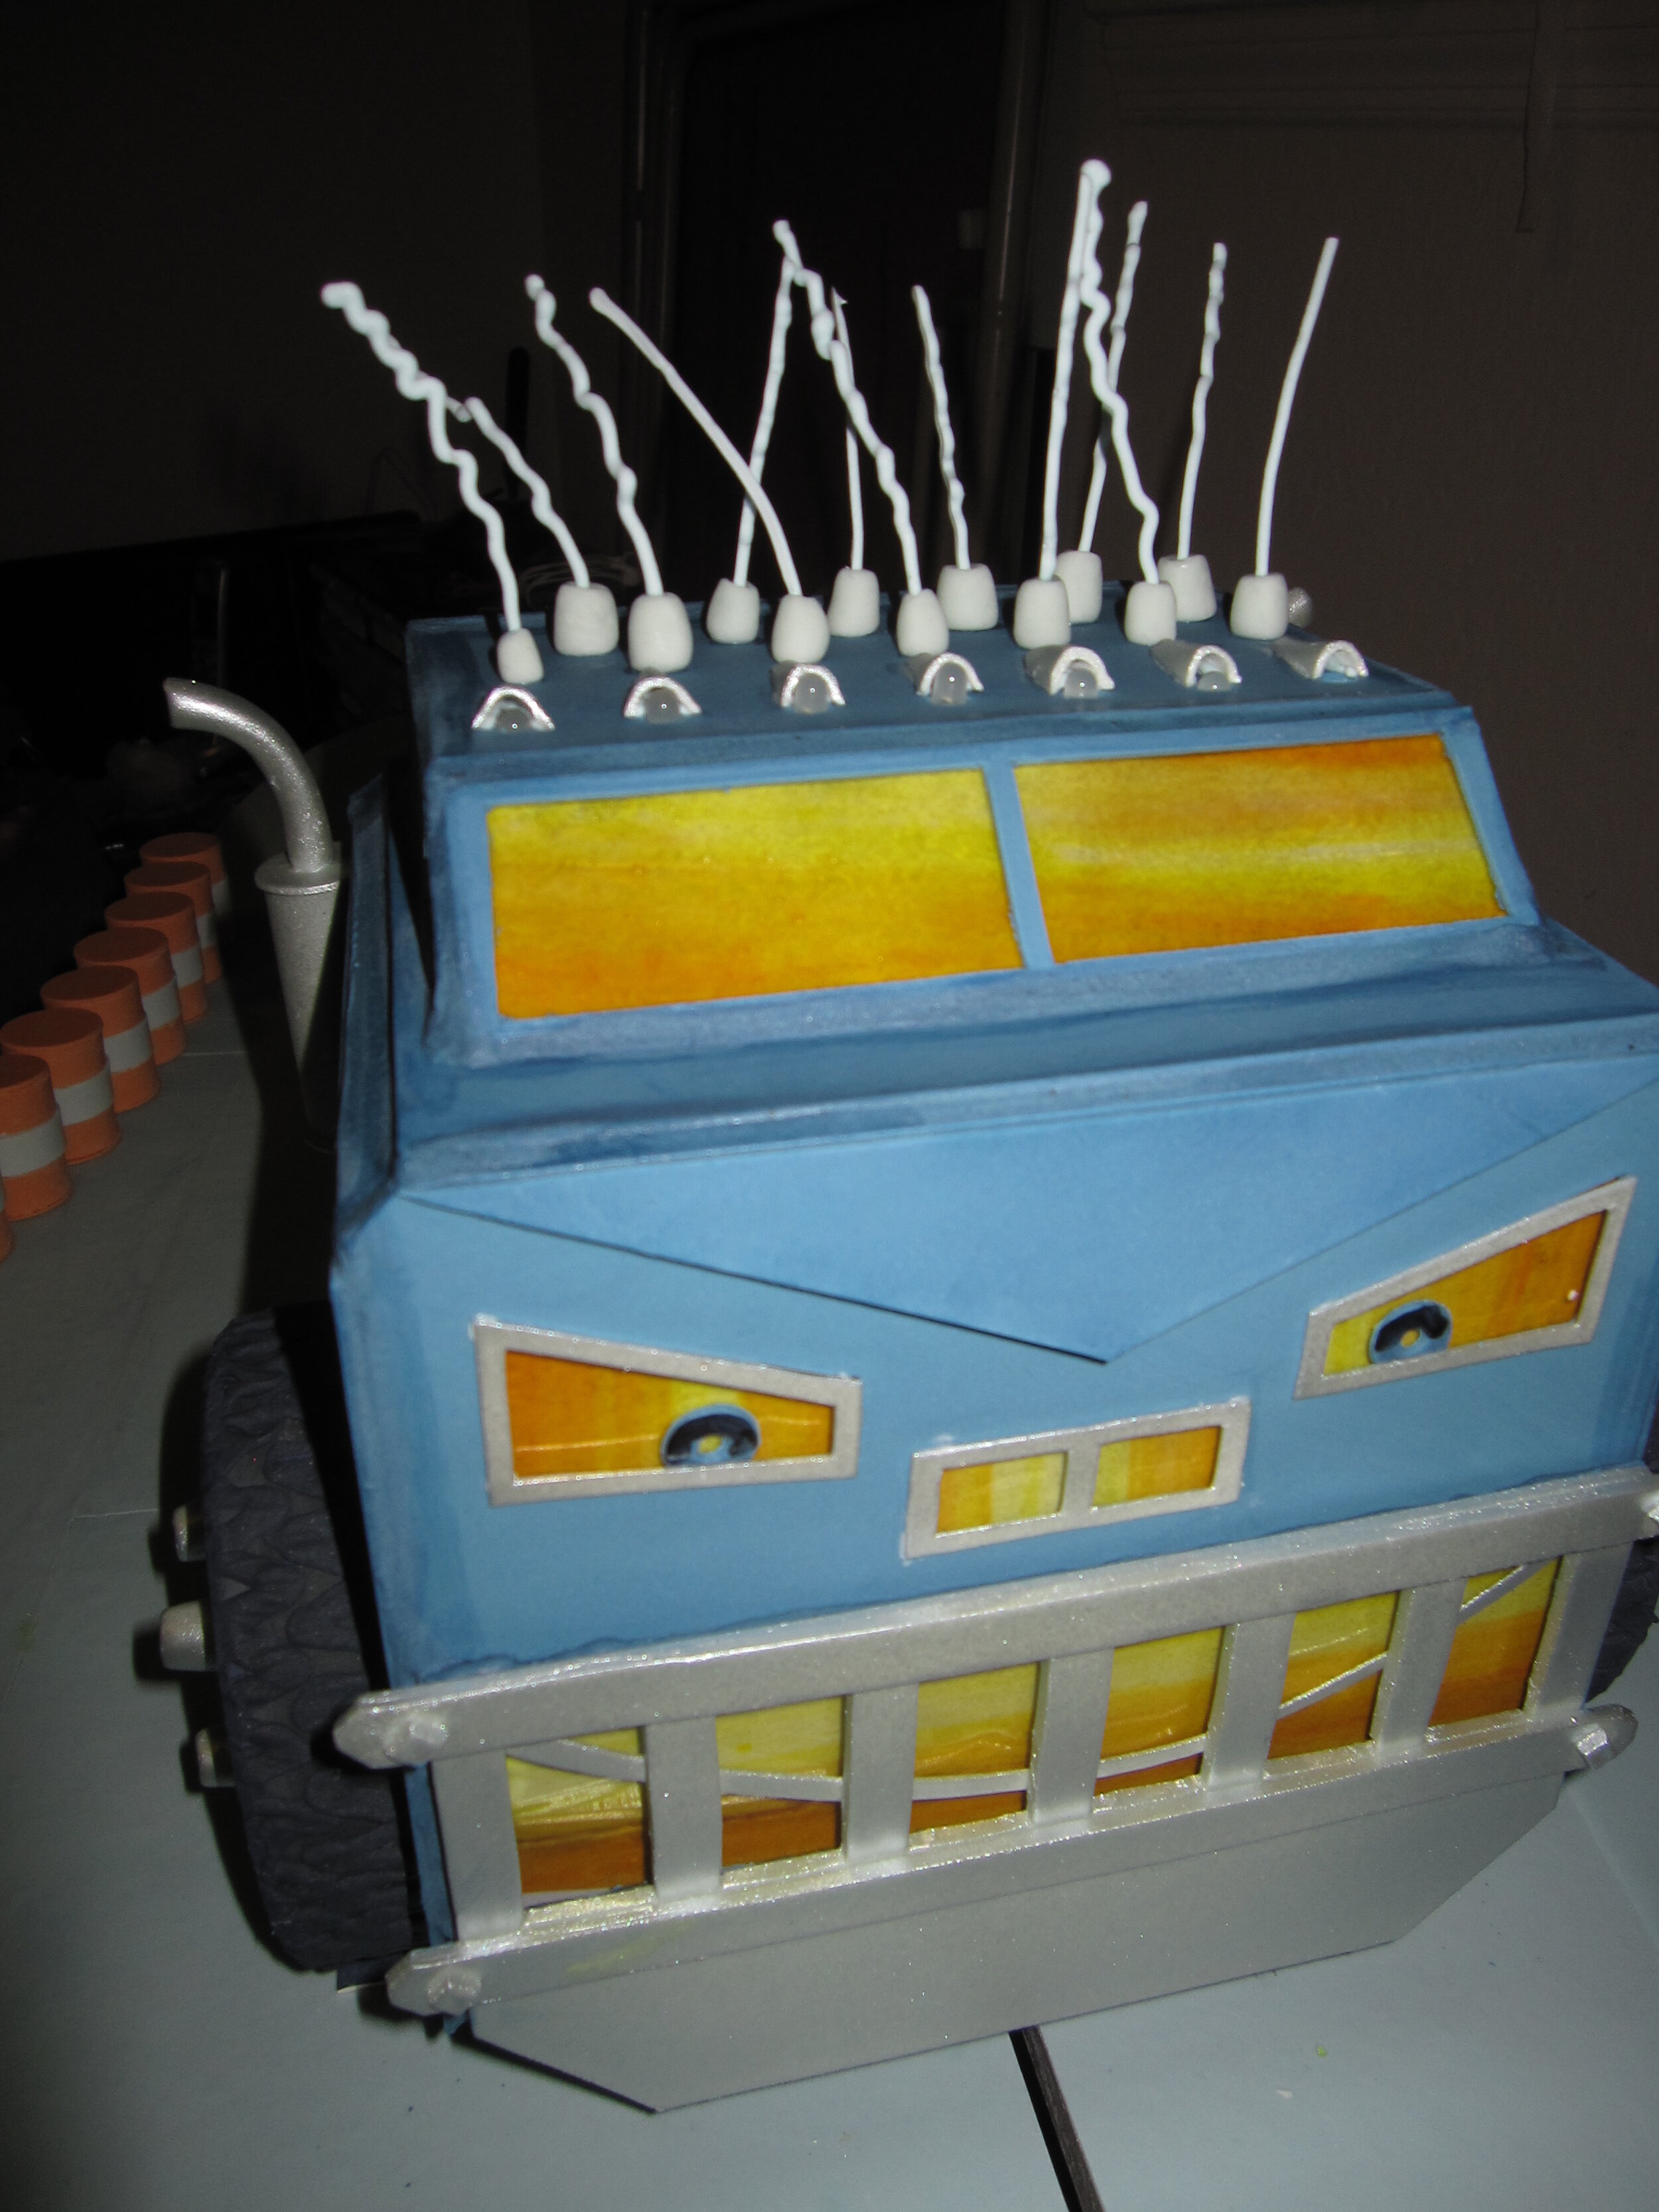
All the gum paste pieces, including tires, hubcaps, fuel tanks, bumpers, walls, trim, and yellow party hat, were made and dried in advance. To get the requisite orange and yellow glow out of Big Rig’s eyes, mouth, etc. I made sheets of gelatin with fades from yellow to orange, backed with rice paper to diffuse the light form the LEDs.
The cake itself was limited to the back of Big Rig and a very small square of cake inside his cab. At the party, someone pointed out that it was like a little cake engine block. I couldn’t put a bigger cake inside his head, because I needed to leave space around it for the LEDs. I kept the fondant layer on the cakes (necessary to prevent the gum paste from touching the buttercream icing, which softens dried gum paste) as thin as possible to keep the weight down. Fortunately, since I was covering the entire thing with pre-made gum paste pieces, the fondant didn’t have to look particularly nice.
With the cakes in place, attaching the gum paste exterior and all the trim pieces was really quite simple. The only problem I had was that when I redid the front axle bushings to accommodate the gears, I had failed to make the corresponding changes to the templates for Big Rig’s cab, so the sides, front, and back of the cab were all about half an inch too short. Fortunately, I had some extra dry blue gum paste pieces that I was able to cut down to patch the gaps. With some liberal royal icing spackle, it turned out just fine. The finishing touches were the royal icing antennae on the top. I have no idea why Big Rig needs so many antennae (which is what I told Alex when she asked me that question) but he has them in the book, so he had them in the cake.
“Cake”
Although the “cake” was the easiest component in that it didn’t have to do anything but sit there and be smashed, it also required more individual gum paste pieces than (I think) Melvin and Big Rig put together. Each barrel was made of five separate gum paste pieces and each crate required six. At the early planning stages of this project, I had envisioned putting tiny individual pieces of cake inside each crate and each barrel. Considering that the crates were only an inch and a half on each side, and the barrels were even smaller, I’m very glad that I came to my senses before I tried to do this. It’s not like there wasn’t already more cake than our guests would possibly eat anyway. Instead, I just put a little square of cake inside the “cake”, surrounded by the hollow crates and barrels and fondant tires. This probably made for a better smash in the long run anyway.
In addition to the crates and barrels, the cake also included a selection of fondant tires and gum paste pipes. Since I had made way more of all these things than were actually required, I used the extras to create bonus piles of stuff around the perimeter of the plywood cake base.
Finishing touches
With everything assembled, I actually went to bed at a relatively reasonable hour the night before the party. The next morning, as I was putting on the finishing touches – mostly adding a little dirt and grime with black powdered food coloring – Alex came in to inspect my work. She walked around it, studying it very carefully and commenting favorably on specific elements, like Big Rig’s tires and Melvin’s articulation. She then pointed out that I needed to put eyes on the chicken hood ornament on Melvin’s nose, which was already on my list of details to finish up before the party.
Alex then noted that I hadn’t made a hitch for the back of Big Rig. I had considered making a hitch for Big Rig, but decided against it because it doesn’t play any role in this scenario and because in some of the images in the source book, he doesn’t appear to have a hitch. Alex listened patiently to this explanation and then countered by pointing out that, in Truckery Rhymes, Big Rig is shown towing a trailer, which he couldn’t do if he didn’t have a hitch. I was forced to bow to her superior logic and quickly made a gum paste hitch. Actually, it even looked better from an aesthetic point of view, as the silver hitch made the solid blue rear section of Big Rig much more interesting. What I especially love about Alex’s argument is that it draws not just upon the specific source book for this project – Zoom Boom Bully – but upon the rest of the Trucktown canon as well. I also enjoy that it is a functional argument. Her point was not merely that Big Rig should have a hitch because he is shown with a hitch in the illustrations, but that Big Rig needs a hitch or he would be unable to fulfill his function as a big rig.
With the hitch completed, I got Alex’s dad to help me move the cake out to the dining room. Then came the stressful moment when I had to pull Big Rig back into his release mechanism. I was terrified that I was either going to lose my grip and send him crashing into the “cake” or crack Big Rig’s head to pieces in the effort of pulling back the rubber band. Fortunately I avoided either catastrophe and got Big Rig primed for release with only the loss of one fuel tank that was easily reattached.
Alex then consulted the source material for one final check on the accuracy of my work. She pointed out that, in the book, the “cake” is shown on a wooden palette, and I had failed to put my cake version of the “cake” onto a palette. I explained that I had noticed that and had considered putting the “cake” on a palette but had decided against it as I was afraid that the palette would arrest Big Rig’s movement so that he wouldn’t smash into the “cake” as effectively. Alex considered this carefully and then decided that perhaps Big Rig had taken the “cake” home on the palette and then removed it from the palette in order to smash it. I agreed that was an excellent explanation.
The party
With only one exception, the cake worked very well. Melvin’s drum turned flawlessly, but sadly, he did not actually pour cement. Either the drum and/or the wedges inside weren’t angle correctly or I had made the ganache too thick. Also, I didn’t really know which way the drum was supposed to be turning to make the cement come out. Cement mixers are complicated. Oh well, at least the drum turned.
Most importantly, Big Rig worked! Zoom! Boom! One of the barrels even flew off the table. Big Rig’s front bumper cracked beautifully so that he wound up with an excellent jagged evil grin.
Alex had a great time eating various gum paste bits (and a little bit of actual cake.) I particularly enjoyed it when she ate one of Melvin’s eyes, revealing the LEDs and leaving Melvin looking like a mangled cyborg.
The next day, as Alex was helping me to disassemble the remains of the cake and salvage the electronic components, she told Melvin (who was by this point essentially just a severed head) that he was her favorite cake ever. I call that a big success. Alex was a very tough audience with an incredible eye for detail. She was tremendously critical, but with such sincerity and such admiration. She has absolute confidence in my ability to execute a perfect cake version of Big Rig, so of course she wants to point out my errors so that I can correct them. It’s such a charming combination of exactitude and blind faith. She’s the perfect manager.
Jet Truck Cake
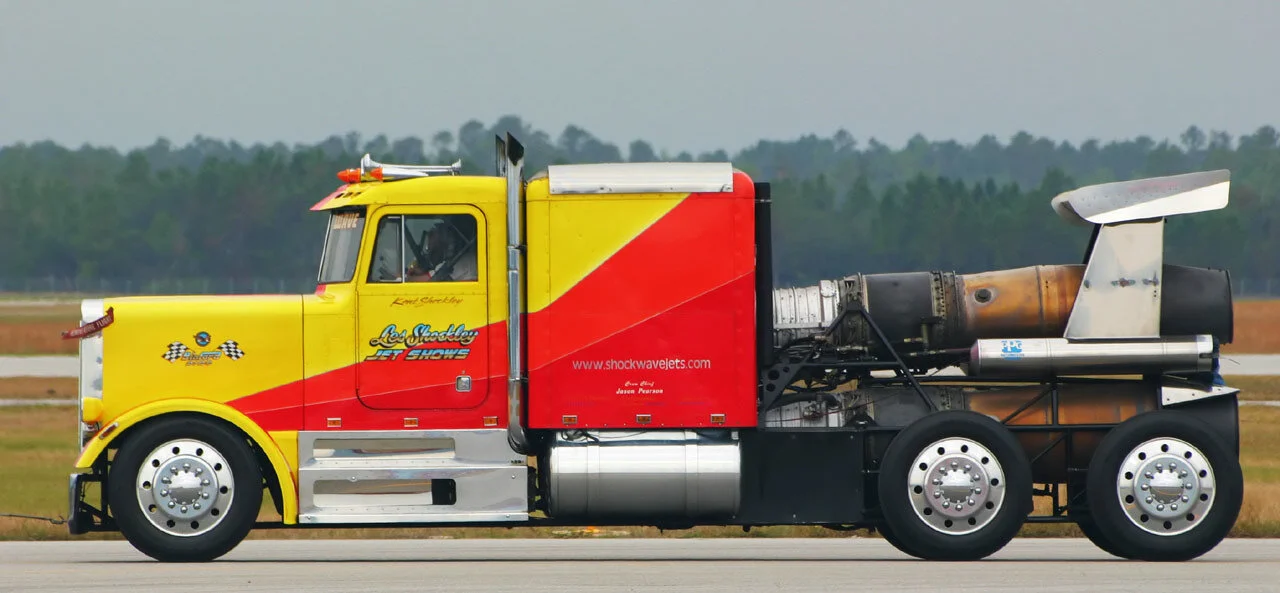
This cake was for my nephew, Sam’s, first birthday. It’s based on a real truck.
This cake was for my nephew, Sam’s, first birthday. It’s based on a real truck. When I asked Sam’s big sister Alex, who was, at the time, almost four years old, what kind of cake she thought that Sam would like for his birthday, she gave me very detailed specs:
Tractor-trailer – w/o trailer
Racing truck
Racing trucks are yellow.
Jet engines on the back
Flame powered engine
Flames come out of exhaust pipe
Flame powered fuel
Button to turn on flames
Alex will show Sam how flames work
Flames come out of jet engine
Flame powered fuel tank on the side
When I showed my notes to my sister, Alex and Sam’s mom, she immediately knew what truck she was thinking of. Evidently she had seen it in a video on youtube. A few google searches later, I had some great reference photos to work from.
Since the planned birthday party would be attended by numerous small children, I decided that having actual flames shoot out the back of the cake would be a bad idea, even if I could accomplish it in a food-safe way. Instead, I planned to make basically a miniature version of the flames on those plastic Halloween cauldrons where a light and a fan inside the cauldron make some waving fabric look like relatively convincing flames.
Ultimately, it didn’t work out nearly as well as I had hoped, for several reasons:
1) Initially I had hoped that I would be able to substitute something edible for the fabric “flames” but I was unable to come up with any food item that was thin, dry, lightweight, and flexible enough to fit the bill. The closest I came was the skin of a bell pepper, but that was too brittle when dried.
2) I bought white fabric, but then dyed it red and orange with food coloring, which stiffened it a bit more than was optimal so it didn’t move as fluidly as I wanted.
3) Fans small enough to fit inside a 2” diameter gum paste rocket aren’t all that powerful. I bought a couple of different ones to try out. I thought the ones I decided on would work, but once I got them all the way hooked up with the fabric I found that they didn’t have enough punch to move strips of fabric more than a couple inches long.
4) When I stuck the fabric to the gum paste rockets, I did it in such a way that the air only passed over one side of the fabric, not both. Unfortunately, I didn’t realize what a big error this was until it was too late to do anything to fix it.
5) When I installed the fans and rockets on the cake, I didn’t leave enough room at the back of the rocket for air to get sucked into the fan. Again, I realized the error too late to correct.
So the flame effect wound up being mediocre at best, but otherwise I think I captured the essence of the jet truck pretty well.
For the base, I started with a trapezoid of plywood. I guess I though that a trapezoid would give it more of a sense of motion than a rectangle, but I’m not sure it really did much. I used grey run-in royal icing, with white and black food coloring sponged on to make it look like asphalt. On top of that I painted yellow lane markers with thinned royal icing and then yellow food coloring.
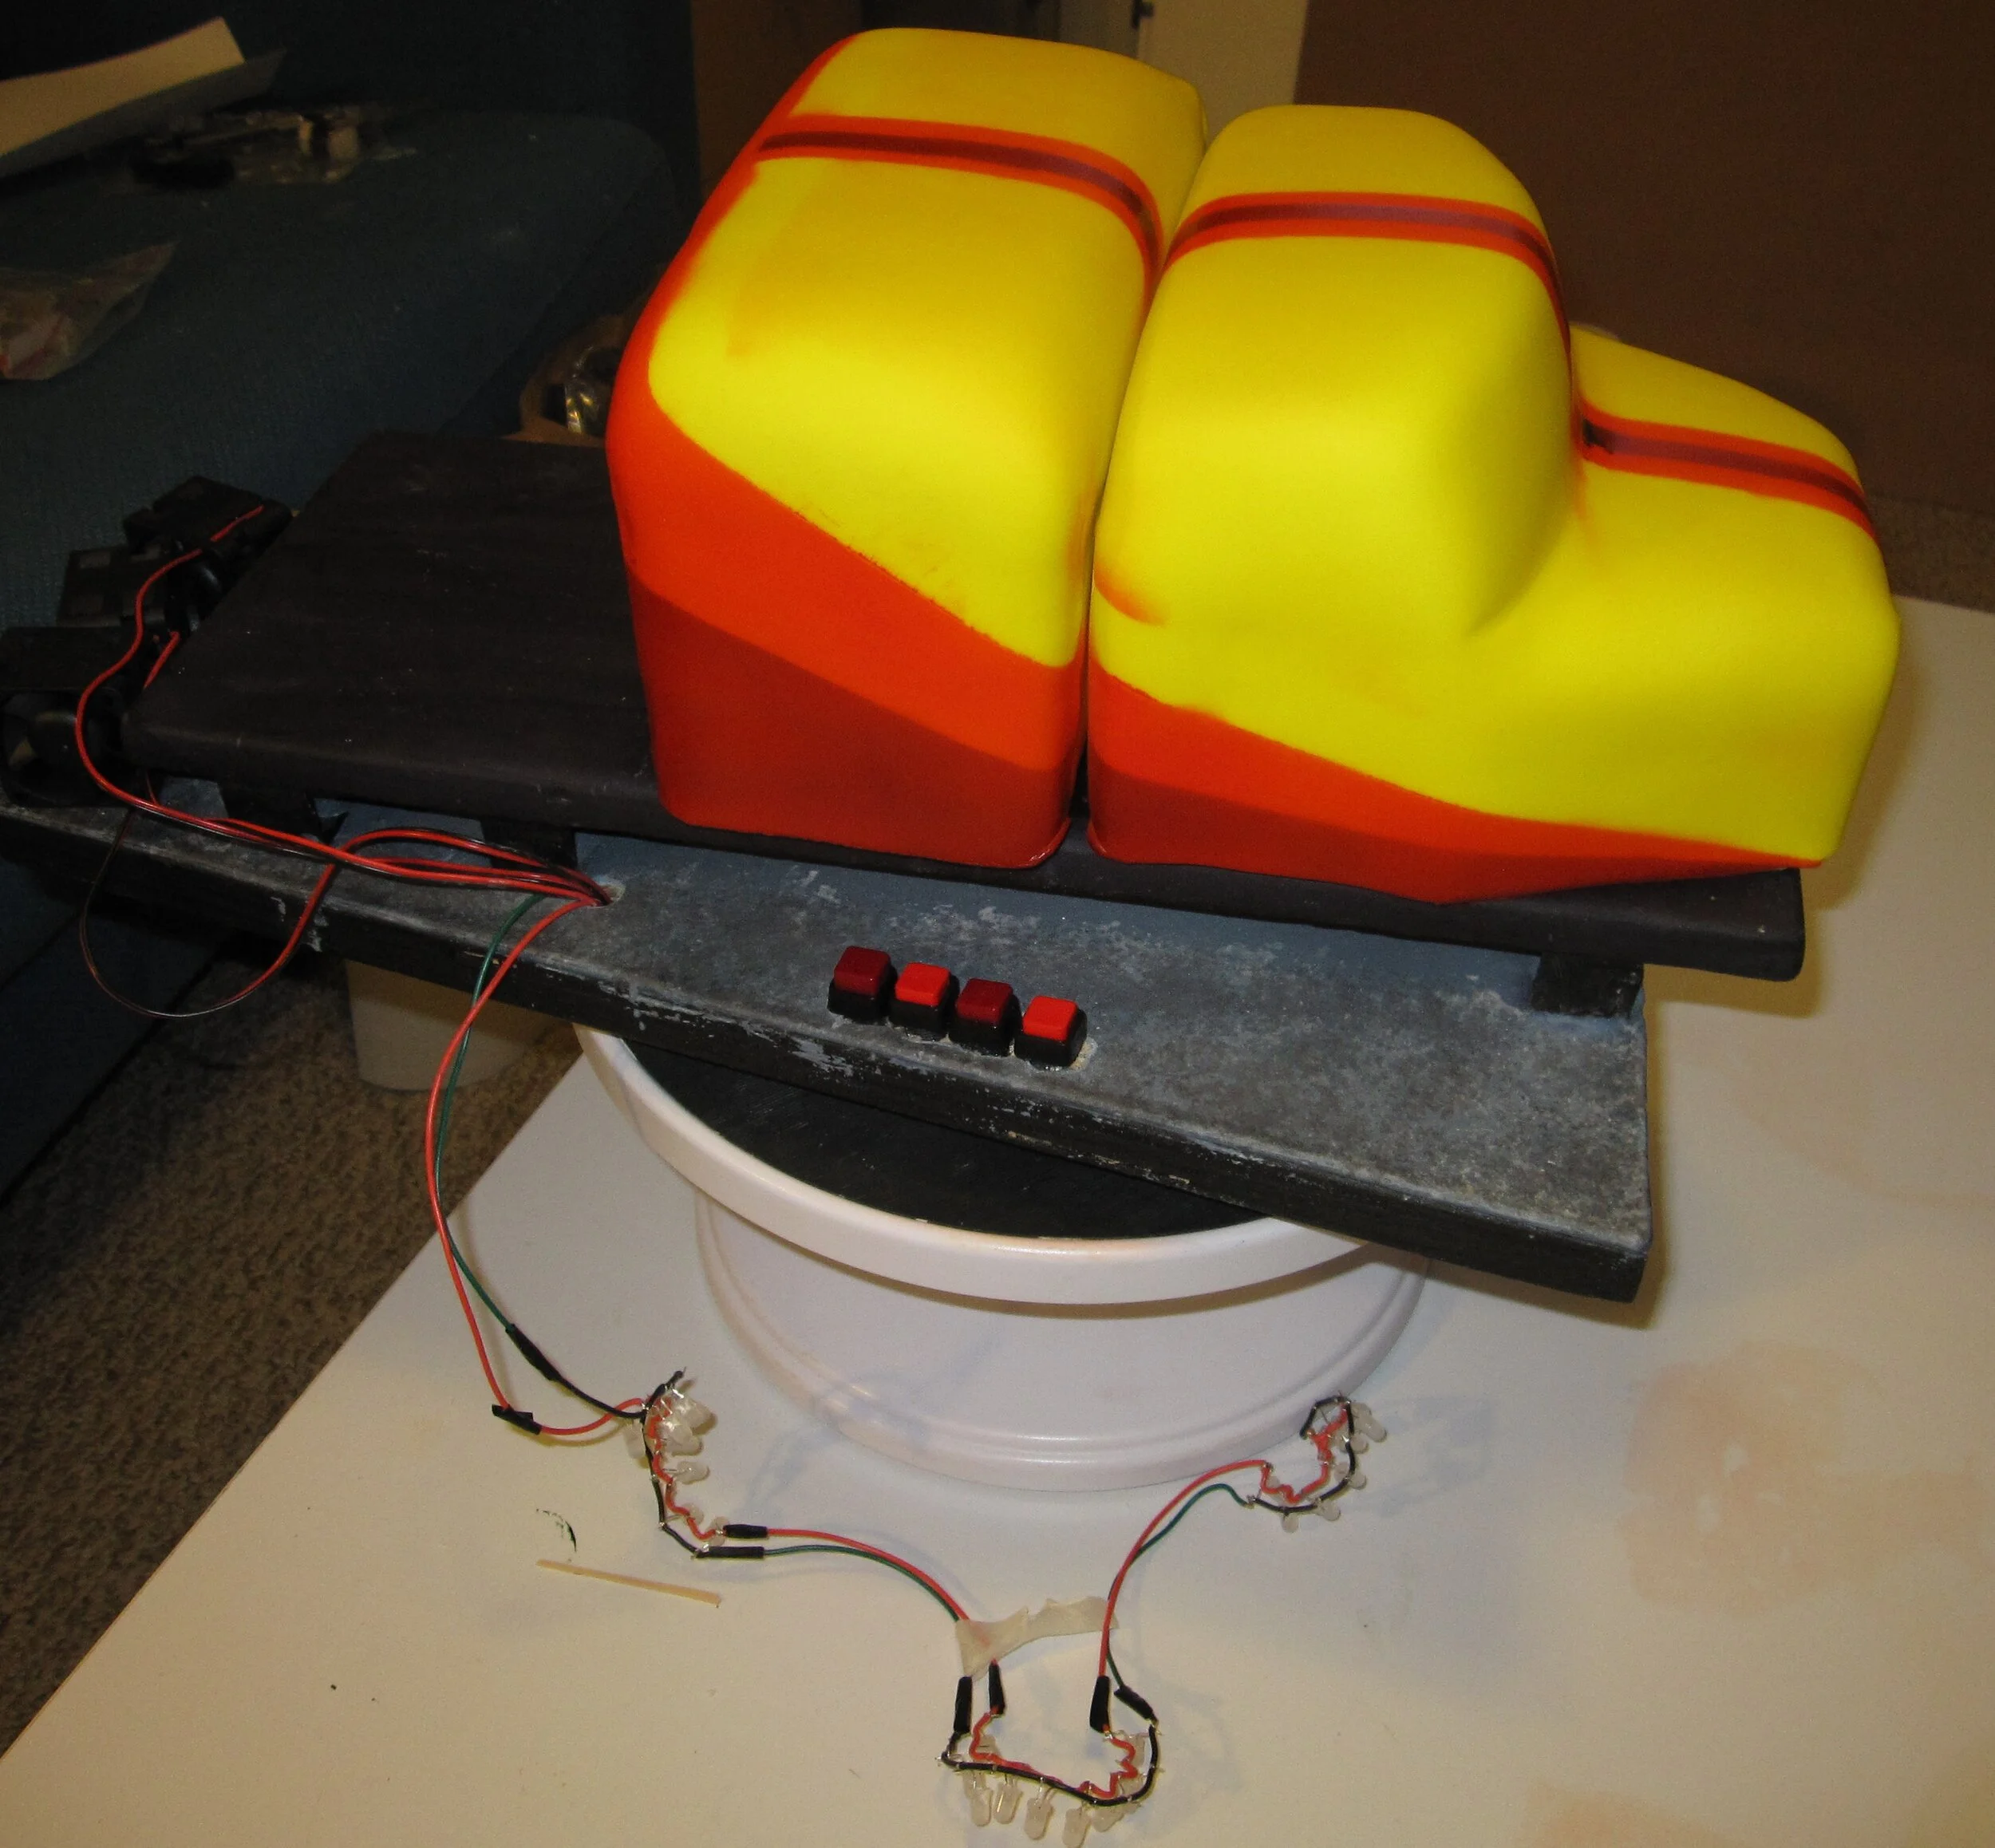
To raise the body of the truck up off the ground, I mounted a second, thinner piece of plywood, on top of some sections of 1” aluminum channel, positioned so that that channel would later be hidden behind the tires. I covered this piece of plywood with black fondant.
At this point I did all the wiring for the fans and the LEDs to light up the inside of the rockets. I got some nice big red buttons to turn them on and off because I thought that Alex would enjoy that.
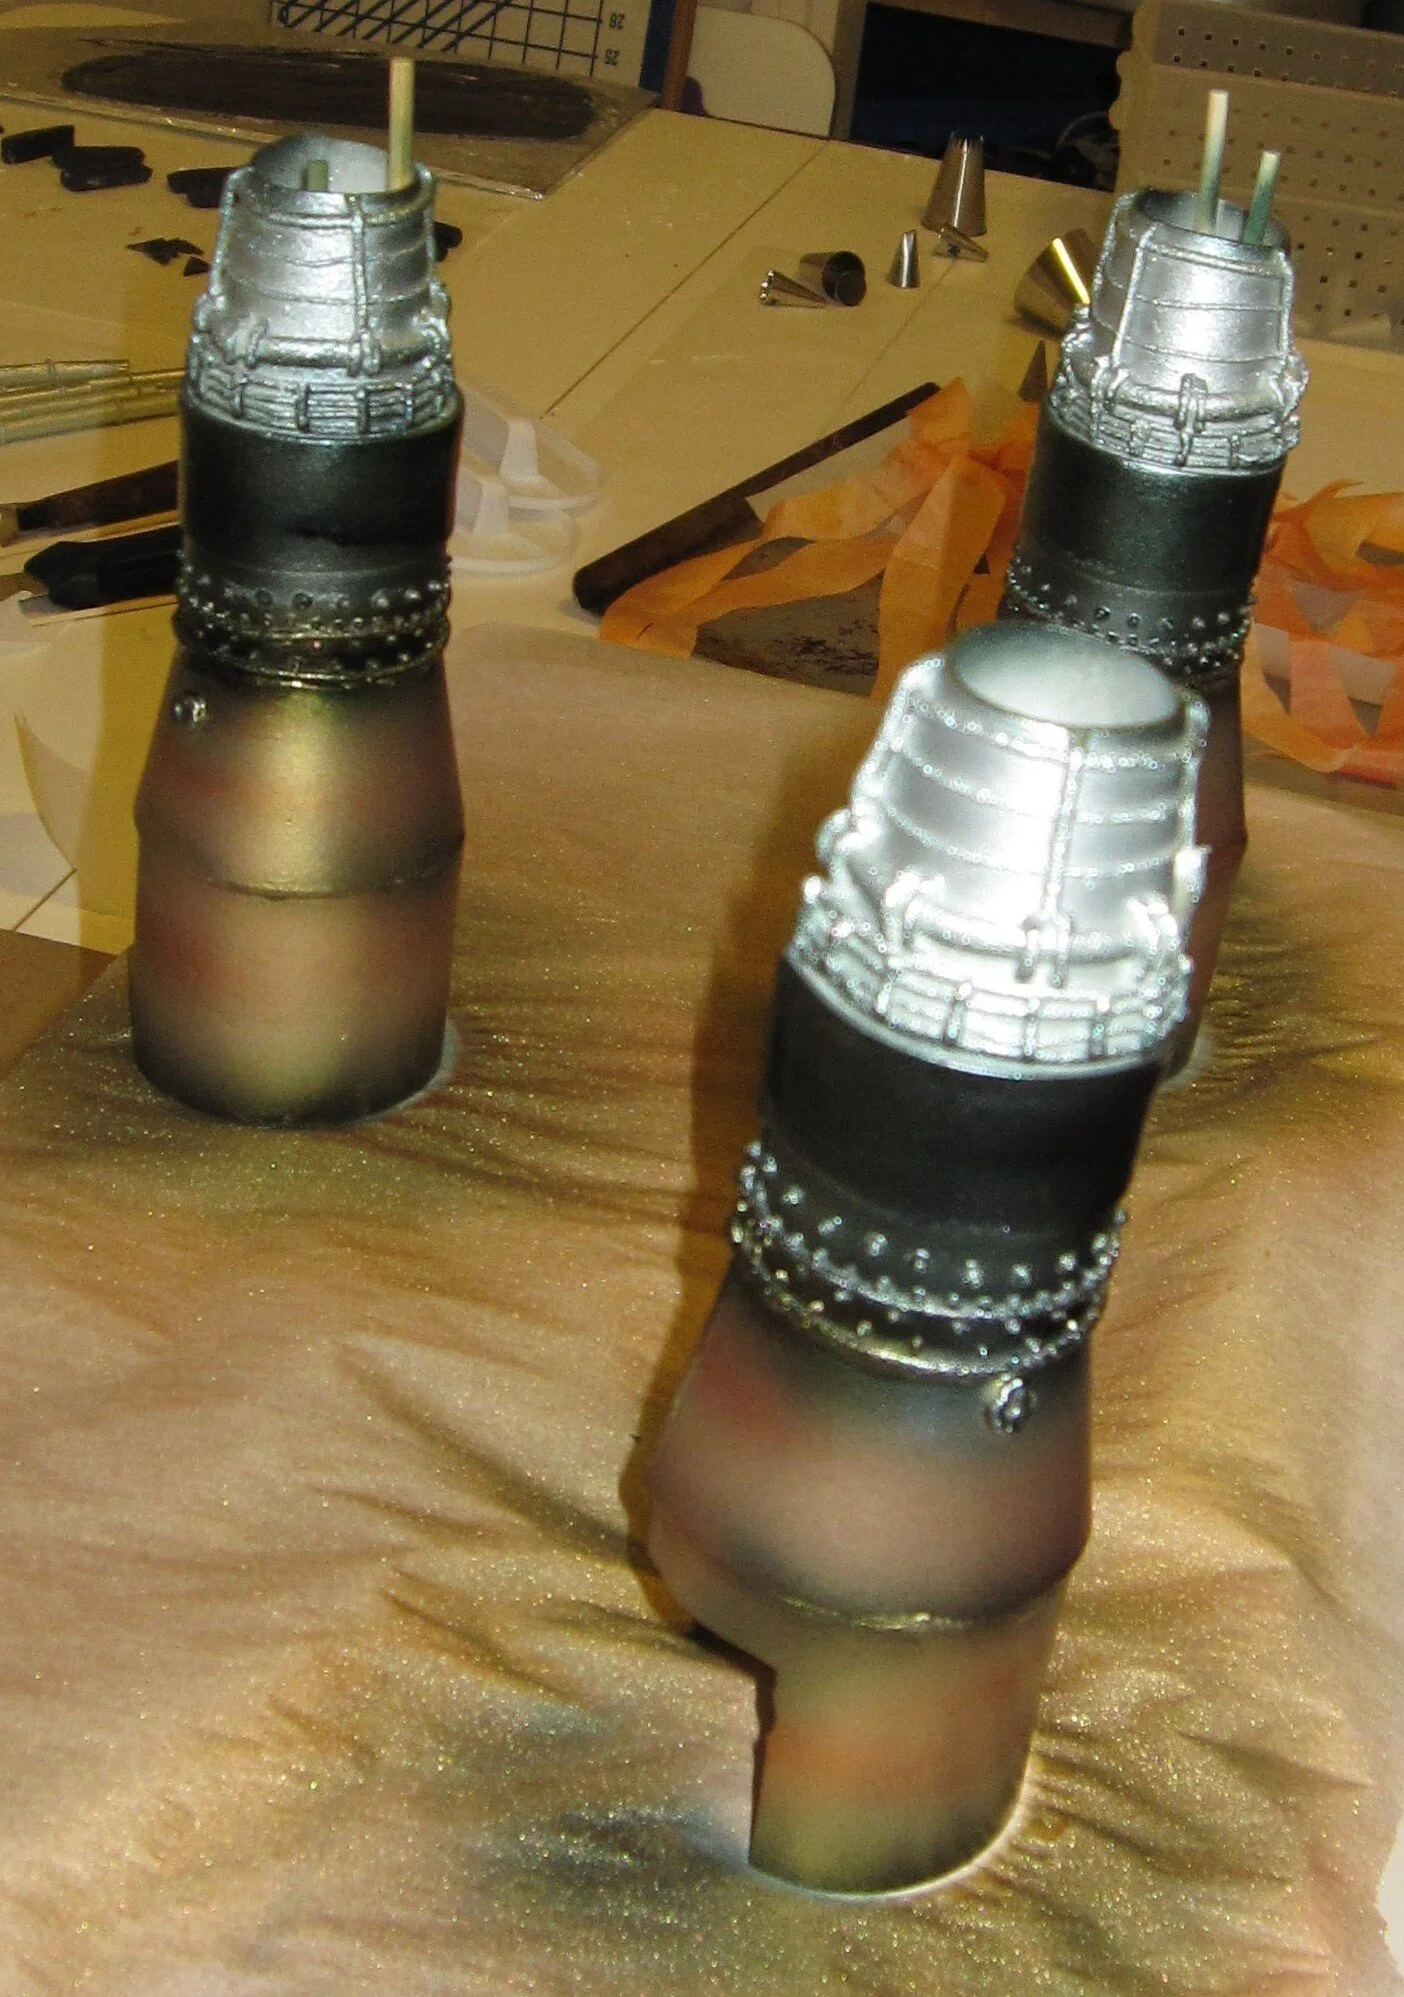
Next, I used gum paste, detailed with royal icing, to make the rockets, the grill, the spoiler, the hubcaps, the wheel wells, the fuel tanks, the bumpers, the reflectors, the license plates, and so on and so on. I used fondant for the tires and a few of the other bulkier trim pieces.
Shiny chrome truck bits gave me a chance to try out my new metallic edible airbrush colors. I was a bit skeptical, but they worked great. I was especially pleased with the job I did on the rockets.
For the cake itself I started with three 10” square cakes, carved into the two separate pieces of the cab, then crumb-coated with buttercream. Once covered with fondant, the corners were more rounded than I wanted, giving the truck a more puffy, cartoon-ish look than I would have liked. I’m reaching the conclusion that the only way to get nice, sharp mechanical corners is to pre-make gum paste pieces like I did for the Tardis cake.
My plan was to cover the front cab section first with blue fondant then with yellow fondant so that I could cut the yellow fondant away from the windows revealing the blue fondant beneath. (This is after I decided that my original plan to actually create an interior for the truck that could be seen through the windows was not feasible in the time I had available.) I have never personally tried this technique before, but I have seen them do it many times on Ace of Cakes, so I figured I ought to be able to do it easily. It probably would have worked just fine, except that I decided to wait to cut out the windows until after I airbrushed the orange and red stripes onto the cake.
Masking parts of the cake off and airbrushing is another technique I’ve seen on Ace of Cakes, but this was my first try at it. It worked relatively well, but next time I’ll be more careful with my masking, since I did have a few spots where the color bled under the paper.
By the time I was finished airbrushing, the top yellow layer of fondant had completely fused to bottom blue layer of fondant, so it was utterly impossible to remove one without removing the other. So I cut all the way through both layers for the windshield, the side windows, and the front grille, all the way down to the crumb-coat, and then stuck a new piece of blue fondant into the hole. To give it a window-like gloss, I painted a layer of piping gel onto the windows.
Assembling the rockets around the fans and the lights was a bit of a challenge, both because I kept getting confused about which side of what rocket each wire was supposed to go on and because I had underestimated the required length of a few wires and had to splice in some extra pieces.
Then it was just a matter of attaching tires, fuel tanks, trim, etc. and running a strip of ribbon around the edge of the base to hide the side of the plywood. I stuck the candle into one of the exhaust pipes.
I’m happy to say that Alex was delighted with the cake, even though the flames were a little lame.
I tried putting edible glittering into the rockets so that it was blown out when the fans were turned on, but that wasn’t too dramatic either. Mostly I think Alex just liked pushing the buttons.
Sam was pretty impressed with the cake, too, although he didn’t actually get any of it, because I foolishly used a chocolate cake recipe that involved almond extract and my sister didn’t want to give him nuts yet for fear of allergies, so we made a last minute emergency batch of cupcakes with a nut-free recipe. Sam was very much in favor of the cupcake. I think the only food I’ve ever seen him enjoy more was pumpkin pie. Alex, on the other hand, was most entranced with eating the gum paste pieces. At one point in the party she ran past me, doing a little happy dance, singing, “I have an exhaust pipe!”
Flying Saucer Cake
The occasion for the cake was my friend Isaac’s third birthday party. My goal in this design was to evoke the classic B-movie spaceships from the 50’s and 60’s (the title of the party’s evite was “Plan 3 from Outer Space”.)
I began this cake flush with the success of my recent Tardis cake. I received a bit of a comeuppance.
The occasion for the cake was my friend Isaac's third birthday party. (You may remember Isaac from his second birthday cake and his first birthday cake.)
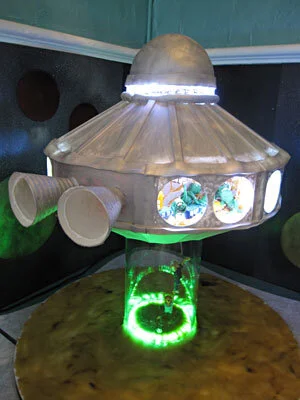
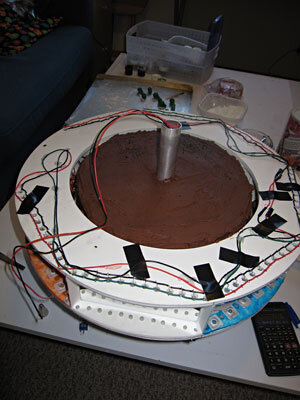
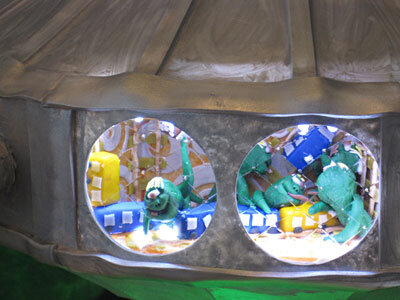
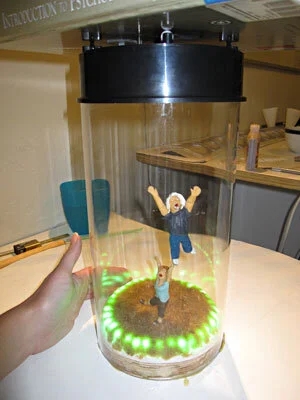
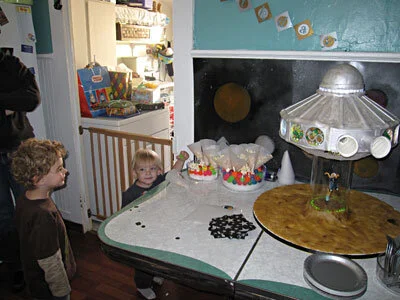
My goal in this design was to evoke the classic B-movie spaceships from the 50's and 60's (the title of the party's evite was "Plan 3 from Outer Space".) As I had so recently completed the Tardis cake, I was still interested in cakes with mirrors, LEDs, and visible interiors. I also wanted to personalize the cake, by including Isaac (in alien form), abducting his parents (in human form). So I designed a classic silver flying saucer with round portholes around the sides that would look into the lighted interior rooms of the ship, where alien Isaacs would be doing things that human Isaac loves to do - eating pretzels, climbing on unsafe things, splashing in a pool, and playing with trains. The entire ship would be mounted on a turntable, so it could slowly rotate. The turntable in turn would sit on a clear acrylic tube, representing the ship's tractor beam, within which I would enclose gum paste figures of Isaac's parents, in the process of being sucked up into the ship.
To make the rooms inside the ship, I started with two pieces of foam core - a 14" diameter circle for the bottom and a 14" diameter 2" ring for the top, so that I would later be able to put the cake inside. I split the space into eight equal slices with gum paste dividers, each with a row of white LEDs on top and bottom. I backed every other space with mirror, so that when their corresponding portholes were backed with mirrored window film and the LEDs were lit, they'd be mirrored ad infinitum within the ship, creating a spacey infinite corridor. For one of these spaces I used red LEDs instead of white, as that was where the conical thrusters would connect to the ship, thereby evoking a combustible power source.
The remaining four spaces became the rooms for the alien-Isaacs. Because I was going for a little-boy's-birthday vibe combined with my 60's B-movie vibe I painted one room aqua, one lime green, one orange, and one yellow. These are all also colors that Isaac's mother has used to decorate their house. Then I appliqued each room with various gum paste squares and circles, painted silver.
I made the aliens out of gum paste, serpentine with green skin and one big eye. To make them reminiscent of Isaac, I gave them puffy cheeks and little shocks of blond hair.
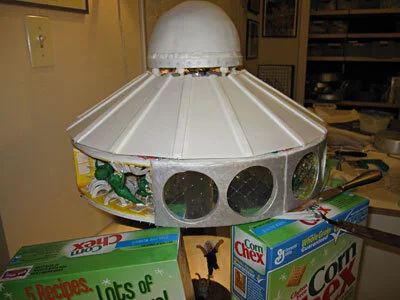
For the portholes, I used a template to cut out gum paste rectangles with windows in them, and draped them over custom forms to dry. The thrusters were also gum paste, wrapped around cones to dry, and then coated with royal icing for a sort of corrugated steel texture. Once the portholes dried, I used royal icing to stick sheet gelatin window panes to the back and, in the case of the portholes in front of the mirrored room, a layer of mirrored window film.
My sister kindly baked the cakes for me. There was space inside the perimeter defined by the rooms to put a 3" tall 10" diameter cake.
To make the tapered upper section of the ship, I started with a 10" diameter cake on top of a 14" diameter cake. I carved these into a truncated cone, 3" high, tapering from 14" diameter at the bottom to 6" diameter at the top. To get the appropriate architectural feel, I covered the cake with a layer of fondant and then the fondant with 16 pre-made gum paste trapezoids. Then I dropped this whole section on top of the cylinder with the rooms.
For the very top of the ship, I carved some 6" round cakes into a hemisphere and covered that with fondant. I mounted this cake onto a foam core circle in which I had embedded a ring of LEDs and mounted it on top of the other cakes.
With the main body of the cake assembled, I needed to get the base together. I embedded a ring of green LEDs into the plywood base to illuminate the tractor beam and then set about creating the people being abducted. I started with a wire armature and built up the figures in gum paste around that.
Once the figures were complete I installed the acrylic tube around them and then glued a turntable to the top of the tube. I had considered mounting the turntable at an angle, but I decided that might make it too hard for the turntable to rotate, so I kept the turntable level. As it turned out, I needn't have worried because the moment that I transferred my cake to the turntable it became clear that the turntable was nowhere near powerful enough to turn such a heavy cake. And thus my cake became stationary. Actually the turntable wasn't a total waste, as it still allowed me to turn the cake manually. This was convenient, since the cake was designed to be viewed from all angles, but it certainly lacked pizzazz.
With the cake mounted on the base my flying saucer still needed to taper at the bottom. Unfortunately, it proved to be far too difficult to attach the gum paste pieces that I had created for the bottom of the flying saucer and by this time it was so late that the royal icing would never have had time to dry. So I was forced to hot glue my Bristol board mockup to the bottom of the turntable. I don't like using non-edible materials any more than necessary, but in this case I felt that it was just too late to do anything else.
In fact, by this time it was about 5:00 am the morning of the party and it was too late for a lot of things. I had planned to finish all the edges very cleanly and wind up with a very polished final product that would live up to the standard that I set for myself with the Tardis Cake. Sadly, at 5:00 am, this was not meant to be. The best I could do was to whip up a few fondant ropes to cover the most egregious seams, slap a coat of silver luster dust on everything and go to bed. I was not thrilled with the results. I'd like to claim that it was some sort of homage to the shoddy special effects that we all love so much in our B-movies, but the sad truth is that it was just poor time management.
The next morning I just had time to cover the plywood base with a layer of pressed sugar and make it to the party in time to help hang up the decorations. The cake did make the car trip with no untoward effects, but there evidently was a lot of moisture trapped in the acrylic tube because the figures' gum paste limbs softened and wilted, so where their arms had meant to be pulled upwards by the inexorable force of the tractor beam, instead their arms curved despondently towards the earth.
I actually don't mind an occasional failure. When you're pushing the boundaries of a medium you have to expect a few unsuccessful trials. This failure irked me however, because in this instance my failure was not due to excessive ambition but to deficient planning. I view the first type of failure as an inevitable result of man's eternal striving to better himself, but the second is merely the inevitable result of opting to watch America's Next Top Model instead of working on the project at hand.
TARDIS Cake
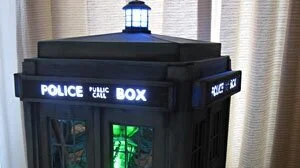
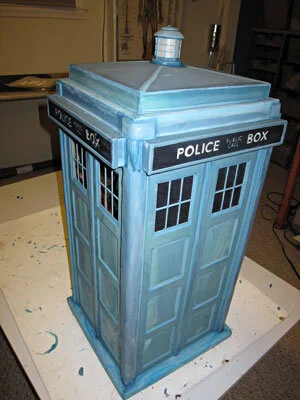
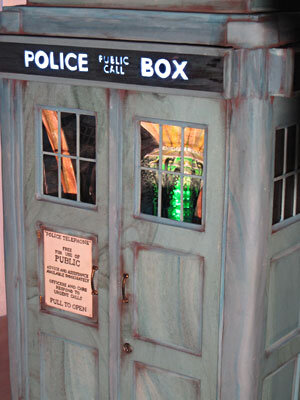
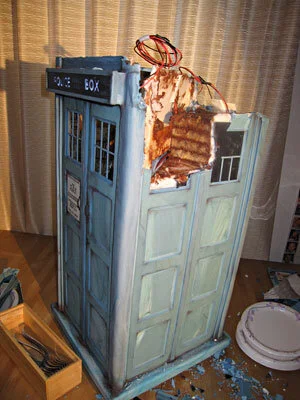
It's a TARDIS! It's bigger on the inside! It's two feet tall (quarter scale)! And aside from the lights, everything you see is edible.
It's a TARDIS! It's bigger on the inside! It's two feet tall (quarter scale)! And aside from the lights, everything you see is edible.
I love Dr. Who. Just a few weeks ago my sister-in-law and I waited in line for five hours to get good seats at the Dr. Who panel at Comic-Con. Totally worth it!
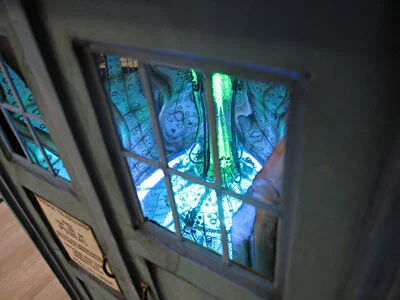
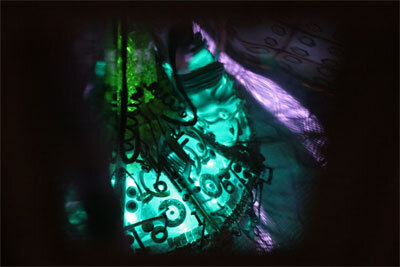
Since I would have to be a Time Lord to make a Tardis cake that could actually go anywhere in time and space, I decided to do the next best thing - make a Tardis cake that's bigger on the inside. Or at least appears to be. Like I said, I'm not a Time Lord. I chose to go with the new Tardis interior because, as it is both more organic and more interestingly illuminated than any previous Tardis interior, I thought it would be the most visually effective.
First I had to figure out the best way to create the illusion of a more spacious interior. I tried to consult the internet about optical illusions, but didn't find anything helpful, so I went with old fashioned trial and error. I played around with a lot of different configurations, eventually settling on two convex mirrors arranged at about a 45 degree angle. To get the curve I wanted, I used flexible carnival mirror, glued onto my custom made wood and mat board form.
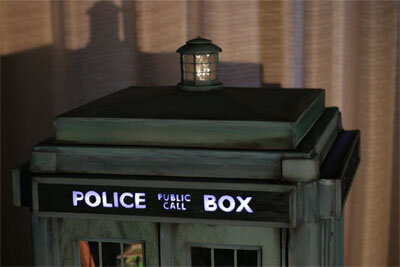
Next, in order to illuminate the inside of the Tardis and the "Police Box" signs on the outside, I needed to learn at least a little bit about electronics. So I ordered a DIY Electronics Kit from the MakerShed that was really sort of geared for pre-teens, but it was also very helpful. Armed with new-found knowledge of resistors and LEDs, I trolled the internet for the best deals and ordered a total of 385 LEDs in blue, aqua, green, yellow, white, and flashing white. They didn't all make it into the cake, but I did wind up using enough of them that I used seven nine-volt batteries to power them. I embedded these batteries into a plywood base and mounted the mirrors.
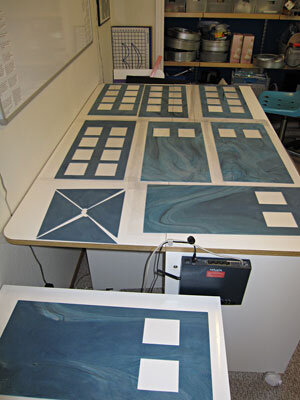
With my structure in place, it was time to start making gum paste pieces. The exterior required fifty-two separate pieces of gum paste - two for the panels on each of the four sides plus one inward-facing panel for the side that looked into the interior and three to back the windows on the other three sides, six for each of the four "Police Box" signs (some of which were quite tedious, as I had to painstakingly cut out the words to let the light through), and sixteen for the roof. Later I needed an additional seventy-two pieces of gum paste for the window frames and mullions. I went with a grey-blue marbled effect because I thought it would look more convincing and more interesting than a uniform color field.
To make the interior I started with a gum paste floor with cutouts to let the light through from all the white LEDs embedded in the base. In order to enhance the illusion of interior space and elevate the bottom of the central console sufficiently to make it easily visible through the windows, I gave the floor a serpentine curve, supported by gum paste struts. Then I stuck a layer of rice paper to the top of the gum paste floor and painted it dark grey with food coloring. On top of this I piped grey royal icing expanded steel. It went pretty quickly, because I got a lot of practice making royal icing expanded steel when I was making the Demolition Cake. To give it a nice sheen, I went over it with some silver luster dust.
Now it was time to make the control console. Fortunately, thanks to the mirrors, I only needed to make one eighth of it. The console structure is gum paste and sheet gelatin, assembled around blue, green, and aqua LEDs and attached to the mirrors with clear piping gel. Then I had a good time sticking on a myriad of gum paste and royal icing levers, dials, cables, monitors, etc. At times the mirrors made things a little difficult because it was sometimes hard to remember which was the real console and which was the reflection. Liberal use of silver, bronze, and gold luster dust made everything nice and shiny.
With the interior finished, I assembled the exterior gum paste pieces, adding the royal icing molding around the perimeter of each recessed panel, and installing the window mullions and backing.
It was at this point in the process that we decided that we really should schedule a party so that we would have something to do with this cake when it was finished. Fortunately, we have a lot of nerd friends, so we soon had about forty positive rsvps to our evite. It was also at this point in the process that I took some time off to go to Comic-Con and then on a family trip to Colorado, so my gum paste pieces had a long time to thoroughly dry. This was definitely an advantage, because it would have been very hard to assemble the cake with anything less than 100% dry gum paste and because the pieces were so large that they did require some significant drying time.
A week before the party I began assembling the exterior, beginning by putting together the "Police Box" signs around my strings of white LEDs. I backed the cutout letters with rice paper, both to diffuse the light and so that I could stick the free-floating interior pieces of the O's, P's, A's, and B's to the rice paper.
Because of the mirrors and the interior space only a little less than half of the interior was actually going to be made of cake. This meant that I could install two of the four sides prior to baking any cake and even attach and solder their respective "Police Box" signs.
Three days before the party I baked the cake. We decided to go with a banana cake with chocolate buttercream icing because, to quote the Doctor, "You should always bring a banana to a party. Bananas are good." I needed a total of eight two inch tall, ten inch square cakes. Of the eight cakes, seven of them were cut in half on the diagonal and stacked in the body of the Tardis. The last cake was reserved for the square top section.
With the cakes in place, I covered them with a layer of fondant, to prevent the gum paste exterior pieces from coming into contact with the buttercream, which would moisten, soften, and weaken the gum paste. Then I was able to install the last two side pieces and their respective "Police Box" signs.
I put the top section together separately, carving the slanted roof, covering it with fondant, and then assembling the gum paste pieces around it with royal icing. I left a hole through the middle, so that I could run blinking LEDs through it for the light on top. Once the top section was in place, my Tardis really started to look like a complete piece, but it still needed a lot a detail work.
I used fondant rather than gum paste to cover the base and for the trim on the corners and in the center of each side panel because some of them needed to be relatively thick, which is easier to accomplish with fondant. I did use gum paste, however, for the thin strips of molding around the perimeter of each "Police Box" sign.
To make the little light on top, I wrapped rice paper around gum paste circles, then put panels of sheet gelatin on top of that, followed by gum paste trim and royal icing mullions. The curved top is gum paste dried over Styrofoam balls.
With all the major features in place, I went over the entire structure with royal icing smoothed with a damp paintbrush, to hide unwanted seams and fill in a few gaps. Then, to give it that distressed look of a vehicle that's been to the end of the universe and back again, I went into all the corners with some black powdered food coloring on a soft paintbrush.
To make the sign for the front of the Tardis, I blew up an image of it to the correct size and then essentially made some edible transfer paper by coating the back with black powdered food coloring. I put this on top of a dry white piece of gum paste and traced all the letters with a stylus to transfer the text onto the gum paste below. Then I painted over the letters with black paste color.
The finishing touches were the royal icing handles, hinges, and tacks to hold on the sign, and the gum paste lock.
Carrying the cake to the table for the party was a bit stressful and difficult, as it probably weighed fifty pounds and all of the weight was in one half of the cake. Part of me was convinced that, after literally months of planning and building, I was going to drop it at the penultimate moment. But actually the move went perfectly smoothly. I got my brother-in-law to help me and he even bravely volunteered to carry the heavy end.
I'm really pleased with the way this one came out, maybe more so than any cake I've ever made before. Please note that, with the exception of the mirrors, the electronics, and the wooden base and dowels and foam core separators that would needed in any cake this size, it is entirely edible. (And if anyone knows how to make an edible mirror, please let me know.) It's hard to capture the "bigger-on-the-inside" effect in a photo, but I do think it was pretty darned successful. By an odd coincidence, Cake Wrecks (one of my favorite websites) did a Dr. Who post on the very same day that we had our party, so I immediately sent them photos of the cake, mere hours after it had been consumed, and they very kindly posted it right away!
For hours after we attended the Dr. Who panel at Comic-Con, my sister-in-law and I were all a-twitter about how awesome it was; now I still kind of feel that way about this cake.
Housewarming Cake
Slightly less than a year after we moved into our new house, my sister, her husband, and I decided that we were finally ready to have a housewarming party, which naturally provided me with a perfect excuse to overdo the cake.
Slightly less than a year after we moved into our new house, my sister, her husband, and I decided that we were finally ready to have a housewarming party, which naturally provided me with a perfect excuse to overdo the cake.
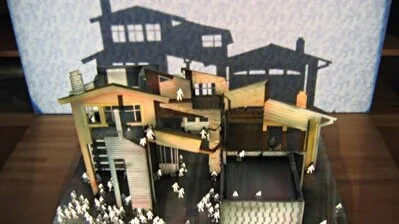
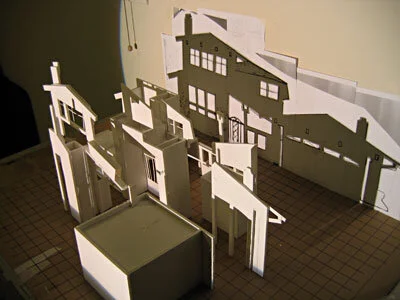
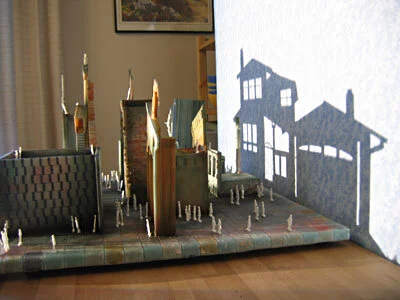
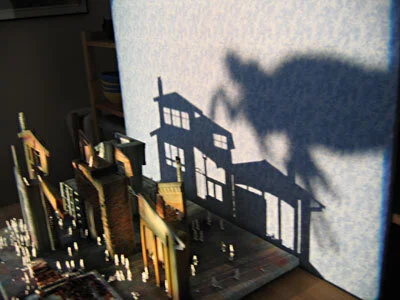
I wanted to convey the idea that, of all the buildings in all the world, we had found the perfect house for us, so I designed a cake that was made up of a collection of small buildings that, when properly lit, cast the shadow of our house on the wall.
The first problem, of course, was to find a light source that cast a sufficiently defined shadow on the wall. After initial tests with household clip lights and powerful flashlights, it became clear that I really needed a bona fide theatrical lighting instrument. So I bought myself a mini-ellipsoidal pattern projector. Which means that I need to build a puppet theatre, now that I have such a nice light for it.
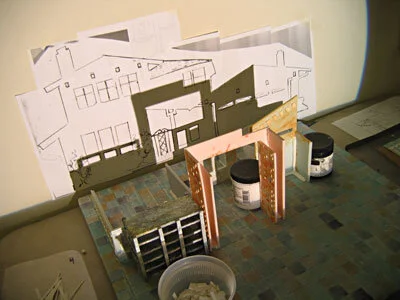
With my light source in hand, I now needed to figure out what the silhouette of our house actually looks like. I think it has a relatively distinctive silhouette (at least distinctive enough that our guests at the party were able to convincingly pretend that they recognized it.) To insure accuracy, I took a photo of the front of the house and traced that, deciding at the same time which features to include and which superfluous features to ignore. When I was happy with my drawing I blew it up to the full size that I wanted the shadow to ultimately be.
I now needed a full scale foam core mockup of the cake, positioned precisely the same way relative to the wall and to the light source as the finished cake would ultimately be. I set up a table in my studio, with the image of the desired silhouette taped to wall behind it and my light source clamped to a book shelf across the room. So as to be able to precisely position the completed cake buildings the same way relative to one another as the foam core mockup, I designed a base for the cake that would include a 1" grid to which I could align all my pieces. In order to insure that I would be able to recreate the setup in the dining room for the party itself, I took precise measurements of the relationship between the cake base, the lens of the lighting instrument, and the wall.
From there it was largely a process of trial and error, creating one building at a time in just right size, shape, and position to block out an incremental portion of the light to create the house's silhouette. I also had to keep myself cognizant of the fact that I needed to incorporate some buildings that were actually large enough to contain some cake. Otherwise I would just be making a big gum paste city, which would have been a big disappointment to our guests.
With the foam core mockup complete, I then had to translate that into a complete set of Bristol board templates which I could use to cut out the gum paste. In the interests of not getting massively confused, I numbered all the buildings. If I recall correctly, there were eleven distinct buildings, several of which I divided into substructures which I labeled with letters. Remarkably, my labeling system actually worked - at no point in the process did I wind up with a carefully cut out piece of gum paste and no idea what to do with it.
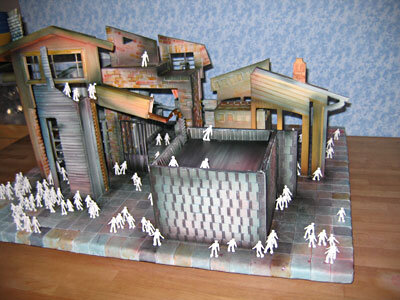
I also made the cake base at this point, which consisted of a piece of 3/8" foamcore covered with fondant, into which I etched lines on a 1"grid. I then painted it like a parti-colored sidewalk and sponged on some royal icing for texture.
Finally I was ready to start creating the actual gum paste buildings, rolling out the gum paste and cutting it out with an X-acto knife using my Bristol board templates. Because there were so many pieces, it was quite a time consuming process, but it all went very smoothly, expect that I didn't have nearly enough flat surfaces in my studio to set all my pieces to dry. I really need one of those flat racks. Maybe I should build one instead of whining about it.
My plan was to do most of the color by hand, but I started out with a few different colors of gum paste - grey, blue, and pink - to get a different color base to build up from. My plan was to ultimately end up with a wide variety of architectural styles, thereby driving home the concept that, while we had essentially infinite choices of house, we culled the choices down to the perfect one.
As I was cutting the gum paste pieces, I also beveled the corners, in the hopes that they would then fit together in nice corners, rather than having more visible seams. For the most part this worked well enough that I was at least able to hide any imperfections with a little strategically placed royal icing.
With the basic gum paste shapes cut out, I set about embellishing them (variously with bricks, stones, adobe textures, wood panels, metallic windows, neo-classical columns, and even a nice little caryatid that I was rather proud of) and painting them.
Assembly was a rather finicky project, because I had to make sure that the shadows lined up appropriately with my shadow sketch, while slotting little slivers of cake into every available divot, some only a 1/2 inch thick. The only real problem I had was with the roof of one of the buildings wanting to cave in under the weight of the smaller buildings on top of it, so I had to disassemble it, shove in some foam core supports, and reassemble.
Once I had all the pieces together, I added some additional bricks and such to cover up messy seams, and then did some airbrushing, in attempt to unify the scene.
Because I was making it, it naturally ended up looking like a bit of a post-apocalyptic wasteland, an effect that was astronomically amplified once I had placed all of my little, white, unintentionally zombie-like, royal icing figures around the scene.
As a backdrop to project the shadow onto, I covered a sheet of foamcore with a vaguely cloudy-ish grayish-blue piece of fabric. Remarkably, I was able to move my entire cake/lighting/backdrop setup from my studio to the dining room without any detrimental effect on the projected silhouette. Truly, I wouldn't have been at all surprised to have moved it and then been utterly unable to recreate the shadow effect that I had achieved in my studio.
In many ways, this was not my most dynamic cake, as it didn't really do anything, or at least there was no dramatic moment in the party at which it did something that it hadn't already been doing before - casting a shadow on the wall behind it. But I like to think that it had a certain finesse to it, a certain quiet dignity that was appropriate to the occasion. Plus I enjoyed how, as we cut it up to eat it, it became evermore and more a diorama of catastrophic destruction, with the shadow crumbling right alongside its more solid counterpart. Also, the royal icing zombies made great garnishes for the slices of cake and everyone had a good time making the shadow of a little stuffed praying mantis menace the shadow of the house.
Cyndi Lauper Cake
This cake was intended to be presented to Cyndi Lauper on The Graham Norton Effect. Unfortunately, it didn't survive being FedExed from Colorado to New York.
This cake was intended to be presented to Cyndi Lauper on The Graham Norton Effect. Unfortunately, it didn't survive being FedExed from Colorado to New York.
As my mom pointed out to me, I had no idea five or so years ago when my sister and I started theyrecoming.com (our horror movie review website) into what strange adventures it might soon lead me. The one it's led me into most recently involved sculpting a bust of Cyndi Lauper in cake to be FedExed to New York City and presented to Cyndi on a show called The Graham Norton Effect, which I had never even heard of until they contacted me about two months ago. Evidently, someone at the show had found their way to theyrecoming.com and seen the photos of my thoracic cavity cake and my zombie cake. Initially, they wanted me to make a werewolf cake for Seth Green, but they didn't give me enough lead time and I was really busy that weekend, so I had to tell them no, but please keep me in mind for the future. The next time they contacted me they wanted a cake for Cyndi Lauper and, as they gave me a few weeks notice this time and I'm a sucker for rock of the 80's, I enthusiastically agreed, providing they could come up with a way to transport the cake from the little Colorado mountain town where I spend my summers to the Big Apple.
I decided to make the cake a portrait of Cyndi with her mouth open, singing or possibly screaming, however one wants to interpret it. Behind the head, which was to be made out of cake, the hair would be a big dome of colorful hard candy with a light bulb underneath. My goal was to give the impression of something along the lines of a Tiffany lampshade. The folks at The Graham Norton Effect were excited about the idea, so I set about the planning and supplying stages. I believe I've mentioned before that I spend the summers in a little town about two hours away from the nearest big city, so supplies are a bit harder to obtain here than usual. Fortunately, the internet knows no petty geographical bounds, so I was able to order some powdered food colors and cocoa butter, which I didn't end up using after all and my sister sent me some paste colors and paintbrushes and luster dust and suchlike from California.
The weekend before the weekend I was to make the cake I was planning to drive to Indiana for a friend's wedding. Yes, I drove eighteen hours just to go to one party, then turned around and drove back. I loved every minute of it. This afforded me an opportunity to pick up supplies at places like Home Depot and Wal-Mart. I was looking for a good, battery-operated method of lighting up the sugar dome, but I never came up with one that I was really satisfied with, so I went with the tried and true method of a plug in light bulb. I also needed a big metal bowl, which I planned to cover with tin foil and use as a mold for the sugar dome. I found one at Wal-Mart that I thought would be perfect. As it turns out, I was wrong.
I returned to Colorado on the evening of Tuesday, September 7 and the cake was due to be shipped to New York on Monday, September 13 for a taping on Tuesday, September 14. The next day I got up and drove forty-five minutes to the nearest Safeway to get all my supplies (mostly sugar and corn syrup, neither of which, as it turned out, I bought nearly enough of.) My goal for that evening was to make the sugar hair dome. I covered the top of my kitchen table with tin foil, then set the bowl on top of some tuna cans to give it a bit more height and covered it with tin foil as well. Using the hard candy recipe from my favorite candy cookbook (The Practical Candymaking Cookbook) my plan was to first create an under layer of clear (or as clear as cooked sugar gets, which is sort of amber) sugar then pour various bright colors of sugar onto that to give the impression of wavy hair. I had forgotten to ask my sister to send me my good candy thermometer, so I bought a cheap one at Safeway, which evidently is cheap for a very good reason. It worked fine for the first batch or two of candy, then condensation formed inside it which made it impossible to read and when I tried to wipe off the inside I inadvertently moved the paper scale inside so it ceased to be accurate at all. I gave up on the thermometer altogether after a while and went by the sound of the bubbling and the color of the sugar. I think I did a remarkably good job of it, too, if I do say so myself.
Building up the preliminary shell of clear sugar went fairly well expect that it was impossible to get it smooth because of the steep slope of the sides of the bowl. Eventually I had a fairly even coating of clear sugar and proceeded to the colored sugar, which was a complete failure. My plan had been to spoon the colored sugar into attractive swirls of hair but this proved to be impossible to do with any kind grace or precision on such a steep slope, so I just ended up with sort of messy wedges of red and purple sugar, which looked really sloppy and non-specific. I set that one aside (just in case I wanted it again later) and started again.
This time my plan was to draw specific wavy hair shapes onto the tin foil over the bowl with royal icing, then fill the spaces with clear sugar, which I would then paint bright colors with food coloring. I took me two tries to get royal icing shapes I was happy with (and this time I didn't set the bowl onto the tuna cans so it was bit shorter) and it proved difficult again to fill the more vertical surfaces of the bowl neatly. I had to do it with my little metal pastry tube from the sixties, which my sister got me at a garage sale or flea market or something, which is awesome because they're pretty much impossible to find. This is a very time-consuming process and it involved a lot of me burning myself with hot sugar. About halfway through the process I ran out of sugar and went to bed.
By the time I woke up the next morning. I had an even better idea - I would start over with a solid, clear sugar shell, then drizzle bright colors of sugar over it in abstract patterns. This would eliminate my difficulty in forming neat, specific shapes and give the cake a wild, carefree look, which I felt would be appropriate to Cyndi Lauper. This was also the day I had planned to bake the cake itself, which I had to do in my friend's cabin because I don't have an oven. I also borrowed a bowl similar to the one I had bought but slightly smaller on which to create my new sugar dome. This way I could start on a new dome without trashing the half-finished dome I had been working on the night before (just in case.) This time I created a more graceful shape (I hoped) than the natural shape of the bowl by taping pieces of paper over it to the bowl and to the table to form ogee-like curves. It formed a good shape, but made the finished product harder to remove from the table.
I spent the morning running back and forth between the two cabins, coating the bowl with clear sugar and baking three 6" round cakes, using a recipe for white cake I got from a book by Colette Peters. This was my first experience baking at a high altitude (about 8,300 feet) so I was a little nervous, but it seemed to go really well. I went online to get tips on high altitude baking (increase eggs, decrease baking powder, decrease sugar, etc.) I followed those and it went without a hitch expect that it seemed to take longer to bake than I expected, but maybe the oven just wasn't as hot as it said it was.
By three in the afternoon I had all the cakes baked and most of a good, solid layer of sugar on the bowl and I had to go to work for a few hours. By the time I came back the sugar on the bowl had had a chance to cool completely, which, I discovered, was a very bad thing. The first time I poured another coat of hot sugar onto a thin spot, the sugar dome started to crack. Evidently sugar can't take that quick a change in temperature. This was make even worse by the fact that I had, for some inexplicable reason, removed the sugar dome from its supporting structure of bowl and paper and even in some sections started to remove the underlining of tinfoil (to assure myself that it was possible), so the hot sugar started drooping through cracks and the dome started to sag. I hurriedly pressed the still-pliable sugar into a tolerable shape and put the bowl back underneath. Clearly, I would have to re-coat the entire dome with hot sugar before I started drizzling hot colored sugar onto it or the whole thing would crack apart. I tried to warm up the sugar dome by setting it in front of the radiator and by rubbing it with a hot, damp sponge, but that didn't help much. Every time I poured more hot sugar onto a cool section of the dome, more cracks appeared. Finally, I had a very thick layer of sugar on everything and all the cracks were sealed and covered up. (By this time I had also made two additional trips to the little grocery store across the street to buy more sugar and corn syrup. I bought pretty much all the corn syrup they had. Ordinarily things are much more expensive there than at a big grocery store, but fortunately the corn syrup was inexplicably cheaper.) I was ready to start on the colored sugar. Finally, something went right and the sugar drizzling went smoothly and looked good. I used bright red, bright purple, and bright greenish-blue. Once this cooled I pulled it off the form and peeled away the tin foil. This was easier said than done and I had to use tweezers to get the foil out of a few of the crevices, but eventually I got (almost) all of it.
Finally my sugar dome was ready and I was ready to start sculpting the cake. I didn't have my cake leveler so I had to eyeball it, but fortunately the cakes were small in diameter so it was pretty easy. I filled the cake with raspberry jam, then, working from a photo I found online, carved it into the rough shape of Cyndi's head with an open mouth. I gave the leftover cake bits to my friend who lent me her oven. To crumbcoat the head I used an apricot glaze, made by boiling and straining apricot jam.
Next, I mounted the head onto a neck, which I had made by stacking circles and oblong shapes of clear sugar on top of each other. This, I hoped, would look more graceful than simply plopping a severed head onto a tray. There's a reason why classical busts always include the shoulders.
My plan at this point had been to use white modeling chocolate to sculpt the facial features, but an old problem I had the first time I used white modeling chocolate resurfaced. Evidently I had added too much corn syrup because the modeling chocolate was very sticky and didn't set up right. I also had a hard time getting it to stay in place on the cake. I went to my backup plan, which was to use royal icing. Unfortunately, in the process of removing the modeling chocolate I had already put on, I ripped the nose off of the cake, so I would have to build it up again with icing. I put a preliminary coat of royal icing onto the whole head and went to bed to let it dry.
The next day, for some incomprehensible reason, I tried the modeling chocolate again. Again, it failed miserably and pulled off some of the royal icing in the process, so I had to redo it. Eventually, I had a good base coat of royal icing on the head and a royal icing beaded necklace around each tier of the sugar neck and could position the head and the sugar hair on the plywood circle I had cut to use as a base. The lightbulb was already mounted to the base, wired and ready to go. I had to move it once because the head sat further back than I expected, but that was easily accomplished. By some miracle the head and neck together were actually the right height to fit with the hair and the whole structure together seemed remarkably stable, a major concern for a cake that had to travel across the country. I lit it up to see what it looked like and was thrilled with the result!
I used a large #12 round decorating tip and a medium #6 round decorating tip to pipe in royal icing features like lips, nose, ears, and cheekbones, then carefully smoothed and shaped them with a slightly damp, soft paintbrush. I put in a tongue and eyelids with a flat #104 decorating tip and again smoothed with the paintbrush. The nose took two applications to get it built up enough, but all in all it was quite successful. I even added a uvula at the back of the throat.
Once the royal icing had dried overnight, I was ready to paint the face. I had gotten powdered food coloring to use when I thought I would be painting onto white modeling chocolate, but with the royal icing I could use paste colors, thinned with water. First the skin tone went on, then rouge, lipstick, and bright, gaudy pink and green eyeshadow. I also painted each beaded necklace a different bright color. Then I added more details with royal icing, such as eyebrows and eyelashes and a head scarf to cover the less-than-perfect edge of the sugar dome hair, then painted those. I used some gold luster dust on the lips and blue luster dust on the eyelids to make it shine and used a few little drops of sugar I had saved for earrings and ornaments on the head scarf. Oh, at some point in there I decided that I didn't like the shape of the lips and had to go back and add more royal icing and touch up the paint job. The finished skin was a little lumpier than would have been ideal, but other than that, and a slightly odd chin shape due to some frosting sagging, I'd say it wasn't half bad.
Finally my cake was done! Hooray! Now my only problem was packing and freezing it for transport. The packing method I came up with pretty darned smart, if I do say so myself. Like many of my "brilliant" ideas, it came to me as I was drifting off to sleep. First I covered the cake in plastic wrap, then tied it inside a plastic bag. I cut another plywood circle, about two inches bigger in diameter than the one on which the cake was mounted. I screwed the cake base to this so it wouldn't shift around. ThenI wrapped about six layers of cardboard around this, forming a squat little tube, the excess space of which I filled with foam peanuts, then closed the top with a triple layer of cardboard. The result looked a lot like a giant hatbox and was far too large to fit in a standard freezer. Fortunately (and this is one of the big advantages of living in a small town) I have a friend who runs a restaurant and he let me stick the cake in his giant freezer.
On Monday morning, I got up, fetched the cake, then spent three hours waiting around for FedEx to arrive to pick it up. He had a little trouble finding my cabin because the street address isn't actually posted anywhere on the property but I guided him in by phone and a few minutes later my rustic little cake was on its merry way to the big city! Sounds like the premise for a Broadway musical, doesn't it?
Sadly, perhaps cakes were not meant to be shipped cross-country as I'm told the cake arrived in New York broken. I never knew what, precisely, was broken or to what extent, but evidently the damage was severe enough to preclude the use of the cake on the show, because it never put in an appearance (though my name did appear for about a third of a second in the special thanks section of the credits.) I like to think that someone showed the photos of the cake I sent to Cyndi Lauper. I also like to envision the crew of the show munching on Cyndi Lauper's smushed face in the break room.
